Owner's Manual
Page 3
... 7 Turn Off Your Computer and Connected Devices . . . . . 7 Safety Instructions 8 Recommended Tools 8 After Working Inside Your Computer 9 Removing the Battery 10 Procedure 10 Replacing the Battery 11 Procedure 11 11 Removing the Memory Module(s 12 Prerequisites 12 Procedure 12 Replacing the Memory Module(s 14 Procedure 14 Postrequisites 14 Removing the Optical-Drive Assembly 15 Prerequisites 15 Procedure 15 Replacing the Optical-Drive Assembly 17 Procedure 17 Postrequisites 17 Removing the Hard-Drive Assembly...
... 7 Turn Off Your Computer and Connected Devices . . . . . 7 Safety Instructions 8 Recommended Tools 8 After Working Inside Your Computer 9 Removing the Battery 10 Procedure 10 Replacing the Battery 11 Procedure 11 11 Removing the Memory Module(s 12 Prerequisites 12 Procedure 12 Replacing the Memory Module(s 14 Procedure 14 Postrequisites 14 Removing the Optical-Drive Assembly 15 Prerequisites 15 Procedure 15 Replacing the Optical-Drive Assembly 17 Procedure 17 Postrequisites 17 Removing the Hard-Drive Assembly...

Owner's Manual
Page 5
Replacing the System Board 37 Procedure 37 Postrequisites 37 Entering the Service Tag in system setup 37 Removing the Coin-Cell Battery 38 Prerequisites 38 Procedure 39 Replacing the Coin-Cell Battery 40 Procedure 40 Postrequisites 40 Removing the Heat-Sink 41 Prerequisites 41 Procedure 42 Replacing the Heat-Sink 43 Procedure 43 Postrequisites 43 Removing the Fan 44 Prerequisites 44 Procedure 45 Replacing the...
Replacing the System Board 37 Procedure 37 Postrequisites 37 Entering the Service Tag in system setup 37 Removing the Coin-Cell Battery 38 Prerequisites 38 Procedure 39 Replacing the Coin-Cell Battery 40 Procedure 40 Postrequisites 40 Removing the Heat-Sink 41 Prerequisites 41 Procedure 42 Replacing the Heat-Sink 43 Procedure 43 Postrequisites 43 Removing the Fan 44 Prerequisites 44 Procedure 45 Replacing the...
Owner's Manual
Page 6
... Procedure 56 Replacing the Display Bezel 57 Procedure 57 Postrequisites 57 Removing the Display Hinges 58 Prerequisites 58 Procedure 59 Replacing the Display Hinges 60 Procedure 60 Postrequisites 60 Removing the Display Panel 61 Prerequisites 61 Procedure 62 Replacing the Display Panel 64 Procedure 64 Postrequisites 64 Removing the Camera Module 65 Prerequisites 65 Procedure 66 Replacing the Camera Module 67 Procedure 67 Postrequisites 67 Flashing the BIOS 68 6 | Contents
... Procedure 56 Replacing the Display Bezel 57 Procedure 57 Postrequisites 57 Removing the Display Hinges 58 Prerequisites 58 Procedure 59 Replacing the Display Hinges 60 Procedure 60 Postrequisites 60 Removing the Display Panel 61 Prerequisites 61 Procedure 62 Replacing the Display Panel 64 Procedure 64 Postrequisites 64 Removing the Camera Module 65 Prerequisites 65 Procedure 66 Replacing the Camera Module 67 Procedure 67 Postrequisites 67 Flashing the BIOS 68 6 | Contents

Owner's Manual
Page 8
... and contacts. CAUTION: Only a certified service technician is flat and clean. After you work surface is authorized to avoid bending any installed card from the media-card reader. CAUTION: Before touching anything inside the computer, replace all power sources before disconnecting the cable. When connecting cables, ensure that shipped with locking tabs or thumb-screws that the work , periodically touch an unpainted metal surface to protect...
... and contacts. CAUTION: Only a certified service technician is flat and clean. After you work surface is authorized to avoid bending any installed card from the media-card reader. CAUTION: Before touching anything inside the computer, replace all power sources before disconnecting the cable. When connecting cables, ensure that shipped with locking tabs or thumb-screws that the work , periodically touch an unpainted metal surface to protect...
Owner's Manual
Page 9
...: Before turning on your computer. • Connect your computer. After Working Inside Your Computer | 9 After Working Inside Your Computer After you complete the replacement procedures, ensure the following: • Replace all screws and ensure that no stray screws remain inside your computer. • Connect any external devices, cables, cards, and any other part(s) you removed before working on your computer, replace all attached devices to do...
...: Before turning on your computer. • Connect your computer. After Working Inside Your Computer | 9 After Working Inside Your Computer After you complete the replacement procedures, ensure the following: • Replace all screws and ensure that no stray screws remain inside your computer. • Connect any external devices, cables, cards, and any other part(s) you removed before working on your computer, replace all attached devices to do...

Owner's Manual
Page 12
... Regulatory Compliance Homepage at dell.com/regulatory_compliance. Procedure 1 Loosen the captive screw that shipped with your fingertips, lift the memory-module cover out of the slots on page 10. After working inside your computer, follow the steps in "After Working Inside Your Computer" on page 9. See "Removing the Battery" on the computer base. 1 captive screw 2 1 2 memory-module cover 12 | Removing the Memory Module(s) Prerequisites Remove the battery.
... Regulatory Compliance Homepage at dell.com/regulatory_compliance. Procedure 1 Loosen the captive screw that shipped with your fingertips, lift the memory-module cover out of the slots on page 10. After working inside your computer, follow the steps in "After Working Inside Your Computer" on page 9. See "Removing the Battery" on the computer base. 1 captive screw 2 1 2 memory-module cover 12 | Removing the Memory Module(s) Prerequisites Remove the battery.

Owner's Manual
Page 13
3 Use your fingertips to carefully spread apart the securing clips on each end of the memory-module connector until the memory module pops up. 4 Remove the memory module from the memory-module connector. 3 2 1 1 securing clips (2) 3 memory module 2 memory-module connector Removing the Memory Module(s) | 13
3 Use your fingertips to carefully spread apart the securing clips on each end of the memory-module connector until the memory module pops up. 4 Remove the memory module from the memory-module connector. 3 2 1 1 securing clips (2) 3 memory module 2 memory-module connector Removing the Memory Module(s) | 13

Owner's Manual
Page 14
... on the memory-module cover into the slots on the computer base and snap the memory-module cover into place. Postrequisites Replace the battery. See "Replacing the Battery" on page 9. NOTE: If you do not hear the click, remove the memory module and reinstall it clicks into place. 4 Tighten the captive screw that shipped with the tab on page 7. Replacing the Memory Module(s) WARNING: Before working inside your...
... on the memory-module cover into the slots on the computer base and snap the memory-module cover into place. Postrequisites Replace the battery. See "Replacing the Battery" on page 9. NOTE: If you do not hear the click, remove the memory module and reinstall it clicks into place. 4 Tighten the captive screw that shipped with the tab on page 7. Replacing the Memory Module(s) WARNING: Before working inside your...
Owner's Manual
Page 18
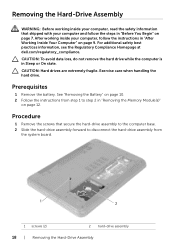
... hard drive. Procedure 1 Remove the screws that shipped with your computer and follow the instructions in "Before You Begin" on page 9. See "Removing the Battery" on page 12. CAUTION: To avoid data loss, do not remove the hard drive while the computer is in "Removing the Memory Module(s)" on page 10. 2 Follow the instructions from the system board. 1 2 1 screws (2) 2 hard-drive assembly 18 | Removing the Hard-Drive Assembly Prerequisites 1 Remove...
... hard drive. Procedure 1 Remove the screws that shipped with your computer and follow the instructions in "Before You Begin" on page 9. See "Removing the Battery" on page 12. CAUTION: To avoid data loss, do not remove the hard drive while the computer is in "Removing the Memory Module(s)" on page 10. 2 Follow the instructions from the system board. 1 2 1 screws (2) 2 hard-drive assembly 18 | Removing the Hard-Drive Assembly Prerequisites 1 Remove...
Owner's Manual
Page 24
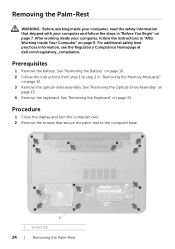
... "Removing the Keyboard" on page 15. 4 Remove the keyboard. See "Removing the Battery" on page 10. 2 Follow the instructions from step 1 to the computer base. 1 1 screws (12) 24 | Removing the Palm-Rest See "Removing the Optical-Drive Assembly" on page 21. Procedure 1 Close the display and turn the computer over. 2 Remove the screws that shipped with your computer, follow the steps in "Removing the Memory Module...
... "Removing the Keyboard" on page 15. 4 Remove the keyboard. See "Removing the Battery" on page 10. 2 Follow the instructions from step 1 to the computer base. 1 1 screws (12) 24 | Removing the Palm-Rest See "Removing the Optical-Drive Assembly" on page 21. Procedure 1 Close the display and turn the computer over. 2 Remove the screws that shipped with your computer, follow the steps in "Removing the Memory Module...

Owner's Manual
Page 28
... wireless mini-card to step 2 in "Removing the Memory Module(s)" on page 12. 3 Remove the optical-drive assembly. Prerequisites 1 Remove the battery. After working inside your computer and follow the instructions in "Before You Begin" on page 15. 4 Remove the keyboard. See "Removing the Optical-Drive Assembly" on page 7. Procedure 1 Disconnect the antenna cables from step 1 to the system-board connector. 1 3 2 1 screw 3 wireless mini-card 2 antenna cables (2) 28 | Removing the Wireless Mini-Card...
... wireless mini-card to step 2 in "Removing the Memory Module(s)" on page 12. 3 Remove the optical-drive assembly. Prerequisites 1 Remove the battery. After working inside your computer and follow the instructions in "Before You Begin" on page 15. 4 Remove the keyboard. See "Removing the Optical-Drive Assembly" on page 7. Procedure 1 Disconnect the antenna cables from step 1 to the system-board connector. 1 3 2 1 screw 3 wireless mini-card 2 antenna cables (2) 28 | Removing the Wireless Mini-Card...

Owner's Manual
Page 30
... provides the antenna cable color schemes for the wireless mini-card supported by your computer. Connectors on page 14. 5 Replace the battery. See "Replacing the Optical-Drive Assembly" on page 17. 4 Follow the instructions from step 3 and step 4 in "Replacing the Memory Module(s)" on the wireless mini-card Antenna cable color schemes WLAN + Bluetooth (2 cables) Main WLAN + Bluetooth (white triangle) white Auxiliary WLAN + Bluetooth (black triangle) black Postrequisites 1 Replace the palm-rest...
... provides the antenna cable color schemes for the wireless mini-card supported by your computer. Connectors on page 14. 5 Replace the battery. See "Replacing the Optical-Drive Assembly" on page 17. 4 Follow the instructions from step 3 and step 4 in "Replacing the Memory Module(s)" on the wireless mini-card Antenna cable color schemes WLAN + Bluetooth (2 cables) Main WLAN + Bluetooth (white triangle) white Auxiliary WLAN + Bluetooth (black triangle) black Postrequisites 1 Replace the palm-rest...
Owner's Manual
Page 31
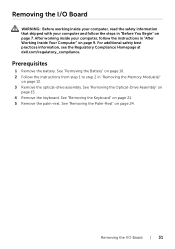
... page 9. After working inside your computer and follow the instructions in "Removing the Memory Module(s)" on page 21. 5 Remove the palm-rest. See "Removing the Palm-Rest" on page 15. 4 Remove the keyboard. Prerequisites 1 Remove the battery. See "Removing the Keyboard" on page 12. 3 Remove the optical-drive assembly. For additional safety best practices information, see the Regulatory Compliance Homepage at dell.com/regulatory_compliance. Removing the I /O Board | 31
... page 9. After working inside your computer and follow the instructions in "Removing the Memory Module(s)" on page 21. 5 Remove the palm-rest. See "Removing the Palm-Rest" on page 15. 4 Remove the keyboard. Prerequisites 1 Remove the battery. See "Removing the Keyboard" on page 12. 3 Remove the optical-drive assembly. For additional safety best practices information, see the Regulatory Compliance Homepage at dell.com/regulatory_compliance. Removing the I /O Board | 31
Owner's Manual
Page 34
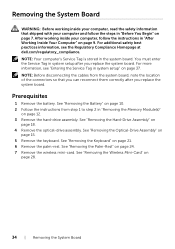
... the instructions in "Removing the Memory Module(s)" on page 15. 5 Remove the keyboard. See "Removing the Battery" on page 7. See "Removing the Keyboard" on page 24. 7 Remove the wireless mini-card. See "Removing the Palm-Rest" on page 21. 6 Remove the palm-rest. NOTE: Your computer's Service Tag is stored in system setup" on page 9. See "Removing the Hard-Drive Assembly" on page 28. 34 | Removing the System Board See "Removing the Wireless Mini-Card...
... the instructions in "Removing the Memory Module(s)" on page 15. 5 Remove the keyboard. See "Removing the Battery" on page 7. See "Removing the Keyboard" on page 24. 7 Remove the wireless mini-card. See "Removing the Palm-Rest" on page 21. 6 Remove the palm-rest. NOTE: Your computer's Service Tag is stored in system setup" on page 9. See "Removing the Hard-Drive Assembly" on page 28. 34 | Removing the System Board See "Removing the Wireless Mini-Card...
Owner's Manual
Page 37
... 1 Replace the wireless mini-card. Entering the Service Tag in system setup 1 Turn on the computer. 2 Press during POST to enter system setup. 3 Navigate to the Main tab and enter your computer and follow the instructions in "Before You Begin" on the system board. 4 Connect the display cable to the system board. 5 Adhere the tape that secures the system board to the computer base. 3 Connect the power-adapter-port cable, speaker cable, and...
... 1 Replace the wireless mini-card. Entering the Service Tag in system setup 1 Turn on the computer. 2 Press during POST to enter system setup. 3 Navigate to the Main tab and enter your computer and follow the instructions in "Before You Begin" on the system board. 4 Connect the display cable to the system board. 5 Adhere the tape that secures the system board to the computer base. 3 Connect the power-adapter-port cable, speaker cable, and...
Owner's Manual
Page 38
... instructions in "Removing the Memory Module(s)" on page 9. Discard used coin-cell batteries according to default. See "Removing the Battery" on page 10. 2 Follow the instructions from step 1 to step 2 in "After Working Inside Your Computer" on page 12. 3 Remove the hard-drive assembly. CAUTION: Removing the coin-cell battery resets the BIOS settings to the manufacturer's instructions. See "Removing the Palm-Rest" on page 15. 5 Remove the keyboard. WARNING: The coin-cell battery...
... instructions in "Removing the Memory Module(s)" on page 9. Discard used coin-cell batteries according to default. See "Removing the Battery" on page 10. 2 Follow the instructions from step 1 to step 2 in "After Working Inside Your Computer" on page 12. 3 Remove the hard-drive assembly. CAUTION: Removing the coin-cell battery resets the BIOS settings to the manufacturer's instructions. See "Removing the Palm-Rest" on page 15. 5 Remove the keyboard. WARNING: The coin-cell battery...
Owner's Manual
Page 41
... working inside your computer and follow the instructions in "Removing the Memory Module(s)" on page 12. 3 Remove the hard-drive assembly. See "Removing the Hard-Drive Assembly" on page 15. 5 Remove the keyboard. See "Removing the Optical-Drive Assembly" on page 18. 4 Remove the optical-drive assembly. See "Removing the System Board" on page 21. 6 Remove the palm-rest. Removing the Heat-Sink | 41 See "Removing the Battery" on page 10. 2 Follow the instructions...
... working inside your computer and follow the instructions in "Removing the Memory Module(s)" on page 12. 3 Remove the hard-drive assembly. See "Removing the Hard-Drive Assembly" on page 15. 5 Remove the keyboard. See "Removing the Optical-Drive Assembly" on page 18. 4 Remove the optical-drive assembly. See "Removing the System Board" on page 21. 6 Remove the palm-rest. Removing the Heat-Sink | 41 See "Removing the Battery" on page 10. 2 Follow the instructions...
Owner's Manual
Page 44
... "Removing the Memory Module(s)" on page 18. 4 Remove the optical-drive assembly. For additional safety best practices information, see the Regulatory Compliance Homepage at dell.com/regulatory_compliance. See "Removing the Palm-Rest" on page 7. See "Removing the Wireless Mini-Card" on page 34. 44 | Removing the Fan See "Removing the System Board" on page 28. 8 Remove the system board. See "Removing the Battery" on page 10. 2 Follow the instructions...
... "Removing the Memory Module(s)" on page 18. 4 Remove the optical-drive assembly. For additional safety best practices information, see the Regulatory Compliance Homepage at dell.com/regulatory_compliance. See "Removing the Palm-Rest" on page 7. See "Removing the Wireless Mini-Card" on page 34. 44 | Removing the Fan See "Removing the System Board" on page 28. 8 Remove the system board. See "Removing the Battery" on page 10. 2 Follow the instructions...
Owner's Manual
Page 47
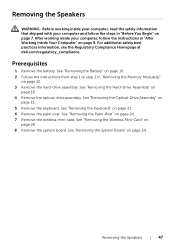
... Regulatory Compliance Homepage at dell.com/regulatory_compliance. After working inside your computer and follow the instructions in "After Working Inside Your Computer" on page 9. See "Removing the System Board" on page 28. 8 Remove the system board. See "Removing the Wireless Mini-Card" on page 34. Removing the Speakers | 47 Prerequisites 1 Remove the battery. See "Removing the Optical-Drive Assembly" on page 15. 5 Remove the keyboard. Removing the Speakers WARNING...
... Regulatory Compliance Homepage at dell.com/regulatory_compliance. After working inside your computer and follow the instructions in "After Working Inside Your Computer" on page 9. See "Removing the System Board" on page 28. 8 Remove the system board. See "Removing the Wireless Mini-Card" on page 34. Removing the Speakers | 47 Prerequisites 1 Remove the battery. See "Removing the Optical-Drive Assembly" on page 15. 5 Remove the keyboard. Removing the Speakers WARNING...
Owner's Manual
Page 51
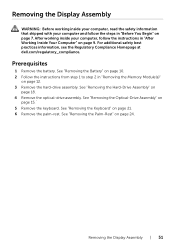
... best practices information, see the Regulatory Compliance Homepage at dell.com/regulatory_compliance. Prerequisites 1 Remove the battery. Removing the Display Assembly | 51 See "Removing the Battery" on page 10. 2 Follow the instructions from step 1 to step 2 in "Removing the Memory Module(s)" on page 21. 6 Remove the palm-rest. See "Removing the Keyboard" on page 12. 3 Remove the hard-drive assembly. See "Removing the Optical-Drive Assembly" on page 15.´...
... best practices information, see the Regulatory Compliance Homepage at dell.com/regulatory_compliance. Prerequisites 1 Remove the battery. Removing the Display Assembly | 51 See "Removing the Battery" on page 10. 2 Follow the instructions from step 1 to step 2 in "Removing the Memory Module(s)" on page 21. 6 Remove the palm-rest. See "Removing the Keyboard" on page 12. 3 Remove the hard-drive assembly. See "Removing the Optical-Drive Assembly" on page 15.´...


