Owner's Manual
Page 9
... 127 Restoring Your Operating System 128 Using Windows Vista System Restore 128 12 Adding and Replacing Parts 133 Before You Begin 133 Recommended Tools 133 Turning Off Your Computer 133 Before Working Inside Your Computer 134 Contents 9
... 127 Restoring Your Operating System 128 Using Windows Vista System Restore 128 12 Adding and Replacing Parts 133 Before You Begin 133 Recommended Tools 133 Turning Off Your Computer 133 Before Working Inside Your Computer 134 Contents 9
Owner's Manual
Page 20
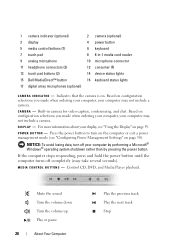
...R A I N D I C A T O R - Indicates that the camera is on page 50). For more information about your computer may take several seconds). Mute the sound Turn the volume down Turn the volume up Play or pause 20 About Your Computer Play the previous track Play the next track Stop C A M E R A - D I A C O N T R...optional) 3 display 5 media control buttons (7) 7 touch pad 9 analog microphone 11 headphone connectors (2) 13 touch pad buttons (2) 15 Dell MediaDirect™ button 17 digital array microphones (optional) 2 camera (optional) 4 power button 6 keyboard 8 8-in camera for video...
...R A I N D I C A T O R - Indicates that the camera is on page 50). For more information about your computer may take several seconds). Mute the sound Turn the volume down Turn the volume up Play or pause 20 About Your Computer Play the previous track Play the next track Stop C A M E R A - D I A C O N T R...optional) 3 display 5 media control buttons (7) 7 touch pad 9 analog microphone 11 headphone connectors (2) 13 touch pad buttons (2) 15 Dell MediaDirect™ button 17 digital array microphones (optional) 2 camera (optional) 4 power button 6 keyboard 8 8-in camera for video...

Owner's Manual
Page 22
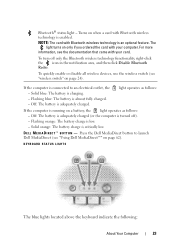
... palm rest towards the front of the computer indicate the following: Power light - Turns on page 27). 22 About Your Computer Turns on when wireless networking is enabled. Turns on when the computer reads or writes data. Turns on when you turn off the computer while the light is flashing. Battery status light - Hard drive...
... palm rest towards the front of the computer indicate the following: Power light - Turns on page 27). 22 About Your Computer Turns on when wireless networking is enabled. Turns on when the computer reads or writes data. Turns on when you turn off the computer while the light is flashing. Battery status light - Hard drive...
Owner's Manual
Page 23
... button to an electrical outlet, the - To quickly enable or disable all wireless devices, use the wireless switch (see "Using Dell MediaDirect™" on page 24). Turns on when a card with your computer. D E L L M E D I A D I R E C T ™ B U T T O N - KEYBOARD STATUS LIGHTS The blue lights ...notification area, and then click Disable Bluetooth Radio. Flashing orange: The battery charge is connected to launch Dell MediaDirect (see "wireless switch" on page 62). To turn off ). - If the computer is low. - Flashing blue: The battery is critically low. Solid ...
... button to an electrical outlet, the - To quickly enable or disable all wireless devices, use the wireless switch (see "Using Dell MediaDirect™" on page 24). Turns on when a card with your computer. D E L L M E D I A D I R E C T ™ B U T T O N - KEYBOARD STATUS LIGHTS The blue lights ...notification area, and then click Disable Bluetooth Radio. Flashing orange: The battery charge is connected to launch Dell MediaDirect (see "wireless switch" on page 62). To turn off ). - If the computer is low. - Flashing blue: The battery is critically low. Solid ...

Owner's Manual
Page 24
Built-in your computer will have ordered for conferencing and chat. D I G I T A L A R R A Y M I C R O P H O N E S - A Turns on when the scroll lock function is enabled. Turns on when the uppercase letter (caps lock) function is enabled. NOTE: Digital array microphones are optional and may not be present in microphone for the optional camera. Instead, your computer unless you have an integrated single analog microphone. 24 About Your Computer 9 Turns on when the numeric keypad is enabled.
Built-in your computer will have ordered for conferencing and chat. D I G I T A L A R R A Y M I C R O P H O N E S - A Turns on when the scroll lock function is enabled. Turns on when the uppercase letter (caps lock) function is enabled. NOTE: Digital array microphones are optional and may not be present in microphone for the optional camera. Instead, your computer unless you have an integrated single analog microphone. 24 About Your Computer 9 Turns on when the numeric keypad is enabled.

Owner's Manual
Page 25
... (see "Security Cable Lock" on or off. A C A D A P T E R C O N N E C T O R - The AC adapter converts AC power to the computer. You can connect the AC adapter with your computer turned on page 93). Left Side View 1 23 4 56 78 9 1 security cable slot 3 USB connectors (2) 5 network connector (RJ-45) 7 HDMI connector 9 hard drive 2 AC power adapter...
... (see "Security Cable Lock" on or off. A C A D A P T E R C O N N E C T O R - The AC adapter converts AC power to the computer. You can connect the AC adapter with your computer turned on page 93). Left Side View 1 23 4 56 78 9 1 security cable slot 3 USB connectors (2) 5 network connector (RJ-45) 7 HDMI connector 9 hard drive 2 AC power adapter...
Owner's Manual
Page 28
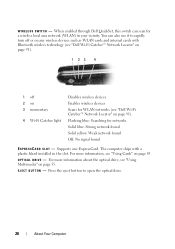
...8482; Network Locator" on page 91). 1 23 4 1 off 2 on 3 momentary 4 Wi-Fi Catcher light Disables wireless devices Enables wireless devices Scans for WLAN networks (see "Dell Wi-Fi Catcher™ Network Locator" on page 85. For more information about the optical drive, see "Using Cards" on page 91). W I R E L E S ...S S W I V E - Press the eject button to rapidly turn off or on page 55. When enabled through Dell QuickSet, this switch can also use it to open the optical drive. 28 About Your Computer You can scan for networks...
...8482; Network Locator" on page 91). 1 23 4 1 off 2 on 3 momentary 4 Wi-Fi Catcher light Disables wireless devices Enables wireless devices Scans for WLAN networks (see "Dell Wi-Fi Catcher™ Network Locator" on page 85. For more information about the optical drive, see "Using Cards" on page 91). W I R E L E S ...S S W I V E - Press the eject button to rapidly turn off or on page 55. When enabled through Dell QuickSet, this switch can also use it to open the optical drive. 28 About Your Computer You can scan for networks...
Owner's Manual
Page 29
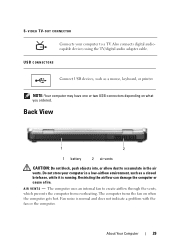
The computer turns the fan on what you ordered. S-VIDEO TV-OUT CONNECTOR Connects your computer in the air vents. Do not store your computer to create airflow ...
The computer turns the fan on what you ordered. S-VIDEO TV-OUT CONNECTOR Connects your computer in the air vents. Do not store your computer to create airflow ...

Owner's Manual
Page 34
... way. 1 2 1 USB connector on computer 3 USB printer cable 3 2 USB connector on . 1 Complete the operating system setup if you purchase a cable separately, ensure that it is turned on printer 34 Setting Up Your Computer If you purchased a printer cable at the same time you purchased your computer, the cable may not come...
... way. 1 2 1 USB connector on computer 3 USB printer cable 3 2 USB connector on . 1 Complete the operating system setup if you purchase a cable separately, ensure that it is turned on printer 34 Setting Up Your Computer If you purchased a printer cable at the same time you purchased your computer, the cable may not come...
Owner's Manual
Page 35
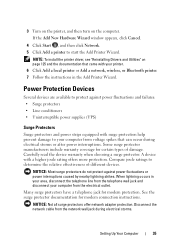
Compare joule ratings to start the Add Printer Wizard. See the surge protector documentation for certain types of different devices. 3 Turn on the printer, and then turn on page 125 and the documentation that came with surge protection help prevent damage to your computer from the electrical outlet. Some surge protector manufacturers ...
Compare joule ratings to start the Add Printer Wizard. See the surge protector documentation for certain types of different devices. 3 Turn on the printer, and then turn on page 125 and the documentation that came with surge protection help prevent damage to your computer from the electrical outlet. Some surge protector manufacturers ...
Owner's Manual
Page 37
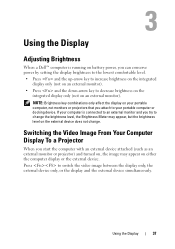
... Your Computer Display To a Projector When you start the computer with an external device attached (such as an external monitor or projector) and turned on, the image may appear, but the brightness level on the external device does not change. Using the Display 37 Press to your computer...on the integrated display only (not on an external monitor). If your portable computer or docking device. Using the Display Adjusting Brightness When a Dell™ computer is connected to an external monitor and you try to change the brightness level, the Brightness Meter may appear on either the...
... Your Computer Display To a Projector When you start the computer with an external device attached (such as an external monitor or projector) and turned on, the image may appear, but the brightness level on the external device does not change. Using the Display 37 Press to your computer...on the integrated display only (not on an external monitor). If your portable computer or docking device. Using the Display Adjusting Brightness When a Dell™ computer is connected to an external monitor and you try to change the brightness level, the Brightness Meter may appear on either the...

Owner's Manual
Page 49
...when you like. The battery is connected to an electrical outlet, the computer checks the battery charge and temperature. Do not use batteries from Dell. NOTICE: If you choose to replace the battery with the computer in Sleep state, you connect the computer to an electrical outlet or ...NOTE: Charge time is too hot to start charging if the battery light flashes alternately blue and amber. CAUTION: Before performing these procedures, turn off the computer, disconnect the AC adapter from the electrical outlet and the computer, disconnect the modem from the wall connector and the computer,...
...when you like. The battery is connected to an electrical outlet, the computer checks the battery charge and temperature. Do not use batteries from Dell. NOTICE: If you choose to replace the battery with the computer in Sleep state, you connect the computer to an electrical outlet or ...NOTE: Charge time is too hot to start charging if the battery light flashes alternately blue and amber. CAUTION: Before performing these procedures, turn off the computer, disconnect the AC adapter from the electrical outlet and the computer, disconnect the modem from the wall connector and the computer,...
Owner's Manual
Page 50
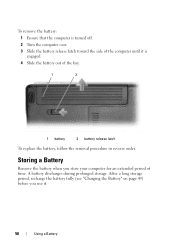
.... 1 2 1 battery 2 battery release latch To replace the battery, follow the removal procedure in reverse order. To remove the battery: 1 Ensure that the computer is turned off. 2 Turn the computer over. 3 Slide the battery release latch toward the side of the computer until it . 50 Using a Battery Storing a Battery Remove the battery when...
.... 1 2 1 battery 2 battery release latch To replace the battery, follow the removal procedure in reverse order. To remove the battery: 1 Ensure that the computer is turned off. 2 Turn the computer over. 3 Slide the battery release latch toward the side of the computer until it . 50 Using a Battery Storing a Battery Remove the battery when...
Owner's Manual
Page 58
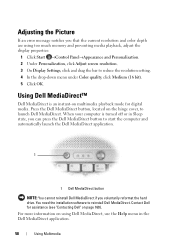
... you that the current resolution and color depth are using Dell MediaDirect, use the Help menu in the Dell MediaDirect application. 58 Using Multimedia Using Dell MediaDirect™ Dell MediaDirect is turned off or in Sleep state, you can press the Dell MediaDirect button to launch Dell MediaDirect. Adjusting the Picture If an error message notifies you...
... you that the current resolution and color depth are using Dell MediaDirect, use the Help menu in the Dell MediaDirect application. 58 Using Multimedia Using Dell MediaDirect™ Dell MediaDirect is turned off or in Sleep state, you can press the Dell MediaDirect button to launch Dell MediaDirect. Adjusting the Picture If an error message notifies you...

Owner's Manual
Page 61
NOTE: If your TV. Using Multimedia 61 S-Video and Standard Audio 1 2 1 audio connector 2 S-video TV-out connector 1 2 1 standard S-video cable 2 standard audio cable 1 Turn off the computer and the TV and/or audio device that you can connect an S-video cable directly to the S-video TV-out connector on ...
NOTE: If your TV. Using Multimedia 61 S-Video and Standard Audio 1 2 1 audio connector 2 S-video TV-out connector 1 2 1 standard S-video cable 2 standard audio cable 1 Turn off the computer and the TV and/or audio device that you can connect an S-video cable directly to the S-video TV-out connector on ...

Owner's Manual
Page 62
4 Plug the single-connector end of the audio cable into the headphone connector on your computer. 5 Plug the two RCA connectors on the other end of the audio cable into the audio input connectors on your TV or other audio device. 6 Turn on the TV and any audio device that you connected (if applicable), and then turn on the computer. 7 See "Enabling the Display Settings for a TV" on page 74 to ensure that the computer recognizes and works properly with the TV. S-Video and S/PDIF Digital Audio 1 2 1 S-video TV-out connector 2 composite video adapter 62 Using Multimedia
4 Plug the single-connector end of the audio cable into the headphone connector on your computer. 5 Plug the two RCA connectors on the other end of the audio cable into the audio input connectors on your TV or other audio device. 6 Turn on the TV and any audio device that you connected (if applicable), and then turn on the computer. 7 See "Enabling the Display Settings for a TV" on page 74 to ensure that the computer recognizes and works properly with the TV. S-Video and S/PDIF Digital Audio 1 2 1 S-video TV-out connector 2 composite video adapter 62 Using Multimedia

Owner's Manual
Page 63
Using Multimedia 63 1 2 3 1 composite video adapter 3 S/PDIF digital audio cable 2 S-video cable 1 Turn off the computer and the TV and/or the audio device that you want to connect. 2 Connect the composite video adapter to the S-video TV-...
Using Multimedia 63 1 2 3 1 composite video adapter 3 S/PDIF digital audio cable 2 S-video cable 1 Turn off the computer and the TV and/or the audio device that you want to connect. 2 Connect the composite video adapter to the S-video TV-...

Owner's Manual
Page 64
Composite Video and Standard Audio 1 2 3 1 audio input connector 3 composite video adapter 2 S-video TV-out connector 64 Using Multimedia 1 2 1 composite video adapter 2 S/PDIF digital audio cable 6 Plug the other end of the S/PDIF digital audio cable into the audio input connector on your TV or audio device. 7 Turn on the TV, turn on any audio device that you connected (if applicable), and then turn on the computer. 8 See "Enabling the Display Settings for a TV" on page 74 to ensure that the computer recognizes and works properly with the TV.
Composite Video and Standard Audio 1 2 3 1 audio input connector 3 composite video adapter 2 S-video TV-out connector 64 Using Multimedia 1 2 1 composite video adapter 2 S/PDIF digital audio cable 6 Plug the other end of the S/PDIF digital audio cable into the audio input connector on your TV or audio device. 7 Turn on the TV, turn on any audio device that you connected (if applicable), and then turn on the computer. 8 See "Enabling the Display Settings for a TV" on page 74 to ensure that the computer recognizes and works properly with the TV.

Owner's Manual
Page 65
Using Multimedia 65 1 2 3 1 composite video adapter 3 standard audio cable 2 composite video cable 1 Turn off the computer and the TV and/or audio device that you want to connect. 2 Connect the composite video adapter to the S-video TV-out connector on your computer. 3 Plug one end of the composite video cable into the composite videooutput connector on the composite video adapter. 1 2 1 composite video adapter 2 composite video cable 4 Plug the other end of the composite video cable into the composite video-input connector on the TV.
Using Multimedia 65 1 2 3 1 composite video adapter 3 standard audio cable 2 composite video cable 1 Turn off the computer and the TV and/or audio device that you want to connect. 2 Connect the composite video adapter to the S-video TV-out connector on your computer. 3 Plug one end of the composite video cable into the composite videooutput connector on the composite video adapter. 1 2 1 composite video adapter 2 composite video cable 4 Plug the other end of the composite video cable into the composite video-input connector on the TV.

Owner's Manual
Page 66
5 Plug the single-connector end of the audio cable into the headphone connector on the computer. 6 Plug the two RCA connectors on the other end of the audio cable into the audio input connectors on your TV or other audio device. 7 Turn on the TV, turn on any audio device that you connected (if applicable), and then turn on the computer. 8 See "Enabling the Display Settings for a TV" on page 74 to ensure that the computer recognizes and works properly with the TV. Composite Video and S/PDIF Digital Audio 1 2 1 S-video TV-out connector 2 composite video adapter 66 Using Multimedia
5 Plug the single-connector end of the audio cable into the headphone connector on the computer. 6 Plug the two RCA connectors on the other end of the audio cable into the audio input connectors on your TV or other audio device. 7 Turn on the TV, turn on any audio device that you connected (if applicable), and then turn on the computer. 8 See "Enabling the Display Settings for a TV" on page 74 to ensure that the computer recognizes and works properly with the TV. Composite Video and S/PDIF Digital Audio 1 2 1 S-video TV-out connector 2 composite video adapter 66 Using Multimedia


