Comprehensive Specifications
Page 1
...-bits 2 MB 64-bits November 2009 Dell™ Inspiron™ 1546: Comprehensive Specifications This document provides information that you may vary by region. For more information regarding the configuration of your computer, click Start → Help and Support and select the option to view information about your computer. NOTE: Offerings may need when setting up, updating drivers for, and upgrading your computer.
...-bits 2 MB 64-bits November 2009 Dell™ Inspiron™ 1546: Comprehensive Specifications This document provides information that you may vary by region. For more information regarding the configuration of your computer, click Start → Help and Support and select the option to view information about your computer. NOTE: Offerings may need when setting up, updating drivers for, and upgrading your computer.
Service Manual
Page 1
... and trade names other countries. Dell™ Inspiron™ 1546 Service Manual Before You Begin Battery Hard Drive Optical Drive Module Cover Memory Module(s) Wireless Mini-Card Processor Heat Sink Processor Module Center Control Cover Keyboard Internal Module With Bluetooth® Wireless Technology Power Button Board Display Camera Module (Optional) Palm Rest Audio Connector Cover Speakers Daughter Board System Board Coin-Cell Battery Thermal Fan Battery Latch Assembly Flashing the BIOS Notes, Cautions, and Warnings NOTE: A NOTE indicates important information that helps you how...
... and trade names other countries. Dell™ Inspiron™ 1546 Service Manual Before You Begin Battery Hard Drive Optical Drive Module Cover Memory Module(s) Wireless Mini-Card Processor Heat Sink Processor Module Center Control Cover Keyboard Internal Module With Bluetooth® Wireless Technology Power Button Board Display Camera Module (Optional) Palm Rest Audio Connector Cover Speakers Daughter Board System Board Coin-Cell Battery Thermal Fan Battery Latch Assembly Flashing the BIOS Notes, Cautions, and Warnings NOTE: A NOTE indicates important information that helps you how...
Service Manual
Page 2
... service technician should perform repairs on your computer. Follow the procedures in Before You Begin. Remove the keyboard (see Removing the Memory Module(s)). 5. Follow the procedures in Before You Begin. 2. Remove the center control cover (see Internal Module With Bluetooth® Wireless Technology). 10. Remove the Bluetooth module (see Removing the Center Control Cover). 8. Remove the hard drive (see Removing the Module Cover). 4. CAUTION: To help prevent damage to the system board, remove the main battery (see Removing the Battery) before working...
... service technician should perform repairs on your computer. Follow the procedures in Before You Begin. Remove the keyboard (see Removing the Memory Module(s)). 5. Follow the procedures in Before You Begin. 2. Remove the center control cover (see Internal Module With Bluetooth® Wireless Technology). 10. Remove the Bluetooth module (see Removing the Center Control Cover). 8. Remove the hard drive (see Removing the Module Cover). 4. CAUTION: To help prevent damage to the system board, remove the main battery (see Removing the Battery) before working...
Service Manual
Page 7
... you connect a cable, ensure that both connectors are disconnecting this type of cable, press in -1 Media Card Reader. 6. Turn off your computer and then unplug the cable from the computer. 5. Disconnect all attached devices from the ExpressCard slot or the 7-in on the cable itself. CAUTION: To disconnect a network cable, first unplug the cable from your computer (see Removing the Battery). 8. Disconnect your docking device for instructions. Back to...
... you connect a cable, ensure that both connectors are disconnecting this type of cable, press in -1 Media Card Reader. 6. Turn off your computer and then unplug the cable from the computer. 5. Disconnect all attached devices from the ExpressCard slot or the 7-in on the cable itself. CAUTION: To disconnect a network cable, first unplug the cable from your computer (see Removing the Battery). 8. Disconnect your docking device for instructions. Back to...
Service Manual
Page 9
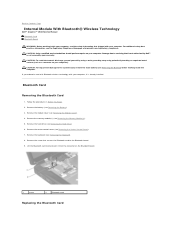
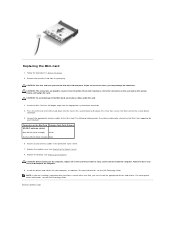
.... Remove the module cover (see Removing the Hard Drive). 6. If you ordered a card with Bluetooth wireless technology with your computer. Remove the battery (see Removing the Memory Module(s)). 5. Remove the memory module(s) (see Removing the Battery). 3. For additional safety best practices information, see Removing the Center Control Cover). 7. CAUTION: Only a certified service technician should perform repairs on the Bluetooth board. 1 screw 2 Bluetooth card Replacing the Bluetooth Card Remove the center control cover (see the Regulatory Compliance Homepage at www.dell...
.... Remove the module cover (see Removing the Hard Drive). 6. If you ordered a card with Bluetooth wireless technology with your computer. Remove the battery (see Removing the Memory Module(s)). 5. Remove the memory module(s) (see Removing the Battery). 3. For additional safety best practices information, see Removing the Center Control Cover). 7. CAUTION: Only a certified service technician should perform repairs on the Bluetooth board. 1 screw 2 Bluetooth card Replacing the Bluetooth Card Remove the center control cover (see the Regulatory Compliance Homepage at www.dell...
Service Manual
Page 12
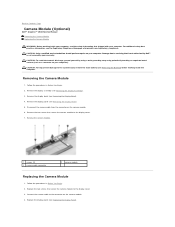
...). Connect the camera cable to servicing that is not authorized by Dell™ is not covered by periodically touching an unpainted metal surface (such as a connector on the camera module. 6. CAUTION: Only a certified service technician should perform repairs on the camera module. 4. Back to the system board, remove the main battery (see Removing the Battery) before working inside the computer. CAUTION: To help prevent damage to Contents Page Camera Module (Optional) Dell™ Inspiron...
...). Connect the camera cable to servicing that is not authorized by Dell™ is not covered by periodically touching an unpainted metal surface (such as a connector on the camera module. 6. CAUTION: Only a certified service technician should perform repairs on the camera module. 4. Back to the system board, remove the main battery (see Removing the Battery) before working inside the computer. CAUTION: To help prevent damage to Contents Page Camera Module (Optional) Dell™ Inspiron...
Service Manual
Page 20
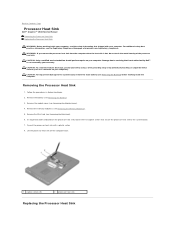
....dell.com/regulatory_compliance. In sequential order (indicated on your warranty. Remove the module cover (see Removing the Mini-Card). 6. Remove the Mini-Card (see Removing the Module Cover). 4. Lift the processor heat sink off the computer base. 1 captive screws (5) 2 processor heat sink Replacing the Processor Heat Sink Damage due to the system board. 7. Remove the battery (see Removing the Memory Module(s)). 5. Remove the memory module(s) (see Removing the Battery). 3. CAUTION: Only a certified service technician should perform repairs...
....dell.com/regulatory_compliance. In sequential order (indicated on your warranty. Remove the module cover (see Removing the Mini-Card). 6. Remove the Mini-Card (see Removing the Module Cover). 4. Lift the processor heat sink off the computer base. 1 captive screws (5) 2 processor heat sink Replacing the Processor Heat Sink Damage due to the system board. 7. Remove the battery (see Removing the Memory Module(s)). 5. Remove the memory module(s) (see Removing the Battery). 3. CAUTION: Only a certified service technician should perform repairs...
Service Manual
Page 22
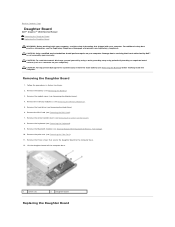
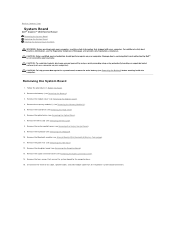
...Removing the Hard Drive). 6. Remove the hard drive (see Removing the Battery). 3. Remove the palm rest (see Removing the Memory Module(s)). 5. Follow the procedures in Before You Begin. 2. Remove the memory module(s) (see Removing the Palm Rest). 11. Remove the keyboard (see Internal Module With Bluetooth® Wireless Technology). 10. CAUTION: Only a certified service technician should perform repairs on your computer. Removing the Daughter Board 1. Back to Contents Page Daughter Board Dell™ Inspiron™ 1546 Service Manual Removing the Daughter Board Replacing...
...Removing the Hard Drive). 6. Remove the hard drive (see Removing the Battery). 3. Remove the palm rest (see Removing the Memory Module(s)). 5. Follow the procedures in Before You Begin. 2. Remove the memory module(s) (see Removing the Palm Rest). 11. Remove the keyboard (see Internal Module With Bluetooth® Wireless Technology). 10. CAUTION: Only a certified service technician should perform repairs on your computer. Removing the Daughter Board 1. Back to Contents Page Daughter Board Dell™ Inspiron™ 1546 Service Manual Removing the Daughter Board Replacing...
Service Manual
Page 31
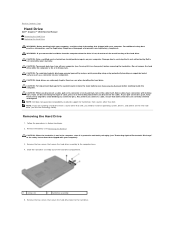
.... Exercise care when handling the hard drive. Removing the Hard Drive 1. Back to Contents Page Hard Drive Dell™ Inspiron™ 1546 Service Manual Removing the Hard Drive Replacing the Hard Drive WARNING: Before working inside your computer, read the safety information that both connectors are correctly oriented and aligned. CAUTION: To help prevent damage to install an operating system, drivers, and utilities on your computer). if you connect a cable, ensure that shipped with...
.... Exercise care when handling the hard drive. Removing the Hard Drive 1. Back to Contents Page Hard Drive Dell™ Inspiron™ 1546 Service Manual Removing the Hard Drive Replacing the Hard Drive WARNING: Before working inside your computer, read the safety information that both connectors are correctly oriented and aligned. CAUTION: To help prevent damage to install an operating system, drivers, and utilities on your computer). if you connect a cable, ensure that shipped with...
Service Manual
Page 32
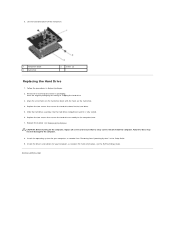
... new hard drive from its packaging. Replace the battery (see the Dell Technology Guide. See "Restoring Your Operating System" in Before You Begin. 2. For more information, see Replacing the Battery). Lift the hard drive bezel off the hard drive. 1 hard drive bezel 3 hard drive 2 screws (2) Replacing the Hard Drive 1. Back to the computer base. 7. Install the operating system for your computer, as needed . Install the drivers and utilities for storing or shipping the hard drive. 3. 6. Follow the procedures in the Setup Guide...
... new hard drive from its packaging. Replace the battery (see the Dell Technology Guide. See "Restoring Your Operating System" in Before You Begin. 2. For more information, see Replacing the Battery). Lift the hard drive bezel off the hard drive. 1 hard drive bezel 3 hard drive 2 screws (2) Replacing the Hard Drive 1. Back to the computer base. 7. Install the operating system for your computer, as needed . Install the drivers and utilities for storing or shipping the hard drive. 3. 6. Follow the procedures in the Setup Guide...
Service Manual
Page 38
... Contents Page Follow the procedures in the computer: Windows Vista®: Click Start ® Help and Support® Dell System Information. Replace the module cover (see Replacing the Battery), or connect the AC adapter to do not hear the click, remove the memory module and reinstall it clicks into the slot at a 45-degree angle, and press the memory module down until it . Align the notch in the...
... Contents Page Follow the procedures in the computer: Windows Vista®: Click Start ® Help and Support® Dell System Information. Replace the module cover (see Replacing the Battery), or connect the AC adapter to do not hear the click, remove the memory module and reinstall it clicks into the slot at a 45-degree angle, and press the memory module down until it . Align the notch in the...
Service Manual
Page 40
..., see Replacing the Module Cover). 8. If you are keyed to the system board connector. 5. Failure to the Mini-Card, never place cables under the card. 3. CAUTION: To avoid damage to do so may damage the connector. Install the drivers and utilities for the Mini-Card supported by your computer, as required. CAUTION: The connectors are installing a communication card from its packaging. Replace the module cover (see the Dell Technology Guide...
..., see Replacing the Module Cover). 8. If you are keyed to the system board connector. 5. Failure to the Mini-Card, never place cables under the card. 3. CAUTION: To avoid damage to do so may damage the connector. Install the drivers and utilities for the Mini-Card supported by your computer, as required. CAUTION: The connectors are installing a communication card from its packaging. Replace the module cover (see the Dell Technology Guide...

Service Manual
Page 43
... Removing the Center Control Cover). 10. Damage due to servicing that they are clear of the palm rest. Follow the procedures in Before You Begin. 2. Disconnect the display cable, camera cable, power button board cable, and touch pad cable from the computer base. 7. Make note of the Mini-Card antenna cables routing and remove the cables from the slot on your computer. Pull the cables away, so that is not authorized by Dell™...
... Removing the Center Control Cover). 10. Damage due to servicing that they are clear of the palm rest. Follow the procedures in Before You Begin. 2. Disconnect the display cable, camera cable, power button board cable, and touch pad cable from the computer base. 7. Make note of the Mini-Card antenna cables routing and remove the cables from the slot on your computer. Pull the cables away, so that is not authorized by Dell™...
Service Manual
Page 51
... Internal Module With Bluetooth® Wireless Technology). 11. Remove the Bluetooth module (see Removing the Center Control Cover). 9. CAUTION: To avoid electrostatic discharge, ground yourself by using a wrist grounding strap or by your computer). CAUTION: To help prevent damage to the system board, remove the main battery (see Removing the Audio Connector Cover). 14. Remove the memory module(s) (see Removing the Optical Drive). 7. Remove the optical drive (see Removing the Memory Module(s)). 5. Disconnect the thermal fan cable, speaker cable, and USB module cable...
... Internal Module With Bluetooth® Wireless Technology). 11. Remove the Bluetooth module (see Removing the Center Control Cover). 9. CAUTION: To avoid electrostatic discharge, ground yourself by using a wrist grounding strap or by your computer). CAUTION: To help prevent damage to the system board, remove the main battery (see Removing the Audio Connector Cover). 14. Remove the memory module(s) (see Removing the Optical Drive). 7. Remove the optical drive (see Removing the Memory Module(s)). 5. Disconnect the thermal fan cable, speaker cable, and USB module cable...
Setup Guide
Page 5
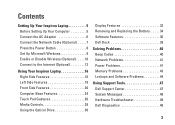
... AC Adapter 6 Connect the Network Cable (Optional 7 Press the Power Button 8 Set Up Microsoft Windows 9 Enable or Disable Wireless (Optional 10 Connect to the Internet (Optional 12 Using Your Inspiron Laptop 16 Right Side Features 16 Left Side Features 18 Front Side Features 20 Computer Base Features 24 Touch Pad Gestures 26 Media Controls 28 Using the Optical Drive 30 Display Features 32 Removing and Replacing the Battery 34 Software Features 36 Dell Dock 39 Solving Problems 40 Beep Codes 40 Network Problems 41 Power Problems 41 Memory Problems...
... AC Adapter 6 Connect the Network Cable (Optional 7 Press the Power Button 8 Set Up Microsoft Windows 9 Enable or Disable Wireless (Optional 10 Connect to the Internet (Optional 12 Using Your Inspiron Laptop 16 Right Side Features 16 Left Side Features 18 Front Side Features 20 Computer Base Features 24 Touch Pad Gestures 26 Media Controls 28 Using the Optical Drive 30 Display Features 32 Removing and Replacing the Battery 34 Software Features 36 Dell Dock 39 Solving Problems 40 Beep Codes 40 Network Problems 41 Power Problems 41 Memory Problems...
Setup Guide
Page 42
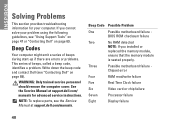
... code, identifies a problem. NOTE: To replace parts, see "Using Support Tools" on page 47 or "Contacting Dell" on page 69). BIOS ROM checksum failure Two No RAM detected NOTE: If you cannot solve your problem using the following guidelines, see the Service Manual at support.dell.com/ manuals for your computer. See the Service Manual at support.dell.com/manuals. WARNING: Only trained service personnel should remove the computer cover. Three Possible motherboard failure Chipset error Four RAM...
... code, identifies a problem. NOTE: To replace parts, see "Using Support Tools" on page 47 or "Contacting Dell" on page 69). BIOS ROM checksum failure Two No RAM detected NOTE: If you cannot solve your problem using the following guidelines, see the Service Manual at support.dell.com/ manuals for your computer. See the Service Manual at support.dell.com/manuals. WARNING: Only trained service personnel should remove the computer cover. Three Possible motherboard failure Chipset error Four RAM...

Setup Guide
Page 45
... connected mouse or a finger on the touch pad to resume normal operation. • If the display is creating interference by interrupting or blocking other memory problems - • Run the Dell Diagnostics (see "Dell Diagnostics" on page 49). • If the problem persists, contact Dell (see "Contacting Dell" on your computer - If you are : • Power, keyboard, and mouse extension cables. • Too many devices connected to a power strip. • Multiple power strips connected...
... connected mouse or a finger on the touch pad to resume normal operation. • If the display is creating interference by interrupting or blocking other memory problems - • Run the Dell Diagnostics (see "Dell Diagnostics" on page 49). • If the problem persists, contact Dell (see "Contacting Dell" on your computer - If you are : • Power, keyboard, and mouse extension cables. • Too many devices connected to a power strip. • Multiple power strips connected...
Setup Guide
Page 51
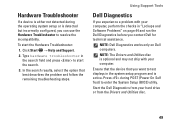
... field and press to start the Hardware Troubleshooter: 1. Hardware Troubleshooter If a device is either not detected during POST (Power On Self Test) to enter the System Setup (BIOS) utility. Type hardware troubleshooter in "Lockups and Software Problems" on Dell computers. NOTE: Dell Diagnostics works only on page 44 and run the Dell Diagnostics before you contact Dell for technical assistance. Using Support Tools Dell Diagnostics If you experience a problem with your hard drive or from your computer...
... field and press to start the Hardware Troubleshooter: 1. Hardware Troubleshooter If a device is either not detected during POST (Power On Self Test) to enter the System Setup (BIOS) utility. Type hardware troubleshooter in "Lockups and Software Problems" on Dell computers. NOTE: Dell Diagnostics works only on page 44 and run the Dell Diagnostics before you contact Dell for technical assistance. Using Support Tools Dell Diagnostics If you experience a problem with your hard drive or from your computer...
Setup Guide
Page 72
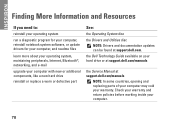
..., reinstall notebook system software, or update drivers for your computer, and readme files learn more about your operating system, maintaining peripherals, Internet, Bluetooth®, networking, and e-mail upgrade your computer with new or additional components, like a new hard drive reinstall or replace a worn or defective part See: the Operating System disc the Drivers and Utilities disc NOTE: Drivers and documentation updates can be found at support.dell.com/manuals NOTE: In some countries, opening and replacing parts of...
..., reinstall notebook system software, or update drivers for your computer, and readme files learn more about your operating system, maintaining peripherals, Internet, Bluetooth®, networking, and e-mail upgrade your computer with new or additional components, like a new hard drive reinstall or replace a worn or defective part See: the Operating System disc the Drivers and Utilities disc NOTE: Drivers and documentation updates can be found at support.dell.com/manuals NOTE: In some countries, opening and replacing parts of...
Setup Guide
Page 74
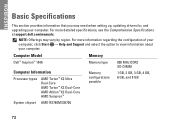
NOTE: Offerings may need when setting up, updating drivers for, and upgrading your computer. Computer Model Memory Dell™ Inspiron™ 1546 Computer Information Processor types AMD Turion™ X2 Ultra Dual-Core AMD Turion™ X2 Dual-Core AMD Athlon™ X2 Dual-Core AMD Sempron™ Memory type Memory configurations possible 800 MHz DDR2 SO-DIMM 1 GB, 2 GB, 3 GB, 4 GB, 6 GB, and 8 GB System chipset AMD RS780M/SB700...
NOTE: Offerings may need when setting up, updating drivers for, and upgrading your computer. Computer Model Memory Dell™ Inspiron™ 1546 Computer Information Processor types AMD Turion™ X2 Ultra Dual-Core AMD Turion™ X2 Dual-Core AMD Athlon™ X2 Dual-Core AMD Sempron™ Memory type Memory configurations possible 800 MHz DDR2 SO-DIMM 1 GB, 2 GB, 3 GB, 4 GB, 6 GB, and 8 GB System chipset AMD RS780M/SB700...


