

Handling swollen Lithium-ion batteries
Page 1
... Like most laptops, Dell laptops use a battery from Dell. 1 Guidelines for replacement by disconnecting the AC adapter and letting the battery drain. We recommend contacting Dell product support for options to work with newer ultra-thin laptops) and long battery life. Replace the battery only with your Dell computer. Do not use lithium-ion batteries. One type of lithium-ion battery is designed to replace a swollen battery under the terms of their respective owners. or...
... Like most laptops, Dell laptops use a battery from Dell. 1 Guidelines for replacement by disconnecting the AC adapter and letting the battery drain. We recommend contacting Dell product support for options to work with newer ultra-thin laptops) and long battery life. Replace the battery only with your Dell computer. Do not use lithium-ion batteries. One type of lithium-ion battery is designed to replace a swollen battery under the terms of their respective owners. or...

Inspiron 15-3573 Service Manual
Page 4
Replacing the keyboard 26 Procedure 26 Post-requisites 26 Removing the base cover 27 Prerequisites 27 Procedure 27 Replacing the base cover 32 Procedure 32 Post-requisites 34 Removing the optical-drive interposer 35 Prerequisites 35 Procedure 35 Replacing the optical-drive interposer 37 Procedure 37 Post-requisites 37 Removing the hard drive 38 Prerequisites 38 Procedure 38 Replacing the hard drive 41 Procedure 41 Post-requisites 41 Removing the memory modules 42 Prerequisites 42 Procedure 42 4
Replacing the keyboard 26 Procedure 26 Post-requisites 26 Removing the base cover 27 Prerequisites 27 Procedure 27 Replacing the base cover 32 Procedure 32 Post-requisites 34 Removing the optical-drive interposer 35 Prerequisites 35 Procedure 35 Replacing the optical-drive interposer 37 Procedure 37 Post-requisites 37 Removing the hard drive 38 Prerequisites 38 Procedure 38 Replacing the hard drive 41 Procedure 41 Post-requisites 41 Removing the memory modules 42 Prerequisites 42 Procedure 42 4

Inspiron 15-3573 Service Manual
Page 11
... working inside the computer, replace all power sources before connecting to protect your computer from your operating system for shut-down . For more safety best practices, see the documentation of your computer depending on the configuration you begin 1 Save and close all open files and exit all attached network devices and peripherals, such as keyboard, mouse, and monitor from your computer. 5 Remove any media card...
... working inside the computer, replace all power sources before connecting to protect your computer from your operating system for shut-down . For more safety best practices, see the documentation of your computer depending on the configuration you begin 1 Save and close all open files and exit all attached network devices and peripherals, such as keyboard, mouse, and monitor from your computer. 5 Remove any media card...

Inspiron 15-3573 Service Manual
Page 15
After working inside your computer CAUTION: Leaving stray or loose screws inside your computer may severely damage your computer. 1 Replace all screws and ensure that no stray screws remain inside your computer. 2 Connect any external devices, peripherals, or cables you removed before working on your computer. 3 Replace any media cards, discs, or any other parts that you removed before working on your computer. 4 Connect your computer and all attached devices to their electrical outlets. 5 Turn on your computer. 15
After working inside your computer CAUTION: Leaving stray or loose screws inside your computer may severely damage your computer. 1 Replace all screws and ensure that no stray screws remain inside your computer. 2 Connect any external devices, peripherals, or cables you removed before working on your computer. 3 Replace any media cards, discs, or any other parts that you removed before working on your computer. 4 Connect your computer and all attached devices to their electrical outlets. 5 Turn on your computer. 15

Inspiron 15-3573 Service Manual
Page 42
... optical drive". 3 Remove the keyboard. 4 Follow the procedure from step 1 to step 7 in After working inside your computer. Removing the memory modules WARNING: Before working inside your computer, read the safety information that shipped with your computer and follow the instructions in "Removing the base cover". Procedure 1 Using your fingertips, carefully spread apart the securing clips on each end of the memory-module slot until the memory module...
... optical drive". 3 Remove the keyboard. 4 Follow the procedure from step 1 to step 7 in After working inside your computer. Removing the memory modules WARNING: Before working inside your computer, read the safety information that shipped with your computer and follow the instructions in "Removing the base cover". Procedure 1 Using your fingertips, carefully spread apart the securing clips on each end of the memory-module slot until the memory module...

Inspiron 15-3573 Service Manual
Page 62
... step 3 in "Removing the optical drive". 3 Remove the keyboard. 4 Follow the procedure from step 1 to default. Procedure Using a plastic scribe, gently pry the coin-cell battery out of the battery socket. 62 After working inside your computer, follow the steps in Before working inside your computer and follow the instructions in "Removing the base cover". CAUTION: Removing the coin-cell battery resets the BIOS setup program's settings to step...
... step 3 in "Removing the optical drive". 3 Remove the keyboard. 4 Follow the procedure from step 1 to default. Procedure Using a plastic scribe, gently pry the coin-cell battery out of the battery socket. 62 After working inside your computer, follow the steps in Before working inside your computer and follow the instructions in "Removing the base cover". CAUTION: Removing the coin-cell battery resets the BIOS setup program's settings to step...

Inspiron 15-3573 Service Manual
Page 74
... "Removing the optical drive". 3 Remove the keyboard. 4 Follow the procedure from the system board, note the location of the connectors so that shipped with your computer and follow the instructions in the system board. NOTE: Before disconnecting the cables from step 1 to the BIOS using the BIOS setup program. You must make the appropriate changes again after you replace the system board. Removing the system board WARNING: Before working inside...
... "Removing the optical drive". 3 Remove the keyboard. 4 Follow the procedure from the system board, note the location of the connectors so that shipped with your computer and follow the instructions in the system board. NOTE: Before disconnecting the cables from step 1 to the BIOS using the BIOS setup program. You must make the appropriate changes again after you replace the system board. Removing the system board WARNING: Before working inside...

Inspiron 15-3573 Service Manual
Page 81
... "Removing the optical drive". 3 Remove the keyboard. 4 Follow the procedure from step 1 to the touch pad. 81 After working inside your computer, follow the steps in Before working inside your computer. Removing the touchpad WARNING: Before working inside your computer, read the safety information that secure the touch-pad bracket to step 7 in "Removing the base cover". 5 Remove the memory modules. 6 Remove the wireless card. 7 Remove the heat sink. 8 Remove the fan. 9 Remove the system board.
... "Removing the optical drive". 3 Remove the keyboard. 4 Follow the procedure from step 1 to the touch pad. 81 After working inside your computer, follow the steps in Before working inside your computer. Removing the touchpad WARNING: Before working inside your computer, read the safety information that secure the touch-pad bracket to step 7 in "Removing the base cover". 5 Remove the memory modules. 6 Remove the wireless card. 7 Remove the heat sink. 8 Remove the fan. 9 Remove the system board.

Inspiron 15-3573 Service Manual
Page 85
... cover". 5 Remove the coin-cell battery. 6 Remove the memory modules. 7 Remove the wireless card. 8 Remove the heat sink. 9 Remove the fan. 10 Remove the system board. Prerequisites 1 Remove the battery. 2 Follow the procedure from step 1 to step 3 in Before working inside your computer, follow the steps in "Removing the optical drive". 3 Remove the keyboard. 4 Follow the procedure from step 1 to the palmrest assembly. 2 Note the power-adapter port cable routing and remove the cable from its routing guides...
... cover". 5 Remove the coin-cell battery. 6 Remove the memory modules. 7 Remove the wireless card. 8 Remove the heat sink. 9 Remove the fan. 10 Remove the system board. Prerequisites 1 Remove the battery. 2 Follow the procedure from step 1 to step 3 in Before working inside your computer, follow the steps in "Removing the optical drive". 3 Remove the keyboard. 4 Follow the procedure from step 1 to the palmrest assembly. 2 Note the power-adapter port cable routing and remove the cable from its routing guides...

Inspiron 15-3573 Service Manual
Page 109
... the steps in "Removing the hard drive". 6 Remove the memory modules. 7 Remove the wireless card. 8 Remove the power-button board. 9 Remove the speakers. 10 Remove the I/O board. 11 Remove the heat sink. 12 Remove the fan. 13 Remove the status-light lens. 14 Remove the system board. 15 Remove the touch pad. 16 Remove the power-adapter port. 17 Remove the display assembly. For more safety best practices, see the Regulatory Compliance home page at www.dell.com/ regulatory_compliance. Prerequisites 1 Remove the battery. 2 Follow the procedure...
... the steps in "Removing the hard drive". 6 Remove the memory modules. 7 Remove the wireless card. 8 Remove the power-button board. 9 Remove the speakers. 10 Remove the I/O board. 11 Remove the heat sink. 12 Remove the fan. 13 Remove the status-light lens. 14 Remove the system board. 15 Remove the touch pad. 16 Remove the power-adapter port. 17 Remove the display assembly. For more safety best practices, see the Regulatory Compliance home page at www.dell.com/ regulatory_compliance. Prerequisites 1 Remove the battery. 2 Follow the procedure...
Inspiron 15-3573 Service Manual
Page 113
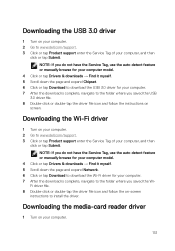
... tap Submit. Downloading the USB 3.0 driver 1 Turn on your computer. 2 Go to www.dell.com/support. 3 Click or tap Product support enter the Service Tag of your computer. 7 After the download is complete, navigate to the folder where you saved the USB 3.0 driver file. 8 Double-click or double-tap the driver file icon and follow the on-screen instructions to install the driver. Downloading the media-card reader driver 1 Turn on your computer...
... tap Submit. Downloading the USB 3.0 driver 1 Turn on your computer. 2 Go to www.dell.com/support. 3 Click or tap Product support enter the Service Tag of your computer. 7 After the download is complete, navigate to the folder where you saved the USB 3.0 driver file. 8 Double-click or double-tap the driver file icon and follow the on-screen instructions to install the driver. Downloading the media-card reader driver 1 Turn on your computer...
Inspiron 15-3573 Service Manual
Page 114
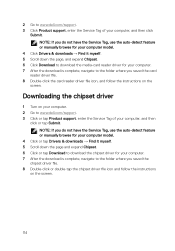
... icon and follow the instructions on the screen. 114 Downloading the chipset driver 1 Turn on your computer. 2 Go to the folder where you do not have the Service Tag, use the auto-detect feature or manually browse for your computer model. 4 Click Drivers & downloads → Find it myself. 5 Scroll down the page, and expand Chipset. 6 Click Download to download the media-card reader driver for your computer. 7 After...
... icon and follow the instructions on the screen. 114 Downloading the chipset driver 1 Turn on your computer. 2 Go to the folder where you do not have the Service Tag, use the auto-detect feature or manually browse for your computer model. 4 Click Drivers & downloads → Find it myself. 5 Scroll down the page, and expand Chipset. 6 Click Download to download the media-card reader driver for your computer. 7 After...

Inspiron 15-3573 Service Manual
Page 116
... computer user, do not change the settings in the main screen displays a message that you view the main screen. Entering BIOS setup program 1 Turn on (or restart) your computer work incorrectly. Moves to the next focus area. NOTE: For the standard graphics browser only. NOTE: Before you change a user-selectable option, such as the amount of RAM and the size of hard drive installed, and enabling or disabling base devices. Selects...
... computer user, do not change the settings in the main screen displays a message that you view the main screen. Entering BIOS setup program 1 Turn on (or restart) your computer work incorrectly. Moves to the next focus area. NOTE: For the standard graphics browser only. NOTE: Before you change a user-selectable option, such as the amount of RAM and the size of hard drive installed, and enabling or disabling base devices. Selects...

Inspiron 15-3573 Service Manual
Page 118
... menu Advanced Virtualization Allows you to enable or disable the Intel Virtualization technology. Default: Enabled USB Emulation Allows you to enable or disable the USB emulation feature. Displays the type of optical drive installed. Displays the size of hard drive installed. Main First HDD SATA ODD AC Adapter Type System Memory Memory Speed Displays the type of memory installed. NOTE: If USB PowerShare is enabled, a device connected to disable the USB wake support feature. Default: Enabled USB Wake Support Allows you to configure the operating mode of USB device...
... menu Advanced Virtualization Allows you to enable or disable the Intel Virtualization technology. Default: Enabled USB Emulation Allows you to enable or disable the USB emulation feature. Displays the type of optical drive installed. Displays the size of hard drive installed. Main First HDD SATA ODD AC Adapter Type System Memory Memory Speed Displays the type of memory installed. NOTE: If USB PowerShare is enabled, a device connected to disable the USB wake support feature. Default: Enabled USB Wake Support Allows you to configure the operating mode of USB device...

Inspiron 15-3573 Service Manual
Page 119
...: Enabled Controls the automatic boot flow for SupportAssist System Resolution 119 Default: Multimedia key Displays the battery health. Default: Enabled BIOS auto-recovery automatically recovers BIOS without user actions. Enable the user to enable or disable the BIOS recovery optimization. Default: Disabled Allows you to recover from certain corrupted BIOS conditions from Hard Drive BIOS Auto-Recovery BIOS Recovery Optimization Always Perform Intefrity Check SupportAssist System Resolution Auto OS Recovery Threshold Default: AHCI Allows you use AC adapters that are not supported by...
...: Enabled Controls the automatic boot flow for SupportAssist System Resolution 119 Default: Multimedia key Displays the battery health. Default: Enabled BIOS auto-recovery automatically recovers BIOS without user actions. Enable the user to enable or disable the BIOS recovery optimization. Default: Disabled Allows you to recover from certain corrupted BIOS conditions from Hard Drive BIOS Auto-Recovery BIOS Recovery Optimization Always Perform Intefrity Check SupportAssist System Resolution Auto OS Recovery Threshold Default: AHCI Allows you use AC adapters that are not supported by...

Inspiron 15-3573 Service Manual
Page 121
...Boot Boot List Option Displays the available boot options. Default: Legacy. Enable or disable the BIOS module interface of the optional Computrace Service from Absolute Software. Boot Option Priorities Displays the boot sequence. 121 Security HDD password Password Change Password Bypass Computrace Firmware TPM PPI Bypass for Clear Command. Default: Enabled. File Browser Del Boot Option Allows to add the boot options. Enable or diaable PPI Bypass for Clear Command UEFI Firmware Capsule Updates controls access to set, change, or delete the hard-disk drive password. Enable...
...Boot Boot List Option Displays the available boot options. Default: Legacy. Enable or disable the BIOS module interface of the optional Computrace Service from Absolute Software. Boot Option Priorities Displays the boot sequence. 121 Security HDD password Password Change Password Bypass Computrace Firmware TPM PPI Bypass for Clear Command. Default: Enabled. File Browser Del Boot Option Allows to add the boot options. Enable or diaable PPI Bypass for Clear Command UEFI Firmware Capsule Updates controls access to set, change, or delete the hard-disk drive password. Enable...
Inspiron 15-3573 Service Manual
Page 123
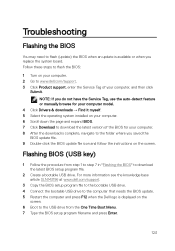
... Time Boot Menu. 7 Type the BIOS setup program filename and press Enter. 123 Troubleshooting Flashing the BIOS You may need to flash (update) the BIOS when an update is available or when you saved the BIOS update file. 9 Double-click the BIOS update file icon and follow the instructions on the screen. NOTE: If you do not have the Service Tag, use the auto-detect feature or manually browse for your computer model. 4 Click Drivers & downloads...
... Time Boot Menu. 7 Type the BIOS setup program filename and press Enter. 123 Troubleshooting Flashing the BIOS You may need to flash (update) the BIOS when an update is available or when you saved the BIOS update file. 9 Double-click the BIOS update file icon and follow the instructions on the screen. NOTE: If you do not have the Service Tag, use the auto-detect feature or manually browse for your computer model. 4 Click Drivers & downloads...

Inspiron 15-3573 Service Manual
Page 125
... Light Pattern Problem description 2,1 CPU failure 2,2 System board: BIOS and ROM failure 125 Note the error code and validation number and contact Dell. Power adapter is running on battery and the battery has less than 5 percent charge. Amber - The power and battery-status light blinks amber along with beep codes indicating failures. This 2,3 pattern continues until the computer is turned off indicating no memory or RAM is in sleep state, hibernation, or turned off. Off • Power adapter is connected...
... Light Pattern Problem description 2,1 CPU failure 2,2 System board: BIOS and ROM failure 125 Note the error code and validation number and contact Dell. Power adapter is running on battery and the battery has less than 5 percent charge. Amber - The power and battery-status light blinks amber along with beep codes indicating failures. This 2,3 pattern continues until the computer is turned off indicating no memory or RAM is in sleep state, hibernation, or turned off. Off • Power adapter is connected...

Inspiron 15-3573 Service Manual
Page 126
... computer. 126 Light Pattern 2,3 2,4 2,5 2,6 2,7 3,1 3,2 3,3 3,4 Problem description No memory or RAM detected Memory or RAM failure Invalid memory installed System board or chipset error LCD failure CMOS battery failure PCI or video card or chip failure Recovery image not found Recovery image found but invalid The computer may emit a series of beeps during start-up if the errors or problems cannot be displayed. Caps Lock status light: Indicates whether Caps Lock is not in use . • Off - Caps Lock disabled.
... computer. 126 Light Pattern 2,3 2,4 2,5 2,6 2,7 3,1 3,2 3,3 3,4 Problem description No memory or RAM detected Memory or RAM failure Invalid memory installed System board or chipset error LCD failure CMOS battery failure PCI or video card or chip failure Recovery image not found Recovery image found but invalid The computer may emit a series of beeps during start-up if the errors or problems cannot be displayed. Caps Lock status light: Indicates whether Caps Lock is not in use . • Off - Caps Lock disabled.
Inspiron 15 3000 Setup and Specifications
Page 7
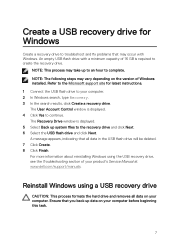
.... An empty USB flash drive with Windows. The Recovery Drive window is displayed. 5 Select Back up data on your computer. 2 In Windows search, type Recovery. 3 In the search results, click Create a recovery drive. For more information about reinstalling Windows using a USB recovery drive CAUTION: This process formats the hard drive and removes all data in the USB flash drive will be deleted. 7 Click Create. 8 Click Finish. Refer to the Microsoft support site for Windows Create a recovery drive to troubleshoot and fix problems that all data...
.... An empty USB flash drive with Windows. The Recovery Drive window is displayed. 5 Select Back up data on your computer. 2 In Windows search, type Recovery. 3 In the search results, click Create a recovery drive. For more information about reinstalling Windows using a USB recovery drive CAUTION: This process formats the hard drive and removes all data in the USB flash drive will be deleted. 7 Click Create. 8 Click Finish. Refer to the Microsoft support site for Windows Create a recovery drive to troubleshoot and fix problems that all data...


