

Inspiron 15 3537 Owner's Manual
Page 3
... 7 Safety Instructions 8 Recommended Tools 8 After Working Inside Your Computer 9 Removing the Battery 10 Procedure 10 Replacing the Battery 11 Procedure 11 11 Removing the Memory Module(s 12 Prerequisites 12 Procedure 12 Replacing the Memory Module(s 14 Procedure 14 Postrequisites 14 Removing the Optical-Drive Assembly 15 Prerequisites 15 Procedure 15 Replacing the Optical-Drive Assembly 17 Procedure 17 Postrequisites 17 Removing the Hard-Drive Assembly 18 Prerequisites 18 Procedure 18 Replacing the Hard-Drive Assembly...
... 7 Safety Instructions 8 Recommended Tools 8 After Working Inside Your Computer 9 Removing the Battery 10 Procedure 10 Replacing the Battery 11 Procedure 11 11 Removing the Memory Module(s 12 Prerequisites 12 Procedure 12 Replacing the Memory Module(s 14 Procedure 14 Postrequisites 14 Removing the Optical-Drive Assembly 15 Prerequisites 15 Procedure 15 Replacing the Optical-Drive Assembly 17 Procedure 17 Postrequisites 17 Removing the Hard-Drive Assembly 18 Prerequisites 18 Procedure 18 Replacing the Hard-Drive Assembly...
Inspiron 15 3537 Owner's Manual
Page 4
... Procedure 27 Postrequisites 27 Removing the Wireless Mini-Card 28 Prerequisites 28 Procedure 28 Replacing the Wireless Mini-Card 30 Procedure 30 Postrequisites 30 Removing the I/O Board 31 Prerequisites 31 Procedure 31 Replacing the I/O Board 32 Procedure 32 Postrequisites 32 Removing the System Board 33 Prerequisites 33 Procedure 34 Replacing the System Board 36 Procedure 36 Postrequisites 36 Entering the Service Tag in system setup 36 4 | Contents
... Procedure 27 Postrequisites 27 Removing the Wireless Mini-Card 28 Prerequisites 28 Procedure 28 Replacing the Wireless Mini-Card 30 Procedure 30 Postrequisites 30 Removing the I/O Board 31 Prerequisites 31 Procedure 31 Replacing the I/O Board 32 Procedure 32 Postrequisites 32 Removing the System Board 33 Prerequisites 33 Procedure 34 Replacing the System Board 36 Procedure 36 Postrequisites 36 Entering the Service Tag in system setup 36 4 | Contents
Inspiron 15 3537 Owner's Manual
Page 6
Removing the Display Bezel 52 Prerequisites 52 Procedure 53 Replacing the Display Bezel 54 Procedure 54 Postrequisites 54 Removing the Display Hinges 55 Prerequisites 55 Procedure 56 Replacing the Display Hinges 57 Procedure 57 Postrequisites 57 Removing the Display Panel 58 Prerequisites 58 Procedure 59 Replacing the Display Panel 61 Procedure 61 Postrequisites 61 Removing the Camera Module 62 Prerequisites 62 Procedure 63 Replacing the Camera Module 64 Procedure 64 Postrequisites 64 Flashing the BIOS 65 6 | Contents
Removing the Display Bezel 52 Prerequisites 52 Procedure 53 Replacing the Display Bezel 54 Procedure 54 Postrequisites 54 Removing the Display Hinges 55 Prerequisites 55 Procedure 56 Replacing the Display Hinges 57 Procedure 57 Postrequisites 57 Removing the Display Panel 58 Prerequisites 58 Procedure 59 Replacing the Display Panel 61 Procedure 61 Postrequisites 61 Removing the Camera Module 62 Prerequisites 62 Procedure 63 Replacing the Camera Module 64 Procedure 64 Postrequisites 64 Flashing the BIOS 65 6 | Contents
Inspiron 15 3537 Owner's Manual
Page 8
... of the components inside the computer, replace all power sources before connecting to remove the computer cover and access any connector pins. WARNING: Disconnect all covers, panels, and screws before opening the computer cover or panels. When disconnecting cables, keep them by touching an unpainted metal surface, such as the metal at dell.com/regulatory_compliance. While you finish working inside the computer. Recommended Tools The...
... of the components inside the computer, replace all power sources before connecting to remove the computer cover and access any connector pins. WARNING: Disconnect all covers, panels, and screws before opening the computer cover or panels. When disconnecting cables, keep them by touching an unpainted metal surface, such as the metal at dell.com/regulatory_compliance. While you finish working inside the computer. Recommended Tools The...
Inspiron 15 3537 Owner's Manual
Page 9
... their electrical outlets. CAUTION: Before turning on your computer, replace all attached devices to do so may damage your computer and all screws and ensure that no stray screws remain inside your computer. • Connect any external devices, cables, cards, and any other part(s) you removed before working on your computer. • Connect your computer. After Working Inside Your Computer After you complete...
... their electrical outlets. CAUTION: Before turning on your computer, replace all attached devices to do so may damage your computer and all screws and ensure that no stray screws remain inside your computer. • Connect any external devices, cables, cards, and any other part(s) you removed before working on your computer. • Connect your computer. After Working Inside Your Computer After you complete...
Inspiron 15 3537 Owner's Manual
Page 12
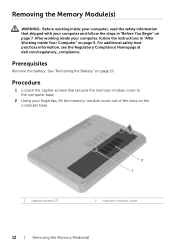
... and follow the instructions in "Before You Begin" on page 10. See "Removing the Battery" on page 7. Removing the Memory Module(s) WARNING: Before working inside your computer, read the safety information that secures the memory-module cover to the computer base. 2 Using your fingertips, lift the memory-module cover out of the slots on the computer base. 1 captive screws (2) 2 1 2 memory-module cover 12 | Removing the Memory Module(s) Prerequisites Remove the battery. For additional...
... and follow the instructions in "Before You Begin" on page 10. See "Removing the Battery" on page 7. Removing the Memory Module(s) WARNING: Before working inside your computer, read the safety information that secures the memory-module cover to the computer base. 2 Using your fingertips, lift the memory-module cover out of the slots on the computer base. 1 captive screws (2) 2 1 2 memory-module cover 12 | Removing the Memory Module(s) Prerequisites Remove the battery. For additional...
Inspiron 15 3537 Owner's Manual
Page 14
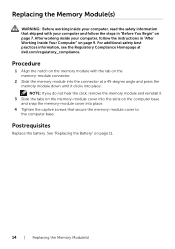
... Battery" on the memory-module connector. 2 Slide the memory module into the slots on page 7. Postrequisites Replace the battery. For additional safety best practices information, see the Regulatory Compliance Homepage at a 45-degree angle and press the memory module down until it . 3 Slide the tabs on the memory-module cover into the connector at dell.com/regulatory_compliance. After working inside your computer and follow the instructions...
... Battery" on the memory-module connector. 2 Slide the memory module into the slots on page 7. Postrequisites Replace the battery. For additional safety best practices information, see the Regulatory Compliance Homepage at a 45-degree angle and press the memory module down until it . 3 Slide the tabs on the memory-module cover into the connector at dell.com/regulatory_compliance. After working inside your computer and follow the instructions...
Inspiron 15 3537 Owner's Manual
Page 18
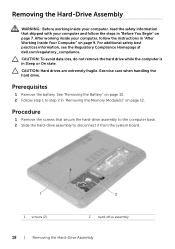
... | Removing the Hard-Drive Assembly For additional safety best practices information, see the Regulatory Compliance Homepage at dell.com/regulatory_compliance. Prerequisites 1 Remove the battery. Exercise care when handling the hard drive. Removing the Hard-Drive Assembly WARNING: Before working inside your computer, read the safety information that secure the hard-drive assembly to the computer base. 2 Slide the hard-drive assembly to step 2 in "Removing the Memory Module(s)" on...
... | Removing the Hard-Drive Assembly For additional safety best practices information, see the Regulatory Compliance Homepage at dell.com/regulatory_compliance. Prerequisites 1 Remove the battery. Exercise care when handling the hard drive. Removing the Hard-Drive Assembly WARNING: Before working inside your computer, read the safety information that secure the hard-drive assembly to the computer base. 2 Slide the hard-drive assembly to step 2 in "Removing the Memory Module(s)" on...
Inspiron 15 3537 Owner's Manual
Page 24
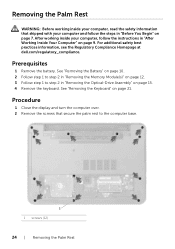
..., read the safety information that secure the palm rest to step 2 in "Removing the Optical-Drive Assembly" on page 15. 4 Remove the keyboard. Procedure 1 Close the display and turn the computer over. 2 Remove the screws that shipped with your computer and follow the instructions in "After Working Inside Your Computer" on page 21. For additional safety best practices information, see...
..., read the safety information that secure the palm rest to step 2 in "Removing the Optical-Drive Assembly" on page 15. 4 Remove the keyboard. Procedure 1 Close the display and turn the computer over. 2 Remove the screws that shipped with your computer and follow the instructions in "After Working Inside Your Computer" on page 21. For additional safety best practices information, see...
Inspiron 15 3537 Owner's Manual
Page 28
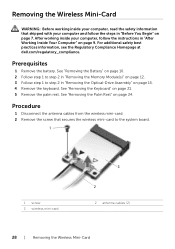
... "Removing the Battery" on page 10. 2 Follow step 1 to step 2 in "Removing the Memory Module(s)" on page 12. 3 Follow step 1 to the system board. 1 1 screw 3 wireless mini-card 3 2 2 antenna cables (2) 28 | Removing the Wireless Mini-Card Procedure 1 Disconnect the antenna cables from the wireless mini-card. 2 Remove the screw that shipped with your computer and follow the instructions in "After Working Inside Your Computer" on page 9. See "Removing the Keyboard...
... "Removing the Battery" on page 10. 2 Follow step 1 to step 2 in "Removing the Memory Module(s)" on page 12. 3 Follow step 1 to the system board. 1 1 screw 3 wireless mini-card 3 2 2 antenna cables (2) 28 | Removing the Wireless Mini-Card Procedure 1 Disconnect the antenna cables from the wireless mini-card. 2 Remove the screw that shipped with your computer and follow the instructions in "After Working Inside Your Computer" on page 9. See "Removing the Keyboard...
Inspiron 15 3537 Owner's Manual
Page 31
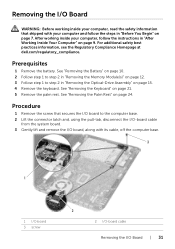
... 1 to step 2 in "Removing the Memory Module(s)" on page 12. 3 Follow step 1 to the computer base. 2 Lift the connector latch and, using the pull-tab, disconnect the I/O-board cable from the system board. 3 Gently lift and remove the I/O board, along with your computer and follow the instructions in "After Working Inside Your Computer" on page 9. See "Removing the Keyboard" on page 24. For...
... 1 to step 2 in "Removing the Memory Module(s)" on page 12. 3 Follow step 1 to the computer base. 2 Lift the connector latch and, using the pull-tab, disconnect the I/O-board cable from the system board. 3 Gently lift and remove the I/O board, along with your computer and follow the instructions in "After Working Inside Your Computer" on page 9. See "Removing the Keyboard" on page 24. For...
Inspiron 15 3537 Owner's Manual
Page 33
... "Removing the Keyboard" on page 24. 7 Remove the wireless mini-card. You must enter the Service Tag in system setup after you replace the system board. For more information, see the Regulatory Compliance Homepage at dell.com/regulatory_compliance. See "Removing the Battery" on page 28. See "Removing the Wireless Mini-Card" on page 10. 2 Remove the memory module(s). See "Removing the Memory Module(s)" on page 12. 3 Follow step 1 to step 3 in "Removing the Hard-Drive...
... "Removing the Keyboard" on page 24. 7 Remove the wireless mini-card. You must enter the Service Tag in system setup after you replace the system board. For more information, see the Regulatory Compliance Homepage at dell.com/regulatory_compliance. See "Removing the Battery" on page 28. See "Removing the Wireless Mini-Card" on page 10. 2 Remove the memory module(s). See "Removing the Memory Module(s)" on page 12. 3 Follow step 1 to step 3 in "Removing the Hard-Drive...
Inspiron 15 3537 Owner's Manual
Page 36
... you replace the system board. Entering the Service Tag in system setup 1 Turn on page 14. 7 Replace the battery. For additional safety best practices information, see the Dell logo to enter system setup. 3 Navigate to step 5 in "Replacing the Hard-Drive Assembly" on page 27. 3 Replace the keyboard. You must enter the Service Tag in the system board. See "Replacing the Palm Rest" on page 20. 6 Replace the memory module(s). See "Replacing the Keyboard" on...
... you replace the system board. Entering the Service Tag in system setup 1 Turn on page 14. 7 Replace the battery. For additional safety best practices information, see the Dell logo to enter system setup. 3 Navigate to step 5 in "Replacing the Hard-Drive Assembly" on page 27. 3 Replace the keyboard. You must enter the Service Tag in the system board. See "Replacing the Palm Rest" on page 20. 6 Replace the memory module(s). See "Replacing the Keyboard" on...
Inspiron 15 3537 Owner's Manual
Page 37
See "Removing the Battery" on page 10. 2 Follow step 1 to step 2 in "Removing the Memory Module(s)" on page 12. 3 Follow step 1 to step 3 in "Removing the Hard-Drive Assembly" on page 15. 5 Remove the keyboard. See "Removing the Keyboard" on page 24. 7 Remove the wireless mini-card. See "Removing the Palm Rest" on page 21. 6 Remove the palm rest. See "Removing the Wireless Mini-Card" on page 33. See "Removing the System Board" on...
See "Removing the Battery" on page 10. 2 Follow step 1 to step 2 in "Removing the Memory Module(s)" on page 12. 3 Follow step 1 to step 3 in "Removing the Hard-Drive Assembly" on page 15. 5 Remove the keyboard. See "Removing the Keyboard" on page 24. 7 Remove the wireless mini-card. See "Removing the Palm Rest" on page 21. 6 Remove the palm rest. See "Removing the Wireless Mini-Card" on page 33. See "Removing the System Board" on...
Inspiron 15 3537 Owner's Manual
Page 40
... dell.com/regulatory_compliance. See "Removing the Keyboard" on page 15. 5 Remove the keyboard. Removing the Heat Sink WARNING: Before working inside your computer, read the safety information that shipped with your computer, follow the steps in "Before You Begin" on page 7. Prerequisites 1 Remove the battery. See "Removing the Palm Rest" on page 28. 8 Remove the system board. See "Removing the Wireless Mini-Card" on page 24. 7 Remove...
... dell.com/regulatory_compliance. See "Removing the Keyboard" on page 15. 5 Remove the keyboard. Removing the Heat Sink WARNING: Before working inside your computer, read the safety information that shipped with your computer, follow the steps in "Before You Begin" on page 7. Prerequisites 1 Remove the battery. See "Removing the Palm Rest" on page 28. 8 Remove the system board. See "Removing the Wireless Mini-Card" on page 24. 7 Remove...
Inspiron 15 3537 Owner's Manual
Page 43
... step 2 in "Removing the Memory Module(s)" on page 12. 3 Follow step 1 to step 3 in "Removing the Hard-Drive Assembly" on page 18. 4 Follow step 1 to step 2 in "Removing the Optical-Drive Assembly" on page 28. 8 Remove the system board. See "Removing the Wireless Mini-Card" on page 15. 5 Remove the keyboard. See "Removing the Palm Rest" on page 33. Removing the Fan | 43 Removing the Fan WARNING: Before working inside your computer...
... step 2 in "Removing the Memory Module(s)" on page 12. 3 Follow step 1 to step 3 in "Removing the Hard-Drive Assembly" on page 18. 4 Follow step 1 to step 2 in "Removing the Optical-Drive Assembly" on page 28. 8 Remove the system board. See "Removing the Wireless Mini-Card" on page 15. 5 Remove the keyboard. See "Removing the Palm Rest" on page 33. Removing the Fan | 43 Removing the Fan WARNING: Before working inside your computer...
Inspiron 15 3537 Owner's Manual
Page 46
... Speakers WARNING: Before working inside your computer, read the safety information that secures the LED silicon tubes to step 2 in "Removing the Optical-Drive Assembly" on page 21. 6 Remove the palm rest. See "Removing the Battery" on page 10. 2 Follow step 1 to step 2 in "Removing the Memory Module(s)" on page 12. 3 Follow step 1 to step 3 in "Removing the Hard-Drive Assembly" on page...
... Speakers WARNING: Before working inside your computer, read the safety information that secures the LED silicon tubes to step 2 in "Removing the Optical-Drive Assembly" on page 21. 6 Remove the palm rest. See "Removing the Battery" on page 10. 2 Follow step 1 to step 2 in "Removing the Memory Module(s)" on page 12. 3 Follow step 1 to step 3 in "Removing the Hard-Drive Assembly" on page...
Inspiron 15 3537 Owner's Manual
Page 49
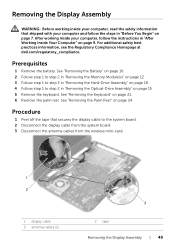
... antenna cables from the wireless mini-card. 1 2 1 display cable 3 antenna cables (2) 3 2 tape Removing the Display Assembly | 49 Removing the Display Assembly WARNING: Before working inside your computer, read the safety information that secures the display cable to step 2 in "Removing the Optical-Drive Assembly" on page 15. 5 Remove the keyboard. After working inside your computer and follow the instructions in "After Working Inside Your Computer" on page 9. Prerequisites 1 Remove the battery. See "Removing the Keyboard...
... antenna cables from the wireless mini-card. 1 2 1 display cable 3 antenna cables (2) 3 2 tape Removing the Display Assembly | 49 Removing the Display Assembly WARNING: Before working inside your computer, read the safety information that secures the display cable to step 2 in "Removing the Optical-Drive Assembly" on page 15. 5 Remove the keyboard. After working inside your computer and follow the instructions in "After Working Inside Your Computer" on page 9. Prerequisites 1 Remove the battery. See "Removing the Keyboard...
Inspiron 15 3537 Owner's Manual
Page 62
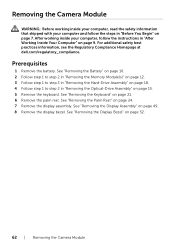
Removing the Camera Module WARNING: Before working inside your computer, read the safety information that shipped with your computer, follow the steps in "Removing the Optical-Drive Assembly" on page 49. 8 Remove the display bezel. See "Removing the Keyboard" on page 7. See "Removing the Display Assembly" on page 15. 5 Remove the keyboard. See "Removing the Battery" on page 10. 2 Follow step 1 to step 2 in "Removing the Memory Module(s)" on page 12...
Removing the Camera Module WARNING: Before working inside your computer, read the safety information that shipped with your computer, follow the steps in "Removing the Optical-Drive Assembly" on page 49. 8 Remove the display bezel. See "Removing the Keyboard" on page 7. See "Removing the Display Assembly" on page 15. 5 Remove the keyboard. See "Removing the Battery" on page 10. 2 Follow step 1 to step 2 in "Removing the Memory Module(s)" on page 12...
Quick Start Guide - Windows 8
Page 2
...the power adapter 3 Complete Windows setup 完成 Windows Windows 設定 Enable security 2 Press the power button Configure wireless (optional) Windows 8 Tiles Resources Swipe or scroll to access more tiles Note: Swipe works only on touch-screen displays Getting started My Dell 我的 Dell My Dell Charms sidebar Charms Swipe from right edge of the display Swipe from right edge of the touchpad Point mouse to lower/upper-right corner Shortcut Keys Switch to external display Turn off/on wireless Disable/enable touchpad...
...the power adapter 3 Complete Windows setup 完成 Windows Windows 設定 Enable security 2 Press the power button Configure wireless (optional) Windows 8 Tiles Resources Swipe or scroll to access more tiles Note: Swipe works only on touch-screen displays Getting started My Dell 我的 Dell My Dell Charms sidebar Charms Swipe from right edge of the display Swipe from right edge of the touchpad Point mouse to lower/upper-right corner Shortcut Keys Switch to external display Turn off/on wireless Disable/enable touchpad...


