
Specifications
Page 13
To learn about your computer keyboard shortcut keys, see the Quick Start Guide at dell.com/support. Dimensions and Weight System Information Memory Ports and Connectors Communications Video Audio Storage Media-Card Reader Display Keyboard Camera Touchpad Battery Power Adapter Computer Environment Views Audio Controller Speakers Speaker output: Average Peak Microphone Volume controls Specifications Realtek ALC3223 with Waves MaxxAudio Two 2 W 2.5 W Single digital microphone in the camera assembly Program menus and keyboard media-control keys.
To learn about your computer keyboard shortcut keys, see the Quick Start Guide at dell.com/support. Dimensions and Weight System Information Memory Ports and Connectors Communications Video Audio Storage Media-Card Reader Display Keyboard Camera Touchpad Battery Power Adapter Computer Environment Views Audio Controller Speakers Speaker output: Average Peak Microphone Volume controls Specifications Realtek ALC3223 with Waves MaxxAudio Two 2 W 2.5 W Single digital microphone in the camera assembly Program menus and keyboard media-control keys.

Specifications
Page 16
... Information Memory Ports and Connectors Communications Video Audio Storage Media-Card Reader Display Keyboard Camera Touchpad Battery Power Adapter Computer Environment Views Display Type Resolution (maximum) Dimensions: Height Width Diagonal Refresh rate Operating angle Pixel pitch Controls Specifications 15.6-inch HD 1366 x 768 224.30 mm (8.83 in) 360 mm (14.17 in) 396.24 mm (15.60 in) 60 Hz 0 degree (closed) to 140 degrees 0.252 mm Brightness can be controlled using keyboard shortcut keys...
... Information Memory Ports and Connectors Communications Video Audio Storage Media-Card Reader Display Keyboard Camera Touchpad Battery Power Adapter Computer Environment Views Display Type Resolution (maximum) Dimensions: Height Width Diagonal Refresh rate Operating angle Pixel pitch Controls Specifications 15.6-inch HD 1366 x 768 224.30 mm (8.83 in) 360 mm (14.17 in) 396.24 mm (15.60 in) 60 Hz 0 degree (closed) to 140 degrees 0.252 mm Brightness can be controlled using keyboard shortcut keys...

Specifications
Page 17
... shortcut keys by changing Function Key Behavior in System Setup. To type the alternate character, press Shift and the desired key. NOTE: You can be used to type alternate characters or to perform secondary functions. To perform secondary functions, press Fn and the desired key. Dimensions and Weight System Information Memory Ports and Connectors Communications Video Audio Storage Media-Card Reader Display Keyboard Camera Touchpad Battery Power Adapter Computer Environment Views Keyboard Type Shortcut keys Specifications Chiclet keyboard Some keys on your keyboard...
... shortcut keys by changing Function Key Behavior in System Setup. To type the alternate character, press Shift and the desired key. NOTE: You can be used to type alternate characters or to perform secondary functions. To perform secondary functions, press Fn and the desired key. Dimensions and Weight System Information Memory Ports and Connectors Communications Video Audio Storage Media-Card Reader Display Keyboard Camera Touchpad Battery Power Adapter Computer Environment Views Keyboard Type Shortcut keys Specifications Chiclet keyboard Some keys on your keyboard...

Service Manual
Page 4
Removing the Memory Module 19 Prerequisites...19 Procedure...20 Replacing the Memory Module 21 Procedure...22 Post-requisites 23 Removing the Hard Drive 24 Prerequisites...24 Procedure...24 Replacing the Hard Drive 27 Procedure...27 Post-requisites 27 Removing the Keyboard 28 Prerequisites...28 Procedure...28 Replacing the Keyboard 31 Procedure...31 Post-requisites 31 Removing the Wireless Card 32 Prerequisites...32 Procedure...32 Replacing the Wireless Card 34 Procedure...34 Post-requisites 34
Removing the Memory Module 19 Prerequisites...19 Procedure...20 Replacing the Memory Module 21 Procedure...22 Post-requisites 23 Removing the Hard Drive 24 Prerequisites...24 Procedure...24 Replacing the Hard Drive 27 Procedure...27 Post-requisites 27 Removing the Keyboard 28 Prerequisites...28 Procedure...28 Replacing the Keyboard 31 Procedure...31 Post-requisites 31 Removing the Wireless Card 32 Prerequisites...32 Procedure...32 Replacing the Wireless Card 34 Procedure...34 Post-requisites 34

Service Manual
Page 10
... the power source. When connecting cables, make sure that the ports and connectors are correctly oriented and aligned. CAUTION: To avoid damaging the computer, make sure that the work , periodically touch an unpainted metal surface to avoid bending any of the computer. WARNING: Disconnect all covers, panels, and screws before disconnecting the cable. CAUTION: To disconnect a network cable, first unplug the cable from the media-card reader...
... the power source. When connecting cables, make sure that the ports and connectors are correctly oriented and aligned. CAUTION: To avoid damaging the computer, make sure that the work , periodically touch an unpainted metal surface to avoid bending any of the computer. WARNING: Disconnect all covers, panels, and screws before disconnecting the cable. CAUTION: To disconnect a network cable, first unplug the cable from the media-card reader...

Service Manual
Page 44
... to step 3 in "Removing the Hard Drive". 5 Remove the keyboard. 6 Remove the wireless card. 7 Remove the palm rest. 8 Remove the light-extender tube. 44 NOTE: Before disconnecting the cables from step 1 to the BIOS using System Setup. You must enter the Service Tag in the System Setup after you replace the system board. NOTE: Your computer's Service Tag is stored in the system board. Prerequisites 1 Remove the battery. 2 Remove the base cover. 3 Remove the memory module. 4 Follow the procedure...
... to step 3 in "Removing the Hard Drive". 5 Remove the keyboard. 6 Remove the wireless card. 7 Remove the palm rest. 8 Remove the light-extender tube. 44 NOTE: Before disconnecting the cables from step 1 to the BIOS using System Setup. You must enter the Service Tag in the System Setup after you replace the system board. NOTE: Your computer's Service Tag is stored in the system board. Prerequisites 1 Remove the battery. 2 Remove the base cover. 3 Remove the memory module. 4 Follow the procedure...

Service Manual
Page 52
... step 3 in "Removing the Hard Drive". 4 Remove the keyboard. 5 Remove the wireless card. 6 Remove the palm rest. 7 Follow the procedure from step 1 to default. Procedure Using a plastic scribe, gently pry out the coin-cell battery out of the battery socket on the system board. 52 After working inside your computer and follow the instructions in After Working Inside Your Computer. CAUTION: Removing the coin-cell battery resets the BIOS settings to step...
... step 3 in "Removing the Hard Drive". 4 Remove the keyboard. 5 Remove the wireless card. 6 Remove the palm rest. 7 Follow the procedure from step 1 to default. Procedure Using a plastic scribe, gently pry out the coin-cell battery out of the battery socket on the system board. 52 After working inside your computer and follow the instructions in After Working Inside Your Computer. CAUTION: Removing the coin-cell battery resets the BIOS settings to step...

Me and My Dell
Page 6
... 53 Flick 53 Quick Launch 54 Using Your Touchscreen 54 Touchscreen Gestures 54 Zoom 55 Dwell 55 Flick 55 Rotate 56 Scroll 56 Using Bluetooth 57 Pairing a Bluetooth device with your Keyboard 44 Keyboard Shortcuts 44 Keyboard Shortcuts - Using Your Computer 44 Charging the Battery 44 Using your computer 57 Using the Webcam 58 Capturing a Still Image 58 Recording a Video 58 Selecting the Camera and Microphone 58 6 Contents...
... 53 Flick 53 Quick Launch 54 Using Your Touchscreen 54 Touchscreen Gestures 54 Zoom 55 Dwell 55 Flick 55 Rotate 56 Scroll 56 Using Bluetooth 57 Pairing a Bluetooth device with your Keyboard 44 Keyboard Shortcuts 44 Keyboard Shortcuts - Using Your Computer 44 Charging the Battery 44 Using your computer 57 Using the Webcam 58 Capturing a Still Image 58 Recording a Video 58 Selecting the Camera and Microphone 58 6 Contents...
Me and My Dell
Page 13
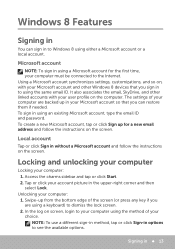
... ID and password. To sign in options to dismiss the lock screen. 2. Windows 8 Features Signing in You can restore them if needed. Access the charms sidebar and tap or click Start. 2. Swipe-up in your choice. Using a Microsoft account synchronizes settings, customizations, and so on the screen. The settings of your computer are using a keyboard) to see the available options. Unlocking your computer: 1. Locking and unlocking your computer Locking your...
... ID and password. To sign in options to dismiss the lock screen. 2. Windows 8 Features Signing in You can restore them if needed. Access the charms sidebar and tap or click Start. 2. Swipe-up in your choice. Using a Microsoft account synchronizes settings, customizations, and so on the screen. The settings of your computer are using a keyboard) to see the available options. Unlocking your computer: 1. Locking and unlocking your computer Locking your...

Me and My Dell
Page 14
... the most common charms are using a multi-touch touchpad, swipe-in the previous versions of the screen or point your computer 1. Toggles between the Start screen and last used app. Also allows to send video and audio to notifications, volume controls, brightness controls, and other computer, and so on your friends and social networks. Provides access to supported devices, such as search, share, settings, and so on with...
... the most common charms are using a multi-touch touchpad, swipe-in the previous versions of the screen or point your computer 1. Toggles between the Start screen and last used app. Also allows to send video and audio to notifications, volume controls, brightness controls, and other computer, and so on your friends and social networks. Provides access to supported devices, such as search, share, settings, and so on with...
Me and My Dell
Page 19
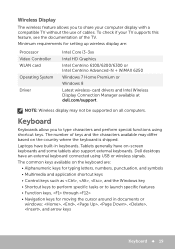
... or Windows 8 Latest wireless-card drivers and Intel Wireless Display Connection Manager available at dell.com/support. Minimum requirements for setting up wireless display are : • Alphanumeric keys for typing letters, numbers, punctuation, and symbols • Multimedia and application shortcut keys • Control keys such as , , , and the Windows key • Shortcut keys to perform specific tasks or to launch specific features • Function keys, through • Navigation keys for moving the cursor around in keyboards. NOTE: Wireless display may...
... or Windows 8 Latest wireless-card drivers and Intel Wireless Display Connection Manager available at dell.com/support. Minimum requirements for setting up wireless display are : • Alphanumeric keys for typing letters, numbers, punctuation, and symbols • Multimedia and application shortcut keys • Control keys such as , , , and the Windows key • Shortcut keys to perform specific tasks or to launch specific features • Function keys, through • Navigation keys for moving the cursor around in keyboards. NOTE: Wireless display may...

Me and My Dell
Page 35
... the internet. Network 35 Most wired home routers have integrated network adapters. NICs can be internal (integrated to the system board) or external (expansion cards). Network A network allows you to connect your computer using an Ethernet cable. Router A router is a device that allow your to connect your computer or router to and from a digital telephone line, like Digital Subscriber Line (DSL) or Integrated Services Digital Network...
... the internet. Network 35 Most wired home routers have integrated network adapters. NICs can be internal (integrated to the system board) or external (expansion cards). Network A network allows you to connect your computer using an Ethernet cable. Router A router is a device that allow your to connect your computer or router to and from a digital telephone line, like Digital Subscriber Line (DSL) or Integrated Services Digital Network...

Me and My Dell
Page 37
... Internet connection. Open your device. Enter the network key, if prompted. Check for activity lights on your computer, see the Quick Start Guide that shipped with your computer or tablet, see the Quick Start Guide that shipped with multiple devices. Connecting to . 5. Windows 8/Windows RT 1. Connect the Ethernet cable to the modem or router and to your computer or at dell.com/support. For details, contact the router manufacturer. 6. For more information on enabling wireless...
... Internet connection. Open your device. Enter the network key, if prompted. Check for activity lights on your computer, see the Quick Start Guide that shipped with your computer or tablet, see the Quick Start Guide that shipped with multiple devices. Connecting to . 5. Windows 8/Windows RT 1. Connect the Ethernet cable to the modem or router and to your computer or at dell.com/support. For details, contact the router manufacturer. 6. For more information on enabling wireless...
Me and My Dell
Page 38
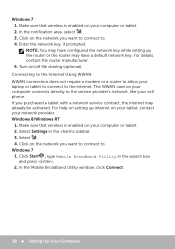
.... 2. Windows 7 1. Connecting to the Internet Using WWAN WWAN connection does not require a modem or a router to . 4. For help on setting up the router or the router may already be activated. Click on your tablet, contact your cell phone. Enter the network key, if prompted. Click Start , type Mobile Broadband Utility in the charms sidebar. 3. Make sure that wireless is enabled on the network you want to connect to...
.... 2. Windows 7 1. Connecting to the Internet Using WWAN WWAN connection does not require a modem or a router to . 4. For help on setting up the router or the router may already be activated. Click on your tablet, contact your cell phone. Enter the network key, if prompted. Click Start , type Mobile Broadband Utility in the charms sidebar. 3. Make sure that wireless is enabled on the network you want to connect to...
Me and My Dell
Page 42
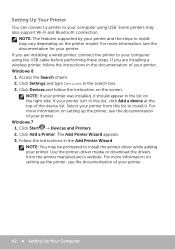
... the instructions in the documentation of your printer. Click Add a Printer. NOTE: You may be prompted to install may also support Wi-Fi and Bluetooth connection. Click Settings and type Devices in the list on setting up the printer, see the documentation of the device list. Select your printer from the printer manufacturer's website. Use the printer-driver media or download the drivers from this list, click Add a device...
... the instructions in the documentation of your printer. Click Add a Printer. NOTE: You may be prompted to install may also support Wi-Fi and Bluetooth connection. Click Settings and type Devices in the list on setting up the printer, see the documentation of the device list. Select your printer from the printer manufacturer's website. Use the printer-driver media or download the drivers from this list, click Add a device...

Me and My Dell
Page 72
... Installations and setup Troubleshooting and repair Offerings Extend warranty or service contact Dell Tech Concierge Computer setup Wireless‑network setup Software installation Windows operating‑system installation Internal‑hardware upgrades TV and home theater installation Antivirus installation Internet and email setup Computer‑accessories setup Internet parental control setup File transfer and data backup Speed up your Dell computer. It provides easy access to your computer Virus and spyware removal Data recovery Computer errors and troubleshooting Network errors...
... Installations and setup Troubleshooting and repair Offerings Extend warranty or service contact Dell Tech Concierge Computer setup Wireless‑network setup Software installation Windows operating‑system installation Internal‑hardware upgrades TV and home theater installation Antivirus installation Internet and email setup Computer‑accessories setup Internet parental control setup File transfer and data backup Speed up your Dell computer. It provides easy access to your computer Virus and spyware removal Data recovery Computer errors and troubleshooting Network errors...
Me and My Dell
Page 75
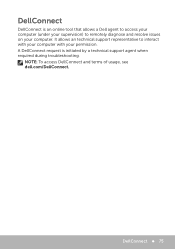
NOTE: To access DellConnect and terms of usage, see dell.com/DellConnect. DellConnect 75 It allows an technical support representative to remotely diagnose and resolve issues on your permission. A DellConnect request is an online tool that allows a Dell agent to access your computer (under your supervision) to interact with your computer with your computer. DellConnect DellConnect is initiated by a technical support agent when required during troubleshooting.
NOTE: To access DellConnect and terms of usage, see dell.com/DellConnect. DellConnect 75 It allows an technical support representative to remotely diagnose and resolve issues on your permission. A DellConnect request is an online tool that allows a Dell agent to access your computer (under your supervision) to interact with your computer with your computer. DellConnect DellConnect is initiated by a technical support agent when required during troubleshooting.

Me and My Dell
Page 88
.... • For internet connection issues, unplug your modem and router from the electrical outlet, wait for technical support. Invoking PSA 1. Press at the Dell logo to diagnose various hardware problems. The ePSA tests devices such as the system board, keyboard, display, memory, hard drive, and so on. These tools may not be supported on all the cables are firmly connected to the respective ports. • Make sure that...
.... • For internet connection issues, unplug your modem and router from the electrical outlet, wait for technical support. Invoking PSA 1. Press at the Dell logo to diagnose various hardware problems. The ePSA tests devices such as the system board, keyboard, display, memory, hard drive, and so on. These tools may not be supported on all the cables are firmly connected to the respective ports. • Make sure that...
Me and My Dell
Page 94
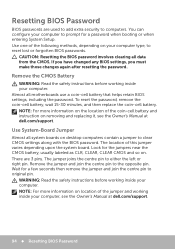
... the Owner's Manual at dell.com/support. 94 Resetting BIOS Password Remove the CMOS Battery WARNING: Read the safety instructions before working inside your computer. To reset the password, remove the coin‑cell battery, wait 15-30 minutes, and then replace the coin‑cell battery. Wait for a password when booting or when entering System Setup. NOTE: For more information on the location of this jumper varies depending upon the system board. Resetting BIOS Password BIOS passwords are...
... the Owner's Manual at dell.com/support. 94 Resetting BIOS Password Remove the CMOS Battery WARNING: Read the safety instructions before working inside your computer. To reset the password, remove the coin‑cell battery, wait 15-30 minutes, and then replace the coin‑cell battery. Wait for a password when booting or when entering System Setup. NOTE: For more information on the location of this jumper varies depending upon the system board. Resetting BIOS Password BIOS passwords are...
Me and My Dell
Page 101
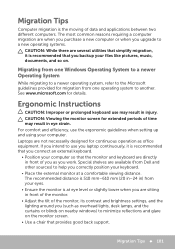
... that you connect an external keyboard. • Position your computer. CAUTION: Viewing the monitor screen for continuous operation as overhead lights, desk lamps, and the curtains or blinds on nearby windows) to use the ergonomic guidelines when setting up and using your computer so that the monitor and keyboard are sitting in front of the monitor, its contrast and brightness settings, and the lighting around you backup your...
... that you connect an external keyboard. • Position your computer. CAUTION: Viewing the monitor screen for continuous operation as overhead lights, desk lamps, and the curtains or blinds on nearby windows) to use the ergonomic guidelines when setting up and using your computer so that the monitor and keyboard are sitting in front of the monitor, its contrast and brightness settings, and the lighting around you backup your...


