Inspiron 14R N4110 Service Manual
Page 7
19 Coin-Cell Battery 87 Removing the Coin-Cell Battery 87 Replacing the Coin-Cell Battery 88 20 Thermal Cooling Assembly 89 Removing the Thermal Cooling Assembly 89 Replacing the Thermal Cooling Assembly 90 21 Processor Module 91 Removing the Processor Module 91 Replacing the Processor Module 92 22 Hard-Drive Assembly 95 Removing the Hard-Drive Assembly 95 Replacing the Hard-Drive Assembly 97 23 I/O Board 99 Removing the I/O Board 99 Replacing the I/O Board 100 24 AC-Adapter Connector 101 Removing the AC-Adapter Connector 101 Contents 7
19 Coin-Cell Battery 87 Removing the Coin-Cell Battery 87 Replacing the Coin-Cell Battery 88 20 Thermal Cooling Assembly 89 Removing the Thermal Cooling Assembly 89 Replacing the Thermal Cooling Assembly 90 21 Processor Module 91 Removing the Processor Module 91 Replacing the Processor Module 92 22 Hard-Drive Assembly 95 Removing the Hard-Drive Assembly 95 Replacing the Hard-Drive Assembly 97 23 I/O Board 99 Removing the I/O Board 99 Replacing the I/O Board 100 24 AC-Adapter Connector 101 Removing the AC-Adapter Connector 101 Contents 7
Inspiron 14R N4110 Service Manual
Page 80
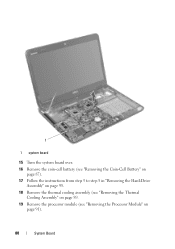
1 1 system board 15 Turn the system board over. 16 Remove the coin-cell battery (see "Removing the Coin-Cell Battery" on page 87). 17 Follow the instructions from step 3 to step 5 in "Removing the Hard-Drive Assembly" on page 95. 18 Remove the thermal cooling assembly (see "Removing the Thermal Cooling Assembly" on page 89. 19 Remove the processor module (see "Removing the Processor Module" on page 91). 80 System Board
1 1 system board 15 Turn the system board over. 16 Remove the coin-cell battery (see "Removing the Coin-Cell Battery" on page 87). 17 Follow the instructions from step 3 to step 5 in "Removing the Hard-Drive Assembly" on page 95. 18 Remove the thermal cooling assembly (see "Removing the Thermal Cooling Assembly" on page 89. 19 Remove the processor module (see "Removing the Processor Module" on page 91). 80 System Board
Inspiron 14R N4110 Service Manual
Page 95
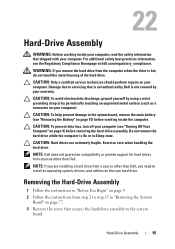
... the Regulatory Compliance Homepage at dell.com/regulatory_compliance. NOTE: Dell does not guarantee compatibility or provide support for hard drives from the computer when the drive is On or in "Removing the System Board" on page 9) before working inside the computer. Hard-Drive Assembly 95 Exercise care when handling the hard drive. Do not remove the hard drive while the computer is hot...
... the Regulatory Compliance Homepage at dell.com/regulatory_compliance. NOTE: Dell does not guarantee compatibility or provide support for hard drives from the computer when the drive is On or in "Removing the System Board" on page 9) before working inside the computer. Hard-Drive Assembly 95 Exercise care when handling the hard drive. Do not remove the hard drive while the computer is hot...
Inspiron 14R N4110 Service Manual
Page 96
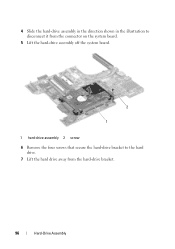
4 Slide the hard-drive assembly in the direction shown in the illustration to disconnect it from the connector on the system board. 5 Lift the hard-drive assembly off the system board. 2 1 1 hard-drive assembly 2 screw 6 Remove the four screws that secure the hard-drive bracket to the hard drive. 7 Lift the hard drive away from the hard-drive bracket. 96 Hard-Drive Assembly
4 Slide the hard-drive assembly in the direction shown in the illustration to disconnect it from the connector on the system board. 5 Lift the hard-drive assembly off the system board. 2 1 1 hard-drive assembly 2 screw 6 Remove the four screws that secure the hard-drive bracket to the hard drive. 7 Lift the hard drive away from the hard-drive bracket. 96 Hard-Drive Assembly
Inspiron 14R N4110 Service Manual
Page 97
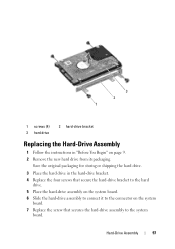
.... Hard-Drive Assembly 97 Save the original packaging for storing or shipping the hard drive. 3 Place the hard drive in "Before You Begin" on the system board. 7 Replace the screw that secure the hard-drive bracket to the hard drive. 5 Place the hard-drive assembly on the system board. 6 Slide the hard-drive assembly to connect it to the connector on page 9. 2 Remove the new hard drive...
.... Hard-Drive Assembly 97 Save the original packaging for storing or shipping the hard drive. 3 Place the hard drive in "Before You Begin" on the system board. 7 Replace the screw that secure the hard-drive bracket to the hard drive. 5 Place the hard-drive assembly on the system board. 6 Slide the hard-drive assembly to connect it to the connector on page 9. 2 Remove the new hard drive...
Inspiron 14R N4110 Setup Guide
Page 71
... times to the computer and remove any newly added internal hardware. then, shut down your computer. 2. Disconnect all regions. Turn off your computer and try again. 5. NOTE: If Dell DataSafe Local Backup is not available on your computer, use Dell DataSafe Local Backup to restore ...Your Computer. 69 Turn on page 72) to wait until you purchased your hard drive to an earlier operating state • Create system recovery media Dell DataSafe Local Backup Basic To restore the Dell factory-installed software while preserving the data files: 1. Restoring Your Operating System NOTE...
... times to the computer and remove any newly added internal hardware. then, shut down your computer. 2. Disconnect all regions. Turn off your computer and try again. 5. NOTE: If Dell DataSafe Local Backup is not available on your computer, use Dell DataSafe Local Backup to restore ...Your Computer. 69 Turn on page 72) to wait until you purchased your hard drive to an earlier operating state • Create system recovery media Dell DataSafe Local Backup Basic To restore the Dell factory-installed software while preserving the data files: 1. Restoring Your Operating System NOTE...
Inspiron 14R N4110 Setup Guide
Page 74
...hard drive and removes any programs or drivers installed after you see "Dell DataSafe Local Backup" on your computer, use Dell DataSafe Local Backup (see the Microsoft Windows desktop; NOTE: Dell Factory Image Restore may not be available in when you received your operating system problem. Use Dell.... 72 Restoring Your Operating System Dell Factory Image Restore CAUTION: Using Dell Factory Image Restore to restore your operating system permanently deletes all data before using Dell Factory Image Restore. This option restores your hard drive to wait until you received your...
...hard drive and removes any programs or drivers installed after you see "Dell DataSafe Local Backup" on your computer, use Dell DataSafe Local Backup (see the Microsoft Windows desktop; NOTE: Dell Factory Image Restore may not be available in when you received your operating system problem. Use Dell.... 72 Restoring Your Operating System Dell Factory Image Restore CAUTION: Using Dell Factory Image Restore to restore your operating system permanently deletes all data before using Dell Factory Image Restore. This option restores your hard drive to wait until you received your...
Inspiron 14R N4110 Setup Guide
Page 80
...cards. or damaged or lost or corrupted data; Include a copy of the Diagnostics Checklist (see "Contacting Dell" on the outside of your confidential, proprietary or personal information; Remove any and all items being returned (AC adapter cable, software, guides, and so on) if the return...Prepare all confidential, proprietary and personal information, as well as removable media, such as follows: NOTE: Before you back up any data on the hard drive(s) and on any other storage device in the product. Call Dell to Dell, ensure that belong with your return. 1. Include any ...
...cards. or damaged or lost or corrupted data; Include a copy of the Diagnostics Checklist (see "Contacting Dell" on the outside of your confidential, proprietary or personal information; Remove any and all items being returned (AC adapter cable, software, guides, and so on) if the return...Prepare all confidential, proprietary and personal information, as well as removable media, such as follows: NOTE: Before you back up any data on the hard drive(s) and on any other storage device in the product. Call Dell to Dell, ensure that belong with your return. 1. Include any ...


