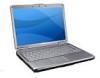

Owner's Manual
Page 5
5 Using a Battery 45 Battery Performance 45 Checking the Battery Charge 46 Dell QuickSet Battery Meter 46 Microsoft® Windows® Battery Meter 47 Charge Gauge 47 Low-Battery Warning 48 Conserving Battery Power 48 Configuring Power Management ... Power State 49 Charging the Battery 49 Replacing the Battery 50 Storing a Battery 50 6 Using the Optional Camera 51 Accessing the Camera's Help File 51 Manually Adjusting the Camera Settings 52 Creating a Picture or a Video 52 7 Using Multimedia 53 Playing Media 53 Playing Media Using...
5 Using a Battery 45 Battery Performance 45 Checking the Battery Charge 46 Dell QuickSet Battery Meter 46 Microsoft® Windows® Battery Meter 47 Charge Gauge 47 Low-Battery Warning 48 Conserving Battery Power 48 Configuring Power Management ... Power State 49 Charging the Battery 49 Replacing the Battery 50 Storing a Battery 50 6 Using the Optional Camera 51 Accessing the Camera's Help File 51 Manually Adjusting the Camera Settings 52 Creating a Picture or a Video 52 7 Using Multimedia 53 Playing Media 53 Playing Media Using...

Owner's Manual
Page 35
Setting Up a Printer NOTICE: Complete the operating system setup before you connect a printer to the printer owner's manual or contact the printer manufacturer. For technical assistance, refer to the computer. See the documentation that came with the printer for transferring data: • Windows ...
Setting Up a Printer NOTICE: Complete the operating system setup before you connect a printer to the printer owner's manual or contact the printer manufacturer. For technical assistance, refer to the computer. See the documentation that came with the printer for transferring data: • Windows ...

Owner's Manual
Page 52
... other camera-related topics, see the camera's Video Software Help file (see "Accessing the Camera's Help File" on page 51). You can manually adjust the camera settings. 1 Right-click the icon in the notification area and click QuickCapture. For more information about creating pictures or videos,...brightness. • Click the Effects tab to adjust audio settings, such as the volume level. To record a video, click Record a Video. Manually Adjusting the Camera Settings If you do not want to record. The QuickCapture window on the screen shows you want the camera to use automatic...
... other camera-related topics, see the camera's Video Software Help file (see "Accessing the Camera's Help File" on page 51). You can manually adjust the camera settings. 1 Right-click the icon in the notification area and click QuickCapture. For more information about creating pictures or videos,...brightness. • Click the Effects tab to adjust audio settings, such as the volume level. To record a video, click Record a Video. Manually Adjusting the Camera Settings If you do not want to record. The QuickCapture window on the screen shows you want the camera to use automatic...

Owner's Manual
Page 123
... listed, then that came with the driver installation (see the Windows desktop, reinsert the Drivers and Utilities disc. 5 At the Welcome Dell System Owner screen, click Next. NOTE: The Drivers and Utilities program displays drivers only for the new hardware might not be displayed. A ... IR port and you are not displayed, exit the Drivers and Utilities program. Troubleshooting 123 If you previously copied the driver files. Manually Reinstalling Drivers NOTE: If your operating system. 4 When you must first enable the Consumer IR port in the system setup program (see...
... listed, then that came with the driver installation (see the Windows desktop, reinsert the Drivers and Utilities disc. 5 At the Welcome Dell System Owner screen, click Next. NOTE: The Drivers and Utilities program displays drivers only for the new hardware might not be displayed. A ... IR port and you are not displayed, exit the Drivers and Utilities program. Troubleshooting 123 If you previously copied the driver files. Manually Reinstalling Drivers NOTE: If your operating system. 4 When you must first enable the Consumer IR port in the system setup program (see...

Owner's Manual
Page 183
...Office, Norton Antivirus, etc). In addition, any interference received, including interference that may cause interference with the manufacturer's instruction manual, may cause undesired operation. Operation is subject to operate this equipment does Appendix 183 Definition of "Third-Party" Software and... Peripherals Third-party software and peripherals include any internal expansion cards, or Dell-branded module bay or ExpressCard accessories. This device complies with the limits for a Class B digital device pursuant to ...
...Office, Norton Antivirus, etc). In addition, any interference received, including interference that may cause interference with the manufacturer's instruction manual, may cause undesired operation. Operation is subject to operate this equipment does Appendix 183 Definition of "Third-Party" Software and... Peripherals Third-party software and peripherals include any internal expansion cards, or Dell-branded module bay or ExpressCard accessories. This device complies with the limits for a Class B digital device pursuant to ...
Service Manual
Page 1
...Intel is subject to change without the written permission of Dell Inc.; Microsoft, Windows, and Windows Vista are trademarks of Dell Inc. Dell Inc. Trademarks used in this document. Dell™ Inspiron™ 1420/Dell Vostro™ 1400 Service Manual Before You Begin Internal Card With Bluetooth® Wireless ...what is used in trademarks and trade names other countries; NOTE: The appearance of Microsoft Corporation in this text: Dell, the DELL logo, Inspiron, and Vostro are either potential damage to hardware or loss of data and tells you make better use of Intel ...
...Intel is subject to change without the written permission of Dell Inc.; Microsoft, Windows, and Windows Vista are trademarks of Dell Inc. Dell Inc. Trademarks used in this document. Dell™ Inspiron™ 1420/Dell Vostro™ 1400 Service Manual Before You Begin Internal Card With Bluetooth® Wireless ...what is used in trademarks and trade names other countries; NOTE: The appearance of Microsoft Corporation in this text: Dell, the DELL logo, Inspiron, and Vostro are either potential damage to hardware or loss of data and tells you make better use of Intel ...

Service Manual
Page 2
...its edges, not by the online or telephone service and support team. Some cables have read the safety information in the Dell™ Product Information Guide. CAUTION: Before you are disconnecting this document may only be replaced or-if purchased separately-installed... your computer and attached devices did not automatically turn them evenly aligned to Contents Page Before You Begin Dell™ Inspiron™ 1420/Dell Vostro™ 1400 Service Manual Recommended Tools Turning Off Your Computer Before Working Inside Your Computer This section provides procedures for about 4 ...
...its edges, not by the online or telephone service and support team. Some cables have read the safety information in the Dell™ Product Information Guide. CAUTION: Before you are disconnecting this document may only be replaced or-if purchased separately-installed... your computer and attached devices did not automatically turn them evenly aligned to Contents Page Before You Begin Dell™ Inspiron™ 1420/Dell Vostro™ 1400 Service Manual Recommended Tools Turning Off Your Computer Before Working Inside Your Computer This section provides procedures for about 4 ...

Service Manual
Page 4
In the Dell BIOS Flash window, click Continue. 4. After the download completes, double-click the BIOS utility file. 3. Back to Contents Page Flashing the BIOS Dell™ Inspiron™ 1420/Dell Vostro™ 1400 Service Manual 1. Back to Contents Page When the reboot message appears, click OK and wait for the computer to your desktop. 2. Download the BIOS utility from the Dell Support website at support.dell.com and save it to restart.
In the Dell BIOS Flash window, click Continue. 4. After the download completes, double-click the BIOS utility file. 3. Back to Contents Page Flashing the BIOS Dell™ Inspiron™ 1420/Dell Vostro™ 1400 Service Manual 1. Back to Contents Page When the reboot message appears, click OK and wait for the computer to your desktop. 2. Download the BIOS utility from the Dell Support website at support.dell.com and save it to restart.

Service Manual
Page 5
... chassis. 4. Follow the procedures in your computer, it is already installed. 1. Back to Contents Page Internal Card With Bluetooth® Wireless Technology Dell™ Inspiron™ 1420/Dell Vostro™ 1400 Service Manual Removing and Replacing Internal Card With Bluetooth® Wireless Technology CAUTION: Before you begin working inside the computer. NOTICE: To help prevent...
... chassis. 4. Follow the procedures in your computer, it is already installed. 1. Back to Contents Page Internal Card With Bluetooth® Wireless Technology Dell™ Inspiron™ 1420/Dell Vostro™ 1400 Service Manual Removing and Replacing Internal Card With Bluetooth® Wireless Technology CAUTION: Before you begin working inside the computer. NOTICE: To help prevent...

Service Manual
Page 6
... camera module cable from the connector. 4. Insert the camera module cable in the Product Information Guide. Back to Contents Page Camera Module Dell™ Inspiron™ 1420/Dell Vostro™ 1400 Service Manual Removing and Replacing the Camera Module Removing and Replacing the Camera Module CAUTION: Before you perform any of the procedures in this...
... camera module cable from the connector. 4. Insert the camera module cable in the Product Information Guide. Back to Contents Page Camera Module Dell™ Inspiron™ 1420/Dell Vostro™ 1400 Service Manual Removing and Replacing the Camera Module Removing and Replacing the Camera Module CAUTION: Before you perform any of the procedures in this...
Service Manual
Page 7
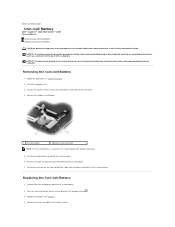
... you begin working inside the computer. Replacing the Coin-Cell Battery 1. Turn the computer over. 3. Back to Contents Page Coin-Cell Battery Dell™ Inspiron™ 1420/Dell Vostro™ 1400 Service Manual Removing the Coin-Cell Battery Replacing the Coin-Cell Battery CAUTION: Before you begin any of the computer). Connect the coin-cell...
... you begin working inside the computer. Replacing the Coin-Cell Battery 1. Turn the computer over. 3. Back to Contents Page Coin-Cell Battery Dell™ Inspiron™ 1420/Dell Vostro™ 1400 Service Manual Removing the Coin-Cell Battery Replacing the Coin-Cell Battery CAUTION: Before you begin any of the computer). Connect the coin-cell...
Service Manual
Page 9
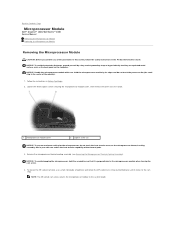
... three captive screws securing the microprocessor module cover, then remove the cover and set it is perpendicular to Contents Page Microprocessor Module Dell™ Inspiron™ 1420/Dell Vostro™ 1400 Service Manual Removing the Microprocessor Module Replacing the Microprocessor Module Removing the Microprocessor Module CAUTION: Before you perform any of the procedures in this...
... three captive screws securing the microprocessor module cover, then remove the cover and set it is perpendicular to Contents Page Microprocessor Module Dell™ Inspiron™ 1420/Dell Vostro™ 1400 Service Manual Removing the Microprocessor Module Replacing the Microprocessor Module Removing the Microprocessor Module CAUTION: Before you perform any of the procedures in this...

Service Manual
Page 12
Follow the instructions in Before You Begin. 2. cooling assembly to Contents Page Microprocessor Thermal-Cooling Assembly Dell™ Inspiron™ 1420/Dell Vostro™ 1400 Service Manual Removing the Microprocessor Thermal-Cooling Assembly Replacing the Microprocessor Thermal-Cooling Assembly Removing the Microprocessor Thermal-Cooling Assembly CAUTION: Before you perform any of the ...
Follow the instructions in Before You Begin. 2. cooling assembly to Contents Page Microprocessor Thermal-Cooling Assembly Dell™ Inspiron™ 1420/Dell Vostro™ 1400 Service Manual Removing the Microprocessor Thermal-Cooling Assembly Replacing the Microprocessor Thermal-Cooling Assembly Removing the Microprocessor Thermal-Cooling Assembly CAUTION: Before you perform any of the ...

Service Manual
Page 14
... hinge covers. 7. Ensure that connect the display assembly to disconnect the display cable from the system board. 9. Back to Contents Page Display Dell™ Inspiron™ 1420/Dell Vostro™ 1400 Service Manual Removing the Display Assembly Replacing the Display Assembly Removing the Display Bezel Replacing the Display Bezel Removing the Display Panel Replacing the...
... hinge covers. 7. Ensure that connect the display assembly to disconnect the display cable from the system board. 9. Back to Contents Page Display Dell™ Inspiron™ 1420/Dell Vostro™ 1400 Service Manual Removing the Display Assembly Replacing the Display Assembly Removing the Display Bezel Replacing the Display Bezel Removing the Display Panel Replacing the...

Service Manual
Page 20
... section, follow the safety instructions in the Product Information Guide. Follow the instructions in Before You Begin. 2. Back to Contents Page Fan Dell™ Inspiron™ 1420/Dell Vostro™ 1400 Service Manual Removing the Fan Replacing the Fan Removing the Fan CAUTION: Before you perform any of the procedures in this section, follow the...
... section, follow the safety instructions in the Product Information Guide. Follow the instructions in Before You Begin. 2. Back to Contents Page Fan Dell™ Inspiron™ 1420/Dell Vostro™ 1400 Service Manual Removing the Fan Replacing the Fan Removing the Fan CAUTION: Before you perform any of the procedures in this section, follow the...
Service Manual
Page 22
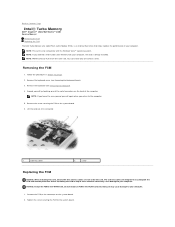
... to the system board. 6. Do not install an FCM in the WLAN card slot. Back to Contents Page Intel® Turbo Memory Dell™ Inspiron™ 1420/Dell Vostro™ 1400 Service Manual Removing the FCM Replacing the FCM The Intel Turbo Memory also called Flash Cache Module (FCM), is an internal flash drive that...
... to the system board. 6. Do not install an FCM in the WLAN card slot. Back to Contents Page Intel® Turbo Memory Dell™ Inspiron™ 1420/Dell Vostro™ 1400 Service Manual Removing the FCM Replacing the FCM The Intel Turbo Memory also called Flash Cache Module (FCM), is an internal flash drive that...

Service Manual
Page 24
Do not remove the hard drive while the computer is hot, do not touch the metal housing of the bay. 4. NOTE: Dell does not guarantee compatibility or provide support for hard drives from the computer when the drive is on, in standby mode, or in ... Product Information Guide. Turn the computer over. 3. Remove the system battery: a. Slide and click the battery release latches to Contents Page Hard Drive Dell™ Inspiron™ 1420/Dell Vostro™ 1400 Service Manual Removing the Hard Drive Replacing the Hard Drive CAUTION: If you remove the hard drive from sources other than...
Do not remove the hard drive while the computer is hot, do not touch the metal housing of the bay. 4. NOTE: Dell does not guarantee compatibility or provide support for hard drives from the computer when the drive is on, in standby mode, or in ... Product Information Guide. Turn the computer over. 3. Remove the system battery: a. Slide and click the battery release latches to Contents Page Hard Drive Dell™ Inspiron™ 1420/Dell Vostro™ 1400 Service Manual Removing the Hard Drive Replacing the Hard Drive CAUTION: If you remove the hard drive from sources other than...

Service Manual
Page 25
... the tabs on the hard drive assembly with the slots in the hard drive assembly. 3. Install the operating system for your Owner's Manual). 7. NOTICE: When the hard drive is not in the computer, store it in protective antistatic packaging (see "Restoring Your Operating System..." in your computer, as needed (see "Protecting Against Electrostatic Discharge" in your Owner's Manual). Back to the hard drive assembly. 4. Replacing the Hard Drive 1. Remove the two screws securing the hard drive to slide the drive ...
... the tabs on the hard drive assembly with the slots in the hard drive assembly. 3. Install the operating system for your Owner's Manual). 7. NOTICE: When the hard drive is not in the computer, store it in protective antistatic packaging (see "Restoring Your Operating System..." in your computer, as needed (see "Protecting Against Electrostatic Discharge" in your Owner's Manual). Back to the hard drive assembly. 4. Replacing the Hard Drive 1. Remove the two screws securing the hard drive to slide the drive ...

Service Manual
Page 26
.... NOTICE: To help prevent damage to left to right until the keyboard cover snaps into the indent to Contents Page Keyboard Cover Dell™ Inspiron™ 1420/Dell Vostro™ 1400 Service Manual Removing the Keyboard Cover Replacing the Keyboard Cover CAUTION: Before you begin any of the procedures in this section, follow the safety...
.... NOTICE: To help prevent damage to left to right until the keyboard cover snaps into the indent to Contents Page Keyboard Cover Dell™ Inspiron™ 1420/Dell Vostro™ 1400 Service Manual Removing the Keyboard Cover Replacing the Keyboard Cover CAUTION: Before you begin any of the procedures in this section, follow the safety...

Service Manual
Page 27
... strap or by periodically touching an unpainted metal surface (such as a connector on the back of the computer to Contents Page Keyboard Dell™ Inspiron™ 1420/Dell Vostro™ 1400 Service Manual Removing the Keyboard Replacing the Keyboard CAUTION: Before you begin working inside the computer. Back to disconnect the keyboard cable from the...
... strap or by periodically touching an unpainted metal surface (such as a connector on the back of the computer to Contents Page Keyboard Dell™ Inspiron™ 1420/Dell Vostro™ 1400 Service Manual Removing the Keyboard Replacing the Keyboard CAUTION: Before you begin working inside the computer. Back to disconnect the keyboard cable from the...


