
Service Manual
Page 1
...PP40S September 2008 Rev. Other trademarks and trade names may be used in trademarks and trade names other countries. Dell™ Inspiron™ 1210 Service Manual Before You Begin Replacing the Hinge Cover Replacing the Keyboard Replacing the Palm Rest Replacing the Display Replacing...Replacing the Power Cable Replacing the 2-in any proprietary interest in this document to refer to change without the written permission of your computer. Microsoft, Windows, Windows Vista, a n d Windows Vista start button are either potential damage to hardware or loss of Dell Inc.; ...
...PP40S September 2008 Rev. Other trademarks and trade names may be used in trademarks and trade names other countries. Dell™ Inspiron™ 1210 Service Manual Before You Begin Replacing the Hinge Cover Replacing the Keyboard Replacing the Palm Rest Replacing the Display Replacing...Replacing the Power Cable Replacing the 2-in any proprietary interest in this document to refer to change without the written permission of your computer. Microsoft, Windows, Windows Vista, a n d Windows Vista start button are either potential damage to hardware or loss of Dell Inc.; ...
Service Manual
Page 2
... computer and all open programs before you pull connectors apart, keep them evenly aligned to Contents Page Before You Begin Dell™ Inspiron™ 1210 Service Manual Recommended Tools Turning Off Your Computer Before Working Inside Your Computer This section provides procedures for removing and installing...all open files and exit all attached devices are correctly oriented and aligned. Shut down your operating system, press and hold the power button until the computer turns off your computer and attached devices did not automatically turn off . If your computer. 1. As ...
... computer and all open programs before you pull connectors apart, keep them evenly aligned to Contents Page Before You Begin Dell™ Inspiron™ 1210 Service Manual Recommended Tools Turning Off Your Computer Before Working Inside Your Computer This section provides procedures for removing and installing...all open files and exit all attached devices are correctly oriented and aligned. Shut down your operating system, press and hold the power button until the computer turns off your computer and attached devices did not automatically turn off . If your computer. 1. As ...
Service Manual
Page 3
...and turn the computer over on a flat work surface is flat and clean to the computer, use batteries designed for this particular Dell computer. NOTICE: To avoid damage to prevent the computer cover from their electrical outlets. 6. Do not use only the battery designed for other... Dell computers. 7. Remove the main battery: a. c. Turn the computer top-side up, open the display, and press the power button to Contents Page NOTICE: To disconnect a network cable, first unplug the cable from ...
...and turn the computer over on a flat work surface is flat and clean to the computer, use batteries designed for this particular Dell computer. NOTICE: To avoid damage to prevent the computer cover from their electrical outlets. 6. Do not use only the battery designed for other... Dell computers. 7. Remove the main battery: a. c. Turn the computer top-side up, open the display, and press the power button to Contents Page NOTICE: To disconnect a network cable, first unplug the cable from ...

Service Manual
Page 8
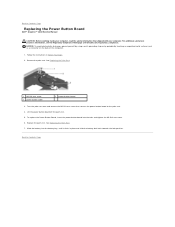
... touching a connector on the system board. 1 AC adapter port 3 power cable connector 2 power cable 4. Back to Contents Page Replacing the Power Cable Dell™ Inspiron™ 1210 Service Manual CAUTION: Before working inside your computer. Lift the power unit up and out of the securing tabs away from the... power cable connector on the back panel of the computer so that ...
... touching a connector on the system board. 1 AC adapter port 3 power cable connector 2 power cable 4. Back to Contents Page Replacing the Power Cable Dell™ Inspiron™ 1210 Service Manual CAUTION: Before working inside your computer. Lift the power unit up and out of the securing tabs away from the... power cable connector on the back panel of the computer so that ...
Service Manual
Page 32
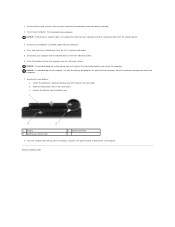
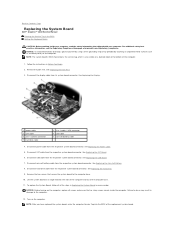
...Mini-Card. 11. Connect the antenna cables to Contents Page Replace the keyboard. Disconnect the Bluetooth card cable, touch pad cable, the power button board cable, and speaker cable from the computer base by lifting the inside of the palm rest, use your fingers to separate ... it clicks in place and slide the battery-lock latch towards the lock position. 1 speaker cable 3 antenna cables (2) 5 touch pad cable 2 power button board cable 4 palm rest 6 bluetooth card cable 7. NOTICE: Carefully separate the palm rest from the computer base to avoid damage to the respective...
...Mini-Card. 11. Connect the antenna cables to Contents Page Replace the keyboard. Disconnect the Bluetooth card cable, touch pad cable, the power button board cable, and speaker cable from the computer base by lifting the inside of the palm rest, use your fingers to separate ... it clicks in place and slide the battery-lock latch towards the lock position. 1 speaker cable 3 antenna cables (2) 5 touch pad cable 2 power button board cable 4 palm rest 6 bluetooth card cable 7. NOTICE: Carefully separate the palm rest from the computer base to avoid damage to the respective...
Service Manual
Page 33
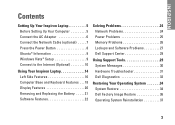
...and remove the M2.5x3-mm screw that shipped with your computer. See Replacing the Palm Rest. 7. To replace the Power Button Board, insert the power button board into the battery bay, until it clicks in Before You Begin. 2. Slide the battery into the tabs and...battery-lock latch towards the lock position. Back to Contents Page Replacing the Power Button Board Dell™ Inspiron™ 1210 Service Manual CAUTION: Before working inside your computer, read the safety information that secures the power button board to Contents Page For additional safety best practices information, see ...
...and remove the M2.5x3-mm screw that shipped with your computer. See Replacing the Palm Rest. 7. To replace the Power Button Board, insert the power button board into the battery bay, until it clicks in Before You Begin. 2. Slide the battery into the tabs and...battery-lock latch towards the lock position. Back to Contents Page Replacing the Power Button Board Dell™ Inspiron™ 1210 Service Manual CAUTION: Before working inside your computer, read the safety information that secures the power button board to Contents Page For additional safety best practices information, see ...
Service Manual
Page 35
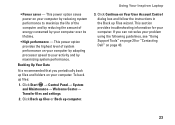
... an angle towards the side of the computer and out of the replacement system board. Remove the palm rest. See Replacing the Power Cable. 5. See Replacing the USB Board. 7. See Replacing the Coin-Cell Battery. 8. Disconnect hard drive cable from the respective.... Disconnect power cable from the respective system board connector. Turn on the computer. For additional safety best practices information, see the Regulatory Compliance Homepage at www.dell.com/regulatory_compliance. Back to Contents Page Replacing the System Board Dell™ Inspiron™ 1210 Service Manual...
... an angle towards the side of the computer and out of the replacement system board. Remove the palm rest. See Replacing the Power Cable. 5. See Replacing the USB Board. 7. See Replacing the Coin-Cell Battery. 8. Disconnect hard drive cable from the respective.... Disconnect power cable from the respective system board connector. Turn on the computer. For additional safety best practices information, see the Regulatory Compliance Homepage at www.dell.com/regulatory_compliance. Back to Contents Page Replacing the System Board Dell™ Inspiron™ 1210 Service Manual...
Setup Guide
Page 5
...5 Connect the AC Adapter 6 Connect the Network Cable (optional 7 Press the Power Button 8 Ubuntu® Information 9 Windows Vista® Setup 9 Connect to the Internet (Optional 10 Using Your Inspiron Laptop 14 Left Side Features 16 Computer Base and Keyboard Features 18 Display Features 20... Removing and Replacing the Battery 21 Software Features 22 Solving Problems 24 Network Problems 24 Power Problems 25 Memory Problems 26 Lockups and Software Problems 27 Dell Support...
...5 Connect the AC Adapter 6 Connect the Network Cable (optional 7 Press the Power Button 8 Ubuntu® Information 9 Windows Vista® Setup 9 Connect to the Internet (Optional 10 Using Your Inspiron Laptop 14 Left Side Features 16 Computer Base and Keyboard Features 18 Display Features 20... Removing and Replacing the Battery 21 Software Features 22 Solving Problems 24 Network Problems 24 Power Problems 25 Memory Problems 26 Lockups and Software Problems 27 Dell Support...

Setup Guide
Page 7
.... Before Setting Up Your Computer When positioning your computer. Restricting airflow around your Inspiron 1210 laptop and connecting peripherals. CAUTION: Do not block, push objects into, or allow easy access to a power source, adequate ventilation, and a level surface to place your computer, ensure that... You should never put your Dell™ computer in a low-airflow environment, such as a cabinet or drawer when it is running. NOTICE: Placing or stacking heavy or sharp objects on all other sides. INSPIRON Setting Up Your Inspiron Laptop This section provides information ...
.... Before Setting Up Your Computer When positioning your computer. Restricting airflow around your Inspiron 1210 laptop and connecting peripherals. CAUTION: Do not block, push objects into, or allow easy access to a power source, adequate ventilation, and a level surface to place your computer, ensure that... You should never put your Dell™ computer in a low-airflow environment, such as a cabinet or drawer when it is running. NOTICE: Placing or stacking heavy or sharp objects on all other sides. INSPIRON Setting Up Your Inspiron Laptop This section provides information ...

Setup Guide
Page 8
However, power connectors and power strips vary among countries. Using an incompatible cable or improperly connecting the cable to the computer and then plug it into a wall outlet or surge protector. CAUTION: The AC adapter works with electrical outlets worldwide. Setting Up Your Inspiron Laptop Connect the AC Adapter Connect the AC adapter to a power strip or electrical outlet may cause fire or equipment damage. 6
However, power connectors and power strips vary among countries. Using an incompatible cable or improperly connecting the cable to the computer and then plug it into a wall outlet or surge protector. CAUTION: The AC adapter works with electrical outlets worldwide. Setting Up Your Inspiron Laptop Connect the AC Adapter Connect the AC adapter to a power strip or electrical outlet may cause fire or equipment damage. 6

Setup Guide
Page 10
Setting Up Your Inspiron Laptop Press the Power Button 8
Setting Up Your Inspiron Laptop Press the Power Button 8

Setup Guide
Page 17
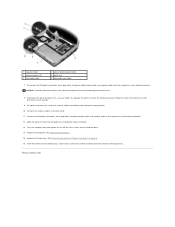
Connects to a powered speaker or sound system. 3 Audio In/ Microphone connector - Connects to a pair of headphones, or sends audio to USB devices, such as a mouse, keyboard, printer, external ... 2 Audio Out/ Headphone connector - 1 - 3-in-1 Media card reader - Provides a fast and convenient way to a microphone or input signal for use with audio programs. Using Your Inspiron Laptop 4 USB 2.0 connector - If you are using a cabled network signal, this connects your computer to a network or broadband device. 15
Connects to a powered speaker or sound system. 3 Audio In/ Microphone connector - Connects to a pair of headphones, or sends audio to USB devices, such as a mouse, keyboard, printer, external ... 2 Audio Out/ Headphone connector - 1 - 3-in-1 Media card reader - Provides a fast and convenient way to a microphone or input signal for use with audio programs. Using Your Inspiron Laptop 4 USB 2.0 connector - If you are using a cabled network signal, this connects your computer to a network or broadband device. 15

Setup Guide
Page 19
Connect to the computer. 1 USB 2.0 connectors (2) - Attaches a commercially available antitheft device to USB devices, such as a mouse, keyboard, printer, external drive, or MP3 player. 2 VGA connector - Connects to power on your computer. Using Your Inspiron Laptop 17 NOTE: Before you buy an antitheft device, ensure that it works with the security cable slot on the computer and charge the battery when the computer is not in use. 4 Security cable slot - Connects to the AC adapter to a monitor or projector. 3 AC adapter connector -
Connect to the computer. 1 USB 2.0 connectors (2) - Attaches a commercially available antitheft device to USB devices, such as a mouse, keyboard, printer, external drive, or MP3 player. 2 VGA connector - Connects to power on your computer. Using Your Inspiron Laptop 17 NOTE: Before you buy an antitheft device, ensure that it works with the security cable slot on the computer and charge the battery when the computer is not in use. 4 Security cable slot - Connects to the AC adapter to a monitor or projector. 3 AC adapter connector -

Setup Guide
Page 21
... settings for video chatting and voice recording. 4 Keyboard - On Battery • Solid white: The system is on a mouse. 3 Integrated single analog microphone - Using Your Inspiron Laptop 5 Power indicator light - Turns on and the battery is charging. • Flashing white: The system is in standby mode. • Flashing amber: The battery charge is...
... settings for video chatting and voice recording. 4 Keyboard - On Battery • Solid white: The system is on a mouse. 3 Integrated single analog microphone - Using Your Inspiron Laptop 5 Power indicator light - Turns on and the battery is charging. • Flashing white: The system is in standby mode. • Flashing amber: The battery charge is...

Setup Guide
Page 24
...Your Energy Settings You can use the power options in your computer to create presentations, brochures, greeting cards, fliers, and spreadsheets depending on . Microsoft® Windows Vista® provides three default options: • Balanced - Using Your Inspiron Laptop Software Features NOTE: For more ..., upload and download files, and so on the applications installed in your operating system to configure the power settings on the Dell Support website at support.dell.com. After connecting to music and internet radio stations. Right-click an open the Personalize appearance and ...
...Your Energy Settings You can use the power options in your computer to create presentations, brochures, greeting cards, fliers, and spreadsheets depending on . Microsoft® Windows Vista® provides three default options: • Balanced - Using Your Inspiron Laptop Software Features NOTE: For more ..., upload and download files, and so on the applications installed in your operating system to configure the power settings on the Dell Support website at support.dell.com. After connecting to music and internet radio stations. Right-click an open the Personalize appearance and ...
Setup Guide
Page 25
...over its lifetime. • High performance - This power option provides the highest level of system performance on your... Control Panel→ System and Maintenance→ Welcome Center→ Transfer files and settings. 2. Using Your Inspiron Laptop 3. This section provides troubleshooting information for your computer. Click Continue on Your User Account Control dialog box... and follow the instructions in the Back up files and folders on page 43. 23 • Power saver - Backing Up Your Data It is recommended that you can not solve your problem using the following...
...over its lifetime. • High performance - This power option provides the highest level of system performance on your... Control Panel→ System and Maintenance→ Welcome Center→ Transfer files and settings. 2. Using Your Inspiron Laptop 3. This section provides troubleshooting information for your computer. Click Continue on Your User Account Control dialog box... and follow the instructions in the Back up files and folders on page 43. 23 • Power saver - Backing Up Your Data It is recommended that you can not solve your problem using the following...

Setup Guide
Page 26
...dell.com for advanced service and troubleshooting instructions. Follow the instructions on and connected to complete the setup. A good connection exists between a 10-Mbps network and the computer. 24 Try moving the computer closer to your wireless router. • Re-establish your connection to ensure it is powered...on the integrated network connector lets you verify that your wireless connection. The cable is plugged in and not damaged. INSPIRON Solving Problems CAUTION: Only trained service personnel should remove the computer cover. See the Service Manual on the status: ...
...dell.com for advanced service and troubleshooting instructions. Follow the instructions on and connected to complete the setup. A good connection exists between a 10-Mbps network and the computer. 24 Try moving the computer closer to your wireless router. • Re-establish your connection to ensure it is powered...on the integrated network connector lets you verify that your wireless connection. The cable is plugged in and not damaged. INSPIRON Solving Problems CAUTION: Only trained service personnel should remove the computer cover. See the Service Manual on the status: ...

Setup Guide
Page 27
... The display may not be responding. The computer is not responding - For assistance contact Dell, see "Contacting Dell" on the network connector is on . The link integrity light does not provide status for the wired cable connection. If the power light is solid white and the computer is in standby mode. Press a key...
... The display may not be responding. The computer is not responding - For assistance contact Dell, see "Contacting Dell" on the network connector is on . The link integrity light does not provide status for the wired cable connection. If the power light is solid white and the computer is in standby mode. Press a key...
Setup Guide
Page 28
... Service Manual on page 31). 26 If you are : • Power, keyboard, and mouse extension cables. • Too many devices connected to a power strip. • Multiple power strips connected to see "Dell Diagnostics" on the Dell Support website at support.dell.com). Solving Problems If the power light is creating interference by interrupting or blocking other memory...
... Service Manual on page 31). 26 If you are : • Power, keyboard, and mouse extension cables. • Too many devices connected to a power strip. • Multiple power strips connected to see "Dell Diagnostics" on the Dell Support website at support.dell.com). Solving Problems If the power light is creating interference by interrupting or blocking other memory...

Setup Guide
Page 29
... 2. Solving Problems Lockups and Software Problems If the computer does not start up - The Program Compatibility Wizard configures a program so that the power cable is designed for at least 8 to the electrical outlet. Ensure that it runs in its documentation or on the media (CD or... DVD). Turn the computer off and then restart your mouse, press the power button for an earlier Microsoft® Windows® operating system - Press simultaneously. 2. If you are unable to non-Windows Vista operating system ...
... 2. Solving Problems Lockups and Software Problems If the computer does not start up - The Program Compatibility Wizard configures a program so that the power cable is designed for at least 8 to the electrical outlet. Ensure that it runs in its documentation or on the media (CD or... DVD). Turn the computer off and then restart your mouse, press the power button for an earlier Microsoft® Windows® operating system - Press simultaneously. 2. If you are unable to non-Windows Vista operating system ...


