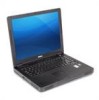
Owner's Manual
Page 36
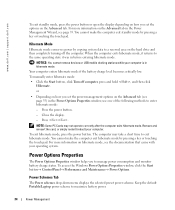
...or touching the touch pad. Keep the default Portable/Laptop power scheme to a reserved area on the hard drive and then completely turning off computer, press and hold , and then click Hibernate. Remove and reinsert the card, or simply restart (reboot) your operating system. When the computer exits hibernate...the options on the Advanced tab. Power Options Properties The Power Options Properties window helps you to exit hibernate mode. www.dell.com | support.dell.com To exit standby mode, press the power button or open the display depending on how you set the power management...
...or touching the touch pad. Keep the default Portable/Laptop power scheme to a reserved area on the hard drive and then completely turning off computer, press and hold , and then click Hibernate. Remove and reinsert the card, or simply restart (reboot) your operating system. When the computer exits hibernate...the options on the Advanced tab. Power Options Properties The Power Options Properties window helps you to exit hibernate mode. www.dell.com | support.dell.com To exit standby mode, press the power button or open the display depending on how you set the power management...
Owner's Manual
Page 58
... system or the program that includes anti-spyware protection (your program may require an upgrade) to scan the computer and remove spyware. The hard drive cannot read the data. If you are experiencing slow computer performance, you frequently receive pop-up advertisements, or you begin... For help, contact your computer might be infected with Windows. Use an antivirus program that was running when the message appeared. www.dell.com | support.dell.com VERIFY THAT THE MODEM IS COMMUNICATING WITH WINDOWS - 1 Click the Start button and click Control Panel. 2 Click Printers and...
... system or the program that includes anti-spyware protection (your program may require an upgrade) to scan the computer and remove spyware. The hard drive cannot read the data. If you are experiencing slow computer performance, you frequently receive pop-up advertisements, or you begin... For help, contact your computer might be infected with Windows. Use an antivirus program that was running when the message appeared. www.dell.com | support.dell.com VERIFY THAT THE MODEM IS COMMUNICATING WITH WINDOWS - 1 Click the Start button and click Control Panel. 2 Click Printers and...

Owner's Manual
Page 59
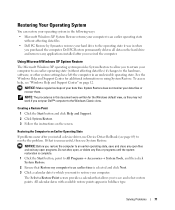
... Guide. Solving Problems 57 T H E D E V I C E I N G S YS T E M N O T F O U N D - Keyboard Problems CAUTION: Before you want to remove. 4 Click Remove or Change/Remove and follow the safety instructions in this section, follow the prompts on the disk, or the disk is too large to a nonbootable CD. Insert...or when running the Dell Diagnostics or the system setup program. NOTE: Use the integrated keyboard when working in filenames. If the problem persists, contact Dell (see page 79. The file that you are trying to use. Reinstall the hard drive, see page 91). ...
... Guide. Solving Problems 57 T H E D E V I C E I N G S YS T E M N O T F O U N D - Keyboard Problems CAUTION: Before you want to remove. 4 Click Remove or Change/Remove and follow the safety instructions in this section, follow the prompts on the disk, or the disk is too large to a nonbootable CD. Insert...or when running the Dell Diagnostics or the system setup program. NOTE: Use the integrated keyboard when working in filenames. If the problem persists, contact Dell (see page 79. The file that you are trying to use. Reinstall the hard drive, see page 91). ...
Owner's Manual
Page 73
... data files) if changes to the hardware, software, or other system settings have left the computer in an undesirable operating state. Dell PC Restore permanently deletes all data on the hard drive and removes any files or programs until the system restoration is complete. 1 Click the Start button, point to All Programs→ Accessories...
... data files) if changes to the hardware, software, or other system settings have left the computer in an undesirable operating state. Dell PC Restore permanently deletes all data on the hard drive and removes any files or programs until the system restoration is complete. 1 Click the Start button, point to All Programs→ Accessories...
Owner's Manual
Page 74
...computer restarts, click OK. Data files include documents, spreadsheets, e-mail messages, digital photos, music files, and so on the hard drive and removes any files or programs until the system restoration is automatically selected. NOTICE: Using PC Restore permanently deletes all data on . Undoing...programs or files added since you prefer. 5 Click Next. www.dell.com | support.dell.com 4 Select a restore point and click Next. The Restoration Complete screen appears after you received your hard drive to restore your computer-including data files-are available, click the restore...
...computer restarts, click OK. Data files include documents, spreadsheets, e-mail messages, digital photos, music files, and so on the hard drive and removes any files or programs until the system restoration is automatically selected. NOTICE: Using PC Restore permanently deletes all data on . Undoing...programs or files added since you prefer. 5 Click Next. www.dell.com | support.dell.com 4 Select a restore point and click Next. The Restoration Complete screen appears after you received your hard drive to restore your computer-including data files-are available, click the restore...
Owner's Manual
Page 75
... takes approximately 6-10 minutes to complete. 5 When prompted, click Finish to remove the partition. NOTICE: If you do not remove PC Restore from the hard drive, you must do not log on as a local administrator. 2 In Windows Explorer, go to proceed with www.dell.com appears at the top of the screen. 2 Immediately upon seeing...
... takes approximately 6-10 minutes to complete. 5 When prompted, click Finish to remove the partition. NOTICE: If you do not remove PC Restore from the hard drive, you must do not log on as a local administrator. 2 In Windows Explorer, go to proceed with www.dell.com appears at the top of the screen. 2 Immediately upon seeing...
Owner's Manual
Page 79
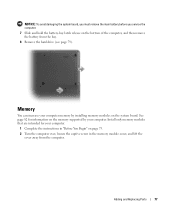
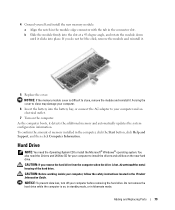
... over, loosen the captive screw in the memory module cover, and lift the cover away from the bay. 8 Remove the hard drive (see page 79). NOTICE: To avoid damaging the system board, you must remove the main battery before you service the computer. 7 Slide and hold the battery-bay latch release on the bottom...
... over, loosen the captive screw in the memory module cover, and lift the cover away from the bay. 8 Remove the hard drive (see page 79). NOTICE: To avoid damaging the system board, you must remove the main battery before you service the computer. 7 Slide and hold the battery-bay latch release on the bottom...
Owner's Manual
Page 81
...loss, turn off your computer and an electrical outlet. 7 Turn on , in standby mode, or in the Product Information Guide. Do not remove the hard drive while the computer is on the computer. Forcing the cover to close may damage your computer to install the Microsoft® Windows® operating ...system. NOTICE: If the memory module cover is hot, do not feel the click, remove the module and reinstall it . To confirm the amount of the hard drive. 4 Ground yourself and install the new memory module: a Align the notch in the module edge connector with the...
...loss, turn off your computer and an electrical outlet. 7 Turn on , in standby mode, or in the Product Information Guide. Do not remove the hard drive while the computer is on the computer. Forcing the cover to close may damage your computer to install the Microsoft® Windows® operating ...system. NOTICE: If the memory module cover is hot, do not feel the click, remove the module and reinstall it . To confirm the amount of the hard drive. 4 Ground yourself and install the new memory module: a Align the notch in the module edge connector with the...

Owner's Manual
Page 82
... it in the Product Information Guide. 4 Slide the hard drive out of the computer. 5 Remove the new drive from sources other than Dell. NOTE: Dell does not guarantee compatibility or provide support for storing or shipping the hard drive. even a slight bump can damage the drive. Save the original packaging for hard drives from its packaging. If you use excessive force...
... it in the Product Information Guide. 4 Slide the hard drive out of the computer. 5 Remove the new drive from sources other than Dell. NOTE: Dell does not guarantee compatibility or provide support for storing or shipping the hard drive. even a slight bump can damage the drive. Save the original packaging for hard drives from its packaging. If you use excessive force...
Owner's Manual
Page 111
... expectancy, 31 low-charge warning, 35 performance, 27 power conservation, 31 removing, 29 storing, 30 system view, 17, 20 blanks removing, 46 boot sequence, 88 C CardBus technology PC Cards, 45 CD drive problems, 54 CDs playing, 37 using, 37 Check Disk, 54 computer crashes..., 14 diagnostics Dell, 51 display description, 13 problems, 67 system view, 13 display latch button description, 13 system view, 13 documentation online, 11 Product Information Guide, 9 Setup Diagram, 9 drivers about, 68 identifying, 69 reinstalling, 69 drives problems, 53 See hard drive DVD drive problems, 54 DVDs...
... expectancy, 31 low-charge warning, 35 performance, 27 power conservation, 31 removing, 29 storing, 30 system view, 17, 20 blanks removing, 46 boot sequence, 88 C CardBus technology PC Cards, 45 CD drive problems, 54 CDs playing, 37 using, 37 Check Disk, 54 computer crashes..., 14 diagnostics Dell, 51 display description, 13 problems, 67 system view, 13 display latch button description, 13 system view, 13 documentation online, 11 Product Information Guide, 9 Setup Diagram, 9 drivers about, 68 identifying, 69 reinstalling, 69 drives problems, 53 See hard drive DVD drive problems, 54 DVDs...
Owner's Manual
Page 112
... description, 20 system view, 20 Files and Settings Transfer Wizard, 22 fixed optical drive description, 17 system view, 17 H hard drive description, 20 problems, 54 replacing, 79 system view, 20 hardware conflicts, 70 Dell Diagnostics, 51 Hardware Troubleshooter, 70 Help and Support Center, 12 hibernate mode, 34... 14 keyboard status lights description, 15 system view, 15 keypad numeric, 41 L labels Microsoft Windows, 10 Service Tag, 10 M memory removing, 78 memory module cover description, 20 system view, 20 messages error, 56 microphone description, 16-17 system view, 16-17 Microsoft Windows...
... description, 20 system view, 20 Files and Settings Transfer Wizard, 22 fixed optical drive description, 17 system view, 17 H hard drive description, 20 problems, 54 replacing, 79 system view, 20 hardware conflicts, 70 Dell Diagnostics, 51 Hardware Troubleshooter, 70 Help and Support Center, 12 hibernate mode, 34... 14 keyboard status lights description, 15 system view, 15 keypad numeric, 41 L labels Microsoft Windows, 10 Service Tag, 10 M memory removing, 78 memory module cover description, 20 system view, 20 messages error, 56 microphone description, 16-17 system view, 16-17 Microsoft Windows...


