Dell™ Technology Guide
Page 11
11 Power (Power Settings, Power Protection Devices, and Batteries) . . . 135 Setting Power Options 135 Windows Vista 135 Windows® XP 137 Power Protection Devices 140 Surge ... Checking the Battery Charge 143 Conserving Battery Power 145 Charging the Battery 145 Storing a Battery 146 US Department of Transportation (DOT) Notebook Battery Restrictions 146 Dell™ ControlPoint Power Manager 146 12 Networks (LAN, Wireless, Mobile Broadband 149 Overview 149 Local Area Networks (LAN 150 What You Need to Set up...
11 Power (Power Settings, Power Protection Devices, and Batteries) . . . 135 Setting Power Options 135 Windows Vista 135 Windows® XP 137 Power Protection Devices 140 Surge ... Checking the Battery Charge 143 Conserving Battery Power 145 Charging the Battery 145 Storing a Battery 146 US Department of Transportation (DOT) Notebook Battery Restrictions 146 Dell™ ControlPoint Power Manager 146 12 Networks (LAN, Wireless, Mobile Broadband 149 Overview 149 Local Area Networks (LAN 150 What You Need to Set up...
Dell™ Technology Guide
Page 89
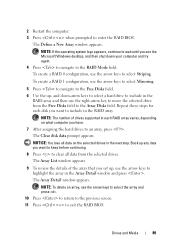
... window appears. NOTE: To delete an array, use the arrow keys to select the array and press . 10 Press to return to the previous screen. 11 Press to select Striping. and down your computer and try again. 4 Press to navigate to enter the RAID BIOS. NOTE: The number of the array...
... window appears. NOTE: To delete an array, use the arrow keys to select the array and press . 10 Press to return to the previous screen. 11 Press to select Striping. and down your computer and try again. 4 Press to navigate to enter the RAID BIOS. NOTE: The number of the array...
Dell™ Technology Guide
Page 97
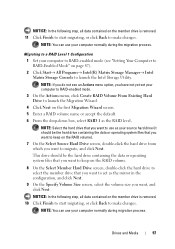
... Manager→ Intel Matrix Storage Console to migrate, and click Next. NOTICE: In the following step, all data contained on the member drive is removed. 11 Click Finish to start migrating, or click Back to make changes. NOTE: If you have not yet set your computer to RAID-enabled mode (see...
... Manager→ Intel Matrix Storage Console to migrate, and click Next. NOTICE: In the following step, all data contained on the member drive is removed. 11 Click Finish to start migrating, or click Back to make changes. NOTE: If you have not yet set your computer to RAID-enabled mode (see...
Dell™ Technology Guide
Page 225
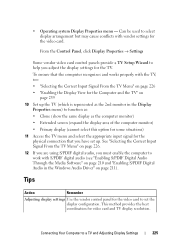
... as the computer monitor) • Extended screen (expand the display area of the computer monitor) • Primary display (cannot select this option for some situations) 11 Access the TV menu and select the appropriate input signal for the video card. This method provides the best coordination for the Computer and the...
... as the computer monitor) • Extended screen (expand the display area of the computer monitor) • Primary display (cannot select this option for some situations) 11 Access the TV menu and select the appropriate input signal for the video card. This method provides the best coordination for the Computer and the...
Dell™ Technology Guide
Page 227
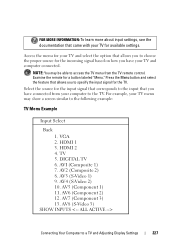
... to choose the proper source for the incoming signal based on how you have connected from the TV remote control. VGA 2. AV2 (Composite 2) 8. AV5 (Component 1) 11. AV3 (S-Video 1) 9. HDMI 2 4. AV4 (S-Video 2) 10. AVI (Composite 1) 7. AV8 (S-Video 3) SHOW INPUTS Connecting Your Computer to the following example: TV Menu Example Input Select Back...
... to choose the proper source for the incoming signal based on how you have connected from the TV remote control. VGA 2. AV2 (Composite 2) 8. AV5 (Component 1) 11. AV3 (S-Video 1) 9. HDMI 2 4. AV4 (S-Video 2) 10. AVI (Composite 1) 7. AV8 (S-Video 3) SHOW INPUTS Connecting Your Computer to the following example: TV Menu Example Input Select Back...

Dell™ Technology Guide
Page 316
... physical interface through which information transfers in a single row) through a serial port. Pin Signal 1 /STROBE 2 D0 3 D1 4 D2 5 D3 6 D4 7 D5 8 D6 9 D7 10 /ACK 11 BUSY 12 PE 13 SEL Pin Signal 14 /AUTOFD 15 /ERROR 16 /INIT 17 /SELIN 18 GND 19 GND 20 GND 21 GND 22 GND...
... physical interface through which information transfers in a single row) through a serial port. Pin Signal 1 /STROBE 2 D0 3 D1 4 D2 5 D3 6 D4 7 D5 8 D6 9 D7 10 /ACK 11 BUSY 12 PE 13 SEL Pin Signal 14 /AUTOFD 15 /ERROR 16 /INIT 17 /SELIN 18 GND 19 GND 20 GND 21 GND 22 GND...
Dell™ Technology Guide
Page 321
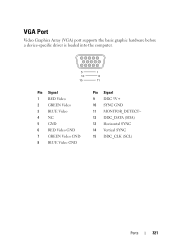
Pin Signal 1 RED Video 2 GREEN Video 3 BLUE Video 4 NC 5 GND 6 RED Video GND 7 GREEN Video GND 8 BLUE Video GND Pin Signal 9 DDC 5V+ 10 SYNC GND 11 MONITOR_DETECT- 12 DDC_DATA (SDA) 13 Horizontal SYNC 14 Vertical SYNC 15 DDC_CLK (SCL) Ports 321 VGA Port Video Graphics Array (VGA) port supports the basic graphic hardware before a device-specific driver is loaded into the computer.
Pin Signal 1 RED Video 2 GREEN Video 3 BLUE Video 4 NC 5 GND 6 RED Video GND 7 GREEN Video GND 8 BLUE Video GND Pin Signal 9 DDC 5V+ 10 SYNC GND 11 MONITOR_DETECT- 12 DDC_DATA (SDA) 13 Horizontal SYNC 14 Vertical SYNC 15 DDC_CLK (SCL) Ports 321 VGA Port Video Graphics Array (VGA) port supports the basic graphic hardware before a device-specific driver is loaded into the computer.
Dell™ Technology Guide
Page 322
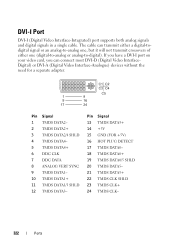
Pin Signal 1 TMDS DATA2- 2 TMDS DATA2+ 3 TMDS DATA2/4 SHLD 4 TMDS DATA4- 5 TMDS DATA4+ 6 DDC CLK 7 DDC DATA 8 ANALOG VERT SYNC 9 TMDS DATA1- 10 TMDS DATA1+ 11 TMDS DATA1/3 SHLD 12 TMDS DATA3- Pin Signal 13 TMDS DATA3+ 14 +5V 15 GND (FOR +5V) 16 HOT PLUG DETECT 17 TMDS DATA0- 18 ...
Pin Signal 1 TMDS DATA2- 2 TMDS DATA2+ 3 TMDS DATA2/4 SHLD 4 TMDS DATA4- 5 TMDS DATA4+ 6 DDC CLK 7 DDC DATA 8 ANALOG VERT SYNC 9 TMDS DATA1- 10 TMDS DATA1+ 11 TMDS DATA1/3 SHLD 12 TMDS DATA3- Pin Signal 13 TMDS DATA3+ 14 +5V 15 GND (FOR +5V) 16 HOT PLUG DETECT 17 TMDS DATA0- 18 ...
Dell™ Technology Guide
Page 326
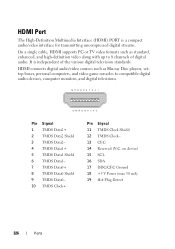
... Data2+ 2 TMDS Data2 Shield 3 TMDS Data2- 4 TMDS Data1+ 5 TMDS Data1 Shield 6 TMDS Data1- 7 TMDS Data0+ 8 TMDS Data0 Shield 9 TMDS Data0- 10 TMDS Clock+ Pin Signal 11 TMDS Clock Shield 12 TMDS Clock- 13 CEC 14 Reserved (N.C. HDMI Port The High-Definition Multimedia Interface (HDMI) PORT is independent of digital audio. It...
... Data2+ 2 TMDS Data2 Shield 3 TMDS Data2- 4 TMDS Data1+ 5 TMDS Data1 Shield 6 TMDS Data1- 7 TMDS Data0+ 8 TMDS Data0 Shield 9 TMDS Data0- 10 TMDS Clock+ Pin Signal 11 TMDS Clock Shield 12 TMDS Clock- 13 CEC 14 Reserved (N.C. HDMI Port The High-Definition Multimedia Interface (HDMI) PORT is independent of digital audio. It...

Dell™ Technology Guide
Page 327
Pin Signal 1 ML_Lane 0(p) 2 GND 3 ML_Lane 0(n) 4 ML_Lane 1(p) 5 GND 6 ML_Lane 1(n) 7 ML_Lane 2(p) 8 GND 9 ML_Lane 2(n) 10 ML_Lane 3(p) Pin Signal 11 GND 12 ML_Lane 3(n) 13 GND 14 GND 15 AUX_CH(p) 16 GND 17 AUX_CH(n) 18 Hot Plug 19 DP_PWR Return 20 DP_PWR Ports 327 Features and ...
Pin Signal 1 ML_Lane 0(p) 2 GND 3 ML_Lane 0(n) 4 ML_Lane 1(p) 5 GND 6 ML_Lane 1(n) 7 ML_Lane 2(p) 8 GND 9 ML_Lane 2(n) 10 ML_Lane 3(p) Pin Signal 11 GND 12 ML_Lane 3(n) 13 GND 14 GND 15 AUX_CH(p) 16 GND 17 AUX_CH(n) 18 Hot Plug 19 DP_PWR Return 20 DP_PWR Ports 327 Features and ...

Setup Guide
Page 7
.... Restricting the airflow can damage the computer or cause a fire. You should never place your Inspiron laptop may result in the air vents. Do not store your Inspiron™ 11 laptop. WARNING: Do not block, push objects into, or allow easy access to a power ...source, adequate ventilation, and a level surface to overheat. INSPIRON Setting Up Your Inspiron Laptop This section provides information about setting up your Dell™ computer in...
.... Restricting the airflow can damage the computer or cause a fire. You should never place your Inspiron laptop may result in the air vents. Do not store your Inspiron™ 11 laptop. WARNING: Do not block, push objects into, or allow easy access to a power ...source, adequate ventilation, and a level surface to overheat. INSPIRON Setting Up Your Inspiron Laptop This section provides information about setting up your Dell™ computer in...

Setup Guide
Page 13
Remove the battery (see "Removing and Replacing the Battery" on 30). 5. Turn on 30). 3. To remove the SIM, press and eject the SIM. 11 Replace the battery (see "Removing and Replacing the Battery" on your computer. 2. In the battery bay, slide the SIM into the SIM card slot. 4. Setting Up Your Inspiron Laptop To install the SIM: 1. Turn off your computer.
Remove the battery (see "Removing and Replacing the Battery" on 30). 5. Turn on 30). 3. To remove the SIM, press and eject the SIM. 11 Replace the battery (see "Removing and Replacing the Battery" on your computer. 2. In the battery bay, slide the SIM into the SIM card slot. 4. Setting Up Your Inspiron Laptop To install the SIM: 1. Turn off your computer.

Setup Guide
Page 20
INSPIRON Using Your Inspiron Laptop This section provides information about the features available on your Inspiron 11 laptop. Right Side Features 1 23 4 18 56
INSPIRON Using Your Inspiron Laptop This section provides information about the features available on your Inspiron 11 laptop. Right Side Features 1 23 4 18 56

Setup Guide
Page 50
... page 61. The Service Tag helps you identify your screen. On the next start the CD menu and press to wait until you see "Contacting Dell" on your computer when you encounter a problem during a test, a message with the error code and a description of each test screen. Type 1 to start... -up, the computer boots according to restart the computer, click Exit. 11. Using Support Tools NOTE: If you wait too long and the operating system logo appears, continue to proceed. 6. then, shut down the error code and...
... page 61. The Service Tag helps you identify your screen. On the next start the CD menu and press to wait until you see "Contacting Dell" on your computer when you encounter a problem during a test, a message with the error code and a description of each test screen. Type 1 to start... -up, the computer boots according to restart the computer, click Exit. 11. Using Support Tools NOTE: If you wait too long and the operating system logo appears, continue to proceed. 6. then, shut down the error code and...

Setup Guide
Page 66
... Memory configurations possible 800 MHz DDR2 1 GB, 2 GB, or 4 GB For more detailed specifications, see the Comprehensive Specifications on the Dell Support website at support.dell.com/manuals. INSPIRON Basic Specifications System Model Inspiron 11 This section provides information that you may vary by region. For more information regarding the configuration of your computer, click...
... Memory configurations possible 800 MHz DDR2 1 GB, 2 GB, or 4 GB For more detailed specifications, see the Comprehensive Specifications on the Dell Support website at support.dell.com/manuals. INSPIRON Basic Specifications System Model Inspiron 11 This section provides information that you may vary by region. For more information regarding the configuration of your computer, click...

Setup Guide
Page 68
Coin-cell battery CR-2032 For more information, see the Dell Technology Guide on your hard drive or on operating conditions and can be significantly reduced under certain power-intensive conditions. Basic Specifications Display Type Dimensions: Height Width Diagonal Maximum resolution 11.6-inch HD+ WLED with TrueLife 144 mm (5.7 inches) 256.12 mm...
Coin-cell battery CR-2032 For more information, see the Dell Technology Guide on your hard drive or on operating conditions and can be significantly reduced under certain power-intensive conditions. Basic Specifications Display Type Dimensions: Height Width Diagonal Maximum resolution 11.6-inch HD+ WLED with TrueLife 144 mm (5.7 inches) 256.12 mm...

Setup Guide
Page 69
...;F) -30° to 65°C (-22° to 149°F) Physical Height 16.4 mm to 25.8 mm (0.64 inches to 1.01 inches) Width 292 mm (11.49 inches) Depth 214 mm (8.42 inches) Weight (with 3-cell battery): Configurable to less 1.35 kg (2.98 lbs) than 67
...;F) -30° to 65°C (-22° to 149°F) Physical Height 16.4 mm to 25.8 mm (0.64 inches to 1.01 inches) Width 292 mm (11.49 inches) Depth 214 mm (8.42 inches) Weight (with 3-cell battery): Configurable to less 1.35 kg (2.98 lbs) than 67
Setup Guide
Page 73
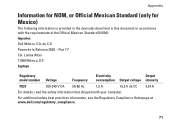
...11° Col. Lomas Altas 11950 México, D.F. de C.V. Laptops Regulatory model number Voltage Frequency Electricity Output consumption Output voltage intensity P03T 100-240 V CA 50-60 Hz 1,5 A 19,5 V de CC 3,34 A For details, read the safety information that shipped with the requirements of the Official Mexican Standard (NOM): Importer: Dell... Reforma 2620 - For additional safety best practices information, see the Regulatory Compliance Homepage at www.dell.com/regulatory_compliance. 71 Appendix Information for NOM, or Official Mexican Standard (only for Mexico) The...
...11° Col. Lomas Altas 11950 México, D.F. de C.V. Laptops Regulatory model number Voltage Frequency Electricity Output consumption Output voltage intensity P03T 100-240 V CA 50-60 Hz 1,5 A 19,5 V de CC 3,34 A For details, read the safety information that shipped with the requirements of the Official Mexican Standard (NOM): Importer: Dell... Reforma 2620 - For additional safety best practices information, see the Regulatory Compliance Homepage at www.dell.com/regulatory_compliance. 71 Appendix Information for NOM, or Official Mexican Standard (only for Mexico) The...


