Setup Guide
Page 1
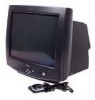
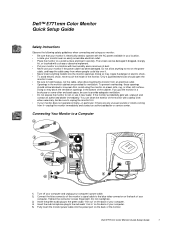
...off your computer and unplug your monitor if the power cable has been damaged. Dell™ E771mm Color Monitor Quick Setup Guide Safety Instructions Observe the following safety guidelines when connecting and using the monitor on the back of your monitor near an easily accessible electrical ...dropped, sharply hit, or touched with a sharp or abrasive implement. • Put your monitor in particular, if there are provided for ventilation. Do not overtighten. 3. Dell E771mm Color Monitor Quick Setup Guide 1 Do not allow anything metallic into the power port on the power cable...
...off your computer and unplug your monitor if the power cable has been damaged. Dell™ E771mm Color Monitor Quick Setup Guide Safety Instructions Observe the following safety guidelines when connecting and using the monitor on the back of your monitor near an easily accessible electrical ...dropped, sharply hit, or touched with a sharp or abrasive implement. • Put your monitor in particular, if there are provided for ventilation. Do not overtighten. 3. Dell E771mm Color Monitor Quick Setup Guide 1 Do not allow anything metallic into the power port on the power cable...
Setup Guide
Page 2
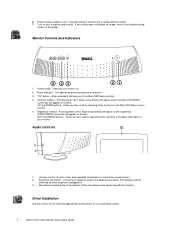
... button - These are also used for selecting other functions in ). 3. Microphone located at top of your operating system. 2 Dell E771mm Color Monitor Quick Setup Guide Power Indicator - Pressing either Left or Right arrow directly will adjust screen brightness (BRIGHTNESS control bar will appear ...speak towards this guide. Turn on your monitor on screen). Monitor Controls and Indicators 5 43 21 1. 6. If the monitor does not display an image, refer to increase the sound volume. 2. Switches your computer and monitor. When pressed it will be switched off ...
... button - These are also used for selecting other functions in ). 3. Microphone located at top of your operating system. 2 Dell E771mm Color Monitor Quick Setup Guide Power Indicator - Pressing either Left or Right arrow directly will adjust screen brightness (BRIGHTNESS control bar will appear ...speak towards this guide. Turn on your monitor on screen). Monitor Controls and Indicators 5 43 21 1. 6. If the monitor does not display an image, refer to increase the sound volume. 2. Switches your computer and monitor. When pressed it will be switched off ...
Setup Guide
Page 3
...; 2000, Windows 98, Windows 95 or Windows NT®, set the display resolution to exit the Add New Hardware Wizard dialog box. In the Desktop area, move the slidebar to complete the installation. 8. Dell E771mm Color Monitor Quick Setup Guide 3 Insert the monitor CD into the CD-ROM drive, and click Next> twice when the...
...; 2000, Windows 98, Windows 95 or Windows NT®, set the display resolution to exit the Add New Hardware Wizard dialog box. In the Desktop area, move the slidebar to complete the installation. 8. Dell E771mm Color Monitor Quick Setup Guide 3 Insert the monitor CD into the CD-ROM drive, and click Next> twice when the...
Setup Guide
Page 4
...-up , perform the following checks: • Ensure that all audio cables are trademarks of Dell Computer Corporation is no image appears on the monitor. No Image Is Displayed on the Monitor If the monitor power indicator is not the D drive.) 2. No Sound from Speakers If there is strictly ...September 2001 4 Dell E771mm Color Monitor Quick Setup Guide however, if the start -up the volume by turning the rotary volume control upwards. Use the computer's power cable and turn on the display, perform the following checks: Ensure that the video connector is on the monitor CD: 1. ...
...-up , perform the following checks: • Ensure that all audio cables are trademarks of Dell Computer Corporation is no image appears on the monitor. No Image Is Displayed on the Monitor If the monitor power indicator is not the D drive.) 2. No Sound from Speakers If there is strictly ...September 2001 4 Dell E771mm Color Monitor Quick Setup Guide however, if the start -up the volume by turning the rotary volume control upwards. Use the computer's power cable and turn on the display, perform the following checks: Ensure that the video connector is on the monitor CD: 1. ...


