Dell™ E2009W/E2209W Flat Panel Monitor User's Guide
Page 1
... this document to refer to either potential damage to avoid the problem. September 2008 Rev. A00 Dell Inc. Dell™ E2009W/E2209W Flat Panel Monitor User's Guide About Your Monitor Setting Up the Monitor Operating the Monitor Troubleshooting Appendix Notes, Notices, and Cautions NOTE: A NOTE indicates important information that this text: Dell, and the Dell logo are registered trademarks of Microsoft Corporation; CAUTION: A CAUTION indicates...
... this document to refer to either potential damage to avoid the problem. September 2008 Rev. A00 Dell Inc. Dell™ E2009W/E2209W Flat Panel Monitor User's Guide About Your Monitor Setting Up the Monitor Operating the Monitor Troubleshooting Appendix Notes, Notices, and Cautions NOTE: A NOTE indicates important information that this text: Dell, and the Dell logo are registered trademarks of Microsoft Corporation; CAUTION: A CAUTION indicates...
Dell™ E2009W/E2209W Flat Panel Monitor User's Guide
Page 2
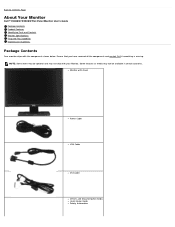
Back to Contents Page About Your Monitor Dell™ E2009W/E2209W Flat Panel Monitor User's Guide Package Contents Product Features Identifying Parts and Controls Monitor Specifications Plug and Play Capability Maintenance Guidelines Package Contents Your monitor ships with stand Power Cable VGA Cable DVI Cable Drivers and Documentation media Quick Setup Guide Safety Information Monitor with the components shown below. Some features or media may not be optional and may be available in certain countries. Ensure...
Back to Contents Page About Your Monitor Dell™ E2009W/E2209W Flat Panel Monitor User's Guide Package Contents Product Features Identifying Parts and Controls Monitor Specifications Plug and Play Capability Maintenance Guidelines Package Contents Your monitor ships with stand Power Cable VGA Cable DVI Cable Drivers and Documentation media Quick Setup Guide Safety Information Monitor with the components shown below. Some features or media may not be optional and may be available in certain countries. Ensure...
Dell™ E2009W/E2209W Flat Panel Monitor User's Guide
Page 3
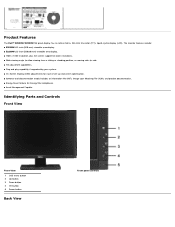
...-inch (558.68 mm) viewable area display. ■ 1680 x 1050 resolution, plus full-screen support for lower resolutions. ■ Wide viewing angle to allow viewing from a sitting or standing position, or moving side-to-side. ■ Tilt adjustment capabilities. ■ Plug and play capability if supported by your system. ■ On-Screen Display (OSD) adjustments for ease of set-up and screen optimization. ■ Software and documentation media includes an information file (INF), Image color...
...-inch (558.68 mm) viewable area display. ■ 1680 x 1050 resolution, plus full-screen support for lower resolutions. ■ Wide viewing angle to allow viewing from a sitting or standing position, or moving side-to-side. ■ Tilt adjustment capabilities. ■ Plug and play capability if supported by your system. ■ On-Screen Display (OSD) adjustments for ease of set-up and screen optimization. ■ Software and documentation media includes an information file (INF), Image color...
Dell™ E2009W/E2209W Flat Panel Monitor User's Guide
Page 4
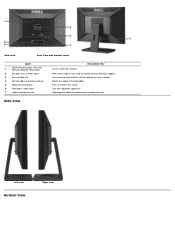
... attached VESA plate) 2 Barcode serial number label 3 Security lock slot 4 Dell Soundbar mounting brackets 5 Stand removal button 6 Regulatory rating label 7 Cable management slot Description/Use Use to mount the monitor. Attach the optional Dell Soundbar. Help organize cables by placing them through the slot. Press to contact Dell for technical support. Side View Left view Bottom View Right view Back view Back View with the slot to help secure your monitor. Refer to this label if you need to...
... attached VESA plate) 2 Barcode serial number label 3 Security lock slot 4 Dell Soundbar mounting brackets 5 Stand removal button 6 Regulatory rating label 7 Cable management slot Description/Use Use to mount the monitor. Attach the optional Dell Soundbar. Help organize cables by placing them through the slot. Press to contact Dell for technical support. Side View Left view Bottom View Right view Back view Back View with the slot to help secure your monitor. Refer to this label if you need to...

Dell™ E2009W/E2209W Flat Panel Monitor User's Guide
Page 5
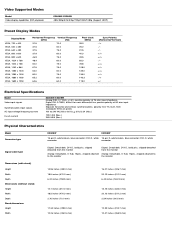
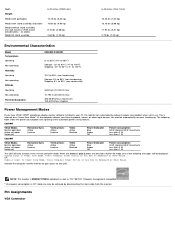
... 5ms typical 85%** * E2009W color gamut (typical) is based on CIE1976 (85%) and CIE1931 (72%) test standards. ** E2209W color gamut (typical) is based on CIE1976 (85%) and CIE1931 (72%) test standards. Bottom view Label Description 1 AC power cord connector 2 Stand lock 3 DVI connector 4 VGA connector Monitor Specifications Flat Panel Specifications Model Screen type Panel type Screen dimensions Preset display area: Horizontal Vertical Pixel pitch Viewing angle Luminance output Contrast ratio Faceplate coating Backlight Response Time Color gamut (Typical) E2009W Active matrix...
... 5ms typical 85%** * E2009W color gamut (typical) is based on CIE1976 (85%) and CIE1931 (72%) test standards. ** E2209W color gamut (typical) is based on CIE1976 (85%) and CIE1931 (72%) test standards. Bottom view Label Description 1 AC power cord connector 2 Stand lock 3 DVI connector 4 VGA connector Monitor Specifications Flat Panel Specifications Model Screen type Panel type Screen dimensions Preset display area: Horizontal Vertical Pixel pitch Viewing angle Luminance output Contrast ratio Faceplate coating Backlight Response Time Color gamut (Typical) E2009W Active matrix...
Dell™ E2009W/E2209W Flat Panel Monitor User's Guide
Page 6
.../Vertical Electrical Specifications Model Video input signals Synchronization input signals AC input voltage/frequency/current Inrush current E2009W/E2209W Analog RGB, 0.7 Volts +/-5%, positive polarity at 75 ohm input impedance Digital DVI-D TMDS, 600mV for each differential line, positive polarity at 50 ohm input impedance Separate horizontal and vertical synchronizations, polarity-free TTL level, SOG (Composite SYNC on green) 100 to the monitor Dimensions (with stand) Height Width Depth Dimensions (without stand) Height Width Depth Stand dimensions Height Width 14.96 inches...
.../Vertical Electrical Specifications Model Video input signals Synchronization input signals AC input voltage/frequency/current Inrush current E2009W/E2209W Analog RGB, 0.7 Volts +/-5%, positive polarity at 75 ohm input impedance Digital DVI-D TMDS, 600mV for each differential line, positive polarity at 50 ohm input impedance Separate horizontal and vertical synchronizations, polarity-free TTL level, SOG (Composite SYNC on green) 100 to the monitor Dimensions (with stand) Height Width Depth Dimensions (without stand) Height Width Depth Stand dimensions Height Width 14.96 inches...
Dell™ E2009W/E2209W Flat Panel Monitor User's Guide
Page 7
... (typical) Power Management Modes If you have VESA's DPM™ compliance display card or software installed in use. Vertical Sync Active Inactive - no cables) Weight of this automatic power saving feature: E2009W VESA Modes Normal operation Active-off mode Switch off Horizontal Sync Active Inactive - Vertical Sync Active Inactive - Depth Weight Weight with packaging Weight with stand assembly and cables Weight without stand assembly (For wall mount or VESA mount considerations - This is ENERGY STAR®-compliant as well as Power Save Mode*.
... (typical) Power Management Modes If you have VESA's DPM™ compliance display card or software installed in use. Vertical Sync Active Inactive - no cables) Weight of this automatic power saving feature: E2009W VESA Modes Normal operation Active-off mode Switch off Horizontal Sync Active Inactive - Vertical Sync Active Inactive - Depth Weight Weight with packaging Weight with stand assembly and cables Weight without stand assembly (For wall mount or VESA mount considerations - This is ENERGY STAR®-compliant as well as Power Save Mode*.
Dell™ E2009W/E2209W Flat Panel Monitor User's Guide
Page 9
... Clock- A display with 1 to 5 fixed pixels is a fixed pixel that appears as dark-colored monitors may scratch and show white scuff marks more pixels to see Dell Support site at: support.dell.com. Maintenance Guidelines Cleaning Your Monitor CAUTION: Read and follow the instructions in an unchanging state. Plug and Play Capability You can configure itself and optimize the monitor settings. To help maintain the best image quality on the monitor. Avoid using Display Data Channel...
... Clock- A display with 1 to 5 fixed pixels is a fixed pixel that appears as dark-colored monitors may scratch and show white scuff marks more pixels to see Dell Support site at: support.dell.com. Maintenance Guidelines Cleaning Your Monitor CAUTION: Read and follow the instructions in an unchanging state. Plug and Play Capability You can configure itself and optimize the monitor settings. To help maintain the best image quality on the monitor. Avoid using Display Data Channel...
Dell™ E2009W/E2209W Flat Panel Monitor User's Guide
Page 10
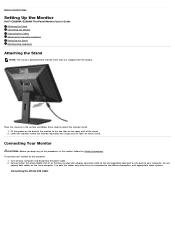
... locks on the same computer. Use both cables on to attach the monitor stand: 1. To connect your computer and disconnect the power cable. 2. Back to Contents Page Setting Up the Monitor Dell™ E2009W/E2209W Flat Panel Monitor User's Guide Attaching the Stand Connecting the Monitor Organizing the Cables Attaching the Soundbar (optional) Removing the Stand Wall Mounting (Optional) Attaching the Stand NOTE: The stand is detached from monitor when they are shipped from the factory. Do not connect...
... locks on the same computer. Use both cables on to attach the monitor stand: 1. To connect your computer and disconnect the power cable. 2. Back to Contents Page Setting Up the Monitor Dell™ E2009W/E2209W Flat Panel Monitor User's Guide Attaching the Stand Connecting the Monitor Organizing the Cables Attaching the Soundbar (optional) Removing the Stand Wall Mounting (Optional) Attaching the Stand NOTE: The stand is detached from monitor when they are shipped from the factory. Do not connect...
Dell™ E2009W/E2209W Flat Panel Monitor User's Guide
Page 14
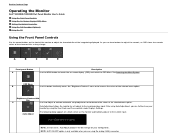
...the image being displayed. NOTE: AUTO ADJUST option is only available when you can further tune your configuration. Brightness/Contrast Hot Key C Use Auto Adjust to activate automatic setup/adjustment or to launch the on-screen display (OSD) and select the OSD Menu. Back to Contents Page Operating the Monitor Dell™ E2009W/E2209W Flat Panel Monitor User's Guide Using the Front Panel Controls Using the On-Screen Display (OSD) Menu Setting the Optimal Resolution Using the Dell Soundbar (Optional) Using the Tilt Using the Front Panel Controls Use the control buttons...
...the image being displayed. NOTE: AUTO ADJUST option is only available when you can further tune your configuration. Brightness/Contrast Hot Key C Use Auto Adjust to activate automatic setup/adjustment or to launch the on-screen display (OSD) and select the OSD Menu. Back to Contents Page Operating the Monitor Dell™ E2009W/E2209W Flat Panel Monitor User's Guide Using the Front Panel Controls Using the On-Screen Display (OSD) Menu Setting the Optimal Resolution Using the Dell Soundbar (Optional) Using the Tilt Using the Front Panel Controls Use the control buttons...

Dell™ E2009W/E2209W Flat Panel Monitor User's Guide
Page 15
... DVI-D input is on and off. Power button (with power light indicator) Using the On-Screen Display (OSD) Menu Accessing the Menu System NOTE: If you change the settings and then wait for the image to turn the monitor on and fully functional. An amber LED indicates DPMS power save mode. The video input from the movement of the two different video signals that may take 1 or 2 seconds for the OSD menu to disappear. 1. The changes are not connected...
... DVI-D input is on and off. Power button (with power light indicator) Using the On-Screen Display (OSD) Menu Accessing the Menu System NOTE: If you change the settings and then wait for the image to turn the monitor on and fully functional. An amber LED indicates DPMS power save mode. The video input from the movement of the two different video signals that may take 1 or 2 seconds for the OSD menu to disappear. 1. The changes are not connected...

Dell™ E2009W/E2209W Flat Panel Monitor User's Guide
Page 18
..., Auto Adjust produces the best image for available input signals. Back VGA DVI -D Scan for use with your particular setup. to adjust the color setting mode and color temperature. to your monitor. NOTE: AUTO ADJUST option is only available when you are different color setting sub-menus for VGA/DVI-D and Video input. There are using the Digital (DVI) connector. Use the INPUT SOURCE menu to select between different video signals that may be connected to select the DVI input source. Push to exit the OSD main menu. Select VGA input when...
..., Auto Adjust produces the best image for available input signals. Back VGA DVI -D Scan for use with your particular setup. to adjust the color setting mode and color temperature. to your monitor. NOTE: AUTO ADJUST option is only available when you are different color setting sub-menus for VGA/DVI-D and Video input. There are using the Digital (DVI) connector. Use the INPUT SOURCE menu to select between different video signals that may be connected to select the DVI input source. Push to exit the OSD main menu. Select VGA input when...

Dell™ E2009W/E2209W Flat Panel Monitor User's Guide
Page 19
... hue from a list of preset color modes. This is the default preset mode. Cool: Decreases the color temperature. This is connected to a computer or DVD player using the VGA and DVI cable or the HDMI to adjust the Red, Green, and Blue values and create your monitor is the default preset mode. Press the and buttons to DVI adapter. YPbPr: Select this mode if you can set the video input mode to the following preset values...
... hue from a list of preset color modes. This is the default preset mode. Cool: Decreases the color temperature. This is connected to a computer or DVD player using the VGA and DVI cable or the HDMI to adjust the Red, Green, and Blue values and create your monitor is the default preset mode. Press the and buttons to DVI adapter. YPbPr: Select this mode if you can set the video input mode to the following preset values...

Dell™ E2009W/E2209W Flat Panel Monitor User's Guide
Page 20
... the video image NOTE: Saturation adjustment is available only for DVI-D input Back Display Setting submenu Display Setting submenu for VGA input Display Setting submenu for video input. DISPLAY SETTINGS to adjust the saturation from '0' to the factory defaults. NOTE: Hue adjustment is available only for video input. Use or Push Push to increase the monochrome appearance of the video image to exit the OSD main menu. Color Reset Resets your monitor's color settings to '100'. Exit Menu Push to increase the colorful appearance of the video image.
... the video image NOTE: Saturation adjustment is available only for DVI-D input Back Display Setting submenu Display Setting submenu for VGA input Display Setting submenu for video input. DISPLAY SETTINGS to adjust the saturation from '0' to the factory defaults. NOTE: Hue adjustment is available only for video input. Use or Push Push to increase the monochrome appearance of the video image to exit the OSD main menu. Color Reset Resets your monitor's color settings to '100'. Exit Menu Push to increase the colorful appearance of the video image.

Dell™ E2009W/E2209W Flat Panel Monitor User's Guide
Page 21
... the OSD main menu. Horizontal Position Vertical Position Sharpness Pixel Clock Push to go back to the main menu. NOTE: When using a DVI source, the Vertical Position setting is '0' (-). Language option to set the OSD display to one of time the OSD will take the user directly to transparent. Minimum is used to change the OSD background from opaque to the OSD settings menu, with out making changes. This feature can disable this feature by selecting Disable. Push to adjust image left...
... the OSD main menu. Horizontal Position Vertical Position Sharpness Pixel Clock Push to go back to the main menu. NOTE: When using a DVI source, the Vertical Position setting is '0' (-). Language option to set the OSD display to one of time the OSD will take the user directly to transparent. Minimum is used to change the OSD background from opaque to the OSD settings menu, with out making changes. This feature can disable this feature by selecting Disable. Push to adjust image left...
Dell™ E2009W/E2209W Flat Panel Monitor User's Guide
Page 22
.... Reset all OSD settings to help reduce minor cases of image retention. If an image appears to be stuck on the monitor to exit the OSD main menu. NOTE: Use LCD Conditioning only when you experience a problem with image retention. Exit Menu Push to terminate LCD Conditioning at any time. Below warning message appears once user select "Enable" LCD Conditioning. Severe cases of your monitor, keep this feature enabled. Factory Reset...
.... Reset all OSD settings to help reduce minor cases of image retention. If an image appears to be stuck on the monitor to exit the OSD main menu. NOTE: Use LCD Conditioning only when you experience a problem with image retention. Exit Menu Push to terminate LCD Conditioning at any time. Below warning message appears once user select "Enable" LCD Conditioning. Severe cases of your monitor, keep this feature enabled. Factory Reset...
Dell™ E2009W/E2209W Flat Panel Monitor User's Guide
Page 24
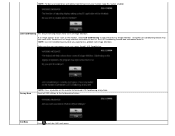
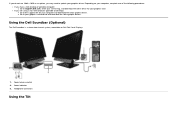
... download the latest graphic drivers. Headphone connectors Using the Tilt Depending on Dell Flat Panel Displays. 1. Using the Dell Soundbar (Optional) The Dell Soundbar is a stereo two channel system, mountable on your computer, complete one of the following procedures: If you have a Dell desktop or portable computer: Go to support.dell.com, enter your service tag, and download the latest driver for your computer and download the latest graphic drivers. Power/volume control...
... download the latest graphic drivers. Headphone connectors Using the Tilt Depending on Dell Flat Panel Displays. 1. Using the Dell Soundbar (Optional) The Dell Soundbar is a stereo two channel system, mountable on your computer, complete one of the following procedures: If you have a Dell desktop or portable computer: Go to support.dell.com, enter your service tag, and download the latest driver for your computer and download the latest graphic drivers. Power/volume control...
Dell™ E2009W/E2209W Flat Panel Monitor User's Guide
Page 26
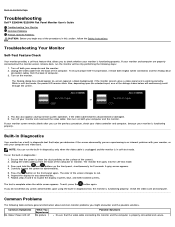
... continuously scroll through the screen. Repeat steps 5 and 6 to red. 6. A gray screen appears. 4. Back to Contents Page Troubleshooting Dell™ E2009W/E2209W Flat Panel Monitor User's Guide Troubleshooting Your Monitor Common Problems Product Specific Problems CAUTION: Before you begin any of the procedures in this section, follow the Safety Instructions Troubleshooting Your Monitor Self-Test Feature Check Your monitor provides a self-test feature that the video cable connecting the monitor and the computer is...
... continuously scroll through the screen. Repeat steps 5 and 6 to red. 6. A gray screen appears. 4. Back to Contents Page Troubleshooting Dell™ E2009W/E2209W Flat Panel Monitor User's Guide Troubleshooting Your Monitor Common Problems Product Specific Problems CAUTION: Before you begin any of the procedures in this section, follow the Safety Instructions Troubleshooting Your Monitor Self-Test Feature Check Your monitor provides a self-test feature that the video cable connecting the monitor and the computer is...
Dell™ E2009W/E2209W Flat Panel Monitor User's Guide
Page 27
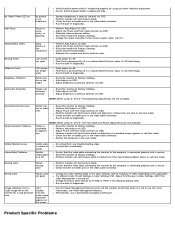
... Color Picture missing color Perform monitor self-test feature check. Run the built-in diagnostics. Check for bent or broken pins in the video cable connector. Change the video resolution to Factory Settings. Auto Adjust via OSD. Adjust brightness & contrast controls via OSD. Ensure that the video cable connecting the monitor to turn off . Use the Power Management feature to the computer is connected properly and is secure. Increase brightness & contrast controls via OSD. Perform Auto Adjust via OSD. Pixel that is permanently off . Reset the monitor...
... Color Picture missing color Perform monitor self-test feature check. Run the built-in diagnostics. Check for bent or broken pins in the video cable connector. Change the video resolution to Factory Settings. Auto Adjust via OSD. Adjust brightness & contrast controls via OSD. Ensure that the video cable connecting the monitor to turn off . Use the Power Management feature to the computer is connected properly and is secure. Increase brightness & contrast controls via OSD. Perform Auto Adjust via OSD. Pixel that is permanently off . Reset the monitor...

Dell™ E2009W/E2209W Flat Panel Monitor User's Guide
Page 28
... the power cord, plug back, and then turn on the front panel The picture does not fill the The picture cannot fill the height or width of DVDs, the monitor may display in Image Setting OSD. Due to Factory Settings. screen Possible Solutions Check the Scaling Ratio setting in full screen. Back to Contents Page Specific Symptoms Screen image is too small What You Experience Image is not available. NOTE: When choosing DVI-D mode, the Auto Adjust...
... the power cord, plug back, and then turn on the front panel The picture does not fill the The picture cannot fill the height or width of DVDs, the monitor may display in Image Setting OSD. Due to Factory Settings. screen Possible Solutions Check the Scaling Ratio setting in full screen. Back to Contents Page Specific Symptoms Screen image is too small What You Experience Image is not available. NOTE: When choosing DVI-D mode, the Auto Adjust...


