User Guide
Page 3
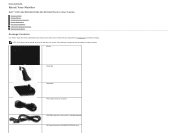
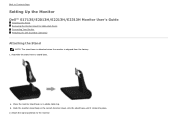
Monitor Stand Riser Stand Base Power Cable (varies by countries) VGA Cable (attached to Contents Page About Your Monitor Dell™ E1713S/E2013H/E2213H/E2313H Monitor User's Guide Package Contents Product Features Identifying Parts and Controls Monitor Specifications Plug and Play Capability LCD Monitor... with your monitor. Back to the monitor or individual packing) DVI Cable (Packing for E2013H/E2213H/E2313H only) Some features or media may not ship with all the components and Contact Dell™ if anything is missing. Ensure that you have received all the components shown below...
Monitor Stand Riser Stand Base Power Cable (varies by countries) VGA Cable (attached to Contents Page About Your Monitor Dell™ E1713S/E2013H/E2213H/E2313H Monitor User's Guide Package Contents Product Features Identifying Parts and Controls Monitor Specifications Plug and Play Capability LCD Monitor... with your monitor. Back to the monitor or individual packing) DVI Cable (Packing for E2013H/E2213H/E2313H only) Some features or media may not ship with all the components and Contact Dell™ if anything is missing. Ensure that you have received all the components shown below...
User Guide
Page 4
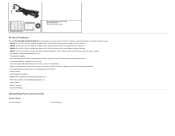
...the CD attached with the monitor). Drivers and Documentation media Quick Setup Guide Product Information Guide Product Features The Dell™ E1713S/E2013H/E2213H/E2313H flat panel display has an active matrix, Thin-Film Transistor, Liquid Crystal Display. Plug and play ... compliant (for flexible mounting solutions. Identifying Parts and Controls Front View E1713S/ E2013H : E2213H/E2313H: Removable stand and Video Electronics Standards Association (VESA) 100 mm mounting holes for E2013H/E2213H/E2313H only). E2013H: 50.8 cm (20.0 inches) viewable area display. 1600 x 900 resolution...
...the CD attached with the monitor). Drivers and Documentation media Quick Setup Guide Product Information Guide Product Features The Dell™ E1713S/E2013H/E2213H/E2313H flat panel display has an active matrix, Thin-Film Transistor, Liquid Crystal Display. Plug and play ... compliant (for flexible mounting solutions. Identifying Parts and Controls Front View E1713S/ E2013H : E2213H/E2313H: Removable stand and Video Electronics Standards Association (VESA) 100 mm mounting holes for E2013H/E2213H/E2313H only). E2013H: 50.8 cm (20.0 inches) viewable area display. 1600 x 900 resolution...
User Guide
Page 11
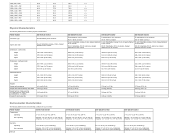
...176;C to 60 °C (-4 °F to 140 °F) Shipping: -20 °C to 60 °C (-4 °F to 140 °F) Dell E2013H monitor Dell E2213H monitor Dell E2313H monitor 0 °C to 40 °C (32 °F to 104 °F) Storage: -20 °C to 60 °C (-4 °F...-condensing) Shipping: 5 % to the monitor Dimensions: (with stand) Height Width Depth Dimensions: (without stand) Height Width Depth Stand dimensions: Height Width Depth Weight: Weight with packaging Weight with stand assembly and cables Weight without stand assembly (For wall mount or VESA mount considerations - no cables...
...176;C to 60 °C (-4 °F to 140 °F) Shipping: -20 °C to 60 °C (-4 °F to 140 °F) Dell E2013H monitor Dell E2213H monitor Dell E2313H monitor 0 °C to 40 °C (32 °F to 104 °F) Storage: -20 °C to 60 °C (-4 °F...-condensing) Shipping: 5 % to the monitor Dimensions: (with stand) Height Width Depth Dimensions: (without stand) Height Width Depth Stand dimensions: Height Width Depth Weight: Weight with packaging Weight with stand assembly and cables Weight without stand assembly (For wall mount or VESA mount considerations - no cables...
User Guide
Page 13
... it clicks into place. 2. Back to Contents Page Setting Up the Monitor Dell™ E1713S/E2013H/E2213H/E2313H Monitor User's Guide Attaching the Stand Removing the Monitor Stand for VESA Wall Mount Connecting Your Monitor Attaching the Dell Soundbar (Optional) Attaching the Stand NOTE: The stand base is detached when the monitor is shipped from the factory. 1.
... it clicks into place. 2. Back to Contents Page Setting Up the Monitor Dell™ E1713S/E2013H/E2213H/E2313H Monitor User's Guide Attaching the Stand Removing the Monitor Stand for VESA Wall Mount Connecting Your Monitor Attaching the Dell Soundbar (Optional) Attaching the Stand NOTE: The stand base is detached when the monitor is shipped from the factory. 1.
User Guide
Page 14
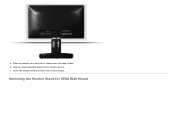
c. Removing the Monitor Stand for VESA Wall Mount b. a. Align the stand assembly bracket to the monitor groove. Insert the bracket towards monitor until it locks in place. Place the monitor on a soft cloth or cushion near the edge of desk.
c. Removing the Monitor Stand for VESA Wall Mount b. a. Align the stand assembly bracket to the monitor groove. Insert the bracket towards monitor until it locks in place. Place the monitor on a soft cloth or cushion near the edge of desk.

User Guide
Page 15
... monitor panel on a soft cloth or cushion, complete the following steps to the computer: 1. Once the latch is released, remove the monitor stand away from the monitor. Connect either the white (digital DVI-D) or the blue (analog VGA) display connector cable to push the release latch...located in this section, follow the Safety Instructions. To connect your monitor to remove the monitor stand: 1. Use both cables on the back of the procedures in a hole just above the monitor stand. 2. Use a long screwdriver to the corresponding video port on the same computer. Connecting Your ...
... monitor panel on a soft cloth or cushion, complete the following steps to the computer: 1. Once the latch is released, remove the monitor stand away from the monitor. Connect either the white (digital DVI-D) or the blue (analog VGA) display connector cable to push the release latch...located in this section, follow the Safety Instructions. To connect your monitor to remove the monitor stand: 1. Use both cables on the back of the procedures in a hole just above the monitor stand. 2. Use a long screwdriver to the corresponding video port on the same computer. Connecting Your ...
User Guide
Page 39
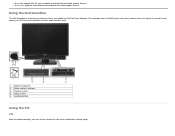
... mechanism 2 Power control/ indicator 3. Audio-in jack 5. Go to your computer and download the latest graphic drivers. Headphone jack Using the Tilt Tilt With the stand assembly, you can tilt the monitor for your graphics card website and download the latest graphic drivers. Volume control 4. Using the...
... mechanism 2 Power control/ indicator 3. Audio-in jack 5. Go to your computer and download the latest graphic drivers. Headphone jack Using the Tilt Tilt With the stand assembly, you can tilt the monitor for your graphics card website and download the latest graphic drivers. Volume control 4. Using the...

User Guide
Page 40
Back to Contents Page NOTE: The stand base is detached when the monitor is shipped from the factory.
Back to Contents Page NOTE: The stand base is detached when the monitor is shipped from the factory.


