User Guide
Page 2
... potential damage to hardware or loss of the warning is intended for bodily harm and tells you how to the display. Back to avoid the problem. Notational Conventions The following subsections describe notational conventions used as follows: Introduction gives an overview of the display. In such cases, the specific presentation of... that helps you how to Contents Page It describes the display's features, setup, and operation. CAUTION: A CAUTION indicates the potential for anyone who uses the Dell E173FP Color Monitor.
... potential damage to hardware or loss of the warning is intended for bodily harm and tells you how to the display. Back to avoid the problem. Notational Conventions The following subsections describe notational conventions used as follows: Introduction gives an overview of the display. In such cases, the specific presentation of... that helps you how to Contents Page It describes the display's features, setup, and operation. CAUTION: A CAUTION indicates the potential for anyone who uses the Dell E173FP Color Monitor.
User Guide
Page 6
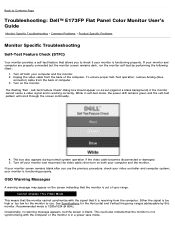
... reconnect the video cable; Back to Contents Page Troubleshooting: Dell™ E173FP Flat Panel Color Monitor User's Guide Monitor Specific Troubleshooting • Common Problems • Product Specific Problems Monitor Specific Troubleshooting Self-Test Feature Check (STFC) Your monitor provides a self-test feature that the monitor is out of computer. 3. Unplug the video cable from the back of sync range...
... reconnect the video cable; Back to Contents Page Troubleshooting: Dell™ E173FP Flat Panel Color Monitor User's Guide Monitor Specific Troubleshooting • Common Problems • Product Specific Problems Monitor Specific Troubleshooting Self-Test Feature Check (STFC) Your monitor provides a self-test feature that the monitor is out of computer. 3. Unplug the video cable from the back of sync range...

User Guide
Page 7
... LCD screen has spots Clean the LCD Screen, please refer to preset display modes. Common Problems The following table contains general information about common monitor problems you might encounter. Perform monitor reset Push 'Auto Adjust' button Adjust 'Phase' and 'Clock' controls via OSD Perform monitor ...pins on the D-sub cable. Perform monitor reset Push 'Auto Adjust' button Adjust 'Phase' and 'Clock' controls via OSD Perform monitor self-test feature check to determine if scrambled screen appears in LCD technology Brightness Problems Geometric Distortion Picture too dim or ...
... LCD screen has spots Clean the LCD Screen, please refer to preset display modes. Common Problems The following table contains general information about common monitor problems you might encounter. Perform monitor reset Push 'Auto Adjust' button Adjust 'Phase' and 'Clock' controls via OSD Perform monitor ...pins on the D-sub cable. Perform monitor reset Push 'Auto Adjust' button Adjust 'Phase' and 'Clock' controls via OSD Perform monitor self-test feature check to determine if scrambled screen appears in LCD technology Brightness Problems Geometric Distortion Picture too dim or ...
User Guide
Page 8
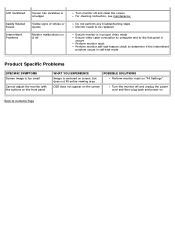
... on the screen Turn the monitor off and unplug the power cord and then plug back and power on & off Turn monitor off and clean the screen For cleaning instruction, see maintenance. LCD Scratched Safety Related Issues Intermittent Problems Screen has scratches or smudges ...Visible signs of smoke or sparks Monitor malfunctions on Back to determine if the intermittent problem occurs in self-test mode Product Specific Problems SPECIFIC SYMPTOMS Screen image is ...
... on the screen Turn the monitor off and unplug the power cord and then plug back and power on & off Turn monitor off and clean the screen For cleaning instruction, see maintenance. LCD Scratched Safety Related Issues Intermittent Problems Screen has scratches or smudges ...Visible signs of smoke or sparks Monitor malfunctions on Back to determine if the intermittent problem occurs in self-test mode Product Specific Problems SPECIFIC SYMPTOMS Screen image is ...
User Guide
Page 21
...of glass and can access the following table. Place your monitor in a location with large temperature differences. High temperatures can cause problems. Don't use your monitor in direct sunlight, and keep it . Unplug your monitor if the power cable has been damaged. If you ...an adverse effect on or into the monitor openings. If you need assistance in the "Electrical Specifications" section. Contacting Dell To contact Dell electronically, you can be damaged if dropped or hit sharply. Avoid moving the LCD monitor between locations with low humidity and minimum ...
...of glass and can access the following table. Place your monitor in a location with large temperature differences. High temperatures can cause problems. Don't use your monitor in direct sunlight, and keep it . Unplug your monitor if the power cable has been damaged. If you ...an adverse effect on or into the monitor openings. If you need assistance in the "Electrical Specifications" section. Contacting Dell To contact Dell electronically, you can be damaged if dropped or hit sharply. Avoid moving the LCD monitor between locations with low humidity and minimum ...

User Guide
Page 44
... on the Soundbar clockwise to 40°C Humidity, Non-condensing 95% RH @ 40°C Troubleshooting The following table contains general information about common audio problems you might encounter. SPL Total Power Output 14 W continuous average power (all speakers operating) @ 10% (THD+N), 1 kHz (FTC rated) Headphone ... 12 mm) Operating Temperature Range 10°C to the middle position; Insert the lime green mini stereo plug from the rear of the monitor, attach Soundbar by aligning the two slots with the two tabs along the bottom rear of the power brick into the place. 3.
... on the Soundbar clockwise to 40°C Humidity, Non-condensing 95% RH @ 40°C Troubleshooting The following table contains general information about common audio problems you might encounter. SPL Total Power Output 14 W continuous average power (all speakers operating) @ 10% (THD+N), 1 kHz (FTC rated) Headphone ... 12 mm) Operating Temperature Range 10°C to the middle position; Insert the lime green mini stereo plug from the rear of the monitor, attach Soundbar by aligning the two slots with the two tabs along the bottom rear of the power brick into the place. 3.


