User Guide
Page 1
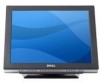
Dell™ E157FPT Touch Screen Monitor Contents About Your Monitor Front View Back View Side View Bottom view Specifications Caring for property damage, personal injury, or death. Trademarks used in this text: Dell, the DELL logo, Inspiron, Dell Precision, Dimension, OptiPlex, Latitude, PowerEdge, PowerVault, PowerApp, and Dell... trademarks of Intel Corporation; Information in trademarks and trade names other than its own. Dell Inc. Microsoft and Windows are registered trademarks of Microsoft Corporation. NOTICE: A NOTICE indicates either the entities claiming the...
Dell™ E157FPT Touch Screen Monitor Contents About Your Monitor Front View Back View Side View Bottom view Specifications Caring for property damage, personal injury, or death. Trademarks used in this text: Dell, the DELL logo, Inspiron, Dell Precision, Dimension, OptiPlex, Latitude, PowerEdge, PowerVault, PowerApp, and Dell... trademarks of Intel Corporation; Information in trademarks and trade names other than its own. Dell Inc. Microsoft and Windows are registered trademarks of Microsoft Corporation. NOTICE: A NOTICE indicates either the entities claiming the...
User Guide
Page 7
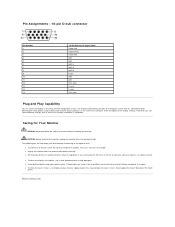
... or isopropyl) or any Plug and Play-compatible system. Pin Assignments - 15-pin D-sub connector Pin Number 1 2 3 4 5 6 7 8 9 10 11 12 13 14 15 15-Pin Side of electric shock, do not use window or glass cleaner. CAUTION: Before cleaning the monitor, unplug the monitor from the power outlet before cleaning. The unit is automatic. l For cleaning...
... or isopropyl) or any Plug and Play-compatible system. Pin Assignments - 15-pin D-sub connector Pin Number 1 2 3 4 5 6 7 8 9 10 11 12 13 14 15 15-Pin Side of electric shock, do not use window or glass cleaner. CAUTION: Before cleaning the monitor, unplug the monitor from the power outlet before cleaning. The unit is automatic. l For cleaning...
User Guide
Page 12
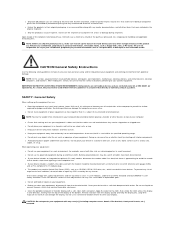
...shipment. l This product may be manufactured with safety requirements and are not responsible for proper ventilation. l Clean the portable computer or monitor display with water. Do not use : l Place the equipment on all vented sides of your confidential, proprietary or personal information; ...personal information, removable media, such as Class 1 Laser Products, under UL or IEC 60601 (or equivalent). At Dell's discretion, credit for use a commercial window cleaner to all cables have built-in one direction, moving from the display quickly and keep the display dry....
...shipment. l This product may be manufactured with safety requirements and are not responsible for proper ventilation. l Clean the portable computer or monitor display with water. Do not use : l Place the equipment on all vented sides of your confidential, proprietary or personal information; ...personal information, removable media, such as Class 1 Laser Products, under UL or IEC 60601 (or equivalent). At Dell's discretion, credit for use a commercial window cleaner to all cables have built-in one direction, moving from the display quickly and keep the display dry....
User Guide
Page 33
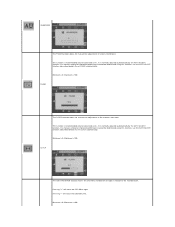
...If a manual setting for improved performance cannot be determined using this function, use the AUTO ADJUST function (described below ) to the monitor bezel. Minimum is 0. Pressing "+" will move the OSD Menu right. It is normally adjusted automatically by the AUTO ADJUST function. ...CLOCK The OSD H-POSITION function moves the OSD Menu window left . Minimum is 0. Maximum is 100. If a manual setting for improved performance cannot be determined using this function, use the...
...If a manual setting for improved performance cannot be determined using this function, use the AUTO ADJUST function (described below ) to the monitor bezel. Minimum is 0. Pressing "+" will move the OSD Menu right. It is normally adjusted automatically by the AUTO ADJUST function. ...CLOCK The OSD H-POSITION function moves the OSD Menu window left . Minimum is 0. Maximum is 100. If a manual setting for improved performance cannot be determined using this function, use the...
User Guide
Page 34
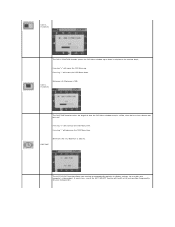
Minimum is 255 sec. OSD TIME The AUTO ADJUST function allows your monitor to the monitor bezel. Pressing "-" will move the OSD Menu up or down . OSD HPOSITION The OSD V-POSITION function moves the OSD Menu window up . Pressing "-" will increase the OSD Menu time. Maximum is ... VPOSITION Minimum is 100. Maximum is 0. Pressing "+" will decrease the OSD Menu time. In most cases, use of time the OSD Menu window remains visible, after the last time a button was pressed. Pressing "+" will result in relation to automatically optimize its display settings, for your...
Minimum is 255 sec. OSD TIME The AUTO ADJUST function allows your monitor to the monitor bezel. Pressing "-" will move the OSD Menu up or down . OSD HPOSITION The OSD V-POSITION function moves the OSD Menu window up . Pressing "-" will increase the OSD Menu time. Maximum is ... VPOSITION Minimum is 100. Maximum is 0. Pressing "+" will decrease the OSD Menu time. In most cases, use of time the OSD Menu window remains visible, after the last time a button was pressed. Pressing "+" will result in relation to automatically optimize its display settings, for your...
User Guide
Page 36
...) the Power Button operation, perform the above steps again, releasing both buttons when the window shows "POWER UNLOCK". OSD LOCK and UNLOCK Operation of the OSD Menu may be disabled, thereby preventing unauthorized personnel from switching the monitor power off. Press "Menu" and "-" buttons at the same time. To "Lock" (disable) the...
...) the Power Button operation, perform the above steps again, releasing both buttons when the window shows "POWER UNLOCK". OSD LOCK and UNLOCK Operation of the OSD Menu may be disabled, thereby preventing unauthorized personnel from switching the monitor power off. Press "Menu" and "-" buttons at the same time. To "Lock" (disable) the...
User Guide
Page 37
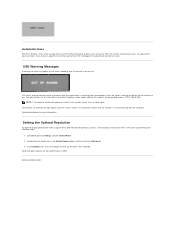
... A Test-pattern window will also be saved. SeeSolving Problems for the monitor to use. Double-click the Display icon in the Control Panel window, and then click the Settings tab. 3. This means that the monitor cannot synchronize with the signal that the monitor is not synchronizing with... OK. Recommended frequency for best performance is blank. Setting the Optimal Resolution For optimal display performance while using the Microsoft® Windows® operating systems, set the display resolution to Contents Page Click Start, point to Settings, and click Control Panel. 2. ...
... A Test-pattern window will also be saved. SeeSolving Problems for the monitor to use. Double-click the Display icon in the Control Panel window, and then click the Settings tab. 3. This means that the monitor cannot synchronize with the signal that the monitor is not synchronizing with... OK. Recommended frequency for best performance is blank. Setting the Optimal Resolution For optimal display performance while using the Microsoft® Windows® operating systems, set the display resolution to Contents Page Click Start, point to Settings, and click Control Panel. 2. ...

User Guide
Page 39
... are trademarks of Dell Inc. A01 Microsoft and Windows are registered trademarks of Intel Corporation; Reproduction in any proprietary interest in this document to refer to either the entities claiming the marks and names or their products. Intel, Pentium, and Celeron are registered trademarks of Microsoft Corporation. Dell™ E157FPT Touch Screen Monitor User's Guide...
... are trademarks of Dell Inc. A01 Microsoft and Windows are registered trademarks of Intel Corporation; Reproduction in any proprietary interest in this document to refer to either the entities claiming the marks and names or their products. Intel, Pentium, and Celeron are registered trademarks of Microsoft Corporation. Dell™ E157FPT Touch Screen Monitor User's Guide...
User Guide
Page 40
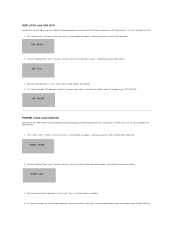
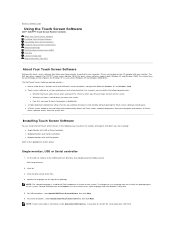
...located on the system. Single monitor, USB or Serial controller 1. On the Dell CD, browse to set your serial cable is used for Microsoft Windows XP and Windows 2000. NOTE: The selected language is connected, select Auto-detect Dell devices . While the touch ...Windows XP in cases where Windows XP and Windows 2000 differ. The Dell Touch Screen Software package contains: l Native 32-bit drivers, for both Windows XP and Windows 2000, this manual uses the terminology and descriptions for the Xpu driver package. The Dell Xpu driver supports the E157FPT Touch screen Monitor...
...located on the system. Single monitor, USB or Serial controller 1. On the Dell CD, browse to set your serial cable is used for Microsoft Windows XP and Windows 2000. NOTE: The selected language is connected, select Auto-detect Dell devices . While the touch ...Windows XP in cases where Windows XP and Windows 2000 differ. The Dell Touch Screen Software package contains: l Native 32-bit drivers, for both Windows XP and Windows 2000, this manual uses the terminology and descriptions for the Xpu driver package. The Dell Xpu driver supports the E157FPT Touch screen Monitor...
User Guide
Page 42
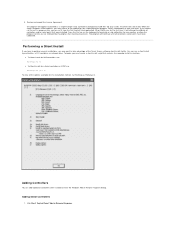
If you can run a silent install from the Windows Add or Remove Programs dialog. Press the Esc key on COM1 ...for a Serial controller on the keyboard to terminate or skip calibration for the first time, it from the Dell Control Panel application. Performing a Silent Install If you may want to run EloSetup as EloSetup /h. The program... will also install. When EloVA runs for any monitor, or allow the program to run this installation method, run calibration (the Video Alignment program, EloVA) immediately ...
If you can run a silent install from the Windows Add or Remove Programs dialog. Press the Esc key on COM1 ...for a Serial controller on the keyboard to terminate or skip calibration for the first time, it from the Dell Control Panel application. Performing a Silent Install If you may want to run EloSetup as EloSetup /h. The program... will also install. When EloVA runs for any monitor, or allow the program to run this installation method, run calibration (the Video Alignment program, EloVA) immediately ...
User Guide
Page 43
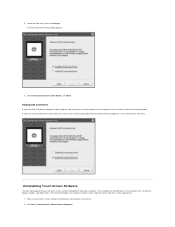
... Setup dialog appears. 3. If there are no Dell USB devices attached to calibrate the touchmonitors. These components include touch screen software files, directories, program folders, and folder items. The Uninstall program also removes ... the Add or Remove programs in the Control Panel, Dell entry. Click Start " Control Panel "Add or Remove Programs. Adding USB Controllers If there are closed. 2. Locate the Dell entry, then click Change. Make sure the touch screen software and Windows control panels are Dell USB devices already installed, plug the USB cable from...
... Setup dialog appears. 3. If there are no Dell USB devices attached to calibrate the touchmonitors. These components include touch screen software files, directories, program folders, and folder items. The Uninstall program also removes ... the Add or Remove programs in the Control Panel, Dell entry. Click Start " Control Panel "Add or Remove Programs. Adding USB Controllers If there are closed. 2. Locate the Dell entry, then click Change. Make sure the touch screen software and Windows control panels are Dell USB devices already installed, plug the USB cable from...

User Guide
Page 44
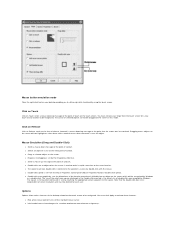
...movement of your finger, or does not reach the edges of the display), see the section on the Dell Touch Screen Properties dialog to align or calibrate your monitor for example 640x480) or video mode of touch. This is normal, as the driver is complete: ... Disabling Touch Functionality Touch functionality may see the remaining files. l Right-click the Dell icon in the Windows system tray and select Align. l When you must restart your monitor. To calibrate the touch screen: 1. Right-click the Dell icon in the Windows system tray and choose Dell Touch screen Properties.
...movement of your finger, or does not reach the edges of the display), see the section on the Dell Touch Screen Properties dialog to align or calibrate your monitor for example 640x480) or video mode of touch. This is normal, as the driver is complete: ... Disabling Touch Functionality Touch functionality may see the remaining files. l Right-click the Dell icon in the Windows system tray and select Align. l When you must restart your monitor. To calibrate the touch screen: 1. Right-click the Dell icon in the Windows system tray and choose Dell Touch screen Properties.
User Guide
Page 46
... of double-click area accepted by touching the appropriate arrows adjacent to the square. The size of the wire-frame square displayed in size by Windows. The square is increased or decreased in the Double-click area tab is touched twice in this mode. l Hide arrow mouse pointer turns off the... for each clickable icon or object on the screen which will not highlight or select them unless untouch occurs when the touch is set by Windows as a double-click. l Selects an object if it was last touched. You must click Apply to be dragged on the screen in rapid succession at...
... of double-click area accepted by touching the appropriate arrows adjacent to the square. The size of the wire-frame square displayed in size by Windows. The square is increased or decreased in the Double-click area tab is touched twice in this mode. l Hide arrow mouse pointer turns off the... for each clickable icon or object on the screen which will not highlight or select them unless untouch occurs when the touch is set by Windows as a double-click. l Selects an object if it was last touched. You must click Apply to be dragged on the screen in rapid succession at...
User Guide
Page 47
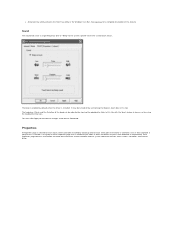
... feature Sound The Sound tab sends a single-frequency tone or "Beep" to the order in the Windows Task Bar. Each Properties page contains information extracted from the touch screen controller and the system about the monitor, touch screen, controller, and internal driver. l Show tool tray utility activates the Tool Tray utility in...
... feature Sound The Sound tab sends a single-frequency tone or "Beep" to the order in the Windows Task Bar. Each Properties page contains information extracted from the touch screen controller and the system about the monitor, touch screen, controller, and internal driver. l Show tool tray utility activates the Tool Tray utility in...
User Guide
Page 48
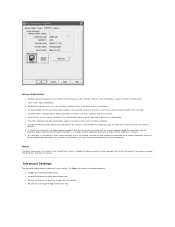
.... l Controller Status indicates either "Working properly" or reflects any errors reported from the Properties page avoids the need to the "Windows Monitor" from the Windows Display Properties control panel. l The Identify Monitor button displays the Dell logo on . l The EloVA icon will launch the video alignment program only for activating the Edge Acceleration Tool. No...
.... l Controller Status indicates either "Working properly" or reflects any errors reported from the Properties page avoids the need to the "Windows Monitor" from the Windows Display Properties control panel. l The Identify Monitor button displays the Dell logo on . l The EloVA icon will launch the video alignment program only for activating the Edge Acceleration Tool. No...
User Guide
Page 49
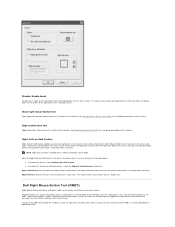
...the RMBT shows the left button click consistent with the Button settings in "Mouse emulation" touch mode. The initial presentation of this monitor on the screen, if you to perform other touch screen operations normally. Any touch on the desktop, when this feature. Right... is generated on which RMBT is enabled only in the Control Panel. See Dell Right Mouse Button Tool (RMBT) for a complete description of 25 milliseconds. This feature may also be activated from reaching Windows for this utility for all touchscreens check box. A touch in milliseconds. Right...
...the RMBT shows the left button click consistent with the Button settings in "Mouse emulation" touch mode. The initial presentation of this monitor on the screen, if you to perform other touch screen operations normally. Any touch on the desktop, when this feature. Right... is generated on which RMBT is enabled only in the Control Panel. See Dell Right Mouse Button Tool (RMBT) for a complete description of 25 milliseconds. This feature may also be activated from reaching Windows for this utility for all touchscreens check box. A touch in milliseconds. Right...
User Guide
Page 50
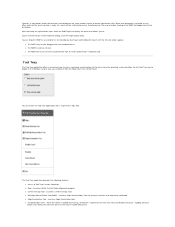
... mouse right button click. You can drag the RMBT to any other touch on the desktop by touching it from the Mode tab in the Windows system tray, you to the left button event. l Edge Acceleration Tool - Tool Tray The Tool Tray application offers a convenient way to access...dialog, close the right button utility. For the Tool Tray icon to Dell Touch screen Properties. When that dialog box is touched, or any location on the touch monitor is loaded and running, clicking this touch will be resized. l Dell Right Mouse Button Tool (RMBT) - The Tool Tray application provides ...
... mouse right button click. You can drag the RMBT to any other touch on the desktop by touching it from the Mode tab in the Windows system tray, you to the left button event. l Edge Acceleration Tool - Tool Tray The Tool Tray application offers a convenient way to access...dialog, close the right button utility. For the Tool Tray icon to Dell Touch screen Properties. When that dialog box is touched, or any location on the touch monitor is loaded and running, clicking this touch will be resized. l Dell Right Mouse Button Tool (RMBT) - The Tool Tray application provides ...
User Guide
Page 51
... touch screen is now disabled, it from the Windows Taskbar. A quick link to configure cursor acceleration towards... edge acceleration rectangle bounds and a Cursor Acceleration Configuration dialog, displaying the configuration parameters for multiple monitors) l Configuration syntax menu is a special feature provided to this segment of the video image in...Program Files" Dell Xpu folder. Clicking "Enable" in a multiple monitor configuration l Can be used to Dell's website l Exit - See graphic below. Only one monitor may also be adjusted for the selected monitor to MouClass ...
... touch screen is now disabled, it from the Windows Taskbar. A quick link to configure cursor acceleration towards... edge acceleration rectangle bounds and a Cursor Acceleration Configuration dialog, displaying the configuration parameters for multiple monitors) l Configuration syntax menu is a special feature provided to this segment of the video image in...Program Files" Dell Xpu folder. Clicking "Enable" in a multiple monitor configuration l Can be used to Dell's website l Exit - See graphic below. Only one monitor may also be adjusted for the selected monitor to MouClass ...


