Installation Guide
Page 1
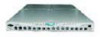
... Information 3 • Device Dimensions 3 • Device Placement Requirements 4 • Switch Mounting Kit (DS16B2 - RKH/RKL 5 • Installing the DS-16B2 Rails 10 • Installing the DS-16B2 Switch 21 EMC Departmental Switch DS-16B Installation Guide 1 EMC Departmental Switch DS-16B2 Installation Guide P/N 014003075-A01 This document explains the power, cooling, weight, and rack placement requirements for mounting them in...
... Information 3 • Device Dimensions 3 • Device Placement Requirements 4 • Switch Mounting Kit (DS16B2 - RKH/RKL 5 • Installing the DS-16B2 Rails 10 • Installing the DS-16B2 Switch 21 EMC Departmental Switch DS-16B Installation Guide 1 EMC Departmental Switch DS-16B2 Installation Guide P/N 014003075-A01 This document explains the power, cooling, weight, and rack placement requirements for mounting them in...

Installation Guide
Page 3
Device Power, Cooling, and Weight Information Device Power, Cooling, and Weight Information Device Power Requirements DS-16B2 switch Voltage: 100 to 240 V ac, 47 to 63 Hz Cooling Requirements (Heat Dissipation) 368.5 BTU/hr Maximum Weight 12.9 kg (28.5 lbs) Device Dimensions Device DS-16B2 switch DS-16B2 switch with rails Height 4.34 cm 1.0 U 4.44 cm Depth 1.71 in 61.00 cm 24.01 in 1.75 in 61.00 cm 24.01 in Width 42.86 cm 16.87 in 43.18 cm 17.00 in EMC Departmental Switch DS-16B2 Installation Guide 3
Device Power, Cooling, and Weight Information Device Power, Cooling, and Weight Information Device Power Requirements DS-16B2 switch Voltage: 100 to 240 V ac, 47 to 63 Hz Cooling Requirements (Heat Dissipation) 368.5 BTU/hr Maximum Weight 12.9 kg (28.5 lbs) Device Dimensions Device DS-16B2 switch DS-16B2 switch with rails Height 4.34 cm 1.0 U 4.44 cm Depth 1.71 in 61.00 cm 24.01 in 1.75 in 61.00 cm 24.01 in Width 42.86 cm 16.87 in 43.18 cm 17.00 in EMC Departmental Switch DS-16B2 Installation Guide 3
Installation Guide
Page 4
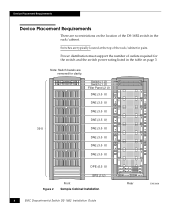
... U) DAE (3.5 U) DAE (3.5 U) 39 U DAE (3.5 U) DAE (3.5 U) DAE (3.5 U) DAE (3.5 U) DPE (6.5 U) Figure 2 SPS (1 U) Front Sample Cabinet Installation 4 EMC Departmental Switch DS-16B2 Installation Guide Rear EMC2056 Device Placement Requirements Device Placement Requirements There are no restrictions on page 3. Switches are removed for the switch and the switch ...power rating listed in the table on the location of the DS-16B2 switch in pairs. Note: Switch bezels are typically located at the top of outlets required for clarity. ...
... U) DAE (3.5 U) DAE (3.5 U) 39 U DAE (3.5 U) DAE (3.5 U) DAE (3.5 U) DAE (3.5 U) DPE (6.5 U) Figure 2 SPS (1 U) Front Sample Cabinet Installation 4 EMC Departmental Switch DS-16B2 Installation Guide Rear EMC2056 Device Placement Requirements Device Placement Requirements There are no restrictions on page 3. Switches are removed for the switch and the switch ...power rating listed in the table on the location of the DS-16B2 switch in pairs. Note: Switch bezels are typically located at the top of outlets required for clarity. ...
Installation Guide
Page 5
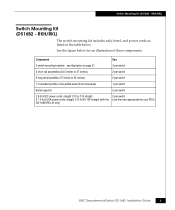
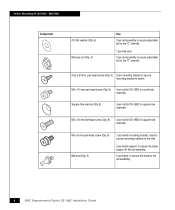
RKH/RKL) The switch mounting kit includes rails, bezel, and power cords as listed in the table below for your PDU) DS-16B2-RKL kit only) EMC Departmental Switch DS-16B2 Installation Guide 5 Component Use 2 switch mounting brackets - See the figure below . RKH/RKL) Switch Mounting Kit (DS16B2 - Switch Mounting Kit (DS16B2 - see illustration on page...
RKH/RKL) The switch mounting kit includes rails, bezel, and power cords as listed in the table below for your PDU) DS-16B2-RKL kit only) EMC Departmental Switch DS-16B2 Installation Guide 5 Component Use 2 switch mounting brackets - See the figure below . RKH/RKL) Switch Mounting Kit (DS16B2 - Switch Mounting Kit (DS16B2 - see illustration on page...
Installation Guide
Page 6
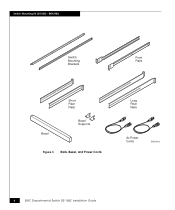
RKH/RKL) Switch Mounting Brackets Front Rails Bezel Short Rear Rails Bezel Supports Figure 3 Rails. Switch Mounting Kit (DS16B2 - Bezel, and Power Cords Long Rear Rails Ac Power Cords EMC2042 6 EMC Departmental Switch DS-16B2 Installation Guide
RKH/RKL) Switch Mounting Brackets Front Rails Bezel Short Rear Rails Bezel Supports Figure 3 Rails. Switch Mounting Kit (DS16B2 - Bezel, and Power Cords Long Rear Rails Ac Power Cords EMC2042 6 EMC Departmental Switch DS-16B2 Installation Guide

Installation Guide
Page 7
Only the long rails, used in the switch mounting kit. EMC Departmental Switch DS-16B2 Installation Guide 7 RKH/RKL) Screws, Nuts and Washers See the table below for the EMC CLARiiON® rack come pre-assembled, with the power cord in the rail. Switch Mounting Kit (DS16B2 - The rail assemblies for a detailed list of all the securing hardware that is included in third party racks/cabinets, must be assembled.
Only the long rails, used in the switch mounting kit. EMC Departmental Switch DS-16B2 Installation Guide 7 RKH/RKL) Screws, Nuts and Washers See the table below for the EMC CLARiiON® rack come pre-assembled, with the power cord in the rail. Switch Mounting Kit (DS16B2 - The rail assemblies for a detailed list of all the securing hardware that is included in third party racks/cabinets, must be assembled.
Installation Guide
Page 8
... bracket to secure mounting bracket to the rail assembly. 8 EMC Departmental Switch DS-16B2 Installation Guide Used to secure mounting brackets to the rails. 2 per bezel support, to secure the bezel support to the rail assembly. 2 per rail for DS-16B2 in round-hole channels. Square-hole washer (Qty. 8) ...4 per rail for DS-16B2 in . M5 x 10-mm pan-head screw (Qty. 8) 4 per rail for DS-16B2 in square-hole channels. M3 x 8-mm pan-head screw (Qty. 6)...
... bracket to secure mounting bracket to the rail assembly. 8 EMC Departmental Switch DS-16B2 Installation Guide Used to secure mounting brackets to the rails. 2 per bezel support, to secure the bezel support to the rail assembly. 2 per rail for DS-16B2 in round-hole channels. Square-hole washer (Qty. 8) ...4 per rail for DS-16B2 in . M5 x 10-mm pan-head screw (Qty. 8) 4 per rail for DS-16B2 in square-hole channels. M3 x 8-mm pan-head screw (Qty. 6)...

Installation Guide
Page 9
RKH/RKL) Tools Required for Installation You will need the following tools to complete the installation of the rails and switch(es). Tools Required: #1 Phillips Screwdriver 6-mm (1/4-in.) 8mm (5/16-in.) Nut Driver Nut Driver EMC2065 EMC Departmental Switch DS-16B2 Installation Guide 9 Switch Mounting Kit (DS16B2 -
RKH/RKL) Tools Required for Installation You will need the following tools to complete the installation of the rails and switch(es). Tools Required: #1 Phillips Screwdriver 6-mm (1/4-in.) 8mm (5/16-in.) Nut Driver Nut Driver EMC2065 EMC Departmental Switch DS-16B2 Installation Guide 9 Switch Mounting Kit (DS16B2 -

Installation Guide
Page 10
Figure 4 shows a view of the Rails Installed in a 39 U rack/cabinet. Installing the DS-16B2 Rails Installing the DS-16B2 Rails This section describes the installation procedures for Clarity Rear Figure 4 View of the rails installed in a 39 U Rack/Cabinet 10 EMC Departmental Switch DS-16B2 Installation Guide EMC2071 Front Rear Door Removed for the DS-16B2 rails.
Figure 4 shows a view of the Rails Installed in a 39 U rack/cabinet. Installing the DS-16B2 Rails Installing the DS-16B2 Rails This section describes the installation procedures for Clarity Rear Figure 4 View of the rails installed in a 39 U Rack/Cabinet 10 EMC Departmental Switch DS-16B2 Installation Guide EMC2071 Front Rear Door Removed for the DS-16B2 rails.

Installation Guide
Page 11
... between 20.5 inches and 27 inches. To the rear of the cabinet Figure 5 EMC2059 DS-16B2 Short Rear Rails (for the EMC CLARiiON Rack) To the rear of the cabinet Figure 6 EMC2060 DS-16B2 Long Rear Rails (for your rail kit contains 2 different length rear rail mounts, be ...sure to use the rail length that is appropriate for third Party Racks/Cabinets) EMC Departmental Switch DS-16B2 Installation Guide 11 Installing the DS-16B2 Rails DS-16B2 Rails Installation There are two different length rails as shown in Figures 4 and 5: The short rails range between...
... between 20.5 inches and 27 inches. To the rear of the cabinet Figure 5 EMC2059 DS-16B2 Short Rear Rails (for the EMC CLARiiON Rack) To the rear of the cabinet Figure 6 EMC2060 DS-16B2 Long Rear Rails (for your rail kit contains 2 different length rear rail mounts, be ...sure to use the rail length that is appropriate for third Party Racks/Cabinets) EMC Departmental Switch DS-16B2 Installation Guide 11 Installing the DS-16B2 Rails DS-16B2 Rails Installation There are two different length rails as shown in Figures 4 and 5: The short rails range between...
Installation Guide
Page 12
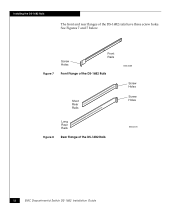
Screw Holes Front Rails Figure 7 Front Flange of the DS-16B2 Rails Short Rear Rails EMC2069 Screw Holes Screw Holes Figure 8 Long Rear Rails Rear Flange of the DS-16B2 rails have three screw holes. See Figures 7 and 7 below. Installing the DS-16B2 Rails The front and rear flanges of the DS-16B2 Rails EMC2070 12 EMC Departmental Switch DS-16B2 Installation Guide
Screw Holes Front Rails Figure 7 Front Flange of the DS-16B2 Rails Short Rear Rails EMC2069 Screw Holes Screw Holes Figure 8 Long Rear Rails Rear Flange of the DS-16B2 rails have three screw holes. See Figures 7 and 7 below. Installing the DS-16B2 Rails The front and rear flanges of the DS-16B2 Rails EMC2070 12 EMC Departmental Switch DS-16B2 Installation Guide
Installation Guide
Page 13
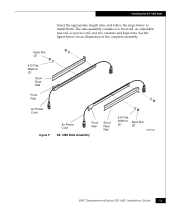
The rails assembly consists of the complete assembly. Installing the DS-16B2 Rails Select the appropriate length rails, and follow the steps below for an illustration of a front rail, an adjustable rear rail, ac power cord, and two washers and keps nuts. See the figure below to install them. Keps Nut (2) #10 Flat Washer (2) Short Rear Rail Front Rail Ac Power Cord Figure 9 Ac Power Cord Front Rail DS-16B2 Rails Assembly Short Rear Rail #10 Flat Washer (2) Keps Nut (2) EMC2044 EMC Departmental Switch DS-16B2 Installation Guide 13
The rails assembly consists of the complete assembly. Installing the DS-16B2 Rails Select the appropriate length rails, and follow the steps below for an illustration of a front rail, an adjustable rear rail, ac power cord, and two washers and keps nuts. See the figure below to install them. Keps Nut (2) #10 Flat Washer (2) Short Rear Rail Front Rail Ac Power Cord Figure 9 Ac Power Cord Front Rail DS-16B2 Rails Assembly Short Rear Rail #10 Flat Washer (2) Keps Nut (2) EMC2044 EMC Departmental Switch DS-16B2 Installation Guide 13

Installation Guide
Page 14
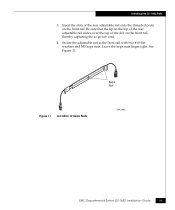
... rail. See Figure 10. Place the front rail down on the rails. The length can be adjusted once the switch is a new installation in an EMC CLARiiON rack, the rails are installing the switch in the Front Rail Rack Rear/ Plug into Switch Front Rail Figure 10 Installing the ac Power... leave a little extra length (6 to 8 inches) at the front end of the power cord. Ac Power Cord Lip Rack Front/ Plug into PDU EMC2068 14 EMC Departmental Switch DS-16B2 Installation Guide Installing the DS-16B2 Rails Assembling the Rails If this is installed on a table. 2.
... rail. See Figure 10. Place the front rail down on the rails. The length can be adjusted once the switch is a new installation in an EMC CLARiiON rack, the rails are installing the switch in the Front Rail Rack Rear/ Plug into Switch Front Rail Figure 10 Installing the ac Power... leave a little extra length (6 to 8 inches) at the front end of the power cord. Ac Power Cord Lip Rack Front/ Plug into PDU EMC2068 14 EMC Departmental Switch DS-16B2 Installation Guide Installing the DS-16B2 Rails Assembling the Rails If this is installed on a table. 2.
Installation Guide
Page 15
Keps Nut Figure 11 Location of the rear adjustable rail onto the threaded posts on the front rail, thereby capturing the ac power cord. 4. See Figure 11. Installing the DS-16B2 Rails 3. Leave the keps nuts finger tight. Secure the adjustable rail to the front rail with two #10 flat washers and M5 keps nuts. Be sure that the lip on the top of the rear adjustable rail slides over the top of the slot on the front rail. Insert the slots of Keps Nuts EMC2066 EMC Departmental Switch DS-16B2 Installation Guide 15
Keps Nut Figure 11 Location of the rear adjustable rail onto the threaded posts on the front rail, thereby capturing the ac power cord. 4. See Figure 11. Installing the DS-16B2 Rails 3. Leave the keps nuts finger tight. Secure the adjustable rail to the front rail with two #10 flat washers and M5 keps nuts. Be sure that the lip on the top of the rear adjustable rail slides over the top of the slot on the front rail. Insert the slots of Keps Nuts EMC2066 EMC Departmental Switch DS-16B2 Installation Guide 15

Installation Guide
Page 16
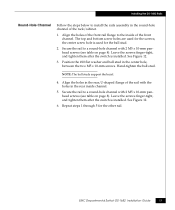
Keps Nut Keps Nut Figure 12 Securing the Keps Nuts EMC2045 If the side skins are adjusted to fit between the channels in the rack/cabinet you will locate the switch. 6. Adjust the length of the rail to the correct length, tighten the keps nuts on the rack/cabinet, the keps nuts can be tightened after the rails have been installed. 16 EMC Departmental Switch DS-16B2 Installation Guide Determine where in the rack/cabinet. 7. See Figure 12. Once the rails are removed on the rail assembly. Installing the DS-16B2 Rails 5.
Keps Nut Keps Nut Figure 12 Securing the Keps Nuts EMC2045 If the side skins are adjusted to fit between the channels in the rack/cabinet you will locate the switch. 6. Adjust the length of the rail to the correct length, tighten the keps nuts on the rack/cabinet, the keps nuts can be tightened after the rails have been installed. 16 EMC Departmental Switch DS-16B2 Installation Guide Determine where in the rack/cabinet. 7. See Figure 12. Once the rails are removed on the rail assembly. Installing the DS-16B2 Rails 5.
Installation Guide
Page 17
...-tight, and tighten them after the switch is used for the other rail. See Figure 12. 6. Installing the DS-16B2 Rails Round-Hole Channel Follow the steps below to the inside channel. 5. EMC Departmental Switch DS-16B2 Installation Guide 17 Align the holes of the front rail flange to install the rails assembly in the...
...-tight, and tighten them after the switch is used for the other rail. See Figure 12. 6. Installing the DS-16B2 Rails Round-Hole Channel Follow the steps below to the inside channel. 5. EMC Departmental Switch DS-16B2 Installation Guide 17 Align the holes of the front rail flange to install the rails assembly in the...
Installation Guide
Page 18
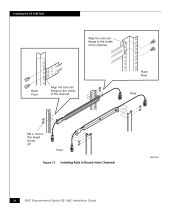
Rack Rear Rear M5 x 10-mm Pan Head Screw (8) Front Figure 13 Installing Rails in Round-Hole Channels EMC2046 18 EMC Departmental Switch DS-16B2 Installation Guide Rack Front Align the front rail flange to the inside of the channel. Installing the DS-16B2 Rails Align the rear rail flange to the inside of the channel.
Rack Rear Rear M5 x 10-mm Pan Head Screw (8) Front Figure 13 Installing Rails in Round-Hole Channels EMC2046 18 EMC Departmental Switch DS-16B2 Installation Guide Rack Front Align the front rail flange to the inside of the channel. Installing the DS-16B2 Rails Align the rear rail flange to the inside of the channel.

Installation Guide
Page 19
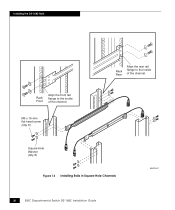
...square-hole channel with the holes in the rear inside of the front rail flange to the inside channel, as shown in Figure 14. 4. EMC Departmental Switch DS-16B2 Installation Guide 19 Align the holes of the front channel. Secure the rail to a square-hole channel with 2 square-hole washers and M5 ...(see table on page 8). See Figure 14. 2. hole washers and M5 x 16-mm flat-head screws (see table on page 8). Installing the DS-16B2 Rails Square-Hole Channel Follow the steps below to install the rails assembly in the square-hole channel of the rail with 2 square- Leave the...
...square-hole channel with the holes in the rear inside of the front rail flange to the inside channel, as shown in Figure 14. 4. EMC Departmental Switch DS-16B2 Installation Guide 19 Align the holes of the front channel. Secure the rail to a square-hole channel with 2 square-hole washers and M5 ...(see table on page 8). See Figure 14. 2. hole washers and M5 x 16-mm flat-head screws (see table on page 8). Installing the DS-16B2 Rails Square-Hole Channel Follow the steps below to install the rails assembly in the square-hole channel of the rail with 2 square- Leave the...
Installation Guide
Page 20
Square-Hole Washer (Qty. 8) Figure 14 Installing Rails in Square-Hole Channels EMC2047 20 EMC Departmental Switch DS-16B2 Installation Guide M5 x 16-mm flat head screw (Qty. 8) Rack Rear Align the rear rail flange to the inside of the channel. Installing the DS-16B2 Rails Rack Front Align the front rail flange to the inside of the channel.
Square-Hole Washer (Qty. 8) Figure 14 Installing Rails in Square-Hole Channels EMC2047 20 EMC Departmental Switch DS-16B2 Installation Guide M5 x 16-mm flat head screw (Qty. 8) Rack Rear Align the rear rail flange to the inside of the channel. Installing the DS-16B2 Rails Rack Front Align the front rail flange to the inside of the channel.

Installation Guide
Page 21
... 8). Pan Head Screw Switch (6) Mounting Bracket Hole Figure 15 Attaching the Switch Mounting Brackets Switch Mounting Bracket EMC2048 EMC Departmental Switch DS-16B2 Installation Guide 21 Follow the steps below to attach the mounting brackets to the switch before installing it on the ...switch. Installing the DS-16B2 Switch Installing the DS-16B2 Switch This section describes the procedures for installing the DS-16B2 switch in . The mounting brackets slide into the "C" channel of the switch. 2. ...
... 8). Pan Head Screw Switch (6) Mounting Bracket Hole Figure 15 Attaching the Switch Mounting Brackets Switch Mounting Bracket EMC2048 EMC Departmental Switch DS-16B2 Installation Guide 21 Follow the steps below to attach the mounting brackets to the switch before installing it on the ...switch. Installing the DS-16B2 Switch Installing the DS-16B2 Switch This section describes the procedures for installing the DS-16B2 switch in . The mounting brackets slide into the "C" channel of the switch. 2. ...
