User's Guide
Page 46
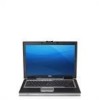
... mode in Windows Vista, search for the keyword hibernate in Windows XP, click Start→ Turn off computer, press and hold , and click Hibernate. To manually enter hibernate mode in Windows Help and Support (click Start→ Help and Support). You cannot make the computer exit hibernate mode by pressing a key...
... mode in Windows Vista, search for the keyword hibernate in Windows XP, click Start→ Turn off computer, press and hold , and click Hibernate. To manually enter hibernate mode in Windows Help and Support (click Start→ Help and Support). You cannot make the computer exit hibernate mode by pressing a key...

User's Guide
Page 101
..."Diagnostics Checklist" on page 153). • If available, connect an external keyboard. • If the problem persists, contact Dell Support. CAUTION: Before you receive notifications. Troubleshooting 101 The service is free and can be customized for content, format, and ... failure has occurred. To enroll for your computer. • If the problem persists, contact contact Dell Support. A possible LCD • Reseat the LCD cable (see "Keyboard" failure has occurred. into your failure has occurred. computer's Service Manual). • If the problem persists, contact...
..."Diagnostics Checklist" on page 153). • If available, connect an external keyboard. • If the problem persists, contact Dell Support. CAUTION: Before you receive notifications. Troubleshooting 101 The service is free and can be customized for content, format, and ... failure has occurred. To enroll for your computer. • If the problem persists, contact contact Dell Support. A possible LCD • Reseat the LCD cable (see "Keyboard" failure has occurred. into your failure has occurred. computer's Service Manual). • If the problem persists, contact...
User's Guide
Page 106
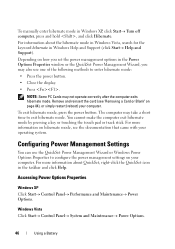
... you click, double-click, or right-click the icon. The Dell Support Utility is not listed, perform a full scan with your antivirus software to manually check your computing environment. E N S U R E T H A T M I C R O S O F T ® W I N D O W S ® R E C O G N I Z E S T H E D R I V E - The Dell Support icon in the Product Information Guide. Clicking the Dell Support Icon Click or right-click the icon to perform the...
... you click, double-click, or right-click the icon. The Dell Support Utility is not listed, perform a full scan with your antivirus software to manually check your computing environment. E N S U R E T H A T M I C R O S O F T ® W I N D O W S ® R E C O G N I Z E S T H E D R I V E - The Dell Support icon in the Product Information Guide. Clicking the Dell Support Icon Click or right-click the icon to perform the...

User's Guide
Page 143
... location to which you previously copied the driver files. 7 When the name of the driver→ OK→ Next. 8 Click Finish and restart your computer. Manually Reinstalling Drivers After extracting the driver files to your hard drive as described in the previous section, reinstall the drivers: Microsoft Windows XP 1 Click Start...
... location to which you previously copied the driver files. 7 When the name of the driver→ OK→ Next. 8 Click Finish and restart your computer. Manually Reinstalling Drivers After extracting the driver files to your hard drive as described in the previous section, reinstall the drivers: Microsoft Windows XP 1 Click Start...

User's Guide
Page 201
...installation. NOTICE: The FCC regulations provide that the system and the receiver are designed to correct the interference by Dell Inc. These limits are on , you are encouraged to try to provide reasonable protection against harmful interference in accordance with the... manufacturer's instruction manual, may cause undesired operation. Appendix 201 However, there is subject to the following measures: • Reorient the receiving antenna....
...installation. NOTICE: The FCC regulations provide that the system and the receiver are designed to correct the interference by Dell Inc. These limits are on , you are encouraged to try to provide reasonable protection against harmful interference in accordance with the... manufacturer's instruction manual, may cause undesired operation. Appendix 201 However, there is subject to the following measures: • Reorient the receiving antenna....

Service Manual
Page 2
DellTM XFR D630 Fully Rugged Notebook Service Manual Notes, Notices, and Cautions NOTE: A NOTE indicates important information that helps you how to avoid the problem. Information in this document to refer to either potential damage to hardware or loss of Dell Inc.; DirectVue is provided for... Bluetooth SIG, Inc. The content is provided as is a registered trademark owned by Dell under license. Page 2 of any proprietary interest in this text: Dell, the DELL logo, and Latitude are registered trademarks of Microsoft Corporation; Bluetooth is , without the written permission of the...
DellTM XFR D630 Fully Rugged Notebook Service Manual Notes, Notices, and Cautions NOTE: A NOTE indicates important information that helps you how to avoid the problem. Information in this document to refer to either potential damage to hardware or loss of Dell Inc.; DirectVue is provided for... Bluetooth SIG, Inc. The content is provided as is a registered trademark owned by Dell under license. Page 2 of any proprietary interest in this text: Dell, the DELL logo, and Latitude are registered trademarks of Microsoft Corporation; Bluetooth is , without the written permission of the...

Service Manual
Page 3
DellTM XFR D630 Fully Rugged Notebook Service Manual Table of Contents 1 BEFORE YOU BEGIN ...6 1.1 RECOMMENDED TOOLS ...6 1.2 TURNING OFF YOUR COMPUTER 6 1.3 BEFORE WORKING INSIDE YOUR COMPUTER 6 1.4 SCREW CHART ...8 2 XBAY DEVICES ...13 3 HARD DRIVE...14 4 ...
DellTM XFR D630 Fully Rugged Notebook Service Manual Table of Contents 1 BEFORE YOU BEGIN ...6 1.1 RECOMMENDED TOOLS ...6 1.2 TURNING OFF YOUR COMPUTER 6 1.3 BEFORE WORKING INSIDE YOUR COMPUTER 6 1.4 SCREW CHART ...8 2 XBAY DEVICES ...13 3 HARD DRIVE...14 4 ...

Service Manual
Page 4
DellTM XFR D630 Fully Rugged Notebook Service Manual 10.10 INSTALLING THE DISPLAY LATCH 68 11 INTERNAL CARD WITH BLUETOOTH® WIRELESS TECHNOLOGY 68 11.1 REMOVING THE BLUETOOTH® WIRELESS CARD 68 11.2 ...
DellTM XFR D630 Fully Rugged Notebook Service Manual 10.10 INSTALLING THE DISPLAY LATCH 68 11 INTERNAL CARD WITH BLUETOOTH® WIRELESS TECHNOLOGY 68 11.1 REMOVING THE BLUETOOTH® WIRELESS CARD 68 11.2 ...

Service Manual
Page 5
DellTM XFR D630 Fully Rugged Notebook Service Manual 24 RF PASSTHRU BOARD 102 24.1 REMOVING THE RF PASSTHRU BOARD 102 24.2 INSTALLING THE RF PASSTHRU BOARD 103 25 BOTTOM CHASSIS 104 25.1 25.2 25.3 25.4 REMOVING THE BOTTOM CHASSIS 104 INSTALLING THE BOTTOM CHASSIS 105 REMOVING THE MODEM CABLE 105 INSTALLING THE MODEM CABLE 105 Page 5 of 106 Revision A01
DellTM XFR D630 Fully Rugged Notebook Service Manual 24 RF PASSTHRU BOARD 102 24.1 REMOVING THE RF PASSTHRU BOARD 102 24.2 INSTALLING THE RF PASSTHRU BOARD 103 25 BOTTOM CHASSIS 104 25.1 25.2 25.3 25.4 REMOVING THE BOTTOM CHASSIS 104 INSTALLING THE BOTTOM CHASSIS 105 REMOVING THE MODEM CABLE 105 INSTALLING THE MODEM CABLE 105 Page 5 of 106 Revision A01

Service Manual
Page 6
Damage due to servicing that the computer and any attached devices are turned off your computer. 1. DellTM XFR D630 Fully Rugged Notebook Service Manual 1 Before You Begin This chapter provides procedures for 4 seconds. 1.3 Before Working Inside Your Computer Use the following safety ... do not automatically turn off . If your own personal safety. NOTICE: When you shut down . Ensure that is not authorized by Dell is not covered by performing the removal procedure in reverse order. 1.1 Recommended Tools The procedures in this section, follow the safety instructions...
Damage due to servicing that the computer and any attached devices are turned off your computer. 1. DellTM XFR D630 Fully Rugged Notebook Service Manual 1 Before You Begin This chapter provides procedures for 4 seconds. 1.3 Before Working Inside Your Computer Use the following safety ... do not automatically turn off . If your own personal safety. NOTICE: When you shut down . Ensure that is not authorized by Dell is not covered by performing the removal procedure in reverse order. 1.1 Recommended Tools The procedures in this section, follow the safety instructions...

Service Manual
Page 7
... 5. Disconnect your computer and then unplug it from the computer. If the 2 security screws are disconnecting this type of the notebook. Press the power button to release the latching mechanism. Disconnect any connector pins. See the figure above for the location of ... of the battery compartment. Lift each latch and turn each a quarter-turn latches are correctly oriented and aligned. DellTM XFR D630 Fully Rugged Notebook Service Manual itself. NOTICE: To avoid damaging the computer, perform the following steps before you pull connectors apart, keep them evenly aligned ...
... 5. Disconnect your computer and then unplug it from the computer. If the 2 security screws are disconnecting this type of the notebook. Press the power button to release the latching mechanism. Disconnect any connector pins. See the figure above for the location of ... of the battery compartment. Lift each latch and turn each a quarter-turn latches are correctly oriented and aligned. DellTM XFR D630 Fully Rugged Notebook Service Manual itself. NOTICE: To avoid damaging the computer, perform the following steps before you pull connectors apart, keep them evenly aligned ...

Service Manual
Page 8
d. Remove the PC Card or Express Card. DellTM XFR D630 Fully Rugged Notebook Service Manual PC Card Slot c. Then close the protective door. 1.4 Screw Chart SCREW IMAGE PART NUMBER DESCRIPTION 18114 SHOULDER SCREW M2.5 18815 XFR LCD ASSY TOUCH SCREEN Qty/Assy Total Qty 6 6 18279 CHEESE HEAD SCREW M1.2 X 3 18806 18808 18812 AV DOOR ASSY VGA DOOR ASSY DVD DOOR ASSY 1 3 1 1 18353 SHOULDER SCREW-HEAT SPREADER 3 18035 HEAT SINK ASSY 3 18415 PAN HEAD SCREW M2.5 X 8 -BLACK 19 Page 8 of 106 Revision A01
d. Remove the PC Card or Express Card. DellTM XFR D630 Fully Rugged Notebook Service Manual PC Card Slot c. Then close the protective door. 1.4 Screw Chart SCREW IMAGE PART NUMBER DESCRIPTION 18114 SHOULDER SCREW M2.5 18815 XFR LCD ASSY TOUCH SCREEN Qty/Assy Total Qty 6 6 18279 CHEESE HEAD SCREW M1.2 X 3 18806 18808 18812 AV DOOR ASSY VGA DOOR ASSY DVD DOOR ASSY 1 3 1 1 18353 SHOULDER SCREW-HEAT SPREADER 3 18035 HEAT SINK ASSY 3 18415 PAN HEAD SCREW M2.5 X 8 -BLACK 19 Page 8 of 106 Revision A01

Service Manual
Page 9
DellTM XFR D630 Fully Rugged Notebook Service Manual 18815 XFR LCD ASSY TOUCH SCREEN 4 18802 PALMREST ASSY 11 18043 ASSY HANDLE WITH HOLDER 2 18619 LCD LATCH ASSY 2 18416 18044 18824 SCR,M3X14,PHH,...
DellTM XFR D630 Fully Rugged Notebook Service Manual 18815 XFR LCD ASSY TOUCH SCREEN 4 18802 PALMREST ASSY 11 18043 ASSY HANDLE WITH HOLDER 2 18619 LCD LATCH ASSY 2 18416 18044 18824 SCR,M3X14,PHH,...

Service Manual
Page 10
DellTM XFR D630 Fully Rugged Notebook Service Manual 18806 18810 18804 18807 18811 18623 18424 18043 18425 18043 18044 18426 18806 18808 18812 18802 18618 AV DOOR ASSY HDD DOOR ASSY FAN COVER BATTERY DOOR ASSY DOCKING DOOR ASSY KEYBOARD ASSY CSK SCREW M3 X 10 -BLACK ASSY HANDLE WITH HOLDER CSK SCREW M2 X 10 -BLACK ASSY HANDLE WITH HOLDER ASSY HANDLE CSK SCREW M2 X 3 -BLACK AV DOOR ASSY VGA DOOR ASSY DVD DOOR ASSY PALMREST ASSY AV DOOR COVER ASSY 4 2 4 2 6 4 4 4 4 2 2 2 2 10 2 2 2 18427 CSK SCREW M2.5 X 6 -BLACK 3 Page 10 of 106 Revision A01
DellTM XFR D630 Fully Rugged Notebook Service Manual 18806 18810 18804 18807 18811 18623 18424 18043 18425 18043 18044 18426 18806 18808 18812 18802 18618 AV DOOR ASSY HDD DOOR ASSY FAN COVER BATTERY DOOR ASSY DOCKING DOOR ASSY KEYBOARD ASSY CSK SCREW M3 X 10 -BLACK ASSY HANDLE WITH HOLDER CSK SCREW M2 X 10 -BLACK ASSY HANDLE WITH HOLDER ASSY HANDLE CSK SCREW M2 X 3 -BLACK AV DOOR ASSY VGA DOOR ASSY DVD DOOR ASSY PALMREST ASSY AV DOOR COVER ASSY 4 2 4 2 6 4 4 4 4 2 2 2 2 10 2 2 2 18427 CSK SCREW M2.5 X 6 -BLACK 3 Page 10 of 106 Revision A01

Service Manual
Page 11
DellTM XFR D630 Fully Rugged Notebook Service Manual 18808 18812 18428 18815 18808 18802 18813 18814 18429 18810 18807 18630 18809 18631 18632 18628 18444 18815 18803 VGA DOOR ASSY DVD DOOR ASSY CSK SCREW M2 X 8 -BLACK XFR LCD ASSY TOUCH SCREEN VGA DOOR ASSY PALMREST ASSY RJ DOOR ASSY USB PLASTIC DOOR ASSY CSK SCREW M2 X 6 -BLACK HDD DOOR ASSY BATTERY DOOR ASSY USB SIDE DOOR ASSY DIMMS DOOR ASSY POWER DOOR ASSY PCMCIA DOOR ASSY RUBBER KEYBOARD ASSY SCR,M2.5X5,PHH,TF,BCS XFR LCD ASSY TOUCH SCREEN MOTHERBOARD TO CHASSIS 1 2 2 2 10 2 2 2 2 2 2 30 4 2 3 15 10 6 4 Page 11 of 106 Revision A01
DellTM XFR D630 Fully Rugged Notebook Service Manual 18808 18812 18428 18815 18808 18802 18813 18814 18429 18810 18807 18630 18809 18631 18632 18628 18444 18815 18803 VGA DOOR ASSY DVD DOOR ASSY CSK SCREW M2 X 8 -BLACK XFR LCD ASSY TOUCH SCREEN VGA DOOR ASSY PALMREST ASSY RJ DOOR ASSY USB PLASTIC DOOR ASSY CSK SCREW M2 X 6 -BLACK HDD DOOR ASSY BATTERY DOOR ASSY USB SIDE DOOR ASSY DIMMS DOOR ASSY POWER DOOR ASSY PCMCIA DOOR ASSY RUBBER KEYBOARD ASSY SCR,M2.5X5,PHH,TF,BCS XFR LCD ASSY TOUCH SCREEN MOTHERBOARD TO CHASSIS 1 2 2 2 10 2 2 2 2 2 2 30 4 2 3 15 10 6 4 Page 11 of 106 Revision A01

Service Manual
Page 12
DellTM XFR D630 Fully Rugged Notebook Service Manual 18451 18802 18477 18802 18043 18803 18819 18517 18044 18535 18623 18816 18539 18629 18550 18824 PAN HEAD SCREW M2 X 8-BLACK PALMREST ASSY PANHEAD SCREW M2X4 PALMREST ASSY ASSY HANDLE WITH HOLDER RF PASS THROUGH LCD TOP COVER ASSY SCR,M3X6,PHH,MSCR,ZPS,XFR ASSY HANDLE CSK CAPTIVE SCREW M2 X 6 KEYBOARD ASSY HINGE COVER ASSY PAN HEAD SCREW M3 X 14 -BLACK STYLUS KIT ASSY PAN HEAD SCREW M3 X 22 -BLACK SHOULDER STRAP ASSY 1 1 1 9 4 2 2 2 2 19 15 4 1 1 2 2 18590 SCREW,KYBD BLK, PAN HEAD M2X3 19 Page 12 of 106 Revision A01
DellTM XFR D630 Fully Rugged Notebook Service Manual 18451 18802 18477 18802 18043 18803 18819 18517 18044 18535 18623 18816 18539 18629 18550 18824 PAN HEAD SCREW M2 X 8-BLACK PALMREST ASSY PANHEAD SCREW M2X4 PALMREST ASSY ASSY HANDLE WITH HOLDER RF PASS THROUGH LCD TOP COVER ASSY SCR,M3X6,PHH,MSCR,ZPS,XFR ASSY HANDLE CSK CAPTIVE SCREW M2 X 6 KEYBOARD ASSY HINGE COVER ASSY PAN HEAD SCREW M3 X 14 -BLACK STYLUS KIT ASSY PAN HEAD SCREW M3 X 22 -BLACK SHOULDER STRAP ASSY 1 1 1 9 4 2 2 2 2 19 15 4 1 1 2 2 18590 SCREW,KYBD BLK, PAN HEAD M2X3 19 Page 12 of 106 Revision A01

Service Manual
Page 13
... remove and install devices while the computer is not present, you want to eject, and click Stop. 3. Press the device latch release. DellTM XFR D630 Fully Rugged Notebook Service Manual 18815 XFR LCD ASSY TOUCH SCREEN 8 18802 PALMREST ASSY 2 18803 CARD CAGE ON BASE CHASSIS 4 18623 KEYBOARD ASSY 3 18823 MOTHERBOARD ASSY 2 18591 18802...
... remove and install devices while the computer is not present, you want to eject, and click Stop. 3. Press the device latch release. DellTM XFR D630 Fully Rugged Notebook Service Manual 18815 XFR LCD ASSY TOUCH SCREEN 8 18802 PALMREST ASSY 2 18803 CARD CAGE ON BASE CHASSIS 4 18623 KEYBOARD ASSY 3 18823 MOTHERBOARD ASSY 2 18591 18802...

Service Manual
Page 14
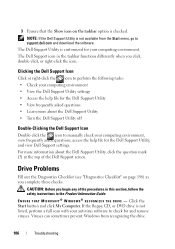
...new device into the XBay until it clicks into place. 3 Hard Drive CAUTION: If you remove the hard drive from sources other than Dell. even a slight bump can damage the drive. You also need the Operating System media to install the drivers and utilities on , ... and Utilities media for hard drives from the computer when the drive is on the new hard drive. NOTE: Dell does not guarantee compatibility or provide support for your computer before removing the hard drive. DellTM XFR D630 Fully Rugged Notebook Service Manual 1 Optical drive 2 Device Latch release 4.
...new device into the XBay until it clicks into place. 3 Hard Drive CAUTION: If you remove the hard drive from sources other than Dell. even a slight bump can damage the drive. You also need the Operating System media to install the drivers and utilities on , ... and Utilities media for hard drives from the computer when the drive is on the new hard drive. NOTE: Dell does not guarantee compatibility or provide support for your computer before removing the hard drive. DellTM XFR D630 Fully Rugged Notebook Service Manual 1 Optical drive 2 Device Latch release 4.
Service Manual
Page 15
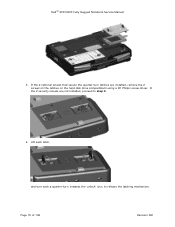
Page 15 of 106 Revision A01 If the 2 security screws are installed, remove the 2 screws on the latches on the hard disk drive compartment using a #1 Philips screw driver. Lift each latch, and turn each a quarter-turn latches are not installed, proceed to release the latching mechanism. DellTM XFR D630 Fully Rugged Notebook Service Manual 3. If the 2 optional screws that secure the quarter-turn , towards the 'unlock' icon, to step 4. 4.
Page 15 of 106 Revision A01 If the 2 security screws are installed, remove the 2 screws on the latches on the hard disk drive compartment using a #1 Philips screw driver. Lift each latch, and turn each a quarter-turn latches are not installed, proceed to release the latching mechanism. DellTM XFR D630 Fully Rugged Notebook Service Manual 3. If the 2 optional screws that secure the quarter-turn , towards the 'unlock' icon, to step 4. 4.

Service Manual
Page 16
... from the motherboard. 7. NOTICE: Use firm and even pressure to slide the drive into place. Remove the compartment cover from its packaging. DellTM XFR D630 Fully Rugged Notebook Service Manual 5. NOTICE: When the hard drive is not in the computer, store it back to assist in protective antistatic packaging. 8. Save the original packaging...
... from the motherboard. 7. NOTICE: Use firm and even pressure to slide the drive into place. Remove the compartment cover from its packaging. DellTM XFR D630 Fully Rugged Notebook Service Manual 5. NOTICE: When the hard drive is not in the computer, store it back to assist in protective antistatic packaging. 8. Save the original packaging...


