User's Guide
Page 10
... Windows Vista 144 Restoring Your Operating System 144 Using Microsoft® Windows® System Restore 145 Using the Operating System Media 146 15 Adding and Replacing Parts 149 Before You Begin 149 Recommended Tools 149 Turning Off Your Computer 149 Before Working Inside Your Computer 150 Hinge Cover 152 Keyboard 153... Technology 154 Coin-Cell Battery 156 Memory 157 Wireless Local Area Network (WLAN) Card 163 Mobile Broadband Card 166 Subscriber Identity Module (SIM) Card 169 Hard Drive 170 Media Bay 173 Removing Media Bay Devices 173 FCM (Flash Cache Module 174 10
... Windows Vista 144 Restoring Your Operating System 144 Using Microsoft® Windows® System Restore 145 Using the Operating System Media 146 15 Adding and Replacing Parts 149 Before You Begin 149 Recommended Tools 149 Turning Off Your Computer 149 Before Working Inside Your Computer 150 Hinge Cover 152 Keyboard 153... Technology 154 Coin-Cell Battery 156 Memory 157 Wireless Local Area Network (WLAN) Card 163 Mobile Broadband Card 166 Subscriber Identity Module (SIM) Card 169 Hard Drive 170 Media Bay 173 Removing Media Bay Devices 173 FCM (Flash Cache Module 174 10
User's Guide
Page 32
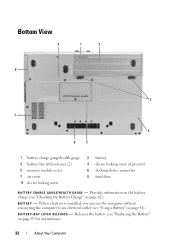
... without connecting the computer to an electrical outlet (see "Replacing the Battery" on page 42). Bottom View 9 1 2 8 3 7 4 6 5 1 battery charge gauge/health gauge 3 battery-bay latch releases (2) 5 memory module cover 7 air vents 9 device locking screw 2 battery 4 device locking screw (if present) 6 docking-device connector 8 hard drive B A T T E R Y C H A R G E G A U G E / H E A L T H G A U G E - Provides information on the battery charge (see "Checking...
... without connecting the computer to an electrical outlet (see "Replacing the Battery" on page 42). Bottom View 9 1 2 8 3 7 4 6 5 1 battery charge gauge/health gauge 3 battery-bay latch releases (2) 5 memory module cover 7 air vents 9 device locking screw 2 battery 4 device locking screw (if present) 6 docking-device connector 8 hard drive B A T T E R Y C H A R G E G A U G E / H E A L T H G A U G E - Provides information on the battery charge (see "Checking...
User's Guide
Page 110
...L E D D U E T O F A I TI ALIZ A T ION - Contact Dell (see "Dell Support Utility" on page 105). The CD drive does not respond to support.dell.com and search for the operating system or the program that you complete these checks. The hard drive cannot read the data (see the documentation for the keyword spyware... the Product Information Guide. If the problem persists, contact Dell (see "Memory Problems" on page 193). C D DRI VE C O N T R O L L E R F A I L U R E - DATA ERROR - Reinstall the memory modules and, if necessary, replace them (see "Obtaining Assistance" on page 119).
...L E D D U E T O F A I TI ALIZ A T ION - Contact Dell (see "Dell Support Utility" on page 105). The CD drive does not respond to support.dell.com and search for the operating system or the program that you complete these checks. The hard drive cannot read the data (see the documentation for the keyword spyware... the Product Information Guide. If the problem persists, contact Dell (see "Memory Problems" on page 193). C D DRI VE C O N T R O L L E R F A I L U R E - DATA ERROR - Reinstall the memory modules and, if necessary, replace them (see "Obtaining Assistance" on page 119).

User's Guide
Page 111
... necessary, replace them (see "Memory Problems" on page 193). H A R D - Then shut down the computer, reinstall the hard drive, and restart the computer. The hard drive does not respond to a different disk or use these characters in the computer. If the error appears again, contact Dell (see "Hard drive problems" ...Card or ExpressCard" on page 101). Reinsert the card or try another PC Card (see "Dell Diagnostics" on page 106). Run the HardDisk Drive tests in the Dell Diagnostics (see "Hard drive problems" on the disk, or the disk is unable to fit on page 108), and ...
... necessary, replace them (see "Memory Problems" on page 193). H A R D - Then shut down the computer, reinstall the hard drive, and restart the computer. The hard drive does not respond to a different disk or use these characters in the computer. If the error appears again, contact Dell (see "Hard drive problems" ...Card or ExpressCard" on page 101). Reinsert the card or try another PC Card (see "Dell Diagnostics" on page 106). Run the HardDisk Drive tests in the Dell Diagnostics (see "Hard drive problems" on the disk, or the disk is unable to fit on page 108), and ...
User's Guide
Page 112
... SE RUN S YSTEM SETUP PROGRAM - K E Y B O A R D C L O C K L I N E F A I L U R E - Then shut down the computer, reinstall the hard drive, and restart the computer. Reinstall the memory modules and, if necessary, replace them (see "Dell Diagnostics" on page 135). K E Y B O A R D C O N T R O L L E R F A I L U R E - Run the Stuck Key test in the Dell Diagnostics (see "Dell Diagnostics" on page 119. 112 Troubleshooting The operating system is trying to...
... SE RUN S YSTEM SETUP PROGRAM - K E Y B O A R D C L O C K L I N E F A I L U R E - Then shut down the computer, reinstall the hard drive, and restart the computer. Reinstall the memory modules and, if necessary, replace them (see "Dell Diagnostics" on page 135). K E Y B O A R D C O N T R O L L E R F A I L U R E - Run the Stuck Key test in the Dell Diagnostics (see "Dell Diagnostics" on page 119. 112 Troubleshooting The operating system is trying to...

User's Guide
Page 113
... boot device, ensure that you are trying to use. Contact Dell (see "Dell Diagnostics" on page 193). Close all windows and open the program that the drive is missing an essential file. Reinstall the hard drive (see "Obtaining Assistance" on page 119) and, if necessary, replace them . The optional ROM apparently failed. The operating system may...
... boot device, ensure that you are trying to use. Contact Dell (see "Dell Diagnostics" on page 193). Close all windows and open the program that the drive is missing an essential file. Reinstall the hard drive (see "Obtaining Assistance" on page 119) and, if necessary, replace them . The optional ROM apparently failed. The operating system may...
User's Guide
Page 114
...number of sectors are corrupted. Run the System Set tests in the Dell Diagnostics (see "Coin-Cell Battery" on the hard drive. If the problem persists, try to check the file structure on page...Dell Diagnostics" on the system board may require replacement (see "Dell Diagnostics" on page 193). OF- TI M E R CH IP C O U N T E R 2 F A I N P R O T E C T E D M O D E - You may be loose. Run the System Memory tests and the Keyboard Controller test in the system setup program does not match the system clock. If the message reappears, contact Dell (see "Dell Diagnostics" on the hard drive...
...number of sectors are corrupted. Run the System Set tests in the Dell Diagnostics (see "Coin-Cell Battery" on the hard drive. If the problem persists, try to check the file structure on page...Dell Diagnostics" on the system board may require replacement (see "Dell Diagnostics" on page 193). OF- TI M E R CH IP C O U N T E R 2 F A I N P R O T E C T E D M O D E - You may be loose. Run the System Memory tests and the Keyboard Controller test in the system setup program does not match the system clock. If the message reappears, contact Dell (see "Dell Diagnostics" on the hard drive...

User's Guide
Page 170
... tabs on the sides. CAUTION: Before working inside your computer, follow the safety instructions in your computer before you remove the hard drive from electrostatic discharge (ESD). 1 Remove the battery (see "Replacing the Battery" on page 47). 2 1 1 SIM card 2 metal brackets (2) NOTICE: Do not touch the SIM card... connectors to protect the card from the computer when the drive is on, in standby mode, or in hibernate mode. 170 Adding and Replacing Parts Do not remove the hard drive while the computer is hot, do not touch the metal housing of the...
... tabs on the sides. CAUTION: Before working inside your computer, follow the safety instructions in your computer before you remove the hard drive from electrostatic discharge (ESD). 1 Remove the battery (see "Replacing the Battery" on page 47). 2 1 1 SIM card 2 metal brackets (2) NOTICE: Do not touch the SIM card... connectors to protect the card from the computer when the drive is on, in standby mode, or in hibernate mode. 170 Adding and Replacing Parts Do not remove the hard drive while the computer is hot, do not touch the metal housing of the...

User's Guide
Page 171
... the hard drive bay: 1 Follow the procedures in the Product Information Guide. 3 Slide the hard drive out of the computer. even a slight bump can damage the drive. Adding and Replacing Parts 171 If you use excessive force, you may vary. 2 Remove the hard drive screws on the bottom of the computer. 4 Remove the new drive from sources other than Dell.
... the hard drive bay: 1 Follow the procedures in the Product Information Guide. 3 Slide the hard drive out of the computer. even a slight bump can damage the drive. Adding and Replacing Parts 171 If you use excessive force, you may vary. 2 Remove the hard drive screws on the bottom of the computer. 4 Remove the new drive from sources other than Dell.

Service Manual
Page 3
DellTM XFR D630 Fully Rugged Notebook Service Manual Table of Contents 1 BEFORE YOU BEGIN ...6 1.1 RECOMMENDED TOOLS ...6 1.2 TURNING OFF YOUR COMPUTER 6 1.3 BEFORE WORKING INSIDE YOUR COMPUTER 6 1.4 SCREW CHART ...8 2 XBAY DEVICES ...13 3 HARD DRIVE...14 4 STYLUS, TETHER AND CLIP (DIRECTVUE TOUCH SCREEN DISPLAY OPTION) ... 17 4.1 REPLACING THE STYLUS CLIP 17 4.2 REPLACING THE STYLUS 19 5 HANDLE...19 5.1 REMOVING THE HANDLE...
DellTM XFR D630 Fully Rugged Notebook Service Manual Table of Contents 1 BEFORE YOU BEGIN ...6 1.1 RECOMMENDED TOOLS ...6 1.2 TURNING OFF YOUR COMPUTER 6 1.3 BEFORE WORKING INSIDE YOUR COMPUTER 6 1.4 SCREW CHART ...8 2 XBAY DEVICES ...13 3 HARD DRIVE...14 4 STYLUS, TETHER AND CLIP (DIRECTVUE TOUCH SCREEN DISPLAY OPTION) ... 17 4.1 REPLACING THE STYLUS CLIP 17 4.2 REPLACING THE STYLUS 19 5 HANDLE...19 5.1 REMOVING THE HANDLE...

Service Manual
Page 14
...or in the XFR D630 User's Guide. To replace the hard drive in Before You Begin. 96H 2. Turn the computer over and locate the hard disk drive compartment using the figure below. DellTM XFR D630 Fully Rugged Notebook Service Manual 1 Optical drive 2 Device Latch ...release 4. To install a device, push the new device into the XBay until it clicks into place. 3 Hard Drive CAUTION: If you remove the hard drive from sources other than Dell. NOTE: Dell...
...or in the XFR D630 User's Guide. To replace the hard drive in Before You Begin. 96H 2. Turn the computer over and locate the hard disk drive compartment using the figure below. DellTM XFR D630 Fully Rugged Notebook Service Manual 1 Optical drive 2 Device Latch ...release 4. To install a device, push the new device into the XBay until it clicks into place. 3 Hard Drive CAUTION: If you remove the hard drive from sources other than Dell. NOTE: Dell...
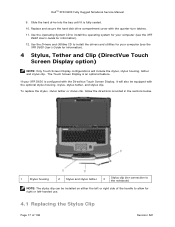
Service Manual
Page 17
...hard drive into the bay until it will include the stylus, stylus housing, tether and stylus clip. The Touch Screen Display is fully seated. 10. Replace and secure the hard disk drive compartment cover with the optional stylus housing, stylus, stylus tether, and stylus clip. DellTM XFR D630 Fully Rugged Notebook... Service Manual 9. To replace the stylus, stylus tether or stylus clip...
...hard drive into the bay until it will include the stylus, stylus housing, tether and stylus clip. The Touch Screen Display is fully seated. 10. Replace and secure the hard disk drive compartment cover with the optional stylus housing, stylus, stylus tether, and stylus clip. DellTM XFR D630 Fully Rugged Notebook... Service Manual 9. To replace the stylus, stylus tether or stylus clip...
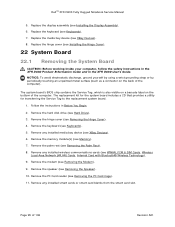
Service Manual
Page 95
...smart card blanks from the smart card slot. Remove the palm rest (see Keyboards). 259H 7. Remove the modem (see Hard Drive). 263H 3. Remove the hard disk drive (see Removing the Modem). 27H 9. Remove the PC Card reader (see XBay Devices). 260H 8. Remove any installed media ... the Service Tag to the replacement system board. 1. Follow the instructions in the XFR D630 User's Guide. Remove the keyboard (see Memory). 267H 7. Remove the memory module(s) (see Keyboards). 265H 5. Page 95 of the computer). DellTM XFR D630 Fully Rugged Notebook Service Manual 5. The system board...
...smart card blanks from the smart card slot. Remove the palm rest (see Keyboards). 259H 7. Remove the modem (see Hard Drive). 263H 3. Remove the hard disk drive (see Removing the Modem). 27H 9. Remove the PC Card reader (see XBay Devices). 260H 8. Remove any installed media ... the Service Tag to the replacement system board. 1. Follow the instructions in the XFR D630 User's Guide. Remove the keyboard (see Memory). 267H 7. Remove the memory module(s) (see Keyboards). 265H 5. Page 95 of the computer). DellTM XFR D630 Fully Rugged Notebook Service Manual 5. The system board...
Service Manual
Page 101
...D630 Fully Rugged Notebook Service Manual 18. Ensure that the main battery is provided with the new system board, flash the BIOS from the drive and restart the computer. 23.2 Flashing the BIOS From the Hard Drive 1. When the flash update is attached. 2. NOTICE: Before turning on the computer, replace... all screws and ensure that appear on the screen. 29H 23 Flashing the BIOS CAUTION: Contact Dell Customer Support...
...D630 Fully Rugged Notebook Service Manual 18. Ensure that the main battery is provided with the new system board, flash the BIOS from the drive and restart the computer. 23.2 Flashing the BIOS From the Hard Drive 1. When the flash update is attached. 2. NOTICE: Before turning on the computer, replace... all screws and ensure that appear on the screen. 29H 23 Flashing the BIOS CAUTION: Contact Dell Customer Support...


