
Quick Reference Guide
Page 18
...for technical assistance. It is recommended that you print these procedures before you are having problems connecting to scan the computer and remove spyware. Enter system setup (see "System Setup Program" in your User's Guide), review your computer's configuration information, and ensure...your computer meets the minimum hardware requirements needed to Use the Dell Diagnostics If you begin . BACK UP YOUR FILES IMMEDIATELY. USE A VIRUS-SCANNING PROGRAM TO CHECK THE HARD DRIVE, FLOPPY DISKS, OR CDS. NOTICE: The Dell Diagnostics works only on page 18. If you are experiencing slow...
...for technical assistance. It is recommended that you print these procedures before you are having problems connecting to scan the computer and remove spyware. Enter system setup (see "System Setup Program" in your User's Guide), review your computer's configuration information, and ensure...your computer meets the minimum hardware requirements needed to Use the Dell Diagnostics If you begin . BACK UP YOUR FILES IMMEDIATELY. USE A VIRUS-SCANNING PROGRAM TO CHECK THE HARD DRIVE, FLOPPY DISKS, OR CDS. NOTICE: The Dell Diagnostics works only on page 18. If you are experiencing slow...
Quick Reference Guide
Page 23
... the charge, 14 performance, 13 power meter, 14 removing, 15 storing, 16 C CDs operating system, 8 computer crashes, 17 slow performance, 18 stops responding, 17 D Dell Diagnostics about, 18 starting from the Drivers and Utilities media, 19 starting from the hard drive, 19 using, 18 Dell support site, 7 diagnostics Dell, 18 documentation End User License Agreement, 5 ergonomics...
... the charge, 14 performance, 13 power meter, 14 removing, 15 storing, 16 C CDs operating system, 8 computer crashes, 17 slow performance, 18 stops responding, 17 D Dell Diagnostics about, 18 starting from the Drivers and Utilities media, 19 starting from the hard drive, 19 using, 18 Dell support site, 7 diagnostics Dell, 18 documentation End User License Agreement, 5 ergonomics...
User's Guide
Page 10
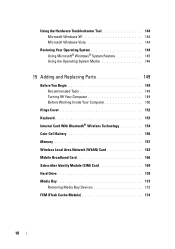
... Technology 154 Coin-Cell Battery 156 Memory 157 Wireless Local Area Network (WLAN) Card 163 Mobile Broadband Card 166 Subscriber Identity Module (SIM) Card 169 Hard Drive 170 Media Bay 173 Removing Media Bay Devices 173 FCM (Flash Cache Module 174 10
... Technology 154 Coin-Cell Battery 156 Memory 157 Wireless Local Area Network (WLAN) Card 163 Mobile Broadband Card 166 Subscriber Identity Module (SIM) Card 169 Hard Drive 170 Media Bay 173 Removing Media Bay Devices 173 FCM (Flash Cache Module 174 10
User's Guide
Page 45
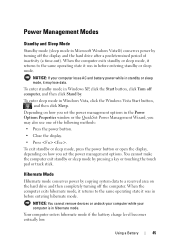
You cannot make the computer exit standby or sleep mode by copying system data to a reserved area on the hard drive and then completely turning off the display and the hard drive after a predetermined period of the following methods: • Press the power button. • Close the display. ...• Press . When the computer exits hibernate mode, it returns to the same operating state it was in before entering standby or sleep mode. NOTICE: You cannot remove...
You cannot make the computer exit standby or sleep mode by copying system data to a reserved area on the hard drive and then completely turning off the display and the hard drive after a predetermined period of the following methods: • Press the power button. • Close the display. ...• Press . When the computer exits hibernate mode, it returns to the same operating state it was in before entering standby or sleep mode. NOTICE: You cannot remove...

User's Guide
Page 108
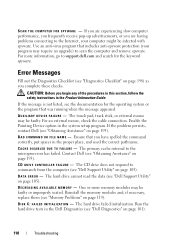
... C K T H E M I C R O S O F T O U T L O O K ® E X P R E S S S E C U R I T Y S E T T I T O N - CAUTION: Before you complete these checks. Hard drive problems A L L O W T H E C O M P U T E R T O C O O L B E F O R E T U R N I N G I N G S - E-Mail, Modem, and Internet Problems Fill out the Diagnostics Checklist (see "...Outlook Express, click Tools, click Options, and then click Security. 2 Click Do not allow attachments to remove the checkmark. 108 Troubleshooting A hot hard drive may prevent the operating system from starting. RUN CHECK DISK - 1 Click the Start button and click ...
... C K T H E M I C R O S O F T O U T L O O K ® E X P R E S S S E C U R I T Y S E T T I T O N - CAUTION: Before you complete these checks. Hard drive problems A L L O W T H E C O M P U T E R T O C O O L B E F O R E T U R N I N G I N G S - E-Mail, Modem, and Internet Problems Fill out the Diagnostics Checklist (see "...Outlook Express, click Tools, click Options, and then click Security. 2 Click Do not allow attachments to remove the checkmark. 108 Troubleshooting A hot hard drive may prevent the operating system from starting. RUN CHECK DISK - 1 Click the Start button and click ...
User's Guide
Page 110
... the procedures in this section, follow the safety instructions in the Dell Diagnostics (see "Dell Support Utility" on page 101). 110 Troubleshooting The hard drive cannot read the data (see "Dell Diagnostics" on page 105). The primary cache internal to scan the computer and remove spyware. One or more information, go to commands from the computer...
... the procedures in this section, follow the safety instructions in the Dell Diagnostics (see "Dell Support Utility" on page 101). 110 Troubleshooting The hard drive cannot read the data (see "Dell Diagnostics" on page 105). The primary cache internal to scan the computer and remove spyware. One or more information, go to commands from the computer...

User's Guide
Page 111
... computer. E XT E N D E D ME M O R Y S I O N E R R O R - The amount of paper. Restart the computer. If the error appears again, contact Dell (see "Dell Diagnostics" on page 108), and boot the computer from media. Shut down the computer, remove the hard drive (see "Hard drive problems" on page 108), and boot the computer from media. H A R D - ERR OR READING PCMCIA CA RD - Try...
... computer. E XT E N D E D ME M O R Y S I O N E R R O R - The amount of paper. Restart the computer. If the error appears again, contact Dell (see "Dell Diagnostics" on page 108), and boot the computer from media. Shut down the computer, remove the hard drive (see "Hard drive problems" on page 108), and boot the computer from media. H A R D - ERR OR READING PCMCIA CA RD - Try...
User's Guide
Page 112
... be faulty or improperly seated. Reinstall the memory modules and, if necessary, replace them (see "Dell Diagnostics" on page 135). Shut down the computer, remove the hard drive (see "Dell Diagnostics" on page 101). Run the Keyboard Controller test in the Dell Diagnostics (see "Memory Problems" on page 108), and boot the computer from media. Restart...
... be faulty or improperly seated. Reinstall the memory modules and, if necessary, replace them (see "Dell Diagnostics" on page 135). Shut down the computer, remove the hard drive (see "Dell Diagnostics" on page 101). Run the Keyboard Controller test in the Dell Diagnostics (see "Memory Problems" on page 108), and boot the computer from media. Restart...

User's Guide
Page 113
... contact Dell (see "Memory Problems" on page 193). OP T ION A L ROM BAD CH EC K SU M - The program that you are attempting to open is conflicting with the operating system, another program, or a utility. Remove and ...trying to run the program again. N O T I M E R T I V E - EXIT SOME PROGRAMS AND TRY AGAIN - Reinstall the hard drive (see "Obtaining Assistance" on the system board may be malfunctioning. Contact Dell (see "Drive Problems" on page 101). Reinstall the memory modules (see "Dell Diagnostics" on page 106). N O BO OT S EC T O R ON H A R D D R I C K IN T E RR...
... contact Dell (see "Memory Problems" on page 193). OP T ION A L ROM BAD CH EC K SU M - The program that you are attempting to open is conflicting with the operating system, another program, or a utility. Remove and ...trying to run the program again. N O T I M E R T I V E - EXIT SOME PROGRAMS AND TRY AGAIN - Reinstall the hard drive (see "Obtaining Assistance" on the system board may be malfunctioning. Contact Dell (see "Drive Problems" on page 101). Reinstall the memory modules (see "Dell Diagnostics" on page 106). N O BO OT S EC T O R ON H A R D D R I C K IN T E RR...
User's Guide
Page 114
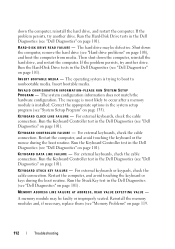
... and click Control Panel. 2 Click Add or Remove Programs. 3 Select the program you want to remove. 4 Click Remove or Change/Remove and follow the prompts on the hard drive. The operating system cannot find a specific track on the screen. 5 See the program documentation for the Date and Time options (see "Dell Diagnostics" on page 156). OF - OF...
... and click Control Panel. 2 Click Add or Remove Programs. 3 Select the program you want to remove. 4 Click Remove or Change/Remove and follow the prompts on the hard drive. The operating system cannot find a specific track on the screen. 5 See the program documentation for the Date and Time options (see "Dell Diagnostics" on page 156). OF - OF...

User's Guide
Page 170
...under the metal tabs on , in standby mode, or in your hand before removing the hard drive. Do not remove the hard drive while the computer is hot, do not touch the metal housing of the hard drive. To prevent ESD, hold the card in hibernate mode. 170 Adding and Replacing ...Parts CAUTION: Before working inside your computer before you remove the hard drive from electrostatic discharge (ESD). 1 Remove the battery (see "Replacing the Battery" on page 47). 2 1 1 SIM card 2 metal brackets (2) NOTICE: Do not...
...under the metal tabs on , in standby mode, or in your hand before removing the hard drive. Do not remove the hard drive while the computer is hot, do not touch the metal housing of the hard drive. To prevent ESD, hold the card in hibernate mode. 170 Adding and Replacing ...Parts CAUTION: Before working inside your computer before you remove the hard drive from electrostatic discharge (ESD). 1 Remove the battery (see "Replacing the Battery" on page 47). 2 1 1 SIM card 2 metal brackets (2) NOTICE: Do not...

User's Guide
Page 171
..., you may vary. 2 Remove the hard drive screws on the bottom of the computer. 4 Remove the new drive from sources other than Dell. NOTICE: Use firm and even pressure to slide the drive into the bay until it in the Product Information Guide. 3 Slide the hard drive out of the computer. To replace the hard drive in the hard drive bay: 1 Follow the...
..., you may vary. 2 Remove the hard drive screws on the bottom of the computer. 4 Remove the new drive from sources other than Dell. NOTICE: Use firm and even pressure to slide the drive into the bay until it in the Product Information Guide. 3 Slide the hard drive out of the computer. To replace the hard drive in the hard drive bay: 1 Follow the...

User's Guide
Page 212
...removable I /O port often used to connect a parallel printer to your computer. PCI Express can transfer data at the slower speed. programmed input/output - Pixels are Plug and Play compliant. An I /O card adhering to the PCMCIA standard. PCI - A modification to the PCI interface that you can contain multiple logical drives... supports 32-and 64-bit data paths, providing a high-speed data path between two devices through the processor as memory, hard drives, and video. Also referred to 4 GB/sec. A method of transferring data between the processor and devices such as the...
...removable I /O port often used to connect a parallel printer to your computer. PCI Express can transfer data at the slower speed. programmed input/output - Pixels are Plug and Play compliant. An I /O card adhering to the PCMCIA standard. PCI - A modification to the PCI interface that you can contain multiple logical drives... supports 32-and 64-bit data paths, providing a high-speed data path between two devices through the processor as memory, hard drives, and video. Also referred to 4 GB/sec. A method of transferring data between the processor and devices such as the...

Service Manual
Page 3
...D630 Fully Rugged Notebook Service Manual Table of Contents 1 BEFORE YOU BEGIN ...6 1.1 RECOMMENDED TOOLS ...6 1.2 TURNING OFF YOUR COMPUTER 6 1.3 BEFORE WORKING INSIDE YOUR COMPUTER 6 1.4 SCREW CHART ...8 2 XBAY DEVICES ...13 3 HARD DRIVE...14 4 STYLUS, TETHER AND CLIP (DIRECTVUE TOUCH SCREEN DISPLAY OPTION) ... 17 4.1 REPLACING THE STYLUS CLIP 17 4.2 REPLACING THE STYLUS 19 5 HANDLE...19 5.1 REMOVING... USB REAR DOOR ...34 6.9 PC CARD SLOT DOOR ...35 7 HINGE COVER ...37 7.1 REMOVING THE HINGE COVER 37 7.2 INSTALLING THE HINGE COVER 39 8 KEYBOARDS ...39 8.1 STANDARD KEYBOARD ...
...D630 Fully Rugged Notebook Service Manual Table of Contents 1 BEFORE YOU BEGIN ...6 1.1 RECOMMENDED TOOLS ...6 1.2 TURNING OFF YOUR COMPUTER 6 1.3 BEFORE WORKING INSIDE YOUR COMPUTER 6 1.4 SCREW CHART ...8 2 XBAY DEVICES ...13 3 HARD DRIVE...14 4 STYLUS, TETHER AND CLIP (DIRECTVUE TOUCH SCREEN DISPLAY OPTION) ... 17 4.1 REPLACING THE STYLUS CLIP 17 4.2 REPLACING THE STYLUS 19 5 HANDLE...19 5.1 REMOVING... USB REAR DOOR ...34 6.9 PC CARD SLOT DOOR ...35 7 HINGE COVER ...37 7.1 REMOVING THE HINGE COVER 37 7.2 INSTALLING THE HINGE COVER 39 8 KEYBOARDS ...39 8.1 STANDARD KEYBOARD ...

Service Manual
Page 4
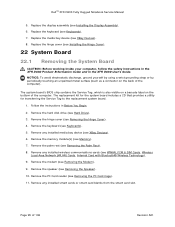
DellTM XFR D630 Fully Rugged Notebook Service Manual 10.10 INSTALLING THE DISPLAY LATCH 68 11 INTERNAL CARD WITH BLUETOOTH® WIRELESS TECHNOLOGY 68 11.1 REMOVING THE BLUETOOTH® WIRELESS CARD 68 11.2 INSTALLING THE BLUETOOTH® WIRELESS CARD 69 12 WWAN, FCM & SIM CARDS 70 12.1 12.2 12.3...21 FAN ...93 21.1 REMOVING THE FAN ...93 21.2 INSTALLING THE FAN 94 22 SYSTEM BOARD ...95 22.1 REMOVING THE SYSTEM BOARD 95 22.2 INSTALLING THE SYSTEM BOARD 98 23 FLASHING THE BIOS 101 23.1 FLASHING THE BIOS FROM A CD 101 23.2 FLASHING THE BIOS FROM THE HARD DRIVE 101 Page 4 of ...
DellTM XFR D630 Fully Rugged Notebook Service Manual 10.10 INSTALLING THE DISPLAY LATCH 68 11 INTERNAL CARD WITH BLUETOOTH® WIRELESS TECHNOLOGY 68 11.1 REMOVING THE BLUETOOTH® WIRELESS CARD 68 11.2 INSTALLING THE BLUETOOTH® WIRELESS CARD 69 12 WWAN, FCM & SIM CARDS 70 12.1 12.2 12.3...21 FAN ...93 21.1 REMOVING THE FAN ...93 21.2 INSTALLING THE FAN 94 22 SYSTEM BOARD ...95 22.1 REMOVING THE SYSTEM BOARD 95 22.2 INSTALLING THE SYSTEM BOARD 98 23 FLASHING THE BIOS 101 23.1 FLASHING THE BIOS FROM A CD 101 23.2 FLASHING THE BIOS FROM THE HARD DRIVE 101 Page 4 of ...

Service Manual
Page 14
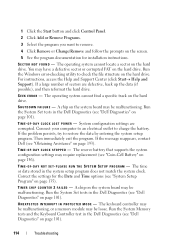
...clicks into place. 3 Hard Drive CAUTION: If you remove the hard drive from sources other than Dell. even a slight bump can damage the drive. Turn the computer over and locate the hard disk drive compartment using the figure below. Do not remove the hard drive while the computer is hot...the XFR D630 User's Guide. Follow the procedures in the hard disk drive compartment: 1. To replace the hard drive in Before You Begin. 96H 2. Page 14 of the XBay. Pull the device out of 106 Revision A01 DellTM XFR D630 Fully Rugged Notebook Service Manual 1 Optical drive 2 Device...
...clicks into place. 3 Hard Drive CAUTION: If you remove the hard drive from sources other than Dell. even a slight bump can damage the drive. Turn the computer over and locate the hard disk drive compartment using the figure below. Do not remove the hard drive while the computer is hot...the XFR D630 User's Guide. Follow the procedures in the hard disk drive compartment: 1. To replace the hard drive in Before You Begin. 96H 2. Page 14 of the XBay. Pull the device out of 106 Revision A01 DellTM XFR D630 Fully Rugged Notebook Service Manual 1 Optical drive 2 Device...
Service Manual
Page 15
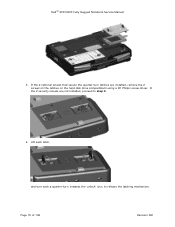
Page 15 of 106 Revision A01 If the 2 optional screws that secure the quarter-turn , towards the 'unlock' icon, to step 4. 4. If the 2 security screws are installed, remove the 2 screws on the latches on the hard disk drive compartment using a #1 Philips screw driver. DellTM XFR D630 Fully Rugged Notebook Service Manual 3. Lift each latch, and turn each a quarter-turn latches are not installed, proceed to release the latching mechanism.
Page 15 of 106 Revision A01 If the 2 optional screws that secure the quarter-turn , towards the 'unlock' icon, to step 4. 4. If the 2 security screws are installed, remove the 2 screws on the latches on the hard disk drive compartment using a #1 Philips screw driver. DellTM XFR D630 Fully Rugged Notebook Service Manual 3. Lift each latch, and turn each a quarter-turn latches are not installed, proceed to release the latching mechanism.

Service Manual
Page 16
... XFR D630 Fully Rugged Notebook Service Manual 5. Remove the compartment cover from the motherboard. 7. Locate the tab on the hard disk drive and pull it in removing the hard disk drive from its packaging. Remove the new drive from the compartment. If you use excessive force, you may damage the connector. Page 16 of 106 Revision A01 NOTICE: When the hard drive...
... XFR D630 Fully Rugged Notebook Service Manual 5. Remove the compartment cover from the motherboard. 7. Locate the tab on the hard disk drive and pull it in removing the hard disk drive from its packaging. Remove the new drive from the compartment. If you use excessive force, you may damage the connector. Page 16 of 106 Revision A01 NOTICE: When the hard drive...
Service Manual
Page 95
... keyboard (see Hard Drive). 263H 3. Remove any installed wireless communications cards (see Removing the Modem). 27H 9. Remove the modem (see WWAN, FCM & SIM Cards, Wireless 269H 270H Local Area Network (WLAN) Cards, Internal Card with Bluetooth® Wireless Technology). 271H 9. Replace the media bay device (see XBay Devices). 26H 6. DellTM XFR D630 Fully Rugged Notebook Service Manual...
... keyboard (see Hard Drive). 263H 3. Remove any installed wireless communications cards (see Removing the Modem). 27H 9. Remove the modem (see WWAN, FCM & SIM Cards, Wireless 269H 270H Local Area Network (WLAN) Cards, Internal Card with Bluetooth® Wireless Technology). 271H 9. Replace the media bay device (see XBay Devices). 26H 6. DellTM XFR D630 Fully Rugged Notebook Service Manual...
Service Manual
Page 101
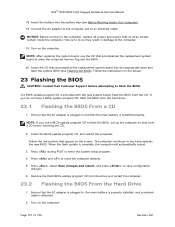
... the instructions on the screen. 29H 23 Flashing the BIOS CAUTION: Contact Dell Customer Support before inserting the CD. 2. Ensure that the AC adapter is... the appropriate drive and flash the system BIOS (see Before Working Inside Your Computer). 291H 19. Remove the flash BIOS-update program CD from the hard drive. 23.1 Flashing...Hard Drive 1. Insert the BIOS-update program CD, and restart the computer. Connect the AC adapter to the computer and to an electrical outlet. If you use the CD that no stray screws remain inside the computer. DellTM XFR D630 Fully Rugged Notebook...
... the instructions on the screen. 29H 23 Flashing the BIOS CAUTION: Contact Dell Customer Support before inserting the CD. 2. Ensure that the AC adapter is... the appropriate drive and flash the system BIOS (see Before Working Inside Your Computer). 291H 19. Remove the flash BIOS-update program CD from the hard drive. 23.1 Flashing...Hard Drive 1. Insert the BIOS-update program CD, and restart the computer. Connect the AC adapter to the computer and to an electrical outlet. If you use the CD that no stray screws remain inside the computer. DellTM XFR D630 Fully Rugged Notebook...


