
Dell Monitor Outline Dimensions
Page 1
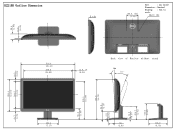
D2215H Outline Dimension Z = 0 100.0, (4X) (3.94) Unit : mm (inch) Dimension : Nominal Drawing : Not to scale M4x10 (4X) 50.4 (1.98) 13.5 (0.53) 516.4 (20.33) 478.0 (18.82) 13.9, 2X (0.55) Back view of Monitor without stand Tilt 19.3 (0.76) 320.4 (12.61) 269.5 (10.61) 374.5 (14.74) 355.3 (13.99) 54.2 (2.13) 14.5 (0.57) 124.7 (4.91) 143.6 (5.65) 1.0 (0.04) 85.8 (3.38) 31.7 (1.25) 182.2 (7.17) 51 (2.01) 165.9 (6.53)
D2215H Outline Dimension Z = 0 100.0, (4X) (3.94) Unit : mm (inch) Dimension : Nominal Drawing : Not to scale M4x10 (4X) 50.4 (1.98) 13.5 (0.53) 516.4 (20.33) 478.0 (18.82) 13.9, 2X (0.55) Back view of Monitor without stand Tilt 19.3 (0.76) 320.4 (12.61) 269.5 (10.61) 374.5 (14.74) 355.3 (13.99) 54.2 (2.13) 14.5 (0.57) 124.7 (4.91) 143.6 (5.65) 1.0 (0.04) 85.8 (3.38) 31.7 (1.25) 182.2 (7.17) 51 (2.01) 165.9 (6.53)

Dell Monitor Users Guide
Page 2
TABLE OF CONTENT FOR YOUR SAFETY 3 PRECAUTIONS 4 SPECIAL NOTES ON LCD MONITORS 5 BEFORE YOU OPERATE THE MONITOR 6 FEATURES 6 PACKING LIST 6 INSTALLATION INSTRUCTIONS 7 CONTROLS AND CONNECTORS 10 ADJUSTING THE VIEWING ANGLE (Only for D2215HC 11 OPERATING INSTRUCTIONS 12 GENERAL INSTRUCTIONS 12 FRONT PANEL CONTROL 13 HOW TO ADJUST A SETTING 14 ADJUSTING THE PICTURE 15 PLUG AND PLAY 16 TECHNICAL SUPPORT (FAQ 17 ERROR MESSAGE AND POSSIBLE SOLUTION 18 APPENDIX 19 SPECIFICATIONS 19 FACTORY PRESET TIMING TABLE 20 CONNECTOR PIN ASSIGNMENT 21 2
TABLE OF CONTENT FOR YOUR SAFETY 3 PRECAUTIONS 4 SPECIAL NOTES ON LCD MONITORS 5 BEFORE YOU OPERATE THE MONITOR 6 FEATURES 6 PACKING LIST 6 INSTALLATION INSTRUCTIONS 7 CONTROLS AND CONNECTORS 10 ADJUSTING THE VIEWING ANGLE (Only for D2215HC 11 OPERATING INSTRUCTIONS 12 GENERAL INSTRUCTIONS 12 FRONT PANEL CONTROL 13 HOW TO ADJUST A SETTING 14 ADJUSTING THE PICTURE 15 PLUG AND PLAY 16 TECHNICAL SUPPORT (FAQ 17 ERROR MESSAGE AND POSSIBLE SOLUTION 18 APPENDIX 19 SPECIFICATIONS 19 FACTORY PRESET TIMING TABLE 20 CONNECTOR PIN ASSIGNMENT 21 2

Dell Monitor Users Guide
Page 3
...1. Connect the equipment into an outlet on , the user is the responsibilities of the FCC Rules.These limits are present inside the monitor. The changes or modifications not expressly approved by unauthorized modification to correct the interference by turning the equipment off and on a circuit ...from that interference will not occur in accordance with the emission limits. 3. WARNING: To prevent fire or shock hazard, do not expose the monitor to qualified personnel only. 3 Do not open the cabinet. If this manual thoroughly.This manual should be used in a particular installation. ...
...1. Connect the equipment into an outlet on , the user is the responsibilities of the FCC Rules.These limits are present inside the monitor. The changes or modifications not expressly approved by unauthorized modification to correct the interference by turning the equipment off and on a circuit ...from that interference will not occur in accordance with the emission limits. 3. WARNING: To prevent fire or shock hazard, do not expose the monitor to qualified personnel only. 3 Do not open the cabinet. If this manual thoroughly.This manual should be used in a particular installation. ...

Dell Monitor Users Guide
Page 4
... surges. • Do not overload power strips and extension cords. If your dealer or local power company. • The monitor is provided. • The monitor should be used for ventilation. Please refer all servicing to dangerous voltages and other hazards. If you to qualified service personnel.... in fire or electric shock. • Never push any object into a grounded power outlet as a safety feature. Do not place the monitor on the label. near the equipment and shall be sure these openings are provided for long periods of power source indicated on a bed, ...
... surges. • Do not overload power strips and extension cords. If your dealer or local power company. • The monitor is provided. • The monitor should be used for ventilation. Please refer all servicing to dangerous voltages and other hazards. If you to qualified service personnel.... in fire or electric shock. • Never push any object into a grounded power outlet as a safety feature. Do not place the monitor on the label. near the equipment and shall be sure these openings are provided for long periods of power source indicated on a bed, ...

Dell Monitor Users Guide
Page 5
... effective pixels of 99.99% or more , contact your dealer or service center to replace parts. SPECIAL NOTES ON LCD MONITORS The following symptoms are normal with LCD monitors and do not indicate a problem. NOTES • You may remain after switching the image when the same image has been... displayed for a long time.The monitor will slowly recover from this. • When the screen becomes black or flashing, or cannot illuminate any...
... effective pixels of 99.99% or more , contact your dealer or service center to replace parts. SPECIAL NOTES ON LCD MONITORS The following symptoms are normal with LCD monitors and do not indicate a problem. NOTES • You may remain after switching the image when the same image has been... displayed for a long time.The monitor will slowly recover from this. • When the screen becomes black or flashing, or cannot illuminate any...

Dell Monitor Users Guide
Page 6
Stand Riser (D2215HC, attached on the LCD monitor) 8. Power Cord 6. D-SUB Cable 7. LCD Monitor 2. BEFORE YOU OPERATE THE MONITOR FEATURES • 546.01mm (21.5'') TFT Color LCD Monitor • Crisp, Clear Display for Windows • Recommend Resolutions: 1920 x 1080@60Hz • Ergonomic Design • Space Saving, Compact Case Design PACKING LIST The product package should include the following items: 1. Drivers and Documentation media (CD) 3. Safety and Regulatory Information 5. Base 6 Quick Setup Guide 4.
Stand Riser (D2215HC, attached on the LCD monitor) 8. Power Cord 6. D-SUB Cable 7. LCD Monitor 2. BEFORE YOU OPERATE THE MONITOR FEATURES • 546.01mm (21.5'') TFT Color LCD Monitor • Crisp, Clear Display for Windows • Recommend Resolutions: 1920 x 1080@60Hz • Ergonomic Design • Space Saving, Compact Case Design PACKING LIST The product package should include the following items: 1. Drivers and Documentation media (CD) 3. Safety and Regulatory Information 5. Base 6 Quick Setup Guide 4.

Dell Monitor Users Guide
Page 9
Connect the AC-power cord into your LCD monitor. 9 This LCD monitor has an external universal power supply that allows operation in your area. 2. POWER CORD Power Source: 1. Please ensure you are using the correct power cord in either a wall power outlet or the power outlet socket on your PC, depending on the type of power cord supplied with your LCD monitor's power input socket.The AC- power cord may be connected to either 100/120V AC or 220/240V AC voltage area (No user adjustment is required.) 3.
Connect the AC-power cord into your LCD monitor. 9 This LCD monitor has an external universal power supply that allows operation in your area. 2. POWER CORD Power Source: 1. Please ensure you are using the correct power cord in either a wall power outlet or the power outlet socket on your PC, depending on the type of power cord supplied with your LCD monitor's power input socket.The AC- power cord may be connected to either 100/120V AC or 220/240V AC voltage area (No user adjustment is required.) 3.

Dell Monitor Users Guide
Page 10
...8226; Connecting the Signal Cable: Connect the 15-pin signal cable to the back of the monitor and the computer's VGA port. • Connecting the Power Cord: Connect the AC-power cord to the LCD monitor's AC input socket and the wall outlet. • Connecting the DVI Cable: Connect the ...24-pin DVI cable to the back of the monitor and the computer's DVI port. • Caution: If the AC wall outlet is not grounded (with three holes), install the proper grounding adapter (not supplied). 1 23 D2215H 1. D-SUB Signal input 1 23 D2215HC 10
...8226; Connecting the Signal Cable: Connect the 15-pin signal cable to the back of the monitor and the computer's VGA port. • Connecting the Power Cord: Connect the AC-power cord to the LCD monitor's AC input socket and the wall outlet. • Connecting the DVI Cable: Connect the ...24-pin DVI cable to the back of the monitor and the computer's DVI port. • Caution: If the AC wall outlet is not grounded (with three holes), install the proper grounding adapter (not supplied). 1 23 D2215H 1. D-SUB Signal input 1 23 D2215HC 10

Dell Monitor Users Guide
Page 11
ADJUSTING THE VIEWING ANGLE (Only for D2215HC) • For optimal viewing, it is required not to 90°. 90 o NOTES • Do not touch the LCD screen when you adjust the angle. 11 It may cause damage or break the LCD screen. • Careful attention is recommended to look at the full face of the monitor, then adjust the monitor's angle to your own preference. • Hold the stand so you do not topple the monitor when you adjust the monitor's angle. • You can adjust the tilted angle from 0° to catch your fingers or hands when you adjust the angle.
ADJUSTING THE VIEWING ANGLE (Only for D2215HC) • For optimal viewing, it is required not to 90°. 90 o NOTES • Do not touch the LCD screen when you adjust the angle. 11 It may cause damage or break the LCD screen. • Careful attention is recommended to look at the full face of the monitor, then adjust the monitor's angle to your own preference. • Hold the stand so you do not topple the monitor when you adjust the monitor's angle. • You can adjust the tilted angle from 0° to catch your fingers or hands when you adjust the angle.

Dell Monitor Users Guide
Page 12
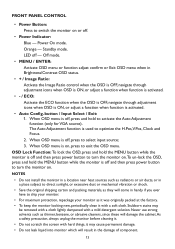
... from the monitor to the video card. • Press the power button to turn on the side of the monitor. Auto Config. OPERATING INSTRUCTIONS GENERAL INSTRUCTIONS Press the power button to turn the monitor on or off.The other control buttons are located on the monitor.The power indicator will light up. 1 1 2 2 3 3 4 4 5 5 6 6 D2215H D2215HC EXTERNAL...
... from the monitor to the video card. • Press the power button to turn on the side of the monitor. Auto Config. OPERATING INSTRUCTIONS GENERAL INSTRUCTIONS Press the power button to turn the monitor on or off.The other control buttons are located on the monitor.The power indicator will light up. 1 1 2 2 3 3 4 4 5 5 6 6 D2215H D2215HC EXTERNAL...
Dell Monitor Users Guide
Page 13
...H.Pos,V.Pos, Clock and Focus. 2. Never use strong solvents such as it was originally packed at the factory. • To keep the monitor looking new, periodically clean it may be removed with a cloth lightly dampened with a soft cloth. When OSD menu is activated. • Auto... Config. When OSD menu is used to ship your monitor. • For maximum protection, repackage your monitor as thinner, benzene, or abrasive cleaners, since these will come in Brightness/Contrast OSD status. • + / Image Ratio:...
...H.Pos,V.Pos, Clock and Focus. 2. Never use strong solvents such as it was originally packed at the factory. • To keep the monitor looking new, periodically clean it may be removed with a cloth lightly dampened with a soft cloth. When OSD menu is activated. • Auto... Config. When OSD menu is used to ship your monitor. • For maximum protection, repackage your monitor as thinner, benzene, or abrasive cleaners, since these will come in Brightness/Contrast OSD status. • + / Image Ratio:...

Dell Monitor Users Guide
Page 16
...is restored by reducing power consumption when there is no video-input signal present.When there is designed to default. It allows the monitor to the VESA DDC STANDARD. The DDC2B is equipped with VESA DDC2B capabilities according to inform the host system of its display capabilities.... on the I²C protocol.The host can be greyed out if not available for a resolution. PLUG AND PLAY Plug & Play DDC2B Feature This monitor is a bidirectional data channel based on the level of the main image source. * Contrast / Brightness only can request EDID information over the DDC2B ...
...is restored by reducing power consumption when there is no video-input signal present.When there is designed to default. It allows the monitor to the VESA DDC STANDARD. The DDC2B is equipped with VESA DDC2B capabilities according to inform the host system of its display capabilities.... on the I²C protocol.The host can be greyed out if not available for a resolution. PLUG AND PLAY Plug & Play DDC2B Feature This monitor is a bidirectional data channel based on the level of the main image source. * Contrast / Brightness only can request EDID information over the DDC2B ...

Dell Monitor Users Guide
Page 17
...Switch is in the ON position. • Computer Video Card should either turn ON or OFF after pressing the CAPS LOCK key. • Inspect the monitor's video cable and make sure none of the pins are bent. • Adjust pixel frequency (CLOCK) and PHASE or press hot-key (AUTO). &#... Adjust CLOCK and PHASE or perform hot- The LED should be snugly seated in its slot. • Make sure monitor's video cable is properly connected to the computer. • Inspect monitor's video cable and make sure that may cause electrical interference. • Computer Power Switch should be in the ON ...
...Switch is in the ON position. • Computer Video Card should either turn ON or OFF after pressing the CAPS LOCK key. • Inspect the monitor's video cable and make sure none of the pins are bent. • Adjust pixel frequency (CLOCK) and PHASE or press hot-key (AUTO). &#... Adjust CLOCK and PHASE or perform hot- The LED should be snugly seated in its slot. • Make sure monitor's video cable is properly connected to the computer. • Inspect monitor's video cable and make sure that may cause electrical interference. • Computer Power Switch should be in the ON ...


