
External Control Guide
Page 5
... of 1 Contrast Step 0 - off during standby SetPowerUSB - YPbPr Parm / Retuen / Comments Max 10 chars (in ASCII) Max 10 chars (in increments of color temperatures (DWORD) 0x00000001 - 5000K 0x00000002 - 5700K 0x00000004 - 6500K 0x00000008 - 7500K 0x00000010 - 9300K 0x00000020 - 10000K Input Color Format (BYTE) 0 - on during active GetPowerUSB SetPowerUSB - RGB 1 - Control Commands List APIs /* MONITOR MANAGEMENT */ GetMonitorName GetMonitorSerialNumber GetBacklightHours /* POWER MANAGEMENT...
... of 1 Contrast Step 0 - off during standby SetPowerUSB - YPbPr Parm / Retuen / Comments Max 10 chars (in ASCII) Max 10 chars (in increments of color temperatures (DWORD) 0x00000001 - 5000K 0x00000002 - 5700K 0x00000004 - 6500K 0x00000008 - 7500K 0x00000010 - 9300K 0x00000020 - 10000K Input Color Format (BYTE) 0 - on during active GetPowerUSB SetPowerUSB - RGB 1 - Control Commands List APIs /* MONITOR MANAGEMENT */ GetMonitorName GetMonitorSerialNumber GetBacklightHours /* POWER MANAGEMENT...

Display Control Guide
Page 5
... and right ends. Dell Display Control │ 5 Selects input from USB Type-C port. Selects input from HDMI 3 port. Selects input from HDMI 2 port. Adjusts the brightness setting. Main window 1 2 4 3 You can operate the basic controls of the monitor on /off 2 Sources List You can click a button to the currently selected input port. Button Power Vol -/ Vol + Mute Description Turns the power on/off Adjusts the volume settings Toggles Mute on this screen. 1 Click a button and operate as follows. Selects input from HDMI 1 port. Button Contrast Brightness Sharpness...
... and right ends. Dell Display Control │ 5 Selects input from USB Type-C port. Selects input from HDMI 3 port. Selects input from HDMI 2 port. Adjusts the brightness setting. Main window 1 2 4 3 You can operate the basic controls of the monitor on /off 2 Sources List You can click a button to the currently selected input port. Button Power Vol -/ Vol + Mute Description Turns the power on/off Adjusts the volume settings Toggles Mute on this screen. 1 Click a button and operate as follows. Selects input from HDMI 1 port. Button Contrast Brightness Sharpness...

Display Control Guide
Page 8
... the monitor. Displays the current input signal source. Displays the the location name of the monitor. Click the [Exit] button to return to the Main window. 1 Monitor Information Item Monitor Name Location Firmware Version MAC address Assigned To Description Displays the monitor name settings. Displays the current picture mode setting. NOTE: Monitor Name, Location and the user name for the monitor. 2 Monitor Status Item Power Status Source Image Description Displays the current power status. Info window Dell C8621QT 1 Room 2 M2T101 Name Displays the settings...
... the monitor. Displays the current input signal source. Displays the the location name of the monitor. Click the [Exit] button to return to the Main window. 1 Monitor Information Item Monitor Name Location Firmware Version MAC address Assigned To Description Displays the monitor name settings. Displays the current picture mode setting. NOTE: Monitor Name, Location and the user name for the monitor. 2 Monitor Status Item Power Status Source Image Description Displays the current power status. Info window Dell C8621QT 1 Room 2 M2T101 Name Displays the settings...

Users Guide
Page 3
Contents About Your Display 5 Package Contents 5 Product Features 7 Identifying Parts and Controls 8 Display Specifications 12 Plug-and-Play 24 LCD Display Quality and Pixel Policy 24 Setting Up the Display 25 Connecting Your Display 25 Wall Mounting 29 Remote Control 30 Magnet Warning Statement 33 Using the stylus 33 Operating the Display 35 Turning on the Display 35 Touch OSD Launcher 35 Using the Touch Control Launcher 36 Using the OSD lock function 37 Using the On-Screen Display (OSD) Menu 38 Dell Web Management for Displays 51 Contents | 3
Contents About Your Display 5 Package Contents 5 Product Features 7 Identifying Parts and Controls 8 Display Specifications 12 Plug-and-Play 24 LCD Display Quality and Pixel Policy 24 Setting Up the Display 25 Connecting Your Display 25 Wall Mounting 29 Remote Control 30 Magnet Warning Statement 33 Using the stylus 33 Operating the Display 35 Turning on the Display 35 Touch OSD Launcher 35 Using the Touch Control Launcher 36 Using the OSD lock function 37 Using the On-Screen Display (OSD) Menu 38 Dell Web Management for Displays 51 Contents | 3

Users Guide
Page 7
... 4 pens InGlassTM Touch technology. • Optimize eye comfort with a flicker-free screen. • The possible long-term effects of blue light emitted from the display may cause damage to optimize eye comfort. About Your Display | 7 • Flatfrog Board Software download instruction • Safety, Environmental and Regulatory Information • Quick Setup Guide Product Features The Dell C8621QT display has an active matrix, thin film transistor (TFT), liquid crystal display (LCD), and LED backlight. ComfortView feature is...
... 4 pens InGlassTM Touch technology. • Optimize eye comfort with a flicker-free screen. • The possible long-term effects of blue light emitted from the display may cause damage to optimize eye comfort. About Your Display | 7 • Flatfrog Board Software download instruction • Safety, Environmental and Regulatory Information • Quick Setup Guide Product Features The Dell C8621QT display has an active matrix, thin film transistor (TFT), liquid crystal display (LCD), and LED backlight. ComfortView feature is...

Users Guide
Page 25
... the procedures in the cables and route the cables using the cable management hooks that is within the PC box holder. Connect the HDMI/DP/USB Type-C/USB cable from your display to the computer. 3. Remove cable cover. 2. Plug in this section, follow the Safety Instructions. Switch on your computer. Select the correct input source at Display OSD Menu and turn on your computer. 2. Setting Up the Display | 25 To connect your display to the computer: 1. Optiplex...
... the procedures in the cables and route the cables using the cable management hooks that is within the PC box holder. Connect the HDMI/DP/USB Type-C/USB cable from your display to the computer. 3. Remove cable cover. 2. Plug in this section, follow the Safety Instructions. Switch on your computer. Select the correct input source at Display OSD Menu and turn on your computer. 2. Setting Up the Display | 25 To connect your display to the computer: 1. Optiplex...
Users Guide
Page 38
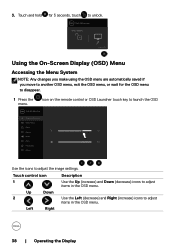
... remote control or OSD Launcher touch key to launch the OSD Dell 86 Monitor Brightness/Contrast Input Source Color Display Audio Menu Personalize Others 75% 75% Use the icons to adjust items in the OSD menu. Left Right 38 | Operating the Display Dell 86 Monitor Select Option: C8621QT Using the On-Screen Display (OSD) Menu Accessing the Menu System NOTE: Any changes you make using the OSD menu are automatically saved if you move to another OSD menu, exit the OSD menu, or wait for 5 seconds, touch to unlock. Touch control icon Description 1 Use...
... remote control or OSD Launcher touch key to launch the OSD Dell 86 Monitor Brightness/Contrast Input Source Color Display Audio Menu Personalize Others 75% 75% Use the icons to adjust items in the OSD menu. Left Right 38 | Operating the Display Dell 86 Monitor Select Option: C8621QT Using the On-Screen Display (OSD) Menu Accessing the Menu System NOTE: Any changes you make using the OSD menu are automatically saved if you move to another OSD menu, exit the OSD menu, or wait for 5 seconds, touch to unlock. Touch control icon Description 1 Use...
Users Guide
Page 42
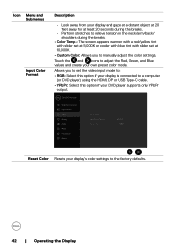
... player) using the HDMI, DP or USB Type-C cable. • YPbPr: Select this option if your DVD player supports only YPbPr output. Allows you to set at 5,000K or cooler with blue tint with slider set at 10,000K. • Custom Color: Allows you to the factory defaults. 42 | Operating the Display Dell 86 Monitor Brightness/Contrast Input Source Color Display Audio Menu Personalize Others Preset Modes Input Color Format Reset Color RGB YPbPr Reset Color Resets your own preset color mode. Touch the...
... player) using the HDMI, DP or USB Type-C cable. • YPbPr: Select this option if your DVD player supports only YPbPr output. Allows you to set at 5,000K or cooler with blue tint with slider set at 10,000K. • Custom Color: Allows you to the factory defaults. 42 | Operating the Display Dell 86 Monitor Brightness/Contrast Input Source Color Display Audio Menu Personalize Others Preset Modes Input Color Format Reset Color RGB YPbPr Reset Color Resets your own preset color mode. Touch the...
Users Guide
Page 46
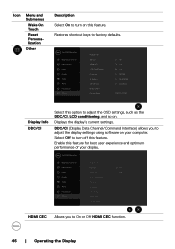
... to adjust the OSD settings, such as the DDC/CI, LCD conditioning, and so on your display. Enable this feature. Dell 86 Monitor Brightness/Contrast Display Info Input Source DDC/CI On Color HDMI CEC O Display LCD Conditioning Audio Firmware Menu IP Address Personalize Service Tag Others Reset Others Factory Reset HDMI CEC Allows you to adjust the display settings using software on . Icon Menu and Submenus Wake On Touch Reset Personalization Other Description Select On to turn off this feature for best user experience...
... to adjust the OSD settings, such as the DDC/CI, LCD conditioning, and so on your display. Enable this feature. Dell 86 Monitor Brightness/Contrast Display Info Input Source DDC/CI On Color HDMI CEC O Display LCD Conditioning Audio Firmware Menu IP Address Personalize Service Tag Others Reset Others Factory Reset HDMI CEC Allows you to adjust the display settings using software on . Icon Menu and Submenus Wake On Touch Reset Personalization Other Description Select On to turn off this feature for best user experience...
Users Guide
Page 47
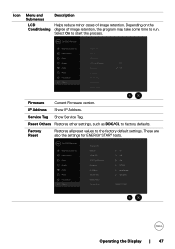
... values to start the process. Dell 86 Monitor Brightness/Contrast Display Info Input Source DDC/CI Color HDMI CEC Display LCD Conditioning On Audio Firmware O Menu IP Address Personalize Service Tag Others Reset Others Factory Reset Firmware Current Firmware version. Service Tag Show Service Tag. Depending on the Conditioning degree of image retention. Reset Others Restores other settings, such as DDC/CI, to factory defaults. These are also the settings for ENERGY STAR® tests. Dell 86 Monitor Brightness/Contrast Input Source Color Display Audio Menu...
... values to start the process. Dell 86 Monitor Brightness/Contrast Display Info Input Source DDC/CI Color HDMI CEC Display LCD Conditioning On Audio Firmware O Menu IP Address Personalize Service Tag Others Reset Others Factory Reset Firmware Current Firmware version. Service Tag Show Service Tag. Depending on the Conditioning degree of image retention. Reset Others Restores other settings, such as DDC/CI, to factory defaults. These are also the settings for ENERGY STAR® tests. Dell 86 Monitor Brightness/Contrast Input Source Color Display Audio Menu...
Users Guide
Page 54
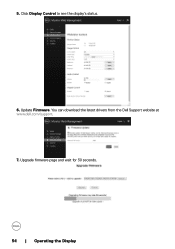
Click Display Control to see the display's status. 6. Upgrade firmware page and wait for 30 seconds. 54 | Operating the Display 5. Update Firmware. You can download the latest drivers from the Dell Support website at www.dell.com/support. 7.
Click Display Control to see the display's status. 6. Upgrade firmware page and wait for 30 seconds. 54 | Operating the Display 5. Update Firmware. You can download the latest drivers from the Dell Support website at www.dell.com/support. 7.
Users Guide
Page 56
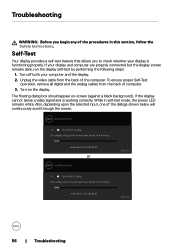
... power LED remains white. While in 4 minutes. C8621QT www.dell.com/C8621QT C8621QT 56 | Troubleshooting Turn off both your display and computer are properly connected but the display screen remains dark, run the display self-test by performing the following steps: 1. The floating dialog box should appear on the display. www.dell.com/C8621QT or Dell 86 Monitor No HDMI 2 Cable The display will go into Power Save Mode in this section, follow the Safety Instructions...
... power LED remains white. While in 4 minutes. C8621QT www.dell.com/C8621QT C8621QT 56 | Troubleshooting Turn off both your display and computer are properly connected but the display screen remains dark, run the display self-test by performing the following steps: 1. The floating dialog box should appear on the display. www.dell.com/C8621QT or Dell 86 Monitor No HDMI 2 Cable The display will go into Power Save Mode in this section, follow the Safety Instructions...

Users Guide
Page 59
... power button is depressed fully. • Ensure that the correct input source is selected in the Input Source menu. • Increase brightness & contrast controls via OSD. • Perform display self-test feature check. • Check for bent or broken pins in the video cable connector. • Run the built-in diagnostics. • Ensure that the correct input source is selected in the Input Source menu. • Eliminate video extension cables. • Reset the display to factory settings. • Change...
... power button is depressed fully. • Ensure that the correct input source is selected in the Input Source menu. • Increase brightness & contrast controls via OSD. • Perform display self-test feature check. • Check for bent or broken pins in the video cable connector. • Run the built-in diagnostics. • Ensure that the correct input source is selected in the Input Source menu. • Eliminate video extension cables. • Reset the display to factory settings. • Change...

Users Guide
Page 60
... centered • Check the Aspect Ratio setting in the Display menu on the screen • Use the Power Management feature to determine if the intermittent problem occurs in use a dynamically changing screensaver. does not fill entire • Reset the display to factory settings. viewing area 60 | Troubleshooting smoke or sparks • Contact Dell immediately. Missing Color Picture missing color • Perform display self-test. • Ensure that the video cable connecting the display to determine...
... centered • Check the Aspect Ratio setting in the Display menu on the screen • Use the Power Management feature to determine if the intermittent problem occurs in use a dynamically changing screensaver. does not fill entire • Reset the display to factory settings. viewing area 60 | Troubleshooting smoke or sparks • Contact Dell immediately. Missing Color Picture missing color • Perform display self-test. • Ensure that the video cable connecting the display to determine...

Users Guide
Page 61
... USB Type-C cable is white • Check the signal source. Specific Symptoms Cannot adjust the display with touch OSD What You Experience OSD does not appear on the screen Possible Solutions • Turn off the display, unplug the display power cable, plug it may display in full screen. laptop, and so on Troubleshooting | 61 Intermittent Intermittent charging when charging using USB Type-C connection to unlock . No Input Signal when user controls are pressed No picture, the LED light is not damaged. Re-plug the signal cable...
... USB Type-C cable is white • Check the signal source. Specific Symptoms Cannot adjust the display with touch OSD What You Experience OSD does not appear on the screen Possible Solutions • Turn off the display, unplug the display power cable, plug it may display in full screen. laptop, and so on Troubleshooting | 61 Intermittent Intermittent charging when charging using USB Type-C connection to unlock . No Input Signal when user controls are pressed No picture, the LED light is not damaged. Re-plug the signal cable...

Users Guide
Page 62
... Serial Bus (USB) Specific Problems Specific Symptoms USB interface is not working at all Possible Solutions • Check that your display is turned ON. • Reconnect the upstream cable to allow the device to your computer. • Reconnect the USB peripherals (downstream connector). • Reboot the computer. 62 | Troubleshooting no touch function • Make sure computer supports USB 2.0 or later. • If the display cannot be detected by using touch in power-save mode...
... Serial Bus (USB) Specific Problems Specific Symptoms USB interface is not working at all Possible Solutions • Check that your display is turned ON. • Reconnect the upstream cable to allow the device to your computer. • Reconnect the USB peripherals (downstream connector). • Reboot the computer. 62 | Troubleshooting no touch function • Make sure computer supports USB 2.0 or later. • If the display cannot be detected by using touch in power-save mode...

Users Guide
Page 65
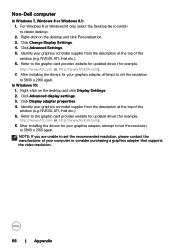
...) For best performance, set the display resolution to classic desktop. 2. Click Advanced display settings. 3. NOTE: If you are unable to set the resolution to www.dell.com/support, enter your service tag, and download the latest driver for your graphics adapter, attempt to set the resolution to 3840 x 2160, please contact Dell to update your graphics card. 2. For Windows 8 or Windows 8.1 only, select the Desktop tile to switch to 3840 x 2160 pixels by...
...) For best performance, set the display resolution to classic desktop. 2. Click Advanced display settings. 3. NOTE: If you are unable to set the resolution to www.dell.com/support, enter your service tag, and download the latest driver for your graphics adapter, attempt to set the resolution to 3840 x 2160, please contact Dell to update your graphics card. 2. For Windows 8 or Windows 8.1 only, select the Desktop tile to switch to 3840 x 2160 pixels by...
Users Guide
Page 66
For Windows 8 or Windows 8.1 only, select the Desktop tile to switch to the graphic card provider website for updated driver (for your computer or consider purchasing a graphics adapter that supports the video resolution. 66 | Appendix Refer to classic desktop. 2. Identify your graphics controller supplier from the description at the top of your graphics adapter, attempt to 3840 x 2160 again. Click Change Display Settings. 4. Click Advanced display settings. 3. NVIDIA...
For Windows 8 or Windows 8.1 only, select the Desktop tile to switch to the graphic card provider website for updated driver (for your computer or consider purchasing a graphics adapter that supports the video resolution. 66 | Appendix Refer to classic desktop. 2. Identify your graphics controller supplier from the description at the top of your graphics adapter, attempt to 3840 x 2160 again. Click Change Display Settings. 4. Click Advanced display settings. 3. NVIDIA...
Display Manager Users Guide
Page 4
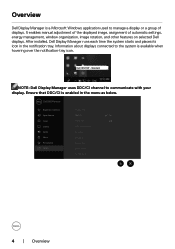
After installed, Dell Display Manager runs each time the system starts and places its icon in the menu as below. Ensure that DDC/CI is enabled in the notification tray. Dell 86 Monitor Brightness/Contrast Display Info Input Source DDC/CI On Color HDMI CEC O Display LCD Conditioning Audio Firmware Menu IP Address Personalize Others Service Tag Reset Others Factory Reset 4 | Overview Dell C8621QT - Overview Dell Display Manager is a Microsoft Windows application used to manage a display or a group of automatic settings, energy...
After installed, Dell Display Manager runs each time the system starts and places its icon in the menu as below. Ensure that DDC/CI is enabled in the notification tray. Dell 86 Monitor Brightness/Contrast Display Info Input Source DDC/CI On Color HDMI CEC O Display LCD Conditioning Audio Firmware Menu IP Address Personalize Others Service Tag Reset Others Factory Reset 4 | Overview Dell C8621QT - Overview Dell Display Manager is a Microsoft Windows application used to manage a display or a group of automatic settings, energy...

Display Manager Users Guide
Page 5
... pointer. Using the Quick Settings Dialog | 5 Using the Quick Settings Dialog Clicking Dell Display Manager's notification tray icon to adjust basic functions, configure auto mode and access other features. Dell C8621QT The Quick Settings dialog box also provides access to Dell Display Manager's advanced user interface that is used to open the Quick Settings dialog box. You can select Manual Mode or Auto Mode, and the screen resolution can be changed. The Quick Settings dialog box enables convenient adjustment of the display's brightness, contrast, resolution, window layout...
... pointer. Using the Quick Settings Dialog | 5 Using the Quick Settings Dialog Clicking Dell Display Manager's notification tray icon to adjust basic functions, configure auto mode and access other features. Dell C8621QT The Quick Settings dialog box also provides access to Dell Display Manager's advanced user interface that is used to open the Quick Settings dialog box. You can select Manual Mode or Auto Mode, and the screen resolution can be changed. The Quick Settings dialog box enables convenient adjustment of the display's brightness, contrast, resolution, window layout...


