Users Guide
Page 3
Contents About Your Display 5 Package Contents 5 Product Features 7 Identifying Parts and Controls 8 Display Specifications 12 Plug-and-Play 24 LCD Display Quality and Pixel Policy 24 Setting Up the Display 25 Connecting Your Display 25 Wall Mounting 30 Remote Control 31 Operating the Display 34 Turning on the Display 34 Touch OSD Launcher 34 Using the Touch Control Launcher 35 Using the OSD lock function 36 Using the On-Screen Display (OSD) Menu 37 Dell Web Management for Displays 51 Troubleshooting 56 Self-Test 56 Contents | 3
Contents About Your Display 5 Package Contents 5 Product Features 7 Identifying Parts and Controls 8 Display Specifications 12 Plug-and-Play 24 LCD Display Quality and Pixel Policy 24 Setting Up the Display 25 Connecting Your Display 25 Wall Mounting 30 Remote Control 31 Operating the Display 34 Turning on the Display 34 Touch OSD Launcher 34 Using the Touch Control Launcher 35 Using the OSD lock function 36 Using the On-Screen Display (OSD) Menu 37 Dell Web Management for Displays 51 Troubleshooting 56 Self-Test 56 Contents | 3
Users Guide
Page 7
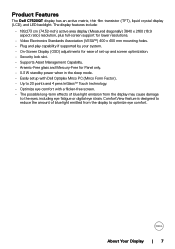
...) resolution, plus full-screen support for lower resolutions. • Video Electronics Standards Association (VESA™) 400 x 400 mm mounting holes. • Plug and play capability if supported by your system. • On-Screen Display (OSD) adjustments for ease of set-up and screen optimization. • Security lock slot. • Supports Asset Management Capability. • Arsenic-Free glass and Mercury-Free for Panel only. • 0.3 W standby power when in the sleep mode. • Easily setup with Dell...
...) resolution, plus full-screen support for lower resolutions. • Video Electronics Standards Association (VESA™) 400 x 400 mm mounting holes. • Plug and play capability if supported by your system. • On-Screen Display (OSD) adjustments for ease of set-up and screen optimization. • Security lock slot. • Supports Asset Management Capability. • Arsenic-Free glass and Mercury-Free for Panel only. • 0.3 W standby power when in the sleep mode. • Easily setup with Dell...
Users Guide
Page 9
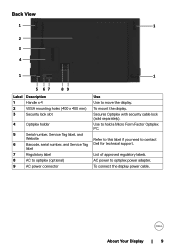
... label if you need to optiplex power adapter. About Your Display | 9 AC power to contact Dell for EU Only: Raheen Business Park Limerick Ireland www.dell.com 1 5 67 89 Label Description 1 Handle x 4 2 VESA mounting holes (400 x 400 mm) 3 Security lock slot 4 Optiplex holder 5 Serial number, Service Tag label, and Website 6 Barcode, serial number, and Service Tag label 7 Regulatory label 8 AC to optiplex (optional) 9 AC power connector Use Use to hold...
... label if you need to optiplex power adapter. About Your Display | 9 AC power to contact Dell for EU Only: Raheen Business Park Limerick Ireland www.dell.com 1 5 67 89 Label Description 1 Handle x 4 2 VESA mounting holes (400 x 400 mm) 3 Security lock slot 4 Optiplex holder 5 Serial number, Service Tag label, and Website 6 Barcode, serial number, and Service Tag label 7 Regulatory label 8 AC to optiplex (optional) 9 AC power connector Use Use to hold...

Users Guide
Page 30
... not attempt to wall mount the Touch Display by qualified installers. • Recommended Wall Mount for EU Only: Raheen Business Park Limerick Ireland www.dell.com (Screw dimension: M8 x 35 mm). NOTE: For use only with UL or CSA or GS-listed wall mount bracket with the 3rd party wall mount that customer purchases. Install Display to Wall. 2. Vesa-compatible base mounting kit (400 x 400) mm. 1. IS 13252 (Part 1)/ IEC 60950-1 Apparaten...
... not attempt to wall mount the Touch Display by qualified installers. • Recommended Wall Mount for EU Only: Raheen Business Park Limerick Ireland www.dell.com (Screw dimension: M8 x 35 mm). NOTE: For use only with UL or CSA or GS-listed wall mount bracket with the 3rd party wall mount that customer purchases. Install Display to Wall. 2. Vesa-compatible base mounting kit (400 x 400) mm. 1. IS 13252 (Part 1)/ IEC 60950-1 Apparaten...

Users Guide
Page 37
... OSD menu. Dell 75 Monitor Brightness/Contrast Auto Adjust Input Source Color Display Audio Menu Personalize Others icon on the remote control or OSD Launcher touch key to launch the OSD 75% 75% Use the icons to disappear. 1 Press the menu. Dell 75 Monitor Select Option: C7520QT Using the On-Screen Display (OSD) Menu Accessing the Menu System NOTE: Any changes you make using the OSD menu are automatically saved if you move to another OSD menu, exit the OSD menu, or wait for 5 seconds, touch to unlock. Left Right Operating the Display...
... OSD menu. Dell 75 Monitor Brightness/Contrast Auto Adjust Input Source Color Display Audio Menu Personalize Others icon on the remote control or OSD Launcher touch key to launch the OSD 75% 75% Use the icons to disappear. 1 Press the menu. Dell 75 Monitor Select Option: C7520QT Using the On-Screen Display (OSD) Menu Accessing the Menu System NOTE: Any changes you make using the OSD menu are automatically saved if you move to another OSD menu, exit the OSD menu, or wait for 5 seconds, touch to unlock. Left Right Operating the Display...

Users Guide
Page 39
... is connected using the Pixel Clock (Coarse) and Phase (Fine) controls under Display menu. NOTE: In most cases, Auto Adjust produces the best image for use with your particular setup. Auto Adjustment allows the display to self-adjust to the current input: Auto adjustment in progress... Dell 75 Monitor Brightness/Contrast Auto Adjust Input Source Color Display Audio Menu Personalize Others Press to adjust the screen automatically. Operating the Display | 39 Icon Menu and Submenus Auto Adjust Description Even though your computer recognizes your display on a black screen as...
... is connected using the Pixel Clock (Coarse) and Phase (Fine) controls under Display menu. NOTE: In most cases, Auto Adjust produces the best image for use with your particular setup. Auto Adjustment allows the display to self-adjust to the current input: Auto adjustment in progress... Dell 75 Monitor Brightness/Contrast Auto Adjust Input Source Color Display Audio Menu Personalize Others Press to adjust the screen automatically. Operating the Display | 39 Icon Menu and Submenus Auto Adjust Description Even though your computer recognizes your display on a black screen as...

Users Guide
Page 40
... connected to adjust the color setting mode. Select DP input when you are using the HDMI 3 connector. Use the Color menu to your display's Input Source settings to the factory defaults. HDMI 3 Select the HDMI 3 input when you are using the DP (DisplayPort) connector. Dell 75 Monitor Brightness/Contrast Auto Adjust Input Source Color Display Audio Menu Personalize Others Preset Modes Input Color Format Reset Color Standard RGB 40 | Operating the Display Select the HDMI 1 input when you are using the VGA connector. Reset Input Source Color Resets your display...
... connected to adjust the color setting mode. Select DP input when you are using the HDMI 3 connector. Use the Color menu to your display's Input Source settings to the factory defaults. HDMI 3 Select the HDMI 3 input when you are using the DP (DisplayPort) connector. Dell 75 Monitor Brightness/Contrast Auto Adjust Input Source Color Display Audio Menu Personalize Others Preset Modes Input Color Format Reset Color Standard RGB 40 | Operating the Display Select the HDMI 1 input when you are using the VGA connector. Reset Input Source Color Resets your display...
Users Guide
Page 41
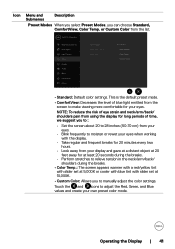
...; Set the screen about 20 to 28 inches (50-70 cm) from your eyes. • Blink frequently to moisten or rewet your eyes when working with the display. • Take regular and frequent breaks for 20 minutes every two hours. • Look away from the list. Operating the Display | 41 Dell 75 Monitor Brightness/Contrast Auto Adjust Input Source Color Display Audio Menu Personalize Others Preset Modes Input Color Format Reset Color Standard ComfortView Color...
...; Set the screen about 20 to 28 inches (50-70 cm) from your eyes. • Blink frequently to moisten or rewet your eyes when working with the display. • Take regular and frequent breaks for 20 minutes every two hours. • Look away from the list. Operating the Display | 41 Dell 75 Monitor Brightness/Contrast Auto Adjust Input Source Color Display Audio Menu Personalize Others Preset Modes Input Color Format Reset Color Standard ComfortView Color...

Users Guide
Page 42
Icon Menu and Submenus Input Color Format Description Allows you to set the video input mode to: • RGB: Select this option if your display is connected to the factory defaults. 42 | Operating the Display Dell 75 Monitor Brightness/Contrast Auto Adjust Input Source Color Display Audio Menu Personalize Others Preset Modes Input Color Format Reset Color RGB YPbPr Reset Color Resets your display's color settings to a computer (or DVD player) using the HDMI, DP or VGA cable. • YPbPr: Select this option if your DVD player supports only YPbPr output.
Icon Menu and Submenus Input Color Format Description Allows you to set the video input mode to: • RGB: Select this option if your display is connected to the factory defaults. 42 | Operating the Display Dell 75 Monitor Brightness/Contrast Auto Adjust Input Source Color Display Audio Menu Personalize Others Preset Modes Input Color Format Reset Color RGB YPbPr Reset Color Resets your display's color settings to a computer (or DVD player) using the HDMI, DP or VGA cable. • YPbPr: Select this option if your DVD player supports only YPbPr output.
Users Guide
Page 46
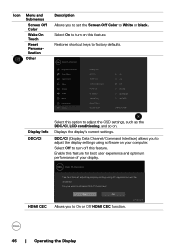
Dell 75 Monitor Brightness/Contrast Auto Adjust Input Source Color Display Audio Menu Personalize Others Display Info DCC/CI HDMI CEC LCD Conditioning Firmware IP Address Service Tag Reset Others Factory Reset On O O M2T101 10.0.50.100 ABCDEFG ENERGY STAR® Display Info DDC/CI Select this feature. Displays the display's current settings. C7520QT 46 | Operating the Display DDC/CI (Display Data Channel/Command Interface) allows you wish to disable DDC/CI function? Select Off to turn on this option...
Dell 75 Monitor Brightness/Contrast Auto Adjust Input Source Color Display Audio Menu Personalize Others Display Info DCC/CI HDMI CEC LCD Conditioning Firmware IP Address Service Tag Reset Others Factory Reset On O O M2T101 10.0.50.100 ABCDEFG ENERGY STAR® Display Info DDC/CI Select this feature. Displays the display's current settings. C7520QT 46 | Operating the Display DDC/CI (Display Data Channel/Command Interface) allows you wish to disable DDC/CI function? Select Off to turn on this option...
Users Guide
Page 54
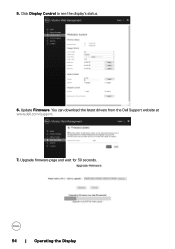
Update Firmware. You can download the latest drivers from the Dell Support website at www.dell.com/support. 7. Upgrade firmware page and wait for 30 seconds. 54 | Operating the Display Click Display Control to see the display's status. 6. 5.
Update Firmware. You can download the latest drivers from the Dell Support website at www.dell.com/support. 7. Upgrade firmware page and wait for 30 seconds. 54 | Operating the Display Click Display Control to see the display's status. 6. 5.
Users Guide
Page 56
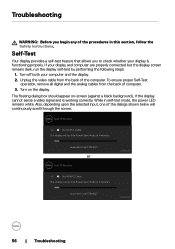
.... To ensure proper Self-Test operation, remove all digital and the analog cables from the back of the dialogs shown below will continuously scroll through the screen. Dell 75 Monitor No HDMI 1 Cable The display will go into Power Save Mode in self-test mode, the power LED remains white. Troubleshooting WARNING: Before you to check whether your display is working correctly. Self-Test Your display provides a self-test feature that allows...
.... To ensure proper Self-Test operation, remove all digital and the analog cables from the back of the dialogs shown below will continuously scroll through the screen. Dell 75 Monitor No HDMI 1 Cable The display will go into Power Save Mode in self-test mode, the power LED remains white. Troubleshooting WARNING: Before you to check whether your display is working correctly. Self-Test Your display provides a self-test feature that allows...

Users Guide
Page 59
... Input Source menu. • Perform Auto Adjust via OSD. • Adjust the Phase and Pixel Clock controls via OSD. • Reset the display to VGA input only. Common Symptoms No Video/Power LED off is selected in LCD technology. • For more information on Dell Display Quality and PixelPolicy, see Dell Support site at : http://www.dell.com/support/monitors. • Cycle power On-Off. • Pixel that is permanently off What You Experience No picture No Video/Power No picture...
... Input Source menu. • Perform Auto Adjust via OSD. • Adjust the Phase and Pixel Clock controls via OSD. • Reset the display to VGA input only. Common Symptoms No Video/Power LED off is selected in LCD technology. • For more information on Dell Display Quality and PixelPolicy, see Dell Support site at : http://www.dell.com/support/monitors. • Cycle power On-Off. • Pixel that is permanently off What You Experience No picture No Video/Power No picture...

Users Guide
Page 60
... in the video cable connector. Common Symptoms Brightness Problems Audio problem Geometric Distortion Horizontal/Vertical Lines Synchronization Problems Safety Related Issues Intermittent Problems Missing Color Wrong Color What You Experience Possible Solutions Picture too dim or • Reset the display to PC RGB or YPbPr in the Color menu OSD. • Run the built-in diagnostics. 60 | Troubleshooting too bright • Auto Adjust via OSD. • Adjust brightness & contrast controls via OSD. • Perform display self-test feature check to factory settings. •...
... in the video cable connector. Common Symptoms Brightness Problems Audio problem Geometric Distortion Horizontal/Vertical Lines Synchronization Problems Safety Related Issues Intermittent Problems Missing Color Wrong Color What You Experience Possible Solutions Picture too dim or • Reset the display to PC RGB or YPbPr in the Color menu OSD. • Run the built-in diagnostics. 60 | Troubleshooting too bright • Auto Adjust via OSD. • Adjust brightness & contrast controls via OSD. • Perform display self-test feature check to factory settings. •...

Users Guide
Page 61
...; Reset the display to unlock . Re-plug the signal cable if necessary. • Reset the computer or video player. viewing area OSD does not appear on the screen • Turn off the display, unplug the display power cable, plug it back, and then turn off . No Input Signal when user controls are pressed The picture does not fill the entire screen No picture, the LED light is white • Check the signal source. Ensure the computer is not in the power saving mode by...
...; Reset the display to unlock . Re-plug the signal cable if necessary. • Reset the computer or video player. viewing area OSD does not appear on the screen • Turn off the display, unplug the display power cable, plug it back, and then turn off . No Input Signal when user controls are pressed The picture does not fill the entire screen No picture, the LED light is white • Check the signal source. Ensure the computer is not in the power saving mode by...

Users Guide
Page 62
.... Touchscreen non-responsive in power-save mode • Right click HID- Universal Serial Bus (USB) Specific Problems Specific Symptoms USB interface is not working at all Possible Solutions • Check that your display is turned ON. • Reconnect the upstream cable to wake the computer. • Check Display OSD 'Wake on touch' setting is enabled. Ensure that the correct USB port is used. • Reconnect the upstream cable to allow the device to...
.... Touchscreen non-responsive in power-save mode • Right click HID- Universal Serial Bus (USB) Specific Problems Specific Symptoms USB interface is not working at all Possible Solutions • Check that your display is turned ON. • Reconnect the upstream cable to wake the computer. • Check Display OSD 'Wake on touch' setting is enabled. Ensure that the correct USB port is used. • Reconnect the upstream cable to allow the device to...

Users Guide
Page 65
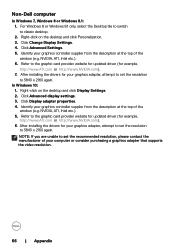
... follow the given steps. After installing the drivers for your graphics adapter, attempt to set the resolution to 3840 x 2160, please contact Dell to www.dell.com/support, enter your service tag, and download the latest driver for your graphics card. 2. For Windows 8 or Windows 8.1 only, select the Desktop tile to switch to 3840 x 2160 again. In Windows 10: 1. Right-click on the desktop and click Screen Resolution. 3.
... follow the given steps. After installing the drivers for your graphics adapter, attempt to set the resolution to 3840 x 2160, please contact Dell to www.dell.com/support, enter your service tag, and download the latest driver for your graphics card. 2. For Windows 8 or Windows 8.1 only, select the Desktop tile to switch to 3840 x 2160 again. In Windows 10: 1. Right-click on the desktop and click Screen Resolution. 3.
Users Guide
Page 66
... window (e.g. NOTE: If you are unable to 3840 x 2160 again. Click Change Display Settings. 4. Identify your computer or consider purchasing a graphics adapter that supports the video resolution. 66 | Appendix After installing the drivers for example, http://www.ATI.com or http://www.NVIDIA.com). 6. NVIDIA, ATI, Intel etc.). 6. Click Advanced Settings. 5. Refer to the graphic card provider website for updated driver (for your graphics adapter...
... window (e.g. NOTE: If you are unable to 3840 x 2160 again. Click Change Display Settings. 4. Identify your computer or consider purchasing a graphics adapter that supports the video resolution. 66 | Appendix After installing the drivers for example, http://www.ATI.com or http://www.NVIDIA.com). 6. NVIDIA, ATI, Intel etc.). 6. Click Advanced Settings. 5. Refer to the graphic card provider website for updated driver (for your graphics adapter...

Display Control Guide
Page 8
... the monitor. Displays the current input signal source. Info window 1 Room 2 Name Displays the settings and status of the monitor firmware. Click the [Exit] button to return to the Main window. 1 Monitor Information Item Monitor Name Location Firmware Version MAC address Assigned To Description Displays the monitor name settings. NOTE: Monitor Name, Location and the user name for the monitor. 2 Monitor Status Item Power Status Source Image Description Displays the current power status. Displays the current picture mode setting. Displays the...
... the monitor. Displays the current input signal source. Info window 1 Room 2 Name Displays the settings and status of the monitor firmware. Click the [Exit] button to return to the Main window. 1 Monitor Information Item Monitor Name Location Firmware Version MAC address Assigned To Description Displays the monitor name settings. NOTE: Monitor Name, Location and the user name for the monitor. 2 Monitor Status Item Power Status Source Image Description Displays the current power status. Displays the current picture mode setting. Displays the...
Display Manager Users Guide
Page 4
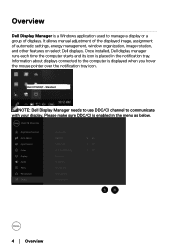
.... Dell C7520QT - Once installed, Dell display manager runs each time the computer starts and its icon is enabled in the notification tray. Please make sure DDC/CI is placed in the menu as below. Information about displays connected to the computer is a Windows application used to communicate with your display. It allows manual adjustment of the displayed image, assignment of displays. Dell 75 Monitor Brightness/Contrast Display Info Auto Adjust DCC/CI On Input Source HDMI CEC O Color LCD Conditioning O Display Audio Firmware...
.... Dell C7520QT - Once installed, Dell display manager runs each time the computer starts and its icon is enabled in the notification tray. Please make sure DDC/CI is placed in the menu as below. Information about displays connected to the computer is a Windows application used to communicate with your display. It allows manual adjustment of the displayed image, assignment of displays. Dell 75 Monitor Brightness/Contrast Display Info Auto Adjust DCC/CI On Input Source HDMI CEC O Color LCD Conditioning O Display Audio Firmware...


