
Users Guide
Page 3
Contents About your monitor 6 Package Contents 6 Product Features 7 Identifying parts and controls 8 Front view 8 Back view 9 Side view 10 Bottom view 11 Monitor specifications 12 Resolution specifications 14 Support video mode 14 Preset display modes 14 Electrical specifications 15 Physical characteristics 15 Environmental characteristics 16 Power management modes 17 Plug and Play capability 19 LCD monitor quality & pixel policy 19 Setting up the monitor 20 Connecting your monitor 20 Connecting the VGA cable 20 Connecting the HDMI cable 21 Connecting the DP cable 21
Contents About your monitor 6 Package Contents 6 Product Features 7 Identifying parts and controls 8 Front view 8 Back view 9 Side view 10 Bottom view 11 Monitor specifications 12 Resolution specifications 14 Support video mode 14 Preset display modes 14 Electrical specifications 15 Physical characteristics 15 Environmental characteristics 16 Power management modes 17 Plug and Play capability 19 LCD monitor quality & pixel policy 19 Setting up the monitor 20 Connecting your monitor 20 Connecting the VGA cable 20 Connecting the HDMI cable 21 Connecting the DP cable 21
Users Guide
Page 4
Connecting the USB cable 21 Connecting the audio cable (optional purchase 22 Wall mounting 23 Remote control 24 Inserting the batteries in the remote control 25 Handling the remote control 26 Operating range of the remote control 26 Operating the monitor 27 Power on the monitor 27 Using the control buttons 28 OSD controls 29 Using the On-Screen Display (OSD) menu 30 Accessing the OSD menu 30 OSD warning messages 42 Dell ethernet/web management for monitors 45 OSD and Power button lock 50 Troubleshooting 52 Self-test 52 Built...
Connecting the USB cable 21 Connecting the audio cable (optional purchase 22 Wall mounting 23 Remote control 24 Inserting the batteries in the remote control 25 Handling the remote control 26 Operating range of the remote control 26 Operating the monitor 27 Power on the monitor 27 Using the control buttons 28 OSD controls 29 Using the On-Screen Display (OSD) menu 30 Accessing the OSD menu 30 OSD warning messages 42 Dell ethernet/web management for monitors 45 OSD and Power button lock 50 Troubleshooting 52 Self-test 52 Built...
Users Guide
Page 7
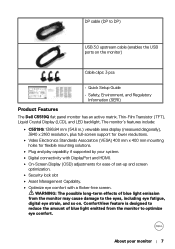
... the monitor) Cable clips: 3 pcs • Quick Setup Guide • Safety, Environment, and Regulatory Information (SERI) Product Features The Dell C5519Q flat panel monitor has an active matrix, Thin-Film Transistor (TFT), Liquid Crystal Display (LCD), and LED backlight. About your system. • Digital connectivity with DisplayPort and HDMI. • On-Screen Display (OSD) adjustments for flexible mounting solutions. • Plug and play capability if supported by your monitor | 7 DP cable (DP to DP) USB 3.0 upstream cable (enables the USB ports on...
... the monitor) Cable clips: 3 pcs • Quick Setup Guide • Safety, Environment, and Regulatory Information (SERI) Product Features The Dell C5519Q flat panel monitor has an active matrix, Thin-Film Transistor (TFT), Liquid Crystal Display (LCD), and LED backlight. About your system. • Digital connectivity with DisplayPort and HDMI. • On-Screen Display (OSD) adjustments for flexible mounting solutions. • Plug and play capability if supported by your monitor | 7 DP cable (DP to DP) USB 3.0 upstream cable (enables the USB ports on...
Users Guide
Page 9
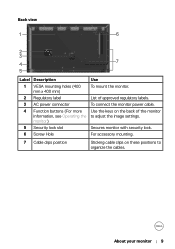
... Use 1 VESA mounting holes (400 mm x 400 mm) To mount the monitor. 2 Regulatory label List of approved regulatory labels. 3 AC power connector To connect the monitor power cable. 4 Function buttons (For more Use the keys on the back of the FCC Rules. About your monitor | 9 Back view 1 6 2 3 4 5 DELL C5519Q 100-240V 50/60Hz,2.5A C5519Q Flat Panel Monitor /Monitor Plano Panel / Moniteur écran plat Model No. /Modelo /N°de modelo /型號: C5519Qc Input Rating...
... Use 1 VESA mounting holes (400 mm x 400 mm) To mount the monitor. 2 Regulatory label List of approved regulatory labels. 3 AC power connector To connect the monitor power cable. 4 Function buttons (For more Use the keys on the back of the FCC Rules. About your monitor | 9 Back view 1 6 2 3 4 5 DELL C5519Q 100-240V 50/60Hz,2.5A C5519Q Flat Panel Monitor /Monitor Plano Panel / Moniteur écran plat Model No. /Modelo /N°de modelo /型號: C5519Qc Input Rating...

Users Guide
Page 10
...the USB cable to external audio peripherals. Side view 1 2 3 4 5 6 7 8 9 10 11 12 Label Description 1 Audio line-out port 2 Audio line-in port 3 VGA connector 4 DP connector 5 HDMI 1 connector 6 HDMI 2 connector 7 USB dedicated charging port 8 USB 3.0 downstream port Use Connect to the computer and USB upstream connector on the monitor. 10 | About your USB device. Only supports 2-channel audio. Analog audio (two channel) input. Power supply (5 V/2.0 A) Connect your monitor USB 3.0 with HDMI cable. NOTE: The audio line-out port does not support headphones. Connect your...
...the USB cable to external audio peripherals. Side view 1 2 3 4 5 6 7 8 9 10 11 12 Label Description 1 Audio line-out port 2 Audio line-in port 3 VGA connector 4 DP connector 5 HDMI 1 connector 6 HDMI 2 connector 7 USB dedicated charging port 8 USB 3.0 downstream port Use Connect to the computer and USB upstream connector on the monitor. 10 | About your USB device. Only supports 2-channel audio. Analog audio (two channel) input. Power supply (5 V/2.0 A) Connect your monitor USB 3.0 with HDMI cable. NOTE: The audio line-out port does not support headphones. Connect your...

Users Guide
Page 11
Remote management and control of monitor via RS232 Remote Network Management and control of monitor via RJ-45. 1 1 1 Speakers About your USB device. 9 USB 3.0 downstream port 10 USB 3.0 upstream port 11 RS232 connector 12 RJ-45 port Bottom view Connect your monitor | 11 Connect the USB cable that comes with your monitor to the computer and USB upstream connector on the monitor. Once this connector after you can use the USB downstream connectors on the monitor. You can only use this cable is connected, you have connected the USB cable to the computer.
Remote management and control of monitor via RS232 Remote Network Management and control of monitor via RJ-45. 1 1 1 Speakers About your USB device. 9 USB 3.0 downstream port 10 USB 3.0 upstream port 11 RS232 connector 12 RJ-45 port Bottom view Connect your monitor | 11 Connect the USB cable that comes with your monitor to the computer and USB upstream connector on the monitor. Once this connector after you can use the USB downstream connectors on the monitor. You can only use this cable is connected, you have connected the USB cable to the computer.

Users Guide
Page 17
... upon this automatic power saving feature. The following table shows the power consumption and signaling of this information in use. Blank - No warranty as to accuracy or completeness is informational only and reflects laboratory performance. Power management modes If you ordered and shall have VESA's DPM™ compliance display card or software installed in off Horizontal Vertical Power Power Video sync sync indicator consumption Active Active Active White 200 W (Maximum...
... upon this automatic power saving feature. The following table shows the power consumption and signaling of this information in use. Blank - No warranty as to accuracy or completeness is informational only and reflects laboratory performance. Power management modes If you ordered and shall have VESA's DPM™ compliance display card or software installed in off Horizontal Vertical Power Power Video sync sync indicator consumption Active Active Active White 200 W (Maximum...
Users Guide
Page 23
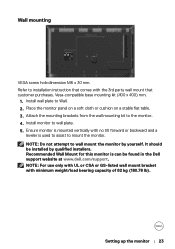
... FCC Rules. Setting up the monitor | 23 Apparatet må tilkoples jordet stikkontakt. Vesa-compatible base mounting kit (400 x 400) mm. 1. NOTE: For use only with UL or CSA or GS-listed wall mount bracket with no tilt forward or backward and a leveler is used to assist to installation instruction that comes with part 15 of Mfg January. 2018 SVC Tag: xxxxxxx Express Service Code: xxx xxx...
... FCC Rules. Setting up the monitor | 23 Apparatet må tilkoples jordet stikkontakt. Vesa-compatible base mounting kit (400 x 400) mm. 1. NOTE: For use only with UL or CSA or GS-listed wall mount bracket with no tilt forward or backward and a leveler is used to assist to installation instruction that comes with part 15 of Mfg January. 2018 SVC Tag: xxxxxxx Express Service Code: xxx xxx...
Users Guide
Page 34
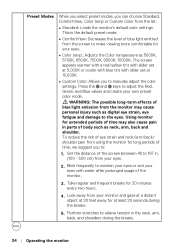
... and keys to adjust the Red, Green, and Blue values and create your eyes. 2. This is the default preset mode. ∞∞ComfortView: Decreases the level of blue light emission from the monitor may also cause pain in . (100 - 500 cm) from the screen to make viewing more comfortable for at 10,000K. ∞∞Custom Color: Allows you to manually adjust the color settings. Perform stretches...
... and keys to adjust the Red, Green, and Blue values and create your eyes. 2. This is the default preset mode. ∞∞ComfortView: Decreases the level of blue light emission from the monitor may also cause pain in . (100 - 500 cm) from the screen to make viewing more comfortable for at 10,000K. ∞∞Custom Color: Allows you to manually adjust the color settings. Perform stretches...

Users Guide
Page 36
... '0' (-). Select this option to restore default display settings. Minimum is sharper. Sharpness This feature can make the image look sharper or softer. NOTE: Wide 16:9 adjustment is '100' (+). Dell 55 Monitor Brightness/Contrast Auto Adjust Input Source Color Display Audio Menu Personalize Others Aspect Ratio Horizontal Position Vertical Position Sharpness Pixel Clock Phase Reset Display Wide 16:9 50 Aspect Ratio Adjusts the image ratio as Wide 16:9, 4:3, or 5:4. Maximum is not required at maximum preset resolution 3840 x 2160. Minimum is '100...
... '0' (-). Select this option to restore default display settings. Minimum is sharper. Sharpness This feature can make the image look sharper or softer. NOTE: Wide 16:9 adjustment is '100' (+). Dell 55 Monitor Brightness/Contrast Auto Adjust Input Source Color Display Audio Menu Personalize Others Aspect Ratio Horizontal Position Vertical Position Sharpness Pixel Clock Phase Reset Display Wide 16:9 50 Aspect Ratio Adjusts the image ratio as Wide 16:9, 4:3, or 5:4. Maximum is not required at maximum preset resolution 3840 x 2160. Minimum is '100...
Users Guide
Page 40
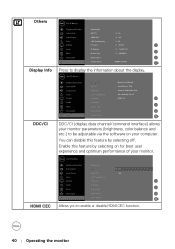
.... Enable this feature by selecting on your monitor. Dell 55 Monitor Brightness/Contrast Auto Adjust Input Source Color Display Audio Menu Personalize Others Display Info DDC/CI HDMI CEC LCD Conditioning Firmware IP Address Service Tag Reset Others Factory Reset Model: Dell C5519Q Input Source: VGA Current: 1920x1080, 60Hz DP Capability: DP 1.2 HDMI: 2.0 DDC/CI (display data channel/command interface) allows your monitor parameters (brightness, color balance and etc.) to be adjustable via the software on for best user experience and optimum performance of your computer.
.... Enable this feature by selecting on your monitor. Dell 55 Monitor Brightness/Contrast Auto Adjust Input Source Color Display Audio Menu Personalize Others Display Info DDC/CI HDMI CEC LCD Conditioning Firmware IP Address Service Tag Reset Others Factory Reset Model: Dell C5519Q Input Source: VGA Current: 1920x1080, 60Hz DP Capability: DP 1.2 HDMI: 2.0 DDC/CI (display data channel/command interface) allows your monitor parameters (brightness, color balance and etc.) to be adjustable via the software on for best user experience and optimum performance of your computer.
Users Guide
Page 48
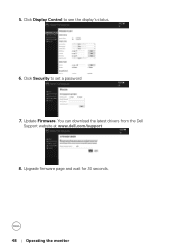
You can download the latest drivers from the Dell Support website at www.dell.com/support 8. Click Security to see the display's status. 6. Upgrade firmware page and wait for 30 seconds. 48 | Operating the monitor Update Firmware. 5. Click Display Control to set a password 7.
You can download the latest drivers from the Dell Support website at www.dell.com/support 8. Click Security to see the display's status. 6. Upgrade firmware page and wait for 30 seconds. 48 | Operating the monitor Update Firmware. 5. Click Display Control to set a password 7.

Users Guide
Page 50
...monitor C5519Q The default setting of OSD lock is set to unlock. 1 Up 2 Down 3 Menu 4 Exit 5 Power To enter OSD lock menu: Hold the Exit key (button 4) for 4 seconds to display OSD lock menu (when OSD unlocked), A OSD lock menu appears and is shown on center of display screen for 4 seconds. Dell 55 Monitor Select Option: + C5519Q To enter OSD unlock menu: Hold the Exit key (button 4) for 4 seconds to adjustments. OSD and Power button lock Controls user access to display OSD lock menu (when OSD locked), A OSD unlock menu appears and is shown on center of display screen...
...monitor C5519Q The default setting of OSD lock is set to unlock. 1 Up 2 Down 3 Menu 4 Exit 5 Power To enter OSD lock menu: Hold the Exit key (button 4) for 4 seconds to display OSD lock menu (when OSD unlocked), A OSD lock menu appears and is shown on center of display screen for 4 seconds. Dell 55 Monitor Select Option: + C5519Q To enter OSD unlock menu: Hold the Exit key (button 4) for 4 seconds to adjustments. OSD and Power button lock Controls user access to display OSD lock menu (when OSD locked), A OSD unlock menu appears and is shown on center of display screen...

Users Guide
Page 56
...; Reset the monitor to Factory Settings (Factory Reset). ∞∞ Adjust brightness & contrast controls via the Input Source menu. Common symptoms Possible solutions No video/Power LED off ∞∞ Ensure that the video cable connecting the monitor and the computer is properly connected and secure. ∞∞ Verify that the power outlet is functioning properly using the OSD. ∞∞ Perform monitor self-test feature check. ∞∞ Check for bent or broken pins in the video cable connector...
...; Reset the monitor to Factory Settings (Factory Reset). ∞∞ Adjust brightness & contrast controls via the Input Source menu. Common symptoms Possible solutions No video/Power LED off ∞∞ Ensure that the video cable connecting the monitor and the computer is properly connected and secure. ∞∞ Verify that the power outlet is functioning properly using the OSD. ∞∞ Perform monitor self-test feature check. ∞∞ Check for bent or broken pins in the video cable connector...

Users Guide
Page 57
...; Reset the monitor to Factory Settings (Factory Reset). ∞∞ Perform monitor self-test feature check to turn off the monitor static image left on the application. ∞∞ Try different Preset Modes in self-test mode. Wrong color ∞∞ Change the Color Setting Mode in the Color Settings OSD to Graphics or Video depending on the at all times when not in use a dynamically changing screensaver. Troubleshooting | 57 Image retention from a ∞∞ Use the Power...
...; Reset the monitor to Factory Settings (Factory Reset). ∞∞ Perform monitor self-test feature check to turn off the monitor static image left on the application. ∞∞ Try different Preset Modes in self-test mode. Wrong color ∞∞ Change the Color Setting Mode in the Color Settings OSD to Graphics or Video depending on the at all times when not in use a dynamically changing screensaver. Troubleshooting | 57 Image retention from a ∞∞ Use the Power...

Users Guide
Page 58
... the monitor, unplug the power cord, plug it back, and then turn On the monitor. ∞∞ Check if the OSD menu is locked. Product-specific problems Specific symptoms Possible solutions Screen image is too small ∞∞ Check the Aspect Ratio setting in the Display settings OSD. ∞∞ Reset the monitor to unlock. Ensure the computer is plugged in diagnostics. 58 | Troubleshooting Cannot adjust the monitor with the buttons on the keyboard. ∞∞ Check if the video cable...
... the monitor, unplug the power cord, plug it back, and then turn On the monitor. ∞∞ Check if the OSD menu is locked. Product-specific problems Specific symptoms Possible solutions Screen image is too small ∞∞ Check the Aspect Ratio setting in the Display settings OSD. ∞∞ Reset the monitor to unlock. Ensure the computer is plugged in diagnostics. 58 | Troubleshooting Cannot adjust the monitor with the buttons on the keyboard. ∞∞ Check if the video cable...
Users Guide
Page 62
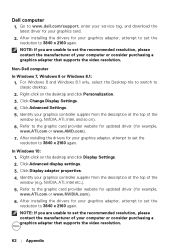
... display settings. 3. After installing the drivers for your graphics adapter, attempt to set the resolution to set the recommended resolution, please contact the manufacturer of your computer or consider purchasing a graphics adapter that supports the video resolution. 62 | Appendix NOTE: If you are unable to 3840 x 2160 again. Dell computer 1. For Windows 8 and Windows 8.1 only, select the Desktop tile to switch to the graphic card provider website for updated driver...
... display settings. 3. After installing the drivers for your graphics adapter, attempt to set the resolution to set the recommended resolution, please contact the manufacturer of your computer or consider purchasing a graphics adapter that supports the video resolution. 62 | Appendix NOTE: If you are unable to 3840 x 2160 again. Dell computer 1. For Windows 8 and Windows 8.1 only, select the Desktop tile to switch to the graphic card provider website for updated driver...

Display Control User Guide
Page 9
Monitor Status Item Power Status Source Image Description Displays the current power status. Dell Display Control | 9 Displays the current input signal source. Displays the version of the monitor. 2. Displays the user name of the monitor firmware. NOTE: Monitor Name, Location and the user name for Assigned To may appear truncated if they are too long. Click the [Exit] button to return to the Main window. 1. Displays the current picture mode setting. Displays the wired LAN MAC address of...
Monitor Status Item Power Status Source Image Description Displays the current power status. Dell Display Control | 9 Displays the current input signal source. Displays the version of the monitor. 2. Displays the user name of the monitor firmware. NOTE: Monitor Name, Location and the user name for Assigned To may appear truncated if they are too long. Click the [Exit] button to return to the Main window. 1. Displays the current picture mode setting. Displays the wired LAN MAC address of...
Display Manager Users Guide
Page 4
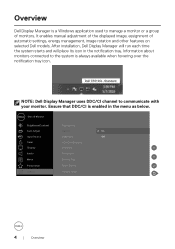
... in the notification tray. After installation, Dell Display Manager will run each time the system starts and will place its icon in the menu as below. Ensure that DDC/CI is always available when hovering over the notification tray icon. Dell 55 Monitor Brightness/Contrast Display Info Auto Adjust DDC/CI On Input Source HDMI CEC Off Color Display LCD Conditioning Firmware Audio IP Address Menu Service Tag Personalize Reset Others Others Factory Reset 4 | Overview Dell C5519Q -
... in the notification tray. After installation, Dell Display Manager will run each time the system starts and will place its icon in the menu as below. Ensure that DDC/CI is always available when hovering over the notification tray icon. Dell 55 Monitor Brightness/Contrast Display Info Auto Adjust DDC/CI On Input Source HDMI CEC Off Color Display LCD Conditioning Firmware Audio IP Address Menu Service Tag Personalize Reset Others Others Factory Reset 4 | Overview Dell C5519Q -

Display Manager Users Guide
Page 8
... applications The Auto Mode tab enables you to associate a specific Preset Mode with a specific application, and apply it . When Auto Mode is pre-configured for batch files, scripts, loaders, and non-executable files such as zip archives or packed files, are not supported. NOTE: Preset Mode assignments for many popular applications. Dell Display Manager is enabled, Dell Display Manager will automatically switch to applications...
... applications The Auto Mode tab enables you to associate a specific Preset Mode with a specific application, and apply it . When Auto Mode is pre-configured for batch files, scripts, loaders, and non-executable files such as zip archives or packed files, are not supported. NOTE: Preset Mode assignments for many popular applications. Dell Display Manager is enabled, Dell Display Manager will automatically switch to applications...


