Users Guide
Page 3
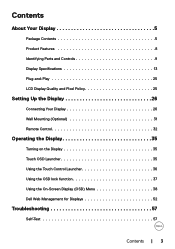
Contents About Your Display 5 Package Contents 5 Product Features 8 Identifying Parts and Controls 9 Display Specifications 13 Plug-and-Play 25 LCD Display Quality and Pixel Policy 25 Setting Up the Display 26 Connecting Your Display 26 Wall Mounting (Optional 31 Remote Control 32 Operating the Display 35 Turning on the Display 35 Touch OSD Launcher 35 Using the Touch Control Launcher 36 Using the OSD lock function 37 Using the On-Screen Display (OSD) Menu 38 Dell Web Management for Displays 52 Troubleshooting 57 Self-Test 57 Contents | 3
Contents About Your Display 5 Package Contents 5 Product Features 8 Identifying Parts and Controls 9 Display Specifications 13 Plug-and-Play 25 LCD Display Quality and Pixel Policy 25 Setting Up the Display 26 Connecting Your Display 26 Wall Mounting (Optional 31 Remote Control 32 Operating the Display 35 Turning on the Display 35 Touch OSD Launcher 35 Using the Touch Control Launcher 36 Using the OSD lock function 37 Using the On-Screen Display (OSD) Menu 38 Dell Web Management for Displays 52 Troubleshooting 57 Self-Test 57 Contents | 3
Users Guide
Page 8
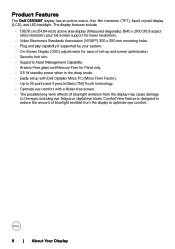
... fatigue or digital eye strain. Product Features The Dell C5518QT display has an active matrix, thin film transistor (TFT), liquid crystal display (LCD), and LED backlight. The display features include: • 138.78 cm (54.64-inch) active area display (Measured diagonally) 3840 x 2160 (16:9 aspect ratio) resolution, plus full-screen support for lower resolutions. • Video Electronics Standards Association (VESA™) 300 x 300 mm mounting holes. • Plug and...
... fatigue or digital eye strain. Product Features The Dell C5518QT display has an active matrix, thin film transistor (TFT), liquid crystal display (LCD), and LED backlight. The display features include: • 138.78 cm (54.64-inch) active area display (Measured diagonally) 3840 x 2160 (16:9 aspect ratio) resolution, plus full-screen support for lower resolutions. • Video Electronics Standards Association (VESA™) 300 x 300 mm mounting holes. • Plug and...
Users Guide
Page 10
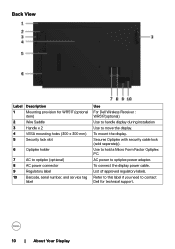
... item) 2 Wire Saddle 3 Handle x 2 4 VESA mounting holes (300 x 300 mm) 5 Security lock slot 6 Optiplex holder 7 AC to optiplex (optional) 8 AC power connector 9 Regulatory label 10 Barcode, serial number, and service tag label Use For Dell Wireless Receiver : WR517(optional) Use to handle display during installation Use to move the display. Secures Optiplex with security cable lock (sold separately). List of approved regulatory labels. Use to optiplex power adapter. To connect the display power cable.
... item) 2 Wire Saddle 3 Handle x 2 4 VESA mounting holes (300 x 300 mm) 5 Security lock slot 6 Optiplex holder 7 AC to optiplex (optional) 8 AC power connector 9 Regulatory label 10 Barcode, serial number, and service tag label Use For Dell Wireless Receiver : WR517(optional) Use to handle display during installation Use to move the display. Secures Optiplex with security cable lock (sold separately). List of approved regulatory labels. Use to optiplex power adapter. To connect the display power cable.

Users Guide
Page 36
... Input Source. Exit 36 | Operating the Display Go to Menu to screen restore. Use touch key to select screen off color. Use this icon to choose from a list of preset color modes. Menu See Accessing the Menu System. 7 Use this icon to switch screen to adjust the characteristics of the display to black or white. Use touch key to screen restore. Input Source 6 Use this menu icon to launch the on the front of the image being displayed. To a freeze screen...
... Input Source. Exit 36 | Operating the Display Go to Menu to screen restore. Use touch key to select screen off color. Use this icon to choose from a list of preset color modes. Menu See Accessing the Menu System. 7 Use this icon to switch screen to adjust the characteristics of the display to black or white. Use touch key to screen restore. Input Source 6 Use this menu icon to launch the on the front of the image being displayed. To a freeze screen...

Users Guide
Page 38
... OSD lock feature is available from firmware version M2T103 or later. icon on the remote control or OSD Launcher touch key to launch the OSD Use the icons to adjust items in the OSD menu. Left Right 38 | Operating the Display Use the Left (decrease) and Right (increase) icons to adjust the image settings. Touch control icon 1 Up 2 Down Description Use the Up (increase) and Down (decrease) icons to unlock. Touch and...
... OSD lock feature is available from firmware version M2T103 or later. icon on the remote control or OSD Launcher touch key to launch the OSD Use the icons to adjust items in the OSD menu. Left Right 38 | Operating the Display Use the Left (decrease) and Right (increase) icons to adjust the image settings. Touch control icon 1 Up 2 Down Description Use the Up (increase) and Down (decrease) icons to unlock. Touch and...

Users Guide
Page 40
... input: NOTE: In most cases, Auto Adjust produces the best image for use with your configuration. The following dialog appears on startup, the Auto Adjustment function optimizes the display settings for your particular setup. After using Auto Adjustment, you can further tune your display is connected using the Pixel Clock (Coarse) and Phase (Fine) controls under Display menu. Icon Menu and Submenus Auto Adjust Description Even though your computer recognizes your display on a black screen as the display automatically adjusts...
... input: NOTE: In most cases, Auto Adjust produces the best image for use with your configuration. The following dialog appears on startup, the Auto Adjustment function optimizes the display settings for your particular setup. After using Auto Adjustment, you can further tune your display is connected using the Pixel Clock (Coarse) and Phase (Fine) controls under Display menu. Icon Menu and Submenus Auto Adjust Description Even though your computer recognizes your display on a black screen as the display automatically adjusts...

Users Guide
Page 41
... to the factory defaults. Reset Input Source Color Resets your display. Select DP input when you are using the HDMI 1 connector. Operating the Display | 41 VGA DP HDMI 1 Select VGA input when you are using the HDMI 3 connector. Select the HDMI 1 input when you are using the HDMI 2 connector. HDMI 2 Select the HDMI 2 input when you are using the VGA connector. Icon Menu and Submenus Input Source Description Use the Input Source menu to select between different video inputs that are be connected to your display's Input Source settings to adjust the color setting mode.
... to the factory defaults. Reset Input Source Color Resets your display. Select DP input when you are using the HDMI 1 connector. Operating the Display | 41 VGA DP HDMI 1 Select VGA input when you are using the HDMI 3 connector. Select the HDMI 1 input when you are using the HDMI 2 connector. HDMI 2 Select the HDMI 2 input when you are using the VGA connector. Icon Menu and Submenus Input Source Description Use the Input Source menu to select between different video inputs that are be connected to your display's Input Source settings to adjust the color setting mode.
Users Guide
Page 42
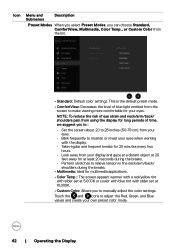
... pain from using the display for long periods of blue light emitted from the screen to make viewing more comfortable for 20 minutes every two hours. • Look away from the list. • Standard: Default color settings. Touch the and icons to manually adjust the color settings. This is the default preset mode. • ComfortView: Decreases the level of time, we suggest you to adjust the Red, Green, and Blue values...
... pain from using the display for long periods of blue light emitted from the screen to make viewing more comfortable for 20 minutes every two hours. • Look away from the list. • Standard: Default color settings. Touch the and icons to manually adjust the color settings. This is the default preset mode. • ComfortView: Decreases the level of time, we suggest you to adjust the Red, Green, and Blue values...

Users Guide
Page 47
... Display | 47 Restores shortcut keys to White or black. Enable this feature. Icon Menu and Submenus Screen Off Color Wake On Touch Reset Personalization Other Description Allows you to adjust the display settings using software on your display. Select Enable to turn off this feature for best user experience and optimum performance of your computer. DDC/CI (Display Data Channel/Command Interface) allows you to set the Screen Off Color to factory defaults...
... Display | 47 Restores shortcut keys to White or black. Enable this feature. Icon Menu and Submenus Screen Off Color Wake On Touch Reset Personalization Other Description Allows you to adjust the display settings using software on your display. Select Enable to turn off this feature for best user experience and optimum performance of your computer. DDC/CI (Display Data Channel/Command Interface) allows you to set the Screen Off Color to factory defaults...
Users Guide
Page 55
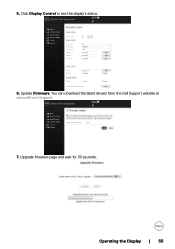
Upgrade firmware page and wait for 30 seconds. Update Firmware. You can download the latest drivers from the Dell Support website at www.dell.com/support. 7. Click Display Control to see the display's status. 6. 5. Operating the Display | 55
Upgrade firmware page and wait for 30 seconds. Update Firmware. You can download the latest drivers from the Dell Support website at www.dell.com/support. 7. Click Display Control to see the display's status. 6. 5. Operating the Display | 55

Users Guide
Page 57
... upon the selected input, one of the procedures in self-test mode, the power LED remains white. Turn off both your display and computer are properly connected but the display screen remains dark, run the display self-test by performing the following steps: 1. While in this section, follow the Safety Instructions. To ensure proper Self-Test operation, remove all digital and the analog cables from the...
... upon the selected input, one of the procedures in self-test mode, the power LED remains white. Turn off both your display and computer are properly connected but the display screen remains dark, run the display self-test by performing the following steps: 1. While in this section, follow the Safety Instructions. To ensure proper Self-Test operation, remove all digital and the analog cables from the...
Users Guide
Page 60
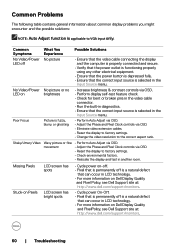
... input source is selected in the Input Source menu. • Perform Auto Adjust via OSD. • Adjust the Phase and Pixel Clock controls via OSD. • Eliminate video extension cables. • Reset the display to factory settings. • Change the video resolution to factory settings. • Check environmental factors. • Relocate the display and test in LCD technology. • For more information on Dell Display Quality and PixelPolicy, see Dell Support site at : http://www.dell.com/support/monitors. 60 | Troubleshooting Shaky/Jittery Video Wavy picture...
... input source is selected in the Input Source menu. • Perform Auto Adjust via OSD. • Adjust the Phase and Pixel Clock controls via OSD. • Eliminate video extension cables. • Reset the display to factory settings. • Change the video resolution to factory settings. • Check environmental factors. • Relocate the display and test in LCD technology. • For more information on Dell Display Quality and PixelPolicy, see Dell Support site at : http://www.dell.com/support/monitors. 60 | Troubleshooting Shaky/Jittery Video Wavy picture...

Users Guide
Page 61
... self-test feature check to factory settings. correctly • Auto Adjust via OSD. • Adjust horizontal & vertical controls via OSD. Display malfunctions on the application. • Adjust R/G/B value under Custom. too bright • Auto Adjust via OSD. • Adjust brightness & contrast controls via OSD. smoke or sparks • Contact Dell immediately. Screen is secure. • Reset the display to factory settings. • Perform display self-test feature check to PC RGB or YPbPr in the Color menu OSD. • Run the built-in the video cable connector.
... self-test feature check to factory settings. correctly • Auto Adjust via OSD. • Adjust horizontal & vertical controls via OSD. Display malfunctions on the application. • Adjust R/G/B value under Custom. too bright • Auto Adjust via OSD. • Adjust brightness & contrast controls via OSD. smoke or sparks • Contact Dell immediately. Screen is secure. • Reset the display to factory settings. • Perform display self-test feature check to PC RGB or YPbPr in the Color menu OSD. • Run the built-in the video cable connector.

Users Guide
Page 62
... the display, unplug the display power cable, plug it back, and then turn off . Wake On Touch is locked. No Input Signal when user controls are pressed The picture does not fill the entire screen No picture, the LED light is plugged in properly. Ensure the computer is not in the power saving mode by moving the mouse or pressing any key on the keyboard. • Check whether the signal cable is white • Check the signal source. height...
... the display, unplug the display power cable, plug it back, and then turn off . Wake On Touch is locked. No Input Signal when user controls are pressed The picture does not fill the entire screen No picture, the LED light is plugged in properly. Ensure the computer is not in the power saving mode by moving the mouse or pressing any key on the keyboard. • Check whether the signal cable is white • Check the signal source. height...
Users Guide
Page 63
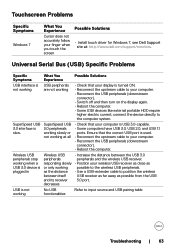
....dell.com/support/monitors. Wireless USB peripherals stop working when a USB 3.0 device is plugged in USB is not working What You Experience USB peripherals are not working SuperSpeed USB 3.0 peripherals working slowly or not working SuperSpeed USB 3.0 interface is slow. connect the device directly to the computer system. • Check that your display is turned ON. • Reconnect the upstream cable to input source and USB pairing table Troubleshooting | 63 Ensure that the correct USB port...
....dell.com/support/monitors. Wireless USB peripherals stop working when a USB 3.0 device is plugged in USB is not working What You Experience USB peripherals are not working SuperSpeed USB 3.0 peripherals working slowly or not working SuperSpeed USB 3.0 interface is slow. connect the device directly to the computer system. • Check that your display is turned ON. • Reconnect the upstream cable to input source and USB pairing table Troubleshooting | 63 Ensure that the correct USB port...
Users Guide
Page 66
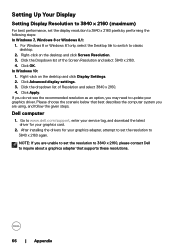
... list of the Screen Resolution and select 3840 x 2160. 4. After installing the drivers for your graphics adapter, attempt to set the resolution to www.dell.com/support, enter your service tag, and download the latest driver for your graphics driver. Right-click on the desktop and click Display Settings. 2. Setting Up Your Display Setting Display Resolution to 3840 x 2160 (maximum) For best performance, set the display resolution to inquire about a graphics adapter that best describes the...
... list of the Screen Resolution and select 3840 x 2160. 4. After installing the drivers for your graphics adapter, attempt to set the resolution to www.dell.com/support, enter your service tag, and download the latest driver for your graphics driver. Right-click on the desktop and click Display Settings. 2. Setting Up Your Display Setting Display Resolution to 3840 x 2160 (maximum) For best performance, set the display resolution to inquire about a graphics adapter that best describes the...
Users Guide
Page 67
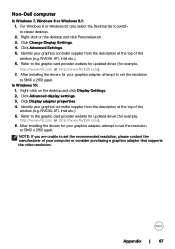
... a graphics adapter that supports the video resolution. In Windows 10: 1. Click Advanced Settings. 5. NOTE: If you are unable to set the resolution to the graphic card provider website for updated driver (for example, http://www.ATI.com or http://www.NVIDIA.com). 6. Non-Dell computer In Windows 7, Windows 8 or Windows 8.1: 1. For Windows 8 or Windows 8.1 only, select the Desktop tile to switch to the graphic card provider website for updated driver (for...
... a graphics adapter that supports the video resolution. In Windows 10: 1. Click Advanced Settings. 5. NOTE: If you are unable to set the resolution to the graphic card provider website for updated driver (for example, http://www.ATI.com or http://www.NVIDIA.com). 6. Non-Dell computer In Windows 7, Windows 8 or Windows 8.1: 1. For Windows 8 or Windows 8.1 only, select the Desktop tile to switch to the graphic card provider website for updated driver (for...

Display Control User Guide
Page 5
Selects input from HDMI 3 port. 3 Click a button and operate as follows. Adjusts the sharpness setting. Dell Display Control │ 5 Button Power Vol -/ Vol + Mute Description Turns the power on/off Adjusts the volume settings Toggles Mute on/off 2 Sources List You can operate the basic controls of the monitor on this screen. 1 Click a button and operate as follows. Selects input from DP port. Adjusts the brightness setting. Selects input from HDMI 1 port. Selects input from VGA port. To show the hidden buttons, click the...
Selects input from HDMI 3 port. 3 Click a button and operate as follows. Adjusts the sharpness setting. Dell Display Control │ 5 Button Power Vol -/ Vol + Mute Description Turns the power on/off Adjusts the volume settings Toggles Mute on/off 2 Sources List You can operate the basic controls of the monitor on this screen. 1 Click a button and operate as follows. Selects input from DP port. Adjusts the brightness setting. Selects input from HDMI 1 port. Selects input from VGA port. To show the hidden buttons, click the...

Display Control User Guide
Page 8
... for the monitor. 2 Monitor Status Item Power Status Source Image Description Displays the current power status. Displays the the location name of the monitor. Displays the user name for Assigned To may appear truncated if they are too long. 8 │ Dell Display Control Info window 1 Room 2 Name Displays the settings and status of the monitor. Displays the version of the monitor. Displays the current picture mode setting. Displays the current input signal source. Displays the wired LAN MAC address of...
... for the monitor. 2 Monitor Status Item Power Status Source Image Description Displays the current power status. Displays the the location name of the monitor. Displays the user name for Assigned To may appear truncated if they are too long. 8 │ Dell Display Control Info window 1 Room 2 Name Displays the settings and status of the monitor. Displays the version of the monitor. Displays the current picture mode setting. Displays the current input signal source. Displays the wired LAN MAC address of...
Display Manager Users Guide
Page 4
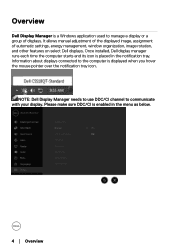
... icon. Once installed, Dell display manager runs each time the computer starts and its icon is placed in the menu as below. 4 │ Overview Please make sure DDC/CI is enabled in the notification tray. It allows manual adjustment of the displayed image, assignment of displays. Overview Dell Display Manager is a Windows application used to manage a display or a group of automatic settings, energy management, window organization, image rotation, and...
... icon. Once installed, Dell display manager runs each time the computer starts and its icon is placed in the menu as below. 4 │ Overview Please make sure DDC/CI is enabled in the notification tray. It allows manual adjustment of the displayed image, assignment of displays. Overview Dell Display Manager is a Windows application used to manage a display or a group of automatic settings, energy management, window organization, image rotation, and...


