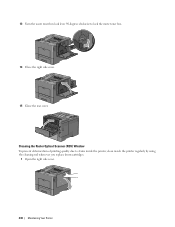
Dell /C3760dn Color Laser Printer Users Guide
Page 14
... 2nd BTR 329 Installing a 2nd BTR 329 Removing the Retard Roller in Tray1 330 Installing a Retard Roller in Tray1 331 Replacing the Waste Toner Box 332 Removing the Waste Toner Box 332 Installing a Waste Toner Box 333 Cleaning Inside the Printer 334 Cleaning the CTD Sensor 334 Cleaning the Raster Optical Scanner (ROS) Window 338 Adjusting Color Registration 342...
Dell /C3760dn Color Laser Printer Users Guide
Page 29
... this manual are those of your Dell™ C3760n/C3760dn Color Laser Printer. 4 About the Printer This chapter provides an overview of the Dell C3760dn Color Laser Printer unless otherwise mentioned. Front and Rear View Front View 1 13 14 12 11 9 10 2 3 4 8 7 5 6 1 Transfer Belt Unit 2 Drum Cartridges 3 Waste Toner Box 4 Right Side Cover 5 Power Switch 6 Tray1...
Dell /C3760dn Color Laser Printer Users Guide
Page 132
...the tray. 130 Dell™ Printer Configuration Web Tool Displays the maximum capacity of the consumables, trays, and covers. OK Replace Soon Replace Now OK Add Paper Indicates that the drum cartridge and/or waste toner box needs to be replaced now. Indicates that the status of toner for use . ... item is available only when the printer is no paper in the tray but the quantity is enough amount of the drum cartridge and/or waste toner box is OK for use . Indicates that there is unknown. Indicates that there is some paper in the tray. "Print Server Settings" "Security...
Dell /C3760dn Color Laser Printer Users Guide
Page 305
... remains, replace the cartridge. Remove the used black drum cartridge, and install a new cartridge. Remove the used waste toner box, and install a new toner box. If the message remains, replace the cartridge. Remove it on the printer driver. Wait for a while until ...cartridge, and install a new cartridge. For more information about replacing the waste toner box, see "Replacing the Drum Cartridges." For more information about reinserting the drum cartridge, see "Replacing the Waste Toner Box." For more information about replacing the drum cartridge, see "Replacing the...
Dell /C3760dn Color Laser Printer Users Guide
Page 315
... or maintenance items that require attention replacing (However, the printer can order consumables (toner cartridges, drum cartridges, and waste toner box) from the Select Reorder URL list. Your Service Tag number is connected to conserve toner cartridge and paper. Type the printer's IP address in your Dell printer Service Tag in your web browser, launch the...
Dell /C3760dn Color Laser Printer Users Guide
Page 319
... and follow the safety instructions in the Product Information Guide. Maintaining Your Printer 317 Removing the Drum Cartridge 1 Open the right side cover. 2 Turn the waste toner box lock lever 90-degrees counterclockwise to replace all drum cartridges (yellow, magenta, cyan, and black) at a time. If the right side cover remains open for...
Dell /C3760dn Color Laser Printer Users Guide
Page 320
Toner can dirty or stain your hands. 4 Stand the removed waste toner box upright on its side as this may cause its malfunction or toner spills. 318 Maintaining Your Printer WARNING: Never lay the waste toner box on a level surface. CAUTION: After removing the waste toner box, do not touch the parts shown in the illustration. CAUTION: Take care not to hold it . 3 Grasp the handle on the waste toner box and pull it out making sure to drop the waste toner box while you are removing it upright so that the waste toner does not spill out.
Dell /C3760dn Color Laser Printer Users Guide
Page 323
9 Insert the cleaning rod fully into one of the printer as illustrated below, and then pull it out. 10 Repeat step 9 also on the other three holes. CAUTION: If the waste toner box does not fit into the interior of the four holes until it clicks into place properly, make sure that the drum cartridge is enough for each hole. 11 Return the cleaning rod to its original location. 12 Reinsert the removed waste toner box. One time insertion is fully inserted in the previous step. Maintaining Your Printer 321
Dell /C3760dn Color Laser Printer Users Guide
Page 324
Replacing the Fusing Unit WARNING: Before performing any of the following procedures, read and follow the safety instructions in the Product Information Guide. Removing the Fusing Unit 1 Turn off the printer and wait for 30 minutes. 2 Push down the latch to lock the waste toner box. 14 Close the right side cover. 13 Turn the waste toner box lock lever 90-degrees clockwise to open the rear cover. 322 Maintaining Your Printer
Dell /C3760dn Color Laser Printer Users Guide
Page 326
... the Product Information Guide. Removing the Transfer Belt Unit 1 Push down the latch to open the rear cover. 2 Open the right side cover. 3 Turn the waste toner box lock lever 90-degrees counterclockwise to replace all three parts (transfer belt unit, 2nd BTR, and retard roller) at a time. WARNING: Before performing any of... may reduce print quality. Replacing the Transfer Belt Unit, the 2nd Belt Transfer Roller (2nd BTR), and the Retard Roller You need to unlock the waste toner box. 324 Maintaining Your Printer
Dell /C3760dn Color Laser Printer Users Guide
Page 327
Toner can dirty or stain your hands. 5 Stand the removed waste toner box upright on its side as this may cause its malfunction or toner spills. WARNING: Never lay the waste toner box on a level surface. 4 Grasp the handle on the waste toner box and pull it out making sure to drop the waste toner box while you are removing it upright so that the waste toner does not spill out. Maintaining Your Printer 325 CAUTION: Take care not to hold it . CAUTION: After removing the waste toner box, do not touch the parts shown in the illustration.
Dell /C3760dn Color Laser Printer Users Guide
Page 330
5 Reinsert the removed waste toner box. NOTE: After replacing the transfer belt unit, be sure to lock the waste toner box. 7 Close the right side cover. CAUTION: If the waste toner box does not fit into place properly, make sure that the transfer belt unit is fully inserted. 6 Turn the waste toner box lock lever 90-degrees clockwise to initialize its life counter by following the instructions in the accompanying manual. 328 Maintaining Your Printer
Dell /C3760dn Color Laser Printer Users Guide
Page 334
Removing the Waste Toner Box 1 Open the right side cover. 2 Turn the waste toner box lock lever 90-degrees counterclockwise to unlock the waste toner box. 3 Grasp the handle on the waste toner box and pull it out making sure to drop the waste toner box while you are removing it upright so that the waste toner does not spill out. CAUTION: Take care not to hold it...
Dell /C3760dn Color Laser Printer Users Guide
Page 335
Maintaining Your Printer 333 4 Insert the used waste toner box into the plastic bag that came with the new waste toner box and seal the bag. Installing a Waste Toner Box 1 Unpack a new waste toner box. 2 Insert the waste toner box. 3 Turn the waste toner box lock lever 90-degrees clockwise to lock the waste toner box. 4 Close the right side cover.
Dell /C3760dn Color Laser Printer Users Guide
Page 336
Cleaning Inside the Printer Cleaning the CTD Sensor Clean the Color Toner Density (CTD) sensor only when an alert for the CTD sensor is shown on the Status Monitor or LCD panel screen. 1 Ensure that the printer is turned off. 2 Push down the latch to open the rear cover. 3 Open the right side cover. 4 Turn the waste toner box lock lever 90-degrees counterclockwise to unlock the waste toner box. 334 Maintaining Your Printer
Dell /C3760dn Color Laser Printer Users Guide
Page 337
CAUTION: After removing the waste toner box, do not touch the parts shown in the illustration. CAUTION: Take care not to hold it . Toner can dirty or stain your hands. 6 Stand the removed waste toner box upright on its side as this may cause its malfunction or toner spills. WARNING: Never lay the waste toner box on a level surface. 5 Grasp the handle on the waste toner box and pull it out making sure to drop the waste toner box while you are removing it upright so that the waste toner does not spill out. Maintaining Your Printer 335
Dell /C3760dn Color Laser Printer Users Guide
Page 339
Maintaining Your Printer 337 CAUTION: If the waste toner box does not fit into the printer until it clicks. 11 Close the top cover. 12 Reinsert the removed waste toner box. 10 Make sure that the arrow marks on the transfer belt unit and the printer face each other, and then insert the unit into place properly, make sure that the transfer belt unit is fully inserted.
Dell /C3760dn Color Laser Printer Users Guide
Page 340
Cleaning the Raster Optical Scanner (ROS) Window To prevent deterioration of printing quality due to lock the waste toner box. 14 Close the right side cover. 15 Close the rear cover. 13 Turn the waste toner box lock lever 90-degrees clockwise to stains inside the printer, clean inside the printer regularly by using the cleaning rod whenever you replace drum cartridges. 1 Open the right side cover. 338 Maintaining Your Printer
Dell /C3760dn Color Laser Printer Users Guide
Page 341
.... Maintaining Your Printer 339 2 Turn the waste toner box lock lever 90-degrees counterclockwise to unlock the waste toner box. 3 Grasp the handle on its side as this may cause its malfunction or toner spills. WARNING: Never lay the waste toner box on the waste toner box and pull it out making sure to drop the waste toner box while you are removing it upright so...
Dell /C3760dn Color Laser Printer Users Guide
Page 343
Maintaining Your Printer 341 8 Return the cleaning rod to its original location. 9 Reinsert the removed waste toner box. 10 Turn the waste toner box lock lever 90-degrees clockwise to lock the waste toner box. 11 Close the right side cover.