User Guide
Page 4
...36 Wireless Connection (Dell C1765nfw Color Multifunction Printer Only) . . . . 37 Reconfiguring the Wireless Setting 42 Connecting the Telephone Line 43 Turning On the Printer 44 7 Setting Up Your Printer 47 Setting Initial Settings on the Operator Panel 47 Printer Setup Using the Software... Printer Drivers on Computers Running Windows® 65 Identifying Printer Driver Pre-install Status 65 Changing the firewall settings before installing your printer 65 Direct Connection Setup 65 For installing host-based printer driver 65 For installing XML Paper Specification (XPS) printer ...
...36 Wireless Connection (Dell C1765nfw Color Multifunction Printer Only) . . . . 37 Reconfiguring the Wireless Setting 42 Connecting the Telephone Line 43 Turning On the Printer 44 7 Setting Up Your Printer 47 Setting Initial Settings on the Operator Panel 47 Printer Setup Using the Software... Printer Drivers on Computers Running Windows® 65 Identifying Printer Driver Pre-install Status 65 Changing the firewall settings before installing your printer 65 Direct Connection Setup 65 For installing host-based printer driver 65 For installing XML Paper Specification (XPS) printer ...
User Guide
Page 6
... 139 Printer Settings Report 140 Printer Information 140 Menu Settings 140 Reports 142 TCP/IP Settings 143 Tray Settings 143 Defaults Settings 144 Fax Settings 145 Printer Maintenance 146 System Settings 146 Date & Time 148 Paper Density 148 Adjust Transfer Roller 149 Adjust Fusing Unit... 149 Registration Adjustment 150 Adjust Altitude 151 Reset Defaults 151 Non-Dell Toner 151 Transfer Roller Refresh Mode ...
... 139 Printer Settings Report 140 Printer Information 140 Menu Settings 140 Reports 142 TCP/IP Settings 143 Tray Settings 143 Defaults Settings 144 Fax Settings 145 Printer Maintenance 146 System Settings 146 Date & Time 148 Paper Density 148 Adjust Transfer Roller 149 Adjust Fusing Unit... 149 Registration Adjustment 150 Adjust Altitude 151 Reset Defaults 151 Non-Dell Toner 151 Transfer Roller Refresh Mode ...
User Guide
Page 8
... 201 16 Print Media Guidelines 203 Paper 203 Paper Characteristics 203 Recommended Paper 204 Unacceptable Paper 204 Selecting Paper 204 Selecting Preprinted Media and Letterhead 205 Printing on Letterhead 205 Loading Letterhead 205 Selecting Pre-Punched Paper 206 Envelopes 206 Labels 207 Storing ...Print Media 207 Identifying Print Media and Specifications 208 Supported Paper Sizes 208 Supported Paper Types 209 Paper Type Specifications 209 17 Loading Print Media 211 ...
... 201 16 Print Media Guidelines 203 Paper 203 Paper Characteristics 203 Recommended Paper 204 Unacceptable Paper 204 Selecting Paper 204 Selecting Preprinted Media and Letterhead 205 Printing on Letterhead 205 Loading Letterhead 205 Selecting Pre-Punched Paper 206 Envelopes 206 Labels 207 Storing ...Print Media 207 Identifying Print Media and Specifications 208 Supported Paper Sizes 208 Supported Paper Types 209 Paper Type Specifications 209 17 Loading Print Media 211 ...
User Guide
Page 9
...Tray Extension 226 Printing, Copying, Scanning, and Faxing 227 18 Printing 229 Tips for Successful Printing 229 Tips on Storing Print Media 229 Avoiding Paper Jams 229 Sending a Job to Print 229 Canceling a Print Job 230 Canceling From the Operator Panel 230 Canceling a Job From the Computer ... USB Storage Device 231 Supported File Formats 231 Printing a File in a USB Memory 231 Printing a Report Page 231 19 Copying 233 Loading Paper for Copying 233 Preparing a Document 233 Making Copies From the Document Glass 233 Making Copies From the ADF 235 Setting Copy Options 235 Number...
...Tray Extension 226 Printing, Copying, Scanning, and Faxing 227 18 Printing 229 Tips for Successful Printing 229 Tips on Storing Print Media 229 Avoiding Paper Jams 229 Sending a Job to Print 229 Canceling a Print Job 230 Canceling From the Operator Panel 230 Canceling a Job From the Computer ... USB Storage Device 231 Supported File Formats 231 Printing a File in a USB Memory 231 Printing a Report Page 231 19 Copying 233 Loading Paper for Copying 233 Preparing a Document 233 Making Copies From the Document Glass 233 Making Copies From the ADF 235 Setting Copy Options 235 Number...
User Guide
Page 11
... Automatic Redialing 275 Sending a Delayed Fax 276 Sending a Fax from the Driver (Direct Fax 276 Example 276 Receiving a Fax 280 About Receiving Modes 280 Loading Paper for Receiving Faxes 280 Receiving a Fax Automatically in the Fax Mode 280 Receiving a Fax Manually in the Telephone Mode 280 Receiving a Fax Automatically in the...
... Automatic Redialing 275 Sending a Delayed Fax 276 Sending a Fax from the Driver (Direct Fax 276 Example 276 Receiving a Fax 280 About Receiving Modes 280 Loading Paper for Receiving Faxes 280 Receiving a Fax Automatically in the Fax Mode 280 Receiving a Fax Manually in the Telephone Mode 280 Receiving a Fax Automatically in the...
User Guide
Page 13
... Jams 323 Avoiding Jams 323 Identifying the Location of Paper Jams 324 Clearing Paper Jams From the ADF 325 Clearing Paper Jams From the Front of the Printer 329 Clearing Paper Jams From the Back of the Printer 330 Clearing Paper Jams From the Output Tray 332 Troubleshooting 337 27 ...Troubleshooting 339 Basic Printer Problems 339 Display Problems 339 Printing Problems 339 Print Quality ...
... Jams 323 Avoiding Jams 323 Identifying the Location of Paper Jams 324 Clearing Paper Jams From the ADF 325 Clearing Paper Jams From the Front of the Printer 329 Clearing Paper Jams From the Back of the Printer 330 Clearing Paper Jams From the Output Tray 332 Troubleshooting 337 27 ...Troubleshooting 339 Basic Printer Problems 339 Display Problems 339 Printing Problems 339 Print Quality ...
User Guide
Page 14
...of alignment 349 Protrudent / Bumpy paper 350 Jam 350 Misfeed jam 350 Multi-feed jam 351 Copy Problem 352 Fax Problems 352 Scanning Problems 353 Scanner Driver/Printer Utility Problems 355 Wireless Problems (Dell C1765nfw Color Multifunction Printer only 356 Other Problems 356 ...Contacting Service 356 Appendix 357 B Appendix 359 Dell Technical Support Policy 359 Online Services 359 Warranty and...
...of alignment 349 Protrudent / Bumpy paper 350 Jam 350 Misfeed jam 350 Multi-feed jam 351 Copy Problem 352 Fax Problems 352 Scanning Problems 353 Scanner Driver/Printer Utility Problems 355 Wireless Problems (Dell C1765nfw Color Multifunction Printer only 356 Other Problems 356 ...Contacting Service 356 Appendix 357 B Appendix 359 Dell Technical Support Policy 359 Online Services 359 Warranty and...
User Guide
Page 19
...this document to refer to restrictions as set forth in subparagraph (c)(1)(ii) of Dell Inc. Reproduction of the codes defined by Eric Young ([email protected]); Dell Inc. Our printer software uses some of these materials in any proprietary interest in the United States...document is either the entities claiming the marks and names or their products. XML Paper Specification (XPS): This product may incorporate intellectual property owned by the Government is a registered trademark of your printer. November 2012 Rev. Wi-Fi is subject to either a registered trademark or...
...this document to refer to restrictions as set forth in subparagraph (c)(1)(ii) of Dell Inc. Reproduction of the codes defined by Eric Young ([email protected]); Dell Inc. Our printer software uses some of these materials in any proprietary interest in the United States...document is either the entities claiming the marks and names or their products. XML Paper Specification (XPS): This product may incorporate intellectual property owned by the Government is a registered trademark of your printer. November 2012 Rev. Wi-Fi is subject to either a registered trademark or...

User Guide
Page 25
...product features and indicates their links. 3 Scanning to a USB Storage Device Printing multiple pages on a single sheet of paper (Multiple-Up) With Dell™ C1765nf/C1765nfw Color Multifunction Printer, Multiple-Up Print allows you to print multiple pages on a single you don't need a PC to connect your... USB storage device to reduce the paper the scanned data. This feature allows you to start your USB storage ...
...product features and indicates their links. 3 Scanning to a USB Storage Device Printing multiple pages on a single sheet of paper (Multiple-Up) With Dell™ C1765nf/C1765nfw Color Multifunction Printer, Multiple-Up Print allows you to print multiple pages on a single you don't need a PC to connect your... USB storage device to reduce the paper the scanned data. This feature allows you to start your USB storage ...
User Guide
Page 27
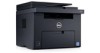
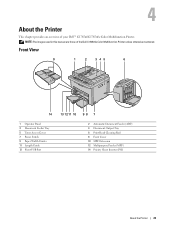
... Switch 9 Paper Width Guides 11 Length Guide 13 Front USB Port 13 12 11 10 9 8 7 2 Automatic Document Feeder (ADF) 4 Document Output Tray 6 Print Head Cleaning Rod 8 Front Cover 10 MPF Extension 12 Multipurpose Feeder (MPF) 14 Priority Sheet Inserter (PSI) About the Printer 25 NOTE:... The images used in this manual are those of your Dell™ C1765nf/C1765nfw Color Multifunction Printer. 4 About the Printer This chapter provides an overview of the...
... Switch 9 Paper Width Guides 11 Length Guide 13 Front USB Port 13 12 11 10 9 8 7 2 Automatic Document Feeder (ADF) 4 Document Output Tray 6 Print Head Cleaning Rod 8 Front Cover 10 MPF Extension 12 Multipurpose Feeder (MPF) 14 Priority Sheet Inserter (PSI) About the Printer 25 NOTE:... The images used in this manual are those of your Dell™ C1765nf/C1765nfw Color Multifunction Printer. 4 About the Printer This chapter provides an overview of the...

User Guide
Page 28
Rear View 12 13 1 11 2 10 9 3 8 4 5 7 1 ADF Cover 3 USB Port 5 Phone Connector 7 Rear Cover 9 Paper Chute 11 Transfer Belt 13 Security Slot 6 2 Ethernet Port 4 Wall Jack Connector 6 Power Connector 8 Transfer Roller 10 Paper Feed Roller 12 Levers 26 About the Printer
Rear View 12 13 1 11 2 10 9 3 8 4 5 7 1 ADF Cover 3 USB Port 5 Phone Connector 7 Rear Cover 9 Paper Chute 11 Transfer Belt 13 Security Slot 6 2 Ethernet Port 4 Wall Jack Connector 6 Power Connector 8 Transfer Roller 10 Paper Feed Roller 12 Levers 26 About the Printer
User Guide
Page 33
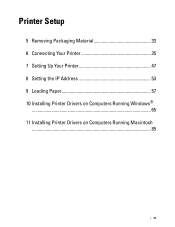
Printer Setup 5 Removing Packaging Material 33 6 Connecting Your Printer 35 7 Setting Up Your Printer 47 8 Setting the IP Address 53 9 Loading Paper 57 10 Installing Printer Drivers on Computers Running Windows® ...65 11 Installing Printer Drivers on Computers Running Macintosh ...85 31
Printer Setup 5 Removing Packaging Material 33 6 Connecting Your Printer 35 7 Setting Up Your Printer 47 8 Setting the IP Address 53 9 Loading Paper 57 10 Installing Printer Drivers on Computers Running Windows® ...65 11 Installing Printer Drivers on Computers Running Macintosh ...85 31
User Guide
Page 59
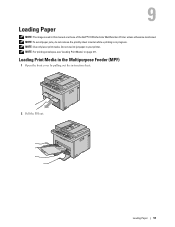
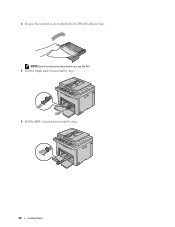
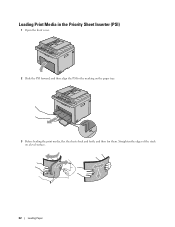
NOTE: To avoid paper jams, do not remove the priority sheet inserter while a printing is in your printer. Do not use ink jet paper in progress. NOTE: For printing envelopes, see "Loading Print Media" on page 211. Loading Paper 57 Loading Print Media in this manual are those of the Dell™ C1765nfw Color Multifunction Printer unless otherwise mentioned. 9 Loading Paper NOTE: The images used in the Multipurpose Feeder (MPF) 1 Open the front cover by pulling out the instruction sheet. 2 Pull the PSI out. NOTE: Use only laser print media.
NOTE: To avoid paper jams, do not remove the priority sheet inserter while a printing is in your printer. Do not use ink jet paper in progress. NOTE: For printing envelopes, see "Loading Print Media" on page 211. Loading Paper 57 Loading Print Media in this manual are those of the Dell™ C1765nfw Color Multifunction Printer unless otherwise mentioned. 9 Loading Paper NOTE: The images used in the Multipurpose Feeder (MPF) 1 Open the front cover by pulling out the instruction sheet. 2 Pull the PSI out. NOTE: Use only laser print media.
User Guide
Page 60
3 Remove the instruction sheet attached to the PSI with adhesive tape. NOTE: Read the instruction sheet before you use the PSI. 4 Pull the length guide forward until it stops. 5 Pull the MPF extension forward until it stops. 58 Loading Paper
3 Remove the instruction sheet attached to the PSI with adhesive tape. NOTE: Read the instruction sheet before you use the PSI. 4 Pull the length guide forward until it stops. 5 Pull the MPF extension forward until it stops. 58 Loading Paper
User Guide
Page 61
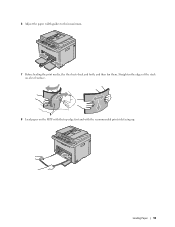
6 Adjust the paper width guides to their maximum. 7 Before loading the print media, flex the sheets back and forth, and then fan them. Straighten the edges of the stack on a level surface. 8 Load paper on the MPF with the top edge first and with the recommended print side facing up. Loading Paper 59
6 Adjust the paper width guides to their maximum. 7 Before loading the print media, flex the sheets back and forth, and then fan them. Straighten the edges of the stack on a level surface. 8 Load paper on the MPF with the top edge first and with the recommended print side facing up. Loading Paper 59
User Guide
Page 62
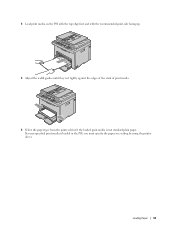
NOTE: Depending on the size of print media. 10 Slide the length guide towards the printer until it touches the print media. 9 Adjust the width guides and length guides until they rest lightly against the edges of the stack of print media, first slide the MPF extension backward until it stops, and then pinch the length guide and slide it backward until it touches print media. 60 Loading Paper
NOTE: Depending on the size of print media. 10 Slide the length guide towards the printer until it touches the print media. 9 Adjust the width guides and length guides until they rest lightly against the edges of the stack of print media, first slide the MPF extension backward until it stops, and then pinch the length guide and slide it backward until it touches print media. 60 Loading Paper
User Guide
Page 63
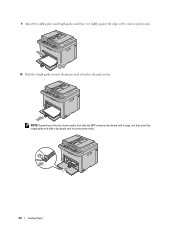
If a user-specified print media is not standard plain paper. Loading Paper 61 11 Insert the PSI into the printer and then align the PSI to the marking on the paper tray. 12 Select the paper type from the printer driver if the loaded print media is loaded in the MPF, you must specify the paper size setting by using the printer driver.
If a user-specified print media is not standard plain paper. Loading Paper 61 11 Insert the PSI into the printer and then align the PSI to the marking on the paper tray. 12 Select the paper type from the printer driver if the loaded print media is loaded in the MPF, you must specify the paper size setting by using the printer driver.
User Guide
Page 64
Straighten the edges of the stack on the paper tray. 3 Before loading the print media, flex the sheets back and forth, and then fan them. Loading Print Media in the Priority Sheet Inserter (PSI) 1 Open the front cover. 2 Slide the PSI forward, and then align the PSI to the marking on a level surface. 62 Loading Paper
Straighten the edges of the stack on the paper tray. 3 Before loading the print media, flex the sheets back and forth, and then fan them. Loading Print Media in the Priority Sheet Inserter (PSI) 1 Open the front cover. 2 Slide the PSI forward, and then align the PSI to the marking on a level surface. 62 Loading Paper
User Guide
Page 65
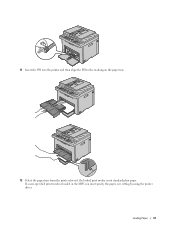
Loading Paper 63 4 Load print media on the PSI with the top edge first and with the recommended print side facing up. 5 Adjust the width guides until they rest lightly against the edges of the stack of print media. 6 Select the paper type from the printer driver if the loaded print media is loaded in the PSI, you must specify the paper size setting by using the printer driver. If a user-specified print media is not standard plain paper.
Loading Paper 63 4 Load print media on the PSI with the top edge first and with the recommended print side facing up. 5 Adjust the width guides until they rest lightly against the edges of the stack of print media. 6 Select the paper type from the printer driver if the loaded print media is loaded in the PSI, you must specify the paper size setting by using the printer driver. If a user-specified print media is not standard plain paper.
User Guide
Page 68
...8 Click OK. 9 Select your printer name and click Next. 66 Installing Printer Drivers on page 68. For installing XML Paper Specification (XPS) printer driver NOTE: Download and install the XPS printer driver at support.dell.com. If your printer is a printer attached to your computer, see "Network...; otherwise, contact your desired location. 2 Click Start → Control Panel → Hardware and Sound → Printers. 3 Click Add a printer. 4 Click Add a local printer. 5 Select the port connected to print a test page. 12 Click Finish. Windows Server 2008 or Windows Server ...
...8 Click OK. 9 Select your printer name and click Next. 66 Installing Printer Drivers on page 68. For installing XML Paper Specification (XPS) printer driver NOTE: Download and install the XPS printer driver at support.dell.com. If your printer is a printer attached to your computer, see "Network...; otherwise, contact your desired location. 2 Click Start → Control Panel → Hardware and Sound → Printers. 3 Click Add a printer. 4 Click Add a local printer. 5 Select the port connected to print a test page. 12 Click Finish. Windows Server 2008 or Windows Server ...


