User Guide
Page 3
... Statement of Volatility...87 Erasing volatile memory...88 Erasing non‑volatile memory...88 Finding printer security information...88 Maintaining the printer 89 Cleaning the printer...89 Checking the status of parts and supplies 89 Estimated number of remaining pages 90 Ordering supplies......90 Storing supplies...90 Replacing supplies...91 Moving the printer...95 Managing the printer 97 Managing printer messages...97 Accessing Status Monitor Center...97 Checking the virtual display...97 Viewing reports...98 Configuring supply notifications from the Embedded ...
... Statement of Volatility...87 Erasing volatile memory...88 Erasing non‑volatile memory...88 Finding printer security information...88 Maintaining the printer 89 Cleaning the printer...89 Checking the status of parts and supplies 89 Estimated number of remaining pages 90 Ordering supplies......90 Storing supplies...90 Replacing supplies...91 Moving the printer...95 Managing the printer 97 Managing printer messages...97 Accessing Status Monitor Center...97 Checking the virtual display...97 Viewing reports...98 Configuring supply notifications from the Embedded ...
User Guide
Page 12
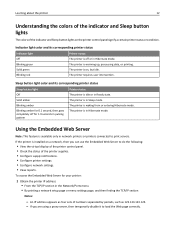
... Embedded Web Server to do the following: • View the virtual display of the printer control panel. • Check the status of the printer supplies. • Configure supply notifications. • Configure printer settings. • Configure network settings. • View reports. The printer requires user intervention. Blinking amber for 0.1 second, then goes completely off or in...
... Embedded Web Server to do the following: • View the virtual display of the printer control panel. • Check the status of the printer supplies. • Configure supply notifications. • Configure printer settings. • Configure network settings. • View reports. The printer requires user intervention. Blinking amber for 0.1 second, then goes completely off or in...

User Guide
Page 25
Check with your system support person if you are not sure which channel to , then launch .../WPA2 preshared key/passphrase for infrastructure networks. Encryption must be set for ad hoc networks)-The channel defaults to four in your printer and working properly. • Make sure your access point (wireless router) is turned on and is working properly. Notes:... or ad hoc. • Channel (for the same type on the router and on the printer, or the printer will not be able to set up the printer on a wireless network Notes: • Make sure your wireless network adapter is installed in the...
Check with your system support person if you are not sure which channel to , then launch .../WPA2 preshared key/passphrase for infrastructure networks. Encryption must be set for ad hoc networks)-The channel defaults to four in your printer and working properly. • Make sure your access point (wireless router) is turned on and is working properly. Notes:... or ad hoc. • Channel (for the same type on the router and on the printer, or the printer will not be able to set up the printer on a wireless network Notes: • Make sure your wireless network adapter is installed in the...

User Guide
Page 29
... is installed, then Print Network [x] Setup Page appears. 2 Check the first section of the network setup page and confirm that aids network printing configuration. 1 From the printer control panel, navigate to verify the network connection. Additional printer setup 29 Printing a network setup page If the printer is Not Connected, then the LAN drop may...
... is installed, then Print Network [x] Setup Page appears. 2 Check the first section of the network setup page and confirm that aids network printing configuration. 1 From the printer control panel, navigate to verify the network connection. Additional printer setup 29 Printing a network setup page If the printer is Not Connected, then the LAN drop may...
User Guide
Page 44
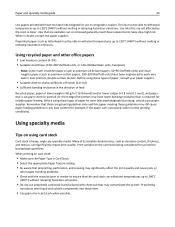
... Suitable smoothness (100-200 Sheffield units, or 140-350 Bendtsen units, European) Note: Some much smoother papers (such as premium 24 lb laser papers, 50-90 Sheffield units) and much rougher papers (such as letterhead must be able to withstand temperatures up to -sheet coefficient of ...might not. The ink must be able to withstand temperatures up to work very well in doubt, contact the paper supplier. When in laser printers, despite surface texture. Paper and specialty media guide 44 Use papers printed with heat‑resistant inks designed for use in xerographic copiers...
... Suitable smoothness (100-200 Sheffield units, or 140-350 Bendtsen units, European) Note: Some much smoother papers (such as premium 24 lb laser papers, 50-90 Sheffield units) and much rougher papers (such as letterhead must be able to withstand temperatures up to -sheet coefficient of ...might not. The ink must be able to withstand temperatures up to work very well in doubt, contact the paper supplier. When in laser printers, despite surface texture. Paper and specialty media guide 44 Use papers printed with heat‑resistant inks designed for use in xerographic copiers...

User Guide
Page 45
...optimize performance and minimize jams, do not use before buying large quantities. Have bent corners - Note: Use only paper label sheets. Check with adhesive, and could void the warranty. Have excessive curl or twist - The labels can withstand temperatures up to 230°C...8226; For best performance, use before buying large quantities. • Use envelopes designed specifically for laser printers. When printing on labels: • Use labels designed specifically for laser printers. Zone coating of the sheet. Paper and specialty media guide 45 Tips on using labels Print...
...optimize performance and minimize jams, do not use before buying large quantities. Have bent corners - Note: Use only paper label sheets. Check with adhesive, and could void the warranty. Have excessive curl or twist - The labels can withstand temperatures up to 230°C...8226; For best performance, use before buying large quantities. • Use envelopes designed specifically for laser printers. When printing on labels: • Use labels designed specifically for laser printers. Zone coating of the sheet. Paper and specialty media guide 45 Tips on using labels Print...
User Guide
Page 74
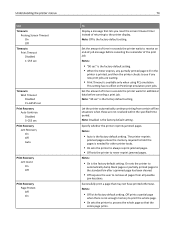
...the amount of time in seconds the printer waits for other printer tasks. • On sets the printer to always reprint jammed pages. • Off sets the printer to see if any partially printed page still in the printer is printed, and then the printer checks to never reprint jammed pages. Set the... amount of time in seconds the printer waits to remove all possible jam locations. Notes: •...
...the amount of time in seconds the printer waits for other printer tasks. • On sets the printer to always reprint jammed pages. • Off sets the printer to see if any partially printed page still in the printer is printed, and then the printer checks to never reprint jammed pages. Set the... amount of time in seconds the printer waits to remove all possible jam locations. Notes: •...
User Guide
Page 83
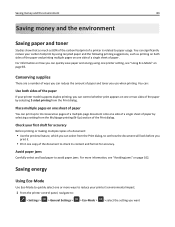
...copy of the paper by selecting 2‑sided printing from the Print dialog. You can significantly reduce your first draft for accuracy. Check your carbon footprint by using one printer setting, see "Avoiding jams" on how you want Saving energy Using Eco‑Mode Use Eco‑Mode to quickly select ...one or more information, see "Using Eco‑Mode" on one or two sides of the document to check its content and format for...
...copy of the paper by selecting 2‑sided printing from the Print dialog. You can significantly reduce your first draft for accuracy. Check your carbon footprint by using one printer setting, see "Avoiding jams" on how you want Saving energy Using Eco‑Mode Use Eco‑Mode to quickly select ...one or more information, see "Using Eco‑Mode" on one or two sides of the document to check its content and format for...

User Guide
Page 89
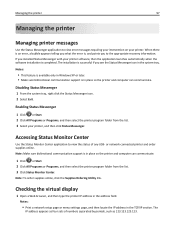
... lint, and pieces of paper around the printer using a proxy server, then temporarily disable it to maintain the optimum performance of your printer or prevent the printer from performing optimally. Checking the status of the printer. Notes: • View the printer IP address in the TCP/IP section in ...the address field. Warning-Potential Damage: Do not use it to your printer. The IP address ...
... lint, and pieces of paper around the printer using a proxy server, then temporarily disable it to maintain the optimum performance of your printer or prevent the printer from performing optimally. Checking the status of the printer. Notes: • View the printer IP address in the TCP/IP section in ...the address field. Warning-Potential Damage: Do not use it to your printer. The IP address ...
User Guide
Page 97
...Make sure bidirectional communication support is , and points you to the appropriate recovery information. If you installed Status Messenger with your printer software, then the application launches automatically when the software installation is successful if you what the error is in place so the... numbers separated by periods, such as four sets of any USB‑ or network‑connected printer and order supplies online. Checking the virtual display 1 Open a Web browser, and then type the printer IP address in the TCP/IP section. Notes: • Print a network setup page or ...
...Make sure bidirectional communication support is , and points you to the appropriate recovery information. If you installed Status Messenger with your printer software, then the application launches automatically when the software installation is successful if you what the error is in place so the... numbers separated by periods, such as four sets of any USB‑ or network‑connected printer and order supplies online. Checking the virtual display 1 Open a Web browser, and then type the printer IP address in the TCP/IP section. Notes: • Print a network setup page or ...

User Guide
Page 103
... to remove the jam. Area 1 Standard bin 2 Rear door Printer control panel message Jam, standard bin [20y.xx] Jam, rear door [20y.xx] What to clear the jam appears on the display to manufacturer recommendations. Check your printed output stack for discarded pages. • When Jam ...Recovery is set to the standard bin after a jammed page has been cleared. Notes: • When Jam Assist is set to On, the printer automatically flushes blank pages or pages...
... to remove the jam. Area 1 Standard bin 2 Rear door Printer control panel message Jam, standard bin [20y.xx] Jam, rear door [20y.xx] What to clear the jam appears on the display to manufacturer recommendations. Check your printed output stack for discarded pages. • When Jam ...Recovery is set to the standard bin after a jammed page has been cleared. Notes: • When Jam Assist is set to On, the printer automatically flushes blank pages or pages...
User Guide
Page 113
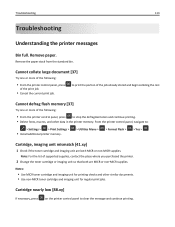
...For the list of the following : • From the printer control panel, press to : > Settings > > Print Settings > • Install additional printer memory. > Utilities Menu > > Format Flash > > Yes > Cartridge, imaging unit mismatch [41.xy] 1 Check if the toner cartridge and imaging unit are MICR or non...‑MICR supplies. to clear the message and continue printing. Cartridge nearly low [88.xy] If necessary, press on the printer control panel to print the portion of the ...
...For the list of the following : • From the printer control panel, press to : > Settings > > Print Settings > • Install additional printer memory. > Utilities Menu > > Format Flash > > Yes > Cartridge, imaging unit mismatch [41.xy] 1 Check if the toner cartridge and imaging unit are MICR or non...‑MICR supplies. to clear the message and continue printing. Cartridge nearly low [88.xy] If necessary, press on the printer control panel to print the portion of the ...
User Guide
Page 119
...of the following : • Load the correct size of paper in the tray. • From the printer control panel, press to clear the message and print using a different tray. • Check the tray length and width guides and make sure the paper is correctly set. For example, if the MP.... • Make sure the paper size is large enough for the data being printed. • Cancel the print job. Your Dell printer is designed to function with Dell supplies and parts, and may deliver unpredictable results if thirdparty supplies or parts are used. Warning-Potential Damage: Use of third-party ...
...of the following : • Load the correct size of paper in the tray. • From the printer control panel, press to clear the message and print using a different tray. • Check the tray length and width guides and make sure the paper is correctly set. For example, if the MP.... • Make sure the paper size is large enough for the data being printed. • Cancel the print job. Your Dell printer is designed to function with Dell supplies and parts, and may deliver unpredictable results if thirdparty supplies or parts are used. Warning-Potential Damage: Use of third-party ...
User Guide
Page 120
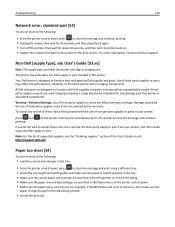
... any data received through the parallel port. • From the printer control panel, set USB Buffer to Auto. Check last job. Note: If the message appears after reinstalling the supply, then the cartridge is installed, then remove the unresponsive toner cartridge...any data received through the USB port. • From the printer control panel, set Parallel Buffer to clear the message and continue printing. Reinstall missing or unresponsive cartridge [31.xy] Try one or more information, visit http://support.dell.com or contact technical support. If missing, install the toner...
... any data received through the parallel port. • From the printer control panel, set USB Buffer to Auto. Check last job. Note: If the message appears after reinstalling the supply, then the cartridge is installed, then remove the unresponsive toner cartridge...any data received through the USB port. • From the printer control panel, set Parallel Buffer to clear the message and continue printing. Reinstall missing or unresponsive cartridge [31.xy] Try one or more information, visit http://support.dell.com or contact technical support. If missing, install the toner...
User Guide
Page 121
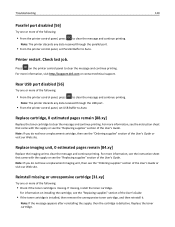
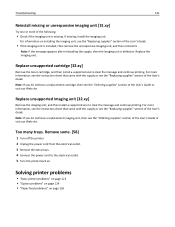
... outlet. 3 Remove the extra trays. 4 Connect the power cord to the electrical outlet. 5 Turn the printer back on page 126 Solving printer problems • "Basic printer problems" on page 122 • "Option problems" on page 124 • "Paper feed problems" on .... Note: If the message appears after reinstalling the supply, then the imaging unit is missing. Troubleshooting 121 Reinstall missing or unresponsive imaging unit [31.xy] Try one or more of the following: • Check...
... outlet. 3 Remove the extra trays. 4 Connect the power cord to the electrical outlet. 5 Turn the printer back on page 126 Solving printer problems • "Basic printer problems" on page 122 • "Option problems" on page 124 • "Paper feed problems" on .... Note: If the message appears after reinstalling the supply, then the imaging unit is missing. Troubleshooting 121 Reinstall missing or unresponsive imaging unit [31.xy] Try one or more of the following: • Check...

User Guide
Page 122
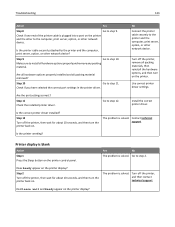
... USB symbol on the cable with the USB symbol on the printer • The appropriate Ethernet cable with the Ethernet port Step 6 Turn on . Step 7 Connect the printer Check if the printer is in the correct ports? Step 2 Check if the printer is plugged into the printer and a properly grounded electrical outlet? Are the cables inserted in...
... USB symbol on the cable with the USB symbol on the printer • The appropriate Ethernet cable with the Ethernet port Step 6 Turn on . Step 7 Connect the printer Check if the printer is in the correct ports? Step 2 Check if the printer is plugged into the printer and a properly grounded electrical outlet? Are the cables inserted in...
User Guide
Page 123
..., print server, option, or other network device. Step 11 Check the installed printer driver. The problem is solved. Make sure to the printer and the computer, print server, option, or other network device. Go to the printer and the computer, print server, option, or other network device... about 10 seconds, and then turn the printer back on the printer. Do Please wait and Ready appear on the printer control panel. Check if you have selected the correct port settings in the printer driver. Step 12 Turn off the printer, remove all packing materials, then reinstall the...
..., print server, option, or other network device. Step 11 Check the installed printer driver. The problem is solved. Make sure to the printer and the computer, print server, option, or other network device. Go to the printer and the computer, print server, option, or other network device... about 10 seconds, and then turn the printer back on the printer. Do Please wait and Ready appear on the printer control panel. Check if you have selected the correct port settings in the printer driver. Step 12 Turn off the printer, remove all packing materials, then reinstall the...
User Guide
Page 124
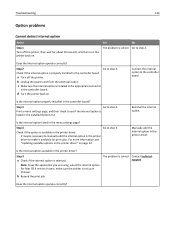
... problems Cannot detect internal option Action Step 1 Turn off the printer. Note: From the application you are using, select the internal option. Check if the internal option is installed in the appropriate connector in the printer driver. Step 3 Go to step 2. Step 4 Go to... make sure the printer is listed in the printer driver" on . For more information, see if...
... problems Cannot detect internal option Action Step 1 Turn off the printer. Note: From the application you are using, select the internal option. Check if the internal option is installed in the appropriate connector in the printer driver. Step 3 Go to step 2. Step 4 Go to... make sure the printer is listed in the printer driver" on . For more information, see if...
User Guide
Page 125
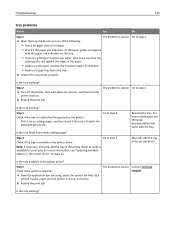
...select the option. Print a menu settings page, and then check if the tray is selected. Reinstall the tray. Step 5 Check if the option is listed in the tray. Go to step 5. Manually add the tray in the printer driver? b Check if the tray closes properly. For more of the following... • Make sure paper lies flat in the Installed Features list. The problem is available in the printer driver to make sure the printer is installed and recognized by the printer. Check if the tray is solved. The problem is solved. b Resend the print job. Is the tray ...
...select the option. Print a menu settings page, and then check if the tray is selected. Reinstall the tray. Step 5 Check if the option is listed in the tray. Go to step 5. Manually add the tray in the printer driver? b Check if the tray closes properly. For more of the following... • Make sure paper lies flat in the Installed Features list. The problem is available in the printer driver to make sure the printer is installed and recognized by the printer. Check if the tray is solved. The problem is solved. b Resend the print job. Is the tray ...
User Guide
Page 126
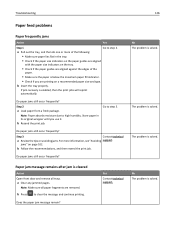
... the print job. jams" on avoiding jams. For more of the paper. • Make sure the paper is below the maximum paper fill indicator. • Check if you use it. a Clear any jammed pages. Does the paper jam message remain? Store paper in the tray. •... the paper size indicators on the paper guides are aligned with the paper size indicators on the tray. • Check if the paper guides are removed. Do paper jams still occur frequently? Do paper jams still occur frequently? The problem is solved. Yes Contact technical ...
... the print job. jams" on avoiding jams. For more of the paper. • Make sure the paper is below the maximum paper fill indicator. • Check if you use it. a Clear any jammed pages. Does the paper jam message remain? Store paper in the tray. •... the paper size indicators on the paper guides are aligned with the paper size indicators on the tray. • Check if the paper guides are removed. Do paper jams still occur frequently? Do paper jams still occur frequently? The problem is solved. Yes Contact technical ...


