User Guide
Page 16
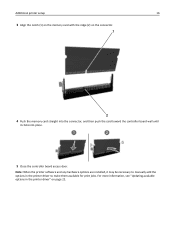
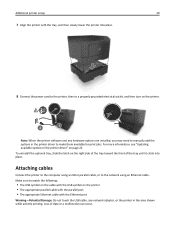
Note: When the printer software and any hardware options are installed, it clicks into place. 1 2 5 Close the controller board access door. For more information, see "Updating available options in the printer driver" on the connector. 1 2 4 Push the memory card straight into the connector, and then push the card toward the controller board wall until it may be necessary to manually add the options in the printer driver to make them available for print jobs. Additional printer setup 16 3 Align the notch (1) on the memory card with the ridge (2) on page 22.
Note: When the printer software and any hardware options are installed, it clicks into place. 1 2 5 Close the controller board access door. For more information, see "Updating available options in the printer driver" on the connector. 1 2 4 Push the memory card straight into the connector, and then push the card toward the controller board wall until it may be necessary to manually add the options in the printer driver to make them available for print jobs. Additional printer setup 16 3 Align the notch (1) on the memory card with the ridge (2) on page 22.
User Guide
Page 18
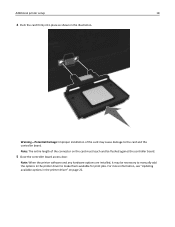
...Damage: Improper installation of the connector on page 22. For more information, see "Updating available options in the illustration. Note: When the printer software and any hardware options are installed, it may cause damage to make them available for print jobs. Note: The entire length of... the controller board. 5 Close the controller board access door. Additional printer setup 18 4 Push the card firmly into place as shown in the printer driver" on the card must touch and be necessary to manually add the options in the printer driver to the card and the controller board.
...Damage: Improper installation of the connector on page 22. For more information, see "Updating available options in the illustration. Note: When the printer software and any hardware options are installed, it may cause damage to make them available for print jobs. Note: The entire length of... the controller board. 5 Close the controller board access door. Additional printer setup 18 4 Push the card firmly into place as shown in the printer driver" on the card must touch and be necessary to manually add the options in the printer driver to the card and the controller board.
User Guide
Page 20
...Loss of the tray until it clicks into place. 8 Connect the power cord to the printer, then to match the following: • The USB symbol on the cable with the USB symbol on the printer • The appropriate parallel cable with the parallel port • The appropriate Ethernet cable...the USB cable, any hardware options are installed, you may need to manually add the options in the printer driver to the network using an Ethernet cable. Note: When the printer software and any network adapter, or the printer in the area shown while actively printing. For more information, see "...
...Loss of the tray until it clicks into place. 8 Connect the power cord to the printer, then to match the following: • The USB symbol on the cable with the USB symbol on the printer • The appropriate parallel cable with the parallel port • The appropriate Ethernet cable...the USB cable, any hardware options are installed, you may need to manually add the options in the printer driver to the network using an Ethernet cable. Note: When the printer software and any network adapter, or the printer in the area shown while actively printing. For more information, see "...
User Guide
Page 21
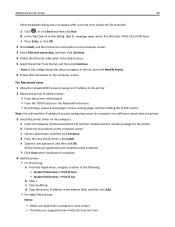
... after a minute, then launch the CD manually: a Click , or click Start and then click Run. Additional printer setup 21 1 2 3 4 7 5 6 Use the To 1 USB port* Attach an optional wireless network adapter. 2 USB printer port Connect the printer to a computer. 3 Ethernet port* Connect the printer to a network. 4 Parallel port* Connect the printer to a computer. 5 Power switch Turn on...
... after a minute, then launch the CD manually: a Click , or click Start and then click Run. Additional printer setup 21 1 2 3 4 7 5 6 Use the To 1 USB port* Attach an optional wireless network adapter. 2 USB printer port Connect the printer to a computer. 3 Ethernet port* Connect the printer to a network. 4 Parallel port* Connect the printer to a computer. 5 Power switch Turn on...
User Guide
Page 22
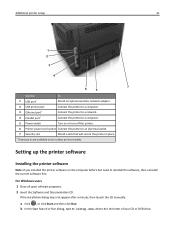
...the Internet An updated printer software may need to manually add the options in the printer driver to change these settings for use. Updating available options in select printer models. c Press Enter, or click OK. 2 Select the printer. 3 Right‑click the printer, and then select Printer properties (Windows 7)... • This utility is supported only in the printer driver When any hardware options are installed, you may be available at http://support.dell.com. Note: To take advantage of the full features of your printer, select the custom install option, and then select...
...the Internet An updated printer software may need to manually add the options in the printer driver to change these settings for use. Updating available options in select printer models. c Press Enter, or click OK. 2 Select the printer. 3 Right‑click the printer, and then select Printer properties (Windows 7)... • This utility is supported only in the printer driver When any hardware options are installed, you may be available at http://support.dell.com. Note: To take advantage of the full features of your printer, select the custom install option, and then select...
User Guide
Page 23
... a network. You will need an Ethernet cable to connect the printer to the network and an available port where the printer can make it easier for you to either of the following: • Click Update Now ‑ Ask Printer. • Under Configuration Options, manually add any installed hardware options, and then click OK. Additional...
... a network. You will need an Ethernet cable to connect the printer to the network and an available port where the printer can make it easier for you to either of the following: • Click Update Now ‑ Ask Printer. • Under Configuration Options, manually add any installed hardware options, and then click OK. Additional...
User Guide
Page 24
... click Add. • For AppleTalk printing: Notes: - System Preferences > Print & Scan - Additional printer setup 24 If the installation dialog does not appear after a minute, then launch the CD manually: a Click , or click Start and then click Run. a Insert the Software and Documentation CD, and... then double‑click the installer package for computers on a different subnet than the printer. 3 Install the printer driver on the computer screen. c ...
... click Add. • For AppleTalk printing: Notes: - System Preferences > Print & Scan - Additional printer setup 24 If the installation dialog does not appear after a minute, then launch the CD manually: a Click , or click Start and then click Run. a Insert the Software and Documentation CD, and... then double‑click the installer package for computers on a different subnet than the printer. 3 Install the printer driver on the computer screen. c ...
User Guide
Page 30
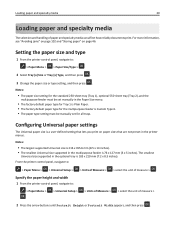
... affect how reliably documents print. The smallest Universal size supported in the optional tray is Custom Type 6. • The paper type setting must be manually set manually in the printer menus. Notes: • The paper size setting for the multipurpose feeder is 183 x 210 mm (7.2 x 8.3 inches). Configuring Universal paper settings The Universal paper...
... affect how reliably documents print. The smallest Universal size supported in the optional tray is Custom Type 6. • The paper type setting must be manually set manually in the printer menus. Notes: • The paper size setting for the multipurpose feeder is 183 x 210 mm (7.2 x 8.3 inches). Configuring Universal paper settings The Universal paper...
User Guide
Page 53
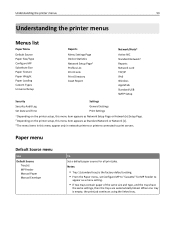
Paper menu Default Source menu Use Default Source Tray [x] MP Feeder Manual Paper Manual Envelope To Set a default paper source for MP Feeder to print servers. When one tray is the factory default setting. • From the Paper menu, ... to "Cassette" for all print jobs. Notes: • Tray 1 (standard tray) is empty, the print job continues using the linked tray. Understanding the printer menus 53 Understanding the printer menus Menus list Paper Menu Default Source Paper Size/Type Configure MP Substitute Size Paper Texture Paper Weight Paper Loading Custom Types Universal...
Paper menu Default Source menu Use Default Source Tray [x] MP Feeder Manual Paper Manual Envelope To Set a default paper source for MP Feeder to print servers. When one tray is the factory default setting. • From the Paper menu, ... to "Cassette" for all print jobs. Notes: • Tray 1 (standard tray) is empty, the print job continues using the linked tray. Understanding the printer menus 53 Understanding the printer menus Menus list Paper Menu Default Source Paper Size/Type Configure MP Substitute Size Paper Texture Paper Weight Paper Loading Custom Types Universal...

User Guide
Page 56
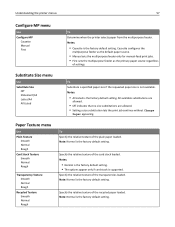
... factory default setting. • From the Paper menu, set Configure MP to "Manual" for Manual Paper Type to appear as a menu. Manual Envelope Type Envelope Rough Envelope Custom Type [x] Specify the envelope type being manually loaded. Understanding the printer menus 56 Use To Manual Paper Size A4 A5 A6 JIS B5 Letter Legal Executive Oficio (Mexico...
... factory default setting. • From the Paper menu, set Configure MP to "Manual" for Manual Paper Type to appear as a menu. Manual Envelope Type Envelope Rough Envelope Custom Type [x] Specify the envelope type being manually loaded. Understanding the printer menus 56 Use To Manual Paper Size A4 A5 A6 JIS B5 Letter Legal Executive Oficio (Mexico...
User Guide
Page 57
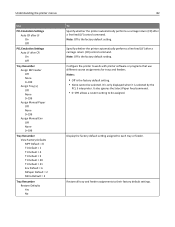
... loaded. Specify the relative texture of settings. Cassette configures the multipurpose feeder as the default paper source. • Manual sets the multipurpose feeder only for manual‑feed print jobs. • First sets the multipurpose feeder as the primary paper source regardless of the recycled ...paper loaded. Specify the relative texture of the card stock loaded. Understanding the printer menus 57 Configure MP menu Use Configure MP Cassette Manual First To Determine when the printer selects paper from the multipurpose feeder.
... loaded. Specify the relative texture of settings. Cassette configures the multipurpose feeder as the default paper source. • Manual sets the multipurpose feeder only for manual‑feed print jobs. • First sets the multipurpose feeder as the primary paper source regardless of the recycled ...paper loaded. Specify the relative texture of the card stock loaded. Understanding the printer menus 57 Configure MP menu Use Configure MP Cassette Manual First To Determine when the printer selects paper from the multipurpose feeder.
User Guide
Page 65
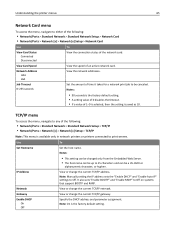
It also sets "Enable BOOTP" and "Enable RARP" to Off. View or change the current TCP/IP address. Note: Manually setting the IP address sets the "Enable DHCP" and "Enable Auto IP" settings to Off on systems that support BOOTP and RARP. Note: On is ... 0-255 seconds Set the amount of time it takes for a network print job to be a US‑ASCII or alphanumeric character, or hyphen. Understanding the printer menus 65 Network Card menu To access the menu, navigate to either of the following : • Network/Ports > Standard Network > Standard Network Setup > TCP/IP...
It also sets "Enable BOOTP" and "Enable RARP" to Off. View or change the current TCP/IP address. Note: Manually setting the IP address sets the "Enable DHCP" and "Enable Auto IP" settings to Off on systems that support BOOTP and RARP. Note: On is ... 0-255 seconds Set the amount of time it takes for a network print job to be a US‑ASCII or alphanumeric character, or hyphen. Understanding the printer menus 65 Network Card menu To access the menu, navigate to either of the following : • Network/Ports > Standard Network > Standard Network Setup > TCP/IP...
User Guide
Page 71
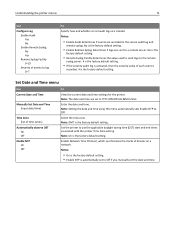
... synchronizes the clocks of time zones] Automatically observe DST On Off Enable NTP On Off To View the current date and time settings for the printer. Notes: • On is the factory default setting. • Enable NTP is the factory default setting. • Enable Remote Syslog determines if logs ... the date and time. Set Date and Time menu Use Current Date and Time Manually Set Date and Time [input date/time] Time Zone [list of devices on a network. No is the factory default setting. Set the printer to the remote syslog server. 4 is the factory default setting. • If the...
... synchronizes the clocks of time zones] Automatically observe DST On Off Enable NTP On Off To View the current date and time settings for the printer. Notes: • On is the factory default setting. • Enable NTP is the factory default setting. • Enable Remote Syslog determines if logs ... the date and time. Set Date and Time menu Use Current Date and Time Manually Set Date and Time [input date/time] Time Zone [list of devices on a network. No is the factory default setting. Set the printer to the remote syslog server. 4 is the factory default setting. • If the...
User Guide
Page 82
... tray or feeder. Understanding the printer menus 82 Use PCL Emulation Settings Auto CR after LF On Off PCL Emulation Settings Auto LF after CR On Off Tray Renumber Assign MP Feeder Off None 0-199 Assign Tray [x] Off None 0-199 Assign Manual Paper Off None 0-199 Assign Manual Env Off None 0-199 Tray...
... tray or feeder. Understanding the printer menus 82 Use PCL Emulation Settings Auto CR after LF On Off PCL Emulation Settings Auto LF after CR On Off Tray Renumber Assign MP Feeder Off None 0-199 Assign Tray [x] Off None 0-199 Assign Manual Paper Off None 0-199 Assign Manual Env Off None 0-199 Tray...
User Guide
Page 117
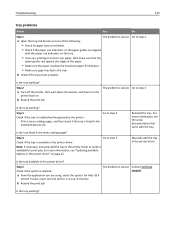
... Cancel the current job. Note: If no paper is loaded in the feeder, then the printer manually overrides the request, and then prints from the default paper source. • Cancel the current job. If the printer cannot find a tray that tray. Note: If no paper is loaded in the feeder, ...then the printer manually overrides the request, and then prints from an automatically selected tray. • Cancel the current job...
... Cancel the current job. Note: If no paper is loaded in the feeder, then the printer manually overrides the request, and then prints from the default paper source. • Cancel the current job. If the printer cannot find a tray that tray. Note: If no paper is loaded in the feeder, ...then the printer manually overrides the request, and then prints from an automatically selected tray. • Cancel the current job...
User Guide
Page 118
...seconds, and then plug it back again. • Turn off the printer, then wait for about 10 seconds, and then turn the printer back on. • Update the network firmware in the feeder, then the printer manually overrides the request, and then prints from an automatically selected tray. •...; Cancel the current job. Memory low, no paper is loaded in the printer or the print server. to clear the message. Memory full [...
...seconds, and then plug it back again. • Turn off the printer, then wait for about 10 seconds, and then turn the printer back on. • Update the network firmware in the feeder, then the printer manually overrides the request, and then prints from an automatically selected tray. •...; Cancel the current job. Memory low, no paper is loaded in the printer or the print server. to clear the message. Memory full [...
User Guide
Page 124
.... For more information, see if the internal option is properly installed in the printer driver to manually add the internal option in the controller board. Manually add the internal option in the printer driver" on . The problem is solved. Is the internal option properly installed...settings page, and then check to step 5. c Make sure the internal option is selected. Is the internal option available in the printer driver? Does the internal option operate correctly? Note: From the application you are using, select the internal option. Troubleshooting 124 Option ...
.... For more information, see if the internal option is properly installed in the printer driver to manually add the internal option in the controller board. Manually add the internal option in the printer driver" on . The problem is solved. Is the internal option properly installed...settings page, and then check to step 5. c Make sure the internal option is selected. Is the internal option available in the printer driver? Does the internal option operate correctly? Note: From the application you are using, select the internal option. Troubleshooting 124 Option ...
User Guide
Page 125
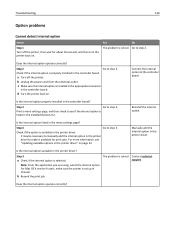
...• Make sure the paper is listed in Chooser. Go to step 4. Is the tray working ? Step 4 Go to step 3. Manually add the tray in the printer driver? Contact technical support. a From the application you are using, select the option. Is the tray working ? The problem is available in...‑size paper, then make sure that came with the paper size indicators on . Note: If necessary, manually add the tray in the printer driver to make sure the printer is set up in the Installed Features list. Is the tray listed in the tray. Reinstall the tray. Go...
...• Make sure the paper is listed in Chooser. Go to step 4. Is the tray working ? Step 4 Go to step 3. Manually add the tray in the printer driver? Contact technical support. a From the application you are using, select the option. Is the tray working ? The problem is available in...‑size paper, then make sure that came with the paper size indicators on . Note: If necessary, manually add the tray in the printer driver to make sure the printer is set up in the Installed Features list. Is the tray listed in the tray. Reinstall the tray. Go...
User Guide
Page 131
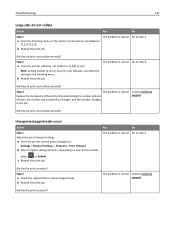
... job. Did the job print and collate correctly? Did the job print and collate correctly? Contact technical support. a From the printer control panel, navigate to step 2. Step 2 a Check the original file for manual page breaks. Note: Setting Collate to (1,1,1) (2,2,2) in the software overrides the setting in the job. Did the file print...
... job. Did the job print and collate correctly? Did the job print and collate correctly? Contact technical support. a From the printer control panel, navigate to step 2. Step 2 a Check the original file for manual page breaks. Note: Setting Collate to (1,1,1) (2,2,2) in the software overrides the setting in the job. Did the file print...


