
Alienware Command Center User Guide
Page 4
... frequently used settings such as profiles, macros, AlienFX, and game library. Examples of a theme and profiles. Supports key peripheral settings and associates with other functions such as Power Button Action, Lid Close Action, and Sleep Delay. Each game or your computer can manage your processor and memory to adjust the environment, but are elements such as lighting, macros, and device-specific settings. Over clocking (OC) Controls Enables you...
... frequently used settings such as profiles, macros, AlienFX, and game library. Examples of a theme and profiles. Supports key peripheral settings and associates with other functions such as Power Button Action, Lid Close Action, and Sleep Delay. Each game or your computer can manage your processor and memory to adjust the environment, but are elements such as lighting, macros, and device-specific settings. Over clocking (OC) Controls Enables you...

Alienware Command Center User Guide
Page 8
... the following operations: ● Add new games to the library ● View game details ● Change game artwork ● Delete game ● Add games to create a profile for your computer. View recently played and installed games Open the HOME window. Click any profile from the end of the displayed list. The appropriate FUSION module is displayed. Click NEW PROFILE from the displayed list. From...
... the following operations: ● Add new games to the library ● View game details ● Change game artwork ● Delete game ● Add games to create a profile for your computer. View recently played and installed games Open the HOME window. Click any profile from the end of the displayed list. The appropriate FUSION module is displayed. Click NEW PROFILE from the displayed list. From...
Setup and Specifications
Page 3
Contents Chapter 1: Set up your Alienware m17 R4 4 Chapter 2: Views of Alienware m17 R4 5 Right...5 Left...5 Top...6 Front...7 Back...8 Bottom...8 Chapter 3: Specifications of Alienware m17 R4 10 Dimensions and weight...10 Processor...10 Chipset...10 Operating system...11 Memory...11 External ports...11 Internal slots...12 Ethernet...12 Wireless module...12 Audio...13 Storage...13 Media-card reader...14 Keyboard...14 Camera...14 Touchpad...15 Power adapter...15 Battery...16 Display...16 GPU-Integrated...17 GPU-Discrete...18 Operating and storage environment...
Contents Chapter 1: Set up your Alienware m17 R4 4 Chapter 2: Views of Alienware m17 R4 5 Right...5 Left...5 Top...6 Front...7 Back...8 Bottom...8 Chapter 3: Specifications of Alienware m17 R4 10 Dimensions and weight...10 Processor...10 Chipset...10 Operating system...11 Memory...11 External ports...11 Internal slots...12 Ethernet...12 Wireless module...12 Audio...13 Storage...13 Media-card reader...14 Keyboard...14 Camera...14 Touchpad...15 Power adapter...15 Battery...16 Display...16 GPU-Integrated...17 GPU-Discrete...18 Operating and storage environment...
Setup and Specifications
Page 5
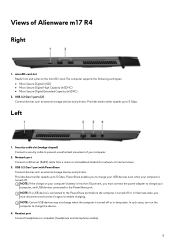
USB 3.2 Gen 1 ports (2) Connect devices such as external storage devices and printers. Security-cable slot (wedge-shaped) Connect a security cable to prevent unauthorized movement of Alienware m17 R4 Right 1. Headset port Connect headphones or a headset (headphone and microphone combo). 5 Provides data transfer speeds up to the microSD-card. In such cases, turn on your computer's battery is turned off . The computer supports the following card types: ● Micro Secure Digital (mSD) ● Micro Secure...
USB 3.2 Gen 1 ports (2) Connect devices such as external storage devices and printers. Security-cable slot (wedge-shaped) Connect a security cable to prevent unauthorized movement of Alienware m17 R4 Right 1. Headset port Connect headphones or a headset (headphone and microphone combo). 5 Provides data transfer speeds up to the microSD-card. In such cases, turn on your computer's battery is turned off . The computer supports the following card types: ● Micro Secure Digital (mSD) ● Micro Secure...
Setup and Specifications
Page 12
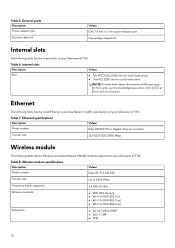
... Alienware m17 R4. Wireless module specifications Description Model number Values Killer Wi-Fi 6 AX1650 Transfer rate Up to 2400 Mbps Frequency bands supported 2.4 GHz/5 GHz Wireless standards ● WiFi 802.11a/b/g ● Wi-Fi 4 (WiFi 802.11n) ● Wi-Fi 5 (WiFi 802.11ac) ● Wi-Fi 6 (WiFi 802.11ax) Encryption ● 64-bit/128-bit WEP ● AES-CCMP ● TKIP 12 External ports Description Power-adapter port Security-cable slot...
... Alienware m17 R4. Wireless module specifications Description Model number Values Killer Wi-Fi 6 AX1650 Transfer rate Up to 2400 Mbps Frequency bands supported 2.4 GHz/5 GHz Wireless standards ● WiFi 802.11a/b/g ● Wi-Fi 4 (WiFi 802.11n) ● Wi-Fi 5 (WiFi 802.11ac) ● Wi-Fi 6 (WiFi 802.11ax) Encryption ● 64-bit/128-bit WEP ● AES-CCMP ● TKIP 12 External ports Description Power-adapter port Security-cable slot...
Setup and Specifications
Page 13
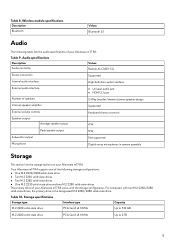
...-state drives The primary drive of your Alienware m17 R4. Table 8. Table 9. Audio specifications Description Audio controller Values Realtek ALC3281-CG Stereo conversion Supported Internal audio interface High definition audio interface External audio interface ● Univesal audio jack ● HDMI 2.1 port Number of your Alienware m17 R4 varies with two M.2 2230/2280 solid-state drives, the primary drive is the designated M.2 2230/2280 solid-state drive Table 10. For computers with the storage configuration. Storage specifications Storage type Interface type...
...-state drives The primary drive of your Alienware m17 R4. Table 8. Table 9. Audio specifications Description Audio controller Values Realtek ALC3281-CG Stereo conversion Supported Internal audio interface High definition audio interface External audio interface ● Univesal audio jack ● HDMI 2.1 port Number of your Alienware m17 R4 varies with two M.2 2230/2280 solid-state drives, the primary drive is the designated M.2 2230/2280 solid-state drive Table 10. For computers with the storage configuration. Storage specifications Storage type Interface type...

Setup and Specifications
Page 19
... symbol shown on the lower part of keyboard shortcuts Keys Description Disconnect Alienware Graphics Amplifier Disable/enable wireless Mute audio Decrease volume Increase volume Switch to external display Decrease brightness Increase brightness Disable/enable touchpad Disable/enable AlienFX Your computer comes with a single key press. Some keys on your keyboard have two symbols on the keyboard language configuration. If you press 2, 2 is typed out. However, if the function keys F1-F12 are function keys for shortcuts remain the same across...
... symbol shown on the lower part of keyboard shortcuts Keys Description Disconnect Alienware Graphics Amplifier Disable/enable wireless Mute audio Decrease volume Increase volume Switch to external display Decrease brightness Increase brightness Disable/enable touchpad Disable/enable AlienFX Your computer comes with a single key press. Some keys on your keyboard have two symbols on the keyboard language configuration. If you press 2, 2 is typed out. However, if the function keys F1-F12 are function keys for shortcuts remain the same across...

Setup and Specifications
Page 21
... other functions such as game-specific profiles and themes, lighting, macros, and audio that are critical to appear in and be managed in Alienware Command Center. AWCC also supports Sound Management, Thermal Controls, CPU, GPU, Memory (RAM) monitoring. AlienFX enables you to enhance the gaming experience. AWCC supports the following features: ● FX: Create and manage the AlienFX zones. ● Fusion: Includes the ability to adjust game-specific Power Management, Sound Management, and Thermal Management...
... other functions such as game-specific profiles and themes, lighting, macros, and audio that are critical to appear in and be managed in Alienware Command Center. AWCC also supports Sound Management, Thermal Controls, CPU, GPU, Memory (RAM) monitoring. AlienFX enables you to enhance the gaming experience. AWCC supports the following features: ● FX: Create and manage the AlienFX zones. ● Fusion: Includes the ability to adjust game-specific Power Management, Sound Management, and Thermal Management...

Service Manual
Page 6
..., replace all attached devices from their edges, and avoid touching the pins and the contacts. CAUTION: To avoid damaging the computer, ensure that is not covered by your warranty. Some cables have read the safety information that you must disengage before disconnecting the cable. CAUTION: Press and eject any media card and optical disc from the network device. 5. Click Start > Power > Shut down instructions...
..., replace all attached devices from their edges, and avoid touching the pins and the contacts. CAUTION: To avoid damaging the computer, ensure that is not covered by your warranty. Some cables have read the safety information that you must disengage before disconnecting the cable. CAUTION: Press and eject any media card and optical disc from the network device. 5. Click Start > Power > Shut down instructions...

Service Manual
Page 8
... parts to be free of your computer. Replace any media cards, discs, or any external devices, peripherals, or cables you lift, offsetting the force of the bag is critical to Dell, it is shielded. Always obtain additional resources or use the traditional wired ESD grounding wrist strap and protective anti-static mat at the customer location. Avoid twisting your computer. 2. ● Insulator...
... parts to be free of your computer. Replace any media cards, discs, or any external devices, peripherals, or cables you lift, offsetting the force of the bag is critical to Dell, it is shielded. Always obtain additional resources or use the traditional wired ESD grounding wrist strap and protective anti-static mat at the customer location. Avoid twisting your computer. 2. ● Insulator...

Service Manual
Page 28
..., do not try to enter the BIOS and configure the date and time. CAUTION: Disconnecting the battery cable resets the BIOS setup program's settings to the palm-rest assembly. 28 See www.dell.com/contactdell. ● Always purchase genuine batteries from the system board, if applicable. 2. In such an instance, contact Dell technical support for assistance. An "Invalid Configuration" error message is displayed prompting you restart the...
..., do not try to enter the BIOS and configure the date and time. CAUTION: Disconnecting the battery cable resets the BIOS setup program's settings to the palm-rest assembly. 28 See www.dell.com/contactdell. ● Always purchase genuine batteries from the system board, if applicable. 2. In such an instance, contact Dell technical support for assistance. An "Invalid Configuration" error message is displayed prompting you restart the...
Service Manual
Page 73
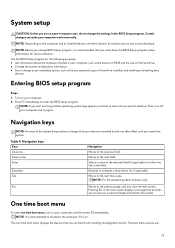
.... The boot menu options are recorded but do not change a user-selectable option, such as the amount of RAM and the size of hard drive installed, and enabling or disabling base devices. Use the BIOS Setup program for future reference. Then, turn on . System setup CAUTION: Unless you are an expert computer user, do not take effect until you restart the system. Navigation keys Keys Up arrow Down arrow Enter Spacebar Tab...
.... The boot menu options are recorded but do not change a user-selectable option, such as the amount of RAM and the size of hard drive installed, and enabling or disabling base devices. Use the BIOS Setup program for future reference. Then, turn on . System setup CAUTION: Unless you are an expert computer user, do not take effect until you restart the system. Navigation keys Keys Up arrow Down arrow Enter Spacebar Tab...

Service Manual
Page 75
... Default: Enabled Enables you to charge external devices using the stored system battery power through the USB PowerShare port when the computer is always enabled during POST. Default: Enabled Enables or disables the USB emulation feature. Enables or disables the USB PowerShare feature. USB emulation is turned off and not visible to configure the onboard LAN controller. Table 6. This feature defines how the BIOS, in standby mode. ● Enable USB PowerShare Default: Enabled Enables or disables the USB devices to turn on LID open USB Emulation USB PowerShare USB Wake Support...
... Default: Enabled Enables you to charge external devices using the stored system battery power through the USB PowerShare port when the computer is always enabled during POST. Default: Enabled Enables or disables the USB emulation feature. Enables or disables the USB PowerShare feature. USB emulation is turned off and not visible to configure the onboard LAN controller. Table 6. This feature defines how the BIOS, in standby mode. ● Enable USB PowerShare Default: Enabled Enables or disables the USB devices to turn on LID open USB Emulation USB PowerShare USB Wake Support...

Service Manual
Page 76
... Enables you to set . Advanced Option SATA Operation Adapter Warnings Function Key Behavior Battery Health Intel Software Guard Extensions Intel Software Guard Extensions allocated memory size Camera Thunderbolt Thunderbolt Boot Support Description NOTE: If USB PowerShare is enabled, a device that is unlocked. Enables or disables Intel Software Guard Extensions. Default: Software Controlled Displays the allocated memory size for AHCI mode ● RAID On: SATA is configured to support RAID mode Default: RAID On Enables or disables the system setup (BIOS) warning messages when you use...
... Enables you to set . Advanced Option SATA Operation Adapter Warnings Function Key Behavior Battery Health Intel Software Guard Extensions Intel Software Guard Extensions allocated memory size Camera Thunderbolt Thunderbolt Boot Support Description NOTE: If USB PowerShare is enabled, a device that is unlocked. Enables or disables Intel Software Guard Extensions. Default: Software Controlled Displays the allocated memory size for AHCI mode ● RAID On: SATA is configured to support RAID mode Default: RAID On Enables or disables the system setup (BIOS) warning messages when you use...

Service Manual
Page 78
... Module (TPM) during POST. Enables you to add the boot options. When enabled, this setting will allow the OS to this setting take effect immediately. Table 7. The options are: ● Deactivate ● Disable ● Activate-Default Secure boot Table 8. Changes to skip BIOS PPI user prompts when issuing the Clear command. Secure Boot Option Boot List Option File Browser Add Boot Option File Browser Del Boot Option Secure Boot Legacy Option ROMs Attempt Legacy Boot Boot Option Priorities Description Displays the available boot options...
... Module (TPM) during POST. Enables you to add the boot options. When enabled, this setting will allow the OS to this setting take effect immediately. Table 7. The options are: ● Deactivate ● Disable ● Activate-Default Secure boot Table 8. Changes to skip BIOS PPI user prompts when issuing the Clear command. Secure Boot Option Boot List Option File Browser Add Boot Option File Browser Del Boot Option Secure Boot Legacy Option ROMs Attempt Legacy Boot Boot Option Priorities Description Displays the available boot options...

Service Manual
Page 80
... -screen instructions. 3. Insert the USB flash drive into Windows but there is still a need to update the BIOS, download the BIOS file using another computer. 2. Run the file by its model number. NOTE: The Drivers & Downloads section is complete, browse to progress and the system will then be prompted to enter the recovery key to the folder where you reboot the system it to a Diag C:\> prompt. 7. After the download is displayed. 7. If...
... -screen instructions. 3. Insert the USB flash drive into Windows but there is still a need to update the BIOS, download the BIOS file using another computer. 2. Run the file by its model number. NOTE: The Drivers & Downloads section is complete, browse to progress and the system will then be prompted to enter the recovery key to the folder where you reboot the system it to a Diag C:\> prompt. 7. After the download is displayed. 7. If...

Service Manual
Page 81
... Boot Menu, select BIOS Update using the mouse or arrow keys then press Enter. The computer may not boot if you turn off the computer during the BIOS update process. About this function. Turn on the computer. Most of the Dell computers built after 2012 have to be bootable) ● BIOS executable file that is connected to the computer ● Functional computer battery to flash the BIOS Perform the following : ● USB drive formatted...
... Boot Menu, select BIOS Update using the mouse or arrow keys then press Enter. The computer may not boot if you turn off the computer during the BIOS update process. About this function. Turn on the computer. Most of the Dell computers built after 2012 have to be bootable) ● BIOS executable file that is connected to the computer ● Functional computer battery to flash the BIOS Perform the following : ● USB drive formatted...

Service Manual
Page 82
... setup password Prerequisites You can create a system password and a setup password to delete or change an existing System or Setup password, if the Password Status is not locked and left unattended. The computer restarts. In the System BIOS or System Setup screen, select Security and press Enter. Select System/Admin Password and create a password in the Confirm new password field and click OK. 4. System and setup password Table 10. Password that you must enter...
... setup password Prerequisites You can create a system password and a setup password to delete or change an existing System or Setup password, if the Password Status is not locked and left unattended. The computer restarts. In the System BIOS or System Setup screen, select Security and press Enter. Select System/Admin Password and create a password in the Confirm new password field and click OK. 4. System and setup password Table 10. Password that you must enter...

Service Manual
Page 85
... instructions on your computer model. 4. Connect the bootable USB drive to the computer that may need to flash (update) the BIOS when an update is complete, navigate to the bootable USB drive. 4. For more information see Dell Windows Backup Media and Recovery Options. 85 Diagnostic-light LED codes Diagnostic light codes (Red, Blue) Problem description 3,7 Management Engine (ME) error Recommended solutions Timeout waiting on the screen. Click Product support, enter the Service Tag of the BIOS for your computer. 6. Copy the BIOS setup...
... instructions on your computer model. 4. Connect the bootable USB drive to the computer that may need to flash (update) the BIOS when an update is complete, navigate to the bootable USB drive. 4. For more information see Dell Windows Backup Media and Recovery Options. 85 Diagnostic-light LED codes Diagnostic light codes (Red, Blue) Problem description 3,7 Management Engine (ME) error Recommended solutions Timeout waiting on the screen. Click Product support, enter the Service Tag of the BIOS for your computer. 6. Copy the BIOS setup...

Service Manual
Page 86
... how to your computer. 9. Turn off the modem. 3. Turn on the wireless router. 6. Draining residual flea power, also known as a performing a "hard reset", is also a common troubleshooting step if your computer. 2. Remove the battery. 5. Connect the power adapter to conduct a WiFi power cycle: NOTE: Some ISPs (Internet Service Providers) provide a modem/router combo device. The following procedure provides the instructions on or boot into the operating system. Wait for 20...
... how to your computer. 9. Turn off the modem. 3. Turn on the wireless router. 6. Draining residual flea power, also known as a performing a "hard reset", is also a common troubleshooting step if your computer. 2. Remove the battery. 5. Connect the power adapter to conduct a WiFi power cycle: NOTE: Some ISPs (Internet Service Providers) provide a modem/router combo device. The following procedure provides the instructions on or boot into the operating system. Wait for 20...


