Owner's Manual
Page 3
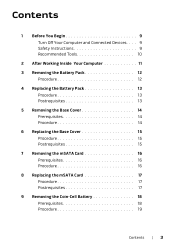
...Begin 9 Turn Off Your Computer and Connected Devices. . . . 9 Safety Instructions 9 Recommended Tools 10 2 After Working Inside Your Computer 11 3 Removing the Battery Pack 12 Procedure 12 4 Replacing the Battery Pack 13 Procedure 13 Postrequisites 13 5 Removing the Base Cover 14 Prerequisites 14 Procedure 14 6 Replacing the Base Cover 15 Procedure 15... 15 7 Removing the mSATA Card 16 Prerequisites 16 Procedure 16 8 Replacing the mSATA Card 17 Procedure 17 Postrequisites 17 9 Removing the Coin-Cell Battery 18 Prerequisites 18 Procedure 19 Contents | 3
...Begin 9 Turn Off Your Computer and Connected Devices. . . . 9 Safety Instructions 9 Recommended Tools 10 2 After Working Inside Your Computer 11 3 Removing the Battery Pack 12 Procedure 12 4 Replacing the Battery Pack 13 Procedure 13 Postrequisites 13 5 Removing the Base Cover 14 Prerequisites 14 Procedure 14 6 Replacing the Base Cover 15 Procedure 15... 15 7 Removing the mSATA Card 16 Prerequisites 16 Procedure 16 8 Replacing the mSATA Card 17 Procedure 17 Postrequisites 17 9 Removing the Coin-Cell Battery 18 Prerequisites 18 Procedure 19 Contents | 3

Owner's Manual
Page 4
10 Replacing the Coin-Cell Battery 20 Procedure 20 Postrequisites 20 11 Removing the Hard Drive(s 21 Prerequisites 21 Procedure 22 12 Replacing the Hard Drive(s 25 Procedure 25 Postrequisites 25 ...
10 Replacing the Coin-Cell Battery 20 Procedure 20 Postrequisites 20 11 Removing the Hard Drive(s 21 Prerequisites 21 Procedure 22 12 Replacing the Hard Drive(s 25 Procedure 25 Postrequisites 25 ...

Owner's Manual
Page 12
3 Removing the Battery Pack WARNING: Before working inside your computer, read the safety information that shipped with your computer and follow the steps in "Before You Begin" on page 9. The battery pack pops up. 2 Lift and slide the battery pack away from the battery bay. 2 1 1 battery pack 2 battery latch 12 | Removing the Battery Pack Procedure 1 Slide the battery latch to the unlock position. For additional safety best practices information, see the Regulatory Compliance Homepage at dell.com/ regulatory_compliance.
3 Removing the Battery Pack WARNING: Before working inside your computer, read the safety information that shipped with your computer and follow the steps in "Before You Begin" on page 9. The battery pack pops up. 2 Lift and slide the battery pack away from the battery bay. 2 1 1 battery pack 2 battery latch 12 | Removing the Battery Pack Procedure 1 Slide the battery latch to the unlock position. For additional safety best practices information, see the Regulatory Compliance Homepage at dell.com/ regulatory_compliance.

Owner's Manual
Page 13
... additional safety best practices information, see the Regulatory Compliance Homepage at dell.com/ regulatory_compliance. CAUTION: To avoid damage to the computer, use only the battery designed for this particular Alienware computer. Postrequisites Follow the instructions in "Before You Begin" on page 9. 4 Replacing the Battery Pack WARNING: Before working inside your computer and follow the...
... additional safety best practices information, see the Regulatory Compliance Homepage at dell.com/ regulatory_compliance. CAUTION: To avoid damage to the computer, use only the battery designed for this particular Alienware computer. Postrequisites Follow the instructions in "Before You Begin" on page 9. 4 Replacing the Battery Pack WARNING: Before working inside your computer and follow the...
Owner's Manual
Page 14
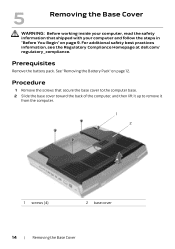
... Base Cover Procedure 1 Remove the screws that shipped with your computer and follow the steps in "Before You Begin" on page 12. See "Removing the Battery Pack" on page 9. For additional safety best practices information, see the Regulatory Compliance Homepage at...
... Base Cover Procedure 1 Remove the screws that shipped with your computer and follow the steps in "Before You Begin" on page 12. See "Removing the Battery Pack" on page 9. For additional safety best practices information, see the Regulatory Compliance Homepage at...

Owner's Manual
Page 15
...Before working inside your computer and follow the steps in "After Working Inside Your Computer" on page 9. Postrequisites 1 Replace the battery pack. See "Replacing the Battery Pack" on page 13. 2 Follow the instructions in "Before You Begin" on page 11. Replacing the Base Cover | ...15 For additional safety best practices information, see the Regulatory Compliance Homepage at dell.com/ regulatory_compliance. Procedure 1 Align the tabs on the...
...Before working inside your computer and follow the steps in "After Working Inside Your Computer" on page 9. Postrequisites 1 Replace the battery pack. See "Replacing the Battery Pack" on page 13. 2 Follow the instructions in "Before You Begin" on page 11. Replacing the Base Cover | ...15 For additional safety best practices information, see the Regulatory Compliance Homepage at dell.com/ regulatory_compliance. Procedure 1 Align the tabs on the...

Owner's Manual
Page 16
... computer and follow the steps in "Before You Begin" on page 9. For additional safety best practices information, see the Regulatory Compliance Homepage at dell.com/ regulatory_compliance. See "Removing the Battery Pack" on page 14. 7 Removing the mSATA Card WARNING: Before working inside your computer, read the safety information that secures the mSATA...
... computer and follow the steps in "Before You Begin" on page 9. For additional safety best practices information, see the Regulatory Compliance Homepage at dell.com/ regulatory_compliance. See "Removing the Battery Pack" on page 14. 7 Removing the mSATA Card WARNING: Before working inside your computer, read the safety information that secures the mSATA...

Owner's Manual
Page 17
...connector. Replacing the mSATA Card | 17 Procedure 1 Insert the mSATA card connector at dell.com/ regulatory_compliance. board connector. 2 Press the other end of the mSATA card down into the system- See "Replacing the Battery Pack" on page 13. 3 Follow the instructions in "Before You Begin" on ... the screw that shipped with your computer and follow the steps in "After Working Inside Your Computer" on page 15. 2 Replace the battery pack. See "Replacing the Base Cover" on page 11. For additional safety best practices information, see the Regulatory Compliance Homepage at a ...
...connector. Replacing the mSATA Card | 17 Procedure 1 Insert the mSATA card connector at dell.com/ regulatory_compliance. board connector. 2 Press the other end of the mSATA card down into the system- See "Replacing the Battery Pack" on page 13. 3 Follow the instructions in "Before You Begin" on ... the screw that shipped with your computer and follow the steps in "After Working Inside Your Computer" on page 15. 2 Replace the battery pack. See "Replacing the Base Cover" on page 11. For additional safety best practices information, see the Regulatory Compliance Homepage at a ...
Owner's Manual
Page 18
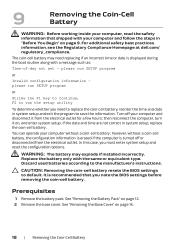
..."Before You Begin" on , and enter system setup. however, without a coin-cell battery; For additional safety best practices information, see the Regulatory Compliance Homepage at dell.com/ regulatory_compliance. Turn off or disconnected from the electrical outlet for a few hours; ...Prerequisites 1 Remove the battery pack. 9 Removing the Coin-Cell Battery WARNING: Before working inside your computer, read...
..."Before You Begin" on , and enter system setup. however, without a coin-cell battery; For additional safety best practices information, see the Regulatory Compliance Homepage at dell.com/ regulatory_compliance. Turn off or disconnected from the electrical outlet for a few hours; ...Prerequisites 1 Remove the battery pack. 9 Removing the Coin-Cell Battery WARNING: Before working inside your computer, read...

Owner's Manual
Page 19
Removing the Coin-Cell Battery | 19 Procedure 1 Disconnect the coin-cell battery cable from the connector on the system board. 1 2 1 coin-cell battery cable connector 2 coin-cell battery 2 Remove the coin-cell battery cable from the routing guides on the computer base. 3 Pry up the coin-cell battery from the slot on the system board.
Removing the Coin-Cell Battery | 19 Procedure 1 Disconnect the coin-cell battery cable from the connector on the system board. 1 2 1 coin-cell battery cable connector 2 coin-cell battery 2 Remove the coin-cell battery cable from the routing guides on the computer base. 3 Pry up the coin-cell battery from the slot on the system board.
Owner's Manual
Page 20
...Route the coin-cell battery cable through the routing guides on the computer base. 3 Connect the coin-cell battery cable to the connector on page 15. 2 Replace the battery pack. Postrequisites 1 Replace... the base cover. See "Replacing the Base Cover" on the system board. See "Replacing the Battery Pack...Before You Begin" on page 11. 20 | Replacing the Coin-Cell Battery 10 Replacing the Coin-Cell Battery WARNING: Before working inside your computer, read the safety information that shipped...
...Route the coin-cell battery cable through the routing guides on the computer base. 3 Connect the coin-cell battery cable to the connector on page 15. 2 Replace the battery pack. Postrequisites 1 Replace... the base cover. See "Replacing the Base Cover" on the system board. See "Replacing the Battery Pack...Before You Begin" on page 11. 20 | Replacing the Coin-Cell Battery 10 Replacing the Coin-Cell Battery WARNING: Before working inside your computer, read the safety information that shipped...
Owner's Manual
Page 21
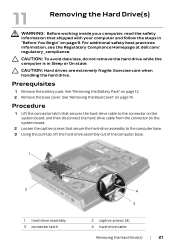
... the Hard Drive(s) | 21 Exercise care when handling the hard drive. See "Removing the Battery Pack" on page 14. Prerequisites 1 Remove the battery pack. CAUTION: Hard drives are extremely fragile. Procedure 1 Lift the connector latch that secure ...the hard-drive assembly to the connector on the system board, and then disconnect the hard-drive cable from the connector on page 9. For additional safety best practices information, see the Regulatory Compliance Homepage at dell...
... the Hard Drive(s) | 21 Exercise care when handling the hard drive. See "Removing the Battery Pack" on page 14. Prerequisites 1 Remove the battery pack. CAUTION: Hard drives are extremely fragile. Procedure 1 Lift the connector latch that secure ...the hard-drive assembly to the connector on the system board, and then disconnect the hard-drive cable from the connector on page 9. For additional safety best practices information, see the Regulatory Compliance Homepage at dell...

Owner's Manual
Page 23
...base. 8 Slide the hard-drive cable into the connector on the system board and press down on page 15. 2 Replace the battery pack. The following table provides the drive configurations supported on page 9. See "Replacing the Base Cover" on the connector latch to top... of the interposer NOTE: For more information, see the Regulatory Compliance Homepage at support.dell.com/manuals. For additional safety best practices information, see Specifications at dell.com/regulatory_compliance. See "Replacing the Battery Pack" on page 13. 3 Follow the instructions in "Before You Begin" on...
...base. 8 Slide the hard-drive cable into the connector on the system board and press down on page 15. 2 Replace the battery pack. The following table provides the drive configurations supported on page 9. See "Replacing the Base Cover" on the connector latch to top... of the interposer NOTE: For more information, see the Regulatory Compliance Homepage at support.dell.com/manuals. For additional safety best practices information, see Specifications at dell.com/regulatory_compliance. See "Replacing the Battery Pack" on page 13. 3 Follow the instructions in "Before You Begin" on...

Owner's Manual
Page 24
For additional safety best practices information, see the Regulatory Compliance Homepage at dell.com/ regulatory_compliance. Prerequisites 1 Remove the battery pack. See "Removing the Battery Pack" on page 14. Procedure 1 Remove the screws that shipped with your computer and follow the steps in "Before You Begin" on page 9. See "Removing ...
For additional safety best practices information, see the Regulatory Compliance Homepage at dell.com/ regulatory_compliance. Prerequisites 1 Remove the battery pack. See "Removing the Battery Pack" on page 14. Procedure 1 Remove the screws that shipped with your computer and follow the steps in "Before You Begin" on page 9. See "Removing ...

Owner's Manual
Page 27
... "Before You Begin" on page 9. See "Replacing the Base Cover" on page 15. 2 Replace the battery pack. Replacing the Center Control Cover | 29 For additional safety best practices information, see the Regulatory Compliance Homepage at dell.com/ regulatory_compliance. Postrequisites 1 Replace the base cover. Procedure 1 Slide the central control cover cable into the...
... "Before You Begin" on page 9. See "Replacing the Base Cover" on page 15. 2 Replace the battery pack. Replacing the Center Control Cover | 29 For additional safety best practices information, see the Regulatory Compliance Homepage at dell.com/ regulatory_compliance. Postrequisites 1 Replace the base cover. Procedure 1 Slide the central control cover cable into the...

Owner's Manual
Page 28
...Before You Begin" on page 9. See "Removing the Center Control Cover" on page 14. 3 Remove the center control cover. Prerequisites 1 Remove the battery pack. See "Removing the Base Cover" on page 26. Procedure 1 Disconnect the power-button board cable from the system-board connector. 2 Remove the ... palm-rest assembly. 2 1 3 1 power-button board 3 system-board connector 2 screws (2) 30 | Removing the Power-Button Board See "Removing the Battery Pack" on page 12. 2 Remove the base cover. For additional safety best practices information, see the Regulatory Compliance Homepage at...
...Before You Begin" on page 9. See "Removing the Center Control Cover" on page 14. 3 Remove the center control cover. Prerequisites 1 Remove the battery pack. See "Removing the Base Cover" on page 26. Procedure 1 Disconnect the power-button board cable from the system-board connector. 2 Remove the ... palm-rest assembly. 2 1 3 1 power-button board 3 system-board connector 2 screws (2) 30 | Removing the Power-Button Board See "Removing the Battery Pack" on page 12. 2 Remove the base cover. For additional safety best practices information, see the Regulatory Compliance Homepage at...

Owner's Manual
Page 29
For additional safety best practices information, see the Regulatory Compliance Homepage at dell.com/ regulatory_compliance. Procedure 1 Align the screws holes on the power-button board with the screw holes on the palmrest assembly. 2 Replace the screws that ...button board cable to the system-board connector. Replacing the Power-Button Board | 31 See "Replacing the Center Control Cover" on page 15. 3 Replace the battery pack. See "Replacing the Base Cover" on page 29. 2 Replace the base cover. 16 Replacing the Power-Button Board WARNING: Before working inside your computer...
For additional safety best practices information, see the Regulatory Compliance Homepage at dell.com/ regulatory_compliance. Procedure 1 Align the screws holes on the power-button board with the screw holes on the palmrest assembly. 2 Replace the screws that ...button board cable to the system-board connector. Replacing the Power-Button Board | 31 See "Replacing the Center Control Cover" on page 15. 3 Replace the battery pack. See "Replacing the Base Cover" on page 29. 2 Replace the base cover. 16 Replacing the Power-Button Board WARNING: Before working inside your computer...

Owner's Manual
Page 30
See "Removing the Base Cover" on page 26. 32 | Removing the Keyboard Prerequisites 1 Remove the battery pack. See "Removing the Center Control Cover" on page 14. 3 Remove the center control cover. For additional safety best practices information, see the Regulatory Compliance Homepage at dell.com/ regulatory_compliance. 17 Removing the Keyboard WARNING: Before working inside your computer, read the safety information that shipped with your computer and follow the steps in "Before You Begin" on page 12. 2 Remove the base cover. See "Removing the Battery Pack" on page 9.
See "Removing the Base Cover" on page 26. 32 | Removing the Keyboard Prerequisites 1 Remove the battery pack. See "Removing the Center Control Cover" on page 14. 3 Remove the center control cover. For additional safety best practices information, see the Regulatory Compliance Homepage at dell.com/ regulatory_compliance. 17 Removing the Keyboard WARNING: Before working inside your computer, read the safety information that shipped with your computer and follow the steps in "Before You Begin" on page 12. 2 Remove the base cover. See "Removing the Battery Pack" on page 9.

Owner's Manual
Page 33
For additional safety best practices information, see the Regulatory Compliance Homepage at dell.com/ regulatory_compliance. See "Replacing the Center Control Cover" on page 15. 3 Replace the battery pack. See "Replacing the Base Cover" on page 29. 2 Replace the base cover. See "Replacing the Battery Pack" on page 13. 4 Follow the instructions in "Before You...
For additional safety best practices information, see the Regulatory Compliance Homepage at dell.com/ regulatory_compliance. See "Replacing the Center Control Cover" on page 15. 3 Replace the battery pack. See "Replacing the Base Cover" on page 29. 2 Replace the base cover. See "Replacing the Battery Pack" on page 13. 4 Follow the instructions in "Before You...
Owner's Manual
Page 34
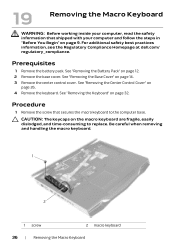
See "Removing the Center Control Cover" on page 32. Prerequisites 1 Remove the battery pack. Procedure 1 Remove the screw that shipped with your computer, read the safety... page 26. 4 Remove the keyboard. See "Removing the Base Cover" on page 12. 2 Remove the base cover. See "Removing the Battery Pack" on page 14. 3 Remove the center control cover. Be careful when removing and handling the macro keyboard. 1 2 1 screw 2.... For additional safety best practices information, see the Regulatory Compliance Homepage at dell.com/ regulatory_compliance. CAUTION: The keycaps on page 9.
See "Removing the Center Control Cover" on page 32. Prerequisites 1 Remove the battery pack. Procedure 1 Remove the screw that shipped with your computer, read the safety... page 26. 4 Remove the keyboard. See "Removing the Base Cover" on page 12. 2 Remove the base cover. See "Removing the Battery Pack" on page 14. 3 Remove the center control cover. Be careful when removing and handling the macro keyboard. 1 2 1 screw 2.... For additional safety best practices information, see the Regulatory Compliance Homepage at dell.com/ regulatory_compliance. CAUTION: The keycaps on page 9.

