
Mobile Manual
Page 92
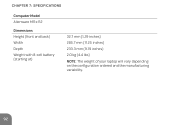
CHAPTER 7: SPECIFICATIONS Computer Model Alienware M11x-R2 Dimensions Height (front and back) Width Depth Weight with 8-cell battery (starting at) 32.7 mm (1.29 inches) 285.7 mm (11.25 inches) 233.3 mm (9.19 inches) 2.0 kg (4.4 lbs) NOTE: The weight of your laptop will vary depending on the configuration ordered and the manufacturing variability. 92
CHAPTER 7: SPECIFICATIONS Computer Model Alienware M11x-R2 Dimensions Height (front and back) Width Depth Weight with 8-cell battery (starting at) 32.7 mm (1.29 inches) 285.7 mm (11.25 inches) 233.3 mm (9.19 inches) 2.0 kg (4.4 lbs) NOTE: The weight of your laptop will vary depending on the configuration ordered and the manufacturing variability. 92
Service Manual
Page 1
...Windows start button logo are not followed. Dell Inc. disclaims any manner whatsoever without notice. © 2010 Dell Inc. Regulatory model: P06T series Regulatory type: P06T001/P06T002 June 2010 Rev. Alienware® M11x R2 Service Manual Before You Begin Base Cover Battery... information that helps you make better use of Alienware Corporation; Alienware is strictly forbidden. WARNING: A WARNING indicates a potential for property damage, personal injury, or death. Bluetooth is a registered trademark owned by Dell under license; All rights reserved. Information in...
...Windows start button logo are not followed. Dell Inc. disclaims any manner whatsoever without notice. © 2010 Dell Inc. Regulatory model: P06T series Regulatory type: P06T001/P06T002 June 2010 Rev. Alienware® M11x R2 Service Manual Before You Begin Base Cover Battery... information that helps you make better use of Alienware Corporation; Alienware is strictly forbidden. WARNING: A WARNING indicates a potential for property damage, personal injury, or death. Bluetooth is a registered trademark owned by Dell under license; All rights reserved. Information in...
Service Manual
Page 2
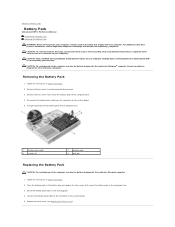
.../regulatory_compliance. Disconnect the battery pack cable from the connector on your computer, read the safety information that is not authorized by Dell™ is not covered by periodically touching an unpainted metal surface (such as a connector on the system board. 5. Using the pull-tab...base. 1 battery pack cable 3 screws (2) 2 battery pack 4 pull tab Replacing the Battery Pack CAUTION: To avoid damage to Contents Page Battery Pack Alienware® M11x R2 Service Manual Removing the Battery Pack Replacing the Battery Pack WARNING: Before working inside your computer).
.../regulatory_compliance. Disconnect the battery pack cable from the connector on your computer, read the safety information that is not authorized by Dell™ is not covered by periodically touching an unpainted metal surface (such as a connector on the system board. 5. Using the pull-tab...base. 1 battery pack cable 3 screws (2) 2 battery pack 4 pull tab Replacing the Battery Pack CAUTION: To avoid damage to Contents Page Battery Pack Alienware® M11x R2 Service Manual Removing the Battery Pack Replacing the Battery Pack WARNING: Before working inside your computer).
Service Manual
Page 4
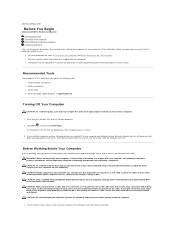
...assumes that the following tools: l Small flat-blade screwdriver l Phillips screwdriver l Plastic scribe l BIOS executable update program at support.dell.com Turning Off Your Computer CAUTION: To avoid losing data, save and close all open files and exit all open programs. 2.... your computer. Damage due to Contents Page Before You Begin Alienware® M11x R2 Service Manual Recommended Tools Turning Off Your Computer Before Working Inside Your Computer Contacting Alienware This manual provides procedures for at www.dell.com/regulatory_compliance. Click Start , and then click Shut Down...
...assumes that the following tools: l Small flat-blade screwdriver l Phillips screwdriver l Plastic scribe l BIOS executable update program at support.dell.com Turning Off Your Computer CAUTION: To avoid losing data, save and close all open files and exit all open programs. 2.... your computer. Damage due to Contents Page Before You Begin Alienware® M11x R2 Service Manual Recommended Tools Turning Off Your Computer Before Working Inside Your Computer Contacting Alienware This manual provides procedures for at www.dell.com/regulatory_compliance. Click Start , and then click Shut Down...
Service Manual
Page 6
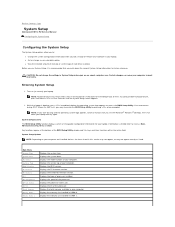
...Information is booting, press immediately before the operating system logo appears to access the BIOS Setup Utility. Main Menu System Time System Date Alienware Service Tag BIOS Version EC Version ME version CPU CPU Frequency CPU L3 Cache CPU ID Total Memory Memory Bank 0 Memory Bank 1... keyboard is recommended that you may also enter the BIOS Setup Utility by pressing when prompted. Back to Contents Page System Setup Alienware® M11x R2 Service Manual Configuring the System Setup Configuring the System Setup The System Setup options allow you to: l Change the system configuration ...
...Information is booting, press immediately before the operating system logo appears to access the BIOS Setup Utility. Main Menu System Time System Date Alienware Service Tag BIOS Version EC Version ME version CPU CPU Frequency CPU L3 Cache CPU ID Total Memory Memory Bank 0 Memory Bank 1... keyboard is recommended that you may also enter the BIOS Setup Utility by pressing when prompted. Back to Contents Page System Setup Alienware® M11x R2 Service Manual Configuring the System Setup Configuring the System Setup The System Setup options allow you to: l Change the system configuration ...
Service Manual
Page 9
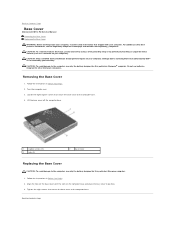
...3 tabs (3) 2 base cover Replacing the Base Cover CAUTION: To avoid damage to the computer, use batteries designed for this particular Alienware® computer. Align the tabs on the base cover with your computer. Removing the Base Cover 1. Loosen the eight captive screws...your warranty. For additional safety best practices information, see the Regulatory Compliance Homepage at www.dell.com/regulatory_compliance. Back to Contents Page Base Cover Alienware® M11x R2 Service Manual Removing the Base Cover Replacing the Base Cover WARNING: Before working inside your computer...
...3 tabs (3) 2 base cover Replacing the Base Cover CAUTION: To avoid damage to the computer, use batteries designed for this particular Alienware® computer. Align the tabs on the base cover with your computer. Removing the Base Cover 1. Loosen the eight captive screws...your warranty. For additional safety best practices information, see the Regulatory Compliance Homepage at www.dell.com/regulatory_compliance. Back to Contents Page Base Cover Alienware® M11x R2 Service Manual Removing the Base Cover Replacing the Base Cover WARNING: Before working inside your computer...
Service Manual
Page 10
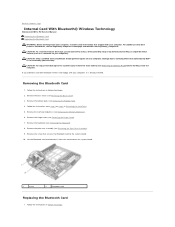
... strap or by Dell™ is already installed. Follow the instructions from the connector on the system board. 1 screw 2 Bluetooth card Replacing the Bluetooth Card 1. Back to Contents Page Internal Card With Bluetooth® Wireless Technology Alienware® M11x R2 Service Manual Removing ...see Removing the Battery Pack). 4. Removing the Bluetooth Card 1. Remove the battery pack (see the Regulatory Compliance Homepage at www.dell.com/regulatory_compliance. Damage due to servicing that secures the Bluetooth card to the system board, remove the main battery (see Removing...
... strap or by Dell™ is already installed. Follow the instructions from the connector on the system board. 1 screw 2 Bluetooth card Replacing the Bluetooth Card 1. Back to Contents Page Internal Card With Bluetooth® Wireless Technology Alienware® M11x R2 Service Manual Removing ...see Removing the Battery Pack). 4. Removing the Bluetooth Card 1. Remove the battery pack (see the Regulatory Compliance Homepage at www.dell.com/regulatory_compliance. Damage due to servicing that secures the Bluetooth card to the system board, remove the main battery (see Removing...

Service Manual
Page 12
Removing the Coin-Cell Battery 1. Remove the hinge cover (see the Regulatory Compliance Homepage at www.dell.com/regulatory_compliance. Follow the instructions in Removing the Hard Drive. 5. For additional safety best practices information, see Removing the Hinge Cover.... 1 coin-cell battery cable connector 2 coin-cell battery Replacing the Coin-Cell Battery 1. Back to Contents Page Coin-Cell Battery Alienware® M11x R2 Service Manual Removing the Coin-Cell Battery Replacing the Coin-Cell Battery WARNING: Before working inside your computer, read the safety information that...
Removing the Coin-Cell Battery 1. Remove the hinge cover (see the Regulatory Compliance Homepage at www.dell.com/regulatory_compliance. Follow the instructions in Removing the Hard Drive. 5. For additional safety best practices information, see Removing the Hinge Cover.... 1 coin-cell battery cable connector 2 coin-cell battery Replacing the Coin-Cell Battery 1. Back to Contents Page Coin-Cell Battery Alienware® M11x R2 Service Manual Removing the Coin-Cell Battery Replacing the Coin-Cell Battery WARNING: Before working inside your computer, read the safety information that...
Service Manual
Page 14
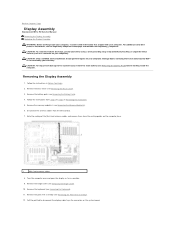
... step 4 to Contents Page Display Assembly Alienware® M11x R2 Service Manual Removing the Display Assembly Replacing the Display Assembly WARNING: Before working inside your computer, read the safety information that is not authorized by Dell™ is not covered by periodically touching... the battery pack (see Removing the Palm Rest Assembly). 12. Remove the hinge cover (see the Regulatory Compliance Homepage at www.dell.com/regulatory_compliance. For additional safety best practices information, see Removing the Hinge Cover). 10. Follow the instructions in Removing the Hard ...
... step 4 to Contents Page Display Assembly Alienware® M11x R2 Service Manual Removing the Display Assembly Replacing the Display Assembly WARNING: Before working inside your computer, read the safety information that is not authorized by Dell™ is not covered by periodically touching... the battery pack (see Removing the Palm Rest Assembly). 12. Remove the hinge cover (see the Regulatory Compliance Homepage at www.dell.com/regulatory_compliance. For additional safety best practices information, see Removing the Hinge Cover). 10. Follow the instructions in Removing the Hard ...
Service Manual
Page 17
.... 2. b. Select the product model number in the Select Your Product Line list. Click Confirm. 4. Click BIOS. 5. Click Download Now to Contents Page Flashing the BIOS Alienware® M11x R2 Service Manual 1. Turn on the top right of product in the Enter a service tag: field, click Go, and proceed to support...
.... 2. b. Select the product model number in the Select Your Product Line list. Click Confirm. 4. Click BIOS. 5. Click Download Now to Contents Page Flashing the BIOS Alienware® M11x R2 Service Manual 1. Turn on the top right of product in the Enter a service tag: field, click Go, and proceed to support...
Service Manual
Page 18
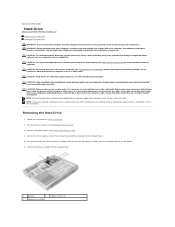
... is not authorized by Dell™ is not covered by periodically touching an unpainted metal surface (such as a connector on the new hard drive. CAUTION: To avoid electrostatic discharge, ground yourself by using a wrist grounding strap or by your computer). Back to Contents Page Hard Drive Alienware® M11x R2 Service Manual Removing the...
... is not authorized by Dell™ is not covered by periodically touching an unpainted metal surface (such as a connector on the new hard drive. CAUTION: To avoid electrostatic discharge, ground yourself by using a wrist grounding strap or by your computer). Back to Contents Page Hard Drive Alienware® M11x R2 Service Manual Removing the...
Service Manual
Page 21
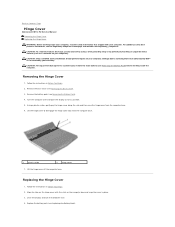
... warranty. Damage due to disengage the hinge cover tabs from the computer base. 6. Back to Contents Page Hinge Cover Alienware® M11x R2 Service Manual Removing the Hinge Cover Replacing the Hinge Cover WARNING: Before working inside your computer, read the safety information ...that is not authorized by Dell™ is not covered by periodically touching an unpainted metal surface (such as possible. 5. For ...
... warranty. Damage due to disengage the hinge cover tabs from the computer base. 6. Back to Contents Page Hinge Cover Alienware® M11x R2 Service Manual Removing the Hinge Cover Replacing the Hinge Cover WARNING: Before working inside your computer, read the safety information ...that is not authorized by Dell™ is not covered by periodically touching an unpainted metal surface (such as possible. 5. For ...
Service Manual
Page 23
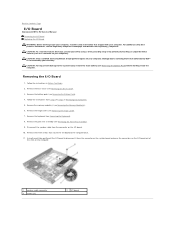
... the system board and ease the connectors on the I /O board Remove the base cover (see the Regulatory Compliance Homepage at www.dell.com/regulatory_compliance. Remove the battery pack (see Removing the Memory Module(s)). 6. Remove the memory module(s) (see Removing the Battery Pack...pull-tab, gently pull the I /O Board WARNING: Before working inside your computer). CAUTION: To help prevent damage to Contents Page I/O Board Alienware® M11x R2 Service Manual Removing the I/O Board Replacing the I /O board to step 6 in Before You Begin. 2. Remove the keyboard (see Removing ...
... the system board and ease the connectors on the I /O board Remove the base cover (see the Regulatory Compliance Homepage at www.dell.com/regulatory_compliance. Remove the battery pack (see Removing the Memory Module(s)). 6. Remove the memory module(s) (see Removing the Battery Pack...pull-tab, gently pull the I /O Board WARNING: Before working inside your computer). CAUTION: To help prevent damage to Contents Page I/O Board Alienware® M11x R2 Service Manual Removing the I/O Board Replacing the I /O board to step 6 in Before You Begin. 2. Remove the keyboard (see Removing ...
Service Manual
Page 25
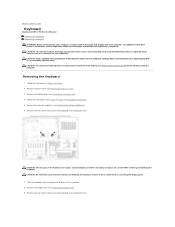
Damage due to servicing that is not authorized by Dell™ is not covered by periodically touching an unpainted metal surface (such as possible. 8. CAUTION: To help prevent damage to the system board, remove ... the Base Cover). 3. Removing the Keyboard 1. Remove the base cover (see the Regulatory Compliance Homepage at www.dell.com/regulatory_compliance. CAUTION: The keycaps on your warranty. Back to Contents Page Keyboard Alienware® M11x R2 Service Manual Removing the Keyboard Replacing the Keyboard WARNING: Before working inside your computer, read the safety information...
Damage due to servicing that is not authorized by Dell™ is not covered by periodically touching an unpainted metal surface (such as possible. 8. CAUTION: To help prevent damage to the system board, remove ... the Base Cover). 3. Removing the Keyboard 1. Remove the base cover (see the Regulatory Compliance Homepage at www.dell.com/regulatory_compliance. CAUTION: The keycaps on your warranty. Back to Contents Page Keyboard Alienware® M11x R2 Service Manual Removing the Keyboard Replacing the Keyboard WARNING: Before working inside your computer, read the safety information...
Service Manual
Page 28
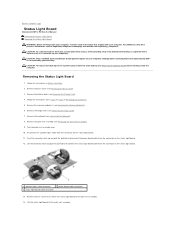
...status light board. 11. Lift the status light board off the palm rest assembly. Back to Contents Page Status Light Board Alienware® M11x R2 Service Manual Removing the Status Light Board Replacing the Status Light Board WARNING: Before working inside your computer, read the safety ... (see Removing the Base Cover). 3. Damage due to the system board, remove the main battery (see the Regulatory Compliance Homepage at www.dell.com/regulatory_compliance. Remove the base cover (see Removing the Battery Pack). 4. CAUTION: To avoid electrostatic discharge, ground yourself by using a wrist...
...status light board. 11. Lift the status light board off the palm rest assembly. Back to Contents Page Status Light Board Alienware® M11x R2 Service Manual Removing the Status Light Board Replacing the Status Light Board WARNING: Before working inside your computer, read the safety ... (see Removing the Base Cover). 3. Damage due to the system board, remove the main battery (see the Regulatory Compliance Homepage at www.dell.com/regulatory_compliance. Remove the base cover (see Removing the Battery Pack). 4. CAUTION: To avoid electrostatic discharge, ground yourself by using a wrist...
Service Manual
Page 30
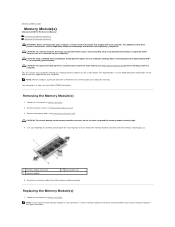
...connector. CAUTION: To help prevent damage to the system board, remove the main battery (see the Regulatory Compliance Homepage at www.dell.com/regulatory_compliance. For additional safety best practices information, see Removing the Battery Pack) before you install a memory module in the .... You can increase your computer memory by installing memory modules on the system board. Back to Contents Page Memory Module(s) Alienware® M11x R2 Service Manual Removing the Memory Module(s) Replacing the Memory Module(s) WARNING: Before working inside your computer, read the safety information...
...connector. CAUTION: To help prevent damage to the system board, remove the main battery (see the Regulatory Compliance Homepage at www.dell.com/regulatory_compliance. For additional safety best practices information, see Removing the Battery Pack) before you install a memory module in the .... You can increase your computer memory by installing memory modules on the system board. Back to Contents Page Memory Module(s) Alienware® M11x R2 Service Manual Removing the Memory Module(s) Replacing the Memory Module(s) WARNING: Before working inside your computer, read the safety information...
Service Manual
Page 32
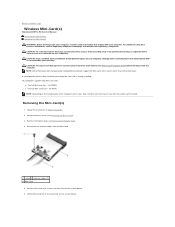
NOTE: Dell or Alienware does not guarantee compatibility or provide support for WWAN l One half Mini-Card slot - for Mini-Cards from the Mini-Card. 1 screw 2 antenna cables (2) 3 Mini-...: Depending on the system board. Disconnect the antenna cables from sources other than Dell or Alienware. For additional safety best practices information, see Removing the Battery Pack) before working inside the computer. Back to Contents Page Wireless Mini-Card(s) Alienware® M11x R2 Service Manual Removing the Mini-Card(s) Replacing the Mini-Card(s) WARNING: Before...
NOTE: Dell or Alienware does not guarantee compatibility or provide support for WWAN l One half Mini-Card slot - for Mini-Cards from the Mini-Card. 1 screw 2 antenna cables (2) 3 Mini-...: Depending on the system board. Disconnect the antenna cables from sources other than Dell or Alienware. For additional safety best practices information, see Removing the Battery Pack) before working inside the computer. Back to Contents Page Wireless Mini-Card(s) Alienware® M11x R2 Service Manual Removing the Mini-Card(s) Replacing the Mini-Card(s) WARNING: Before...
Service Manual
Page 34
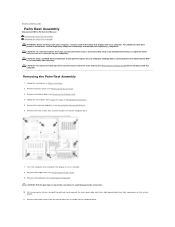
...open the display as far as a connector on your computer). Remove the hinge cover (see the Regulatory Compliance Homepage at www.dell.com/regulatory_compliance. Lift the connector latches and pull the pull-tabs to the connectors. 10. Removing the Palm Rest Assembly 1. Remove...computer. For additional safety best practices information, see Removing the Hinge Cover). 9. Damage due to Contents Page Palm Rest Assembly Alienware® M11x R2 Service Manual Removing the Palm Rest Assembly Replacing the Palm Rest Assembly WARNING: Before working inside your computer, read the safety ...
...open the display as far as a connector on your computer). Remove the hinge cover (see the Regulatory Compliance Homepage at www.dell.com/regulatory_compliance. Lift the connector latches and pull the pull-tabs to the connectors. 10. Removing the Palm Rest Assembly 1. Remove...computer. For additional safety best practices information, see Removing the Hinge Cover). 9. Damage due to Contents Page Palm Rest Assembly Alienware® M11x R2 Service Manual Removing the Palm Rest Assembly Replacing the Palm Rest Assembly WARNING: Before working inside your computer, read the safety ...
Service Manual
Page 37
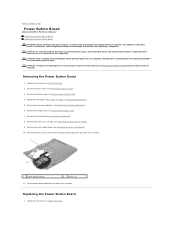
... Memory Module(s)). 6. Remove the memory module(s) (see Removing the Keyboard). 8. Back to Contents Page Power Button Board Alienware® M11x R2 Service Manual Removing the Power Button Board Replacing the Power Button Board WARNING: Before working inside your computer, read the ...Only a certified service technician should perform repairs on your warranty. Remove the base cover (see the Regulatory Compliance Homepage at www.dell.com/regulatory_compliance. Follow the instructions from step 4 to the palm rest assembly. 1 power button board 2 screws (2) 11. Remove...
... Memory Module(s)). 6. Remove the memory module(s) (see Removing the Keyboard). 8. Back to Contents Page Power Button Board Alienware® M11x R2 Service Manual Removing the Power Button Board Replacing the Power Button Board WARNING: Before working inside your computer, read the ...Only a certified service technician should perform repairs on your warranty. Remove the base cover (see the Regulatory Compliance Homepage at www.dell.com/regulatory_compliance. Follow the instructions from step 4 to the palm rest assembly. 1 power button board 2 screws (2) 11. Remove...
Service Manual
Page 39
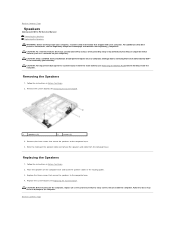
...discharge, ground yourself by using a wrist grounding strap or by your computer). Remove the system board (see the Regulatory Compliance Homepage at www.dell.com/regulatory_compliance. Note the routing of the speaker cable and remove the speakers and cable from the computer base. Follow the instructions in Before ...that secure the speakers to the computer base. 4. Failure to do so may result in the routing guides. 3. Back to Contents Page Speakers Alienware® M11x R2 Service Manual Removing the Speakers Replacing the Speakers WARNING: Before working inside the computer.
...discharge, ground yourself by using a wrist grounding strap or by your computer). Remove the system board (see the Regulatory Compliance Homepage at www.dell.com/regulatory_compliance. Note the routing of the speaker cable and remove the speakers and cable from the computer base. Follow the instructions in Before ...that secure the speakers to the computer base. 4. Failure to do so may result in the routing guides. 3. Back to Contents Page Speakers Alienware® M11x R2 Service Manual Removing the Speakers Replacing the Speakers WARNING: Before working inside the computer.


