Mobile Manual
Page 4
CONTENTS CHAPTER 3: USING YOUR LAPTOP 35 Alienware Command Center 36 Using Removable Media and Cards 39 Using the Wireless Control 40 Battery Pack 40 Power Management 41 nVidia Optimus Technology 43 Configuring the BIOS 45 CHAPTER 4: INSTALLING AND REPLACING COMPONENTS 55 Before You Begin 56 Replacing the Battery Pack 60 Upgrading or Replacing Memory 63 Upgrading or Replacing the Hard Drive Assembly 66 CHAPTER 5: TROUBLESHOOTING 71 Basic Hints and Tips 72 Backup and General Maintenance 73 Software Diagnostic Tools 75 Answers to Common Problems 78 4
CONTENTS CHAPTER 3: USING YOUR LAPTOP 35 Alienware Command Center 36 Using Removable Media and Cards 39 Using the Wireless Control 40 Battery Pack 40 Power Management 41 nVidia Optimus Technology 43 Configuring the BIOS 45 CHAPTER 4: INSTALLING AND REPLACING COMPONENTS 55 Before You Begin 56 Replacing the Battery Pack 60 Upgrading or Replacing Memory 63 Upgrading or Replacing the Hard Drive Assembly 66 CHAPTER 5: TROUBLESHOOTING 71 Basic Hints and Tips 72 Backup and General Maintenance 73 Software Diagnostic Tools 75 Answers to Common Problems 78 4
Mobile Manual
Page 22
..., external drive, or MP3 player. NOTE: Certain USB devices may not charge when the computer is automatically shut off when only 10% of the total battery life remains. 5 Network connector - In such cases, turn on /off or in sleep state. NOTE: The USB PowerShare is powered off or in sleep state...
..., external drive, or MP3 player. NOTE: Certain USB devices may not charge when the computer is automatically shut off when only 10% of the total battery life remains. 5 Network connector - In such cases, turn on /off or in sleep state. NOTE: The USB PowerShare is powered off or in sleep state...

Mobile Manual
Page 25
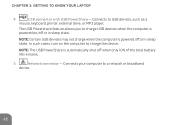
Connects to an AC adapter to power the computer and charge the battery. 25 Back View Features CHAPTER 2: GETTING TO KNOW YOUR LAPTOP 1 1 AC adapter connector -
Connects to an AC adapter to power the computer and charge the battery. 25 Back View Features CHAPTER 2: GETTING TO KNOW YOUR LAPTOP 1 1 AC adapter connector -

Mobile Manual
Page 31
...is in standby mode. The computer is in the control panel of your Microsoft Windows operating system. 31 On battery: Amber or custom battery-color Amber or custom battery-color fading into black The battery is fully charged. CHAPTER 2: GETTING TO KNOW YOUR LAPTOP On AC adapter: Blue or custom AC-color ...Blue or custom AC-color fading into white or custom battery-color The battery is fully charged. The computer is turned off or on standby and hibernate mode, see Power Options in standby mode. Blinking Amber or ...
...is in standby mode. The computer is in the control panel of your Microsoft Windows operating system. 31 On battery: Amber or custom battery-color Amber or custom battery-color fading into black The battery is fully charged. CHAPTER 2: GETTING TO KNOW YOUR LAPTOP On AC adapter: Blue or custom AC-color ...Blue or custom AC-color fading into white or custom battery-color The battery is fully charged. The computer is turned off or on standby and hibernate mode, see Power Options in standby mode. Blinking Amber or ...
Mobile Manual
Page 32
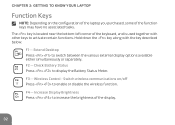
... options available either simultaneously or separately. F4 - Hold down the key along with other keys to activate certain functions. Extend Desktop Press to display the Battery Status Meter. CHAPTER 2: GETTING TO KNOW YOUR LAPTOP Function Keys NOTE: Depending on /off Press to increase the brightness of the display. 32 Switch wireless...
... options available either simultaneously or separately. F4 - Hold down the key along with other keys to activate certain functions. Extend Desktop Press to display the Battery Status Meter. CHAPTER 2: GETTING TO KNOW YOUR LAPTOP Function Keys NOTE: Depending on /off Press to increase the brightness of the display. 32 Switch wireless...
Mobile Manual
Page 40
...the five lights represent approximately 20% of this battery will vary depending on , there is 80% of the battery. When you pressed the first time. Battery life will decrease with a high-energy rechargeable lithium ion prismatic (Li-ion) battery pack. Battery Pack Your laptop is equipped with time and... turn on your wireless radios to their respective states they were in the battery. 40 Press to disable all wireless radios on , there is no charge remaining in before you press the battery meter once, the charge level lights illuminate. Pressing again returns your laptop ...
...the five lights represent approximately 20% of this battery will vary depending on , there is 80% of the battery. When you pressed the first time. Battery life will decrease with a high-energy rechargeable lithium ion prismatic (Li-ion) battery pack. Battery Pack Your laptop is equipped with time and... turn on your wireless radios to their respective states they were in the battery. 40 Press to disable all wireless radios on , there is no charge remaining in before you press the battery meter once, the charge level lights illuminate. Pressing again returns your laptop ...

Mobile Manual
Page 41
... activity and by maximizing system performance. 41 CHAPTER 3: USING YOUR LAPTOP Power Management Understanding Power Consumption In order to fully utilize the power of your battery, it and saves power during periods of system performance on your computer by reducing system performance to maximize the life of the computer and by...
... activity and by maximizing system performance. 41 CHAPTER 3: USING YOUR LAPTOP Power Management Understanding Power Consumption In order to fully utilize the power of your battery, it and saves power during periods of system performance on your computer by reducing system performance to maximize the life of the computer and by...

Mobile Manual
Page 43
...profiles for any application on your computer, while minimizing the impact on battery life. When an application is launched, the video drivers check to the internet. CHAPTER 3: USING YOUR LAPTOP nVidia Optimus Technology Your Alienware M11x laptop is equipped with it. • If an application profile exists...Optimus solution is used. The Optimus technology is turned on your computer. This may be required for preset applications and thus extends the battery life. The nVidia GPU is turned off automatically when the application is closed. • If an application profile does not exist,...
...profiles for any application on your computer, while minimizing the impact on battery life. When an application is launched, the video drivers check to the internet. CHAPTER 3: USING YOUR LAPTOP nVidia Optimus Technology Your Alienware M11x laptop is equipped with it. • If an application profile exists...Optimus solution is used. The Optimus technology is turned on your computer. This may be required for preset applications and thus extends the battery life. The nVidia GPU is turned off automatically when the application is closed. • If an application profile does not exist,...
Mobile Manual
Page 48
.... NOTE: You cannot boot any type of USB device (floppy, hard drive, or memory key) when this feature may improve performance, but will greatly reduce battery life. Displays the total memory available in the absence of the processor. Disabling this option is always enabled during POST (Power On Self Test). USB...
.... NOTE: You cannot boot any type of USB device (floppy, hard drive, or memory key) when this feature may improve performance, but will greatly reduce battery life. Displays the total memory available in the absence of the processor. Disabling this option is always enabled during POST (Power On Self Test). USB...

Mobile Manual
Page 51
... Charger Behavior USB Powershare Allows you to screen. Allows you to enable or disable charging of devices plugged into the USB Powershare connector while in Battery Mode. 51 Allows you to enable or disable...
... Charger Behavior USB Powershare Allows you to screen. Allows you to enable or disable charging of devices plugged into the USB Powershare connector while in Battery Mode. 51 Allows you to enable or disable...
Mobile Manual
Page 59
... the computer, perform the following steps before you begin working inside the computer. 1. Turn off your computer (for more information, see "Replacing the Battery Pack" on page 57). Press and eject any installed cards from being scratched. 2. Press the power button to prevent the computer cover from the ...Media Card Reader. 5. Disconnect all attached devices from their electrical outlets. Disconnect your computer and then unplug the cable from the battery bay before you service the laptop. 6. CAUTION: To help prevent damage to the system board, you must remove the...
... the computer, perform the following steps before you begin working inside the computer. 1. Turn off your computer (for more information, see "Replacing the Battery Pack" on page 57). Press and eject any installed cards from being scratched. 2. Press the power button to prevent the computer cover from the ...Media Card Reader. 5. Disconnect all attached devices from their electrical outlets. Disconnect your computer and then unplug the cable from the battery bay before you service the laptop. 6. CAUTION: To help prevent damage to the system board, you must remove the...

Mobile Manual
Page 60
... the instructions in "Before You Begin" on page 56. 2. CHAPTER 4: INSTALLING AND REPLACING COMPONENTS Replacing the Battery Pack This battery pack can easily be removed and replaced. Do not use only the battery designed for other Alienware or Dell laptops. Turn the laptop over. 4. Ensure that the laptop is properly shut down the laptop. 3. Shut...
... the instructions in "Before You Begin" on page 56. 2. CHAPTER 4: INSTALLING AND REPLACING COMPONENTS Replacing the Battery Pack This battery pack can easily be removed and replaced. Do not use only the battery designed for other Alienware or Dell laptops. Turn the laptop over. 4. Ensure that the laptop is properly shut down the laptop. 3. Shut...

Mobile Manual
Page 62
Lift and slide the battery pack out of the computer. 3 1 2 1 battery pack 3 battery pack cable 2 screws (2) To replace the battery pack, perform the removal steps in reverse order. 62 Remove the two screws that secure the battery pack to the computer base. 6. CHAPTER 4: INSTALLING AND REPLACING COMPONENTS 5. Disconnect the battery pack cable from the connector on the system board. 7.
Lift and slide the battery pack out of the computer. 3 1 2 1 battery pack 3 battery pack cable 2 screws (2) To replace the battery pack, perform the removal steps in reverse order. 62 Remove the two screws that secure the battery pack to the computer base. 6. CHAPTER 4: INSTALLING AND REPLACING COMPONENTS 5. Disconnect the battery pack cable from the connector on the system board. 7.
Mobile Manual
Page 64
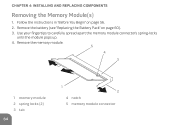
Use your fingertips to carefully spread apart the memory module connector's spring-locks until the module pops up. 4. Remove the memory module. 5 4 3 1 memory module 2 spring locks (2) 3 tab 64 1 2 4 notch 5 memory module connector Remove the battery (see "Replacing the Battery Pack" on page 56. 2. CHAPTER 4: INSTALLING AND REPLACING COMPONENTS Removing the Memory Module(s) 1. Follow the instructions in "Before You Begin" on page 60). 3.
Use your fingertips to carefully spread apart the memory module connector's spring-locks until the module pops up. 4. Remove the memory module. 5 4 3 1 memory module 2 spring locks (2) 3 tab 64 1 2 4 notch 5 memory module connector Remove the battery (see "Replacing the Battery Pack" on page 56. 2. CHAPTER 4: INSTALLING AND REPLACING COMPONENTS Removing the Memory Module(s) 1. Follow the instructions in "Before You Begin" on page 60). 3.
Mobile Manual
Page 66
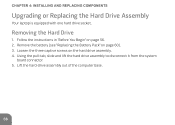
Lift the hard-drive assembly out of the computer base. 66 CHAPTER 4: INSTALLING AND REPLACING COMPONENTS Upgrading or Replacing the Hard Drive Assembly Your laptop is equipped with one hard drive socket. Removing the Hard Drive 1. Using the pull-tab, slide and lift the hard drive assembly to disconnect it from the system board connector. 5. Remove the battery (see "Replacing the Battery Pack" on the hard drive assembly. 4. Loosen the three captive screws on page 60). 3. Follow the instructions in "Before You Begin" on page 56. 2.
Lift the hard-drive assembly out of the computer base. 66 CHAPTER 4: INSTALLING AND REPLACING COMPONENTS Upgrading or Replacing the Hard Drive Assembly Your laptop is equipped with one hard drive socket. Removing the Hard Drive 1. Using the pull-tab, slide and lift the hard drive assembly to disconnect it from the system board connector. 5. Remove the battery (see "Replacing the Battery Pack" on the hard drive assembly. 4. Loosen the three captive screws on page 60). 3. Follow the instructions in "Before You Begin" on page 56. 2.
Mobile Manual
Page 92
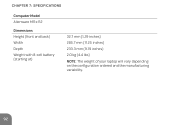
CHAPTER 7: SPECIFICATIONS Computer Model Alienware M11x-R2 Dimensions Height (front and back) Width Depth Weight with 8-cell battery (starting at) 32.7 mm (1.29 inches) 285.7 mm (11.25 inches) 233.3 mm (9.19 inches) 2.0 kg (4.4 lbs) NOTE: The weight of your laptop will vary depending on the configuration ordered and the manufacturing variability. 92
CHAPTER 7: SPECIFICATIONS Computer Model Alienware M11x-R2 Dimensions Height (front and back) Width Depth Weight with 8-cell battery (starting at) 32.7 mm (1.29 inches) 285.7 mm (11.25 inches) 233.3 mm (9.19 inches) 2.0 kg (4.4 lbs) NOTE: The weight of your laptop will vary depending on the configuration ordered and the manufacturing variability. 92

Mobile Manual
Page 100
CHAPTER 7: SPECIFICATIONS Battery 8-cell "smart" lithium ion (63 Whr) Height 11.2 mm (0.44 inches) Width 173 mm (6.81 inches) Depth 109.4 mm (4.31 inches) Weight 0.43 kg (0.94 lb) Voltage Operating time Life span (approximate) Temperature range Operating Storage Coin-cell battery 14.8 V battery operating time varies depending on operating conditions and can be significantly reduced under certain power-intensive conditions. 300 discharge/charge cycles 0° to 50°C (32° to 122°F) -20° to 60°C (-4° to 140°F) CR-2032 100
CHAPTER 7: SPECIFICATIONS Battery 8-cell "smart" lithium ion (63 Whr) Height 11.2 mm (0.44 inches) Width 173 mm (6.81 inches) Depth 109.4 mm (4.31 inches) Weight 0.43 kg (0.94 lb) Voltage Operating time Life span (approximate) Temperature range Operating Storage Coin-cell battery 14.8 V battery operating time varies depending on operating conditions and can be significantly reduced under certain power-intensive conditions. 300 discharge/charge cycles 0° to 50°C (32° to 122°F) -20° to 60°C (-4° to 140°F) CR-2032 100
Mobile Manual
Page 108
... never be subjected to remove peripheral cards for any reason, place them on the portion of your computer, there is not covered by Alienware. 108 APPENDIX • If you do not open up your computer may cause damage. Mechanical Shock is nothing to worry about. Your... computer protects itself against most irregularities in the power source. When You Should Contact Alienware • The battery, power cable or connector is only advised to the system board. Careless handling of the computer's case that connect to use replacement...
... never be subjected to remove peripheral cards for any reason, place them on the portion of your computer, there is not covered by Alienware. 108 APPENDIX • If you do not open up your computer may cause damage. Mechanical Shock is nothing to worry about. Your... computer protects itself against most irregularities in the power source. When You Should Contact Alienware • The battery, power cable or connector is only advised to the system board. Careless handling of the computer's case that connect to use replacement...
Service Manual
Page 1
... to refer to hardware or loss of Dell Inc. Alienware is subject to change without the written permission of data if instructions are not followed. A00 Other trademarks and trade names may be used by Bluetooth SIG, Inc. Alienware® M11x R2 Service Manual Before You Begin Base Cover Battery Pack Hard Drive Memory Module(s) Wireless...
... to refer to hardware or loss of Dell Inc. Alienware is subject to change without the written permission of data if instructions are not followed. A00 Other trademarks and trade names may be used by Bluetooth SIG, Inc. Alienware® M11x R2 Service Manual Before You Begin Base Cover Battery Pack Hard Drive Memory Module(s) Wireless...
Service Manual
Page 2
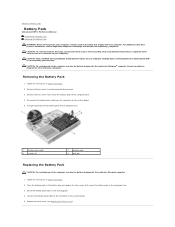
...battery pack off the computer base. 1 battery pack cable 3 screws (2) 2 battery pack 4 pull tab Replacing the Battery Pack CAUTION: To avoid damage to the computer, use batteries designed for this particular Alienware computer. 1. For additional safety best practices information, see the Regulatory Compliance Homepage at www.dell...warranty. Disconnect the battery pack cable from the connector on the system board. 5. Removing the Battery Pack 1. Back to Contents Page Battery Pack Alienware® M11x R2 Service Manual Removing the Battery Pack Replacing the Battery Pack WARNING: ...
...battery pack off the computer base. 1 battery pack cable 3 screws (2) 2 battery pack 4 pull tab Replacing the Battery Pack CAUTION: To avoid damage to the computer, use batteries designed for this particular Alienware computer. 1. For additional safety best practices information, see the Regulatory Compliance Homepage at www.dell...warranty. Disconnect the battery pack cable from the connector on the system board. 5. Removing the Battery Pack 1. Back to Contents Page Battery Pack Alienware® M11x R2 Service Manual Removing the Battery Pack Replacing the Battery Pack WARNING: ...

