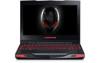
Mobile Manual
Page 2
..., personal injury, or death. Microsoft and Windows are registered trademarks and Core is a registered trademark of Dell Inc.; Other trademarks and trade names may be used in trademarks and trade names other countries; Reproduction of Alienware Corporation; Dell Inc. Regulatory model: P06T Regulatory type: P06T001/P06T002 P/N: 7XM1F Rev. is a registered trademark owned by...
..., personal injury, or death. Microsoft and Windows are registered trademarks and Core is a registered trademark of Dell Inc.; Other trademarks and trade names may be used in trademarks and trade names other countries; Reproduction of Alienware Corporation; Dell Inc. Regulatory model: P06T Regulatory type: P06T001/P06T002 P/N: 7XM1F Rev. is a registered trademark owned by...
Mobile Manual
Page 3
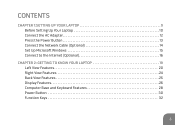
CONTENTS CHAPTER 1:SETTING UP YOUR LAPTOP 9 Before Setting Up Your Laptop 10 Connect the AC Adapter 12 Press the Power Button 13 Connect the Network Cable (Optional 14 Set Up Microsoft Windows 15 Connect to the Internet (Optional 16 CHAPTER 2: GETTING TO KNOW YOUR LAPTOP 19 Left View Features 20 Right View Features 24 Back View Features 25 Display Features 26 Computer Base and Keyboard Features 28 Power Button 30 Function Keys 32 3
CONTENTS CHAPTER 1:SETTING UP YOUR LAPTOP 9 Before Setting Up Your Laptop 10 Connect the AC Adapter 12 Press the Power Button 13 Connect the Network Cable (Optional 14 Set Up Microsoft Windows 15 Connect to the Internet (Optional 16 CHAPTER 2: GETTING TO KNOW YOUR LAPTOP 19 Left View Features 20 Right View Features 24 Back View Features 25 Display Features 26 Computer Base and Keyboard Features 28 Power Button 30 Function Keys 32 3
Mobile Manual
Page 4
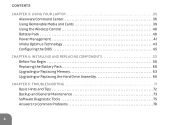
CONTENTS CHAPTER 3: USING YOUR LAPTOP 35 Alienware Command Center 36 Using Removable Media and Cards 39 Using the Wireless Control 40 Battery Pack 40 Power Management 41 nVidia Optimus Technology 43 Configuring the BIOS 45 CHAPTER 4: INSTALLING AND REPLACING COMPONENTS 55 Before You Begin 56 Replacing the Battery Pack 60 Upgrading or Replacing Memory 63 Upgrading or Replacing the Hard Drive Assembly 66 CHAPTER 5: TROUBLESHOOTING 71 Basic Hints and Tips 72 Backup and General Maintenance 73 Software Diagnostic Tools 75 Answers to Common Problems 78 4
CONTENTS CHAPTER 3: USING YOUR LAPTOP 35 Alienware Command Center 36 Using Removable Media and Cards 39 Using the Wireless Control 40 Battery Pack 40 Power Management 41 nVidia Optimus Technology 43 Configuring the BIOS 45 CHAPTER 4: INSTALLING AND REPLACING COMPONENTS 55 Before You Begin 56 Replacing the Battery Pack 60 Upgrading or Replacing Memory 63 Upgrading or Replacing the Hard Drive Assembly 66 CHAPTER 5: TROUBLESHOOTING 71 Basic Hints and Tips 72 Backup and General Maintenance 73 Software Diagnostic Tools 75 Answers to Common Problems 78 4

Mobile Manual
Page 5
CONTENTS CHAPTER 6: SYSTEM RECOVERY 85 Recovery Options 86 Dell DataSafe Local Backup 87 CHAPTER 7: SPECIFICATIONS 91 APPENDIX 105 GENERAL AND ELECTRICAL SAFETY PRECAUTIONS 106 CONTACTING ALIENWARE 109 5
CONTENTS CHAPTER 6: SYSTEM RECOVERY 85 Recovery Options 86 Dell DataSafe Local Backup 87 CHAPTER 7: SPECIFICATIONS 91 APPENDIX 105 GENERAL AND ELECTRICAL SAFETY PRECAUTIONS 106 CONTACTING ALIENWARE 109 5

Mobile Manual
Page 7
...have made certain that you to share your experience with your highperformance mobile is properly optimized and performs to either e-mail or call Alienware with any questions or concerns. We are thrilled to ensure that your new high-performance mobile with one single unwavering purpose: Build It... As If It Were Your Own. The Alienware technicians who have crafted your machine have tested your machine extensively in period, your system has been evaluated using your new machine meets...
...have made certain that you to share your experience with your highperformance mobile is properly optimized and performs to either e-mail or call Alienware with any questions or concerns. We are thrilled to ensure that your new high-performance mobile with one single unwavering purpose: Build It... As If It Were Your Own. The Alienware technicians who have crafted your machine have tested your machine extensively in period, your system has been evaluated using your new machine meets...

Mobile Manual
Page 10
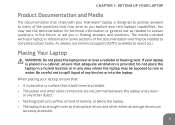
Read all safety and setup instructions before connecting your Alienware® M11x! Some of the most common items to check for include: • Laptop and AC adapter with power cable • Microsoft CD-key located at the ...
Read all safety and setup instructions before connecting your Alienware® M11x! Some of the most common items to check for include: • Laptop and AC adapter with power cable • Microsoft CD-key located at the ...
Mobile Manual
Page 11
... to rain or water. If your laptop is placed in any area where the laptop may be easily accessed. 11 The media included with your Alienware® laptop is referenced in some sections of the documentation and may be needed to answer questions in the future, or aid you in front...
... to rain or water. If your laptop is placed in any area where the laptop may be easily accessed. 11 The media included with your Alienware® laptop is referenced in some sections of the documentation and may be needed to answer questions in the future, or aid you in front...
Mobile Manual
Page 12
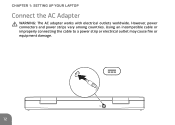
Using an incompatible cable or improperly connecting the cable to a power strip or electrical outlet may cause fire or equipment damage. 12 CHAPTER 1: SETTING UP YOUR LAPTOP Connect the AC Adapter WARNING: The AC adapter works with electrical outlets worldwide. However, power connectors and power strips vary among countries.
Using an incompatible cable or improperly connecting the cable to a power strip or electrical outlet may cause fire or equipment damage. 12 CHAPTER 1: SETTING UP YOUR LAPTOP Connect the AC Adapter WARNING: The AC adapter works with electrical outlets worldwide. However, power connectors and power strips vary among countries.
Mobile Manual
Page 13
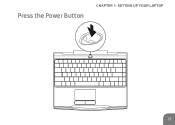
Press the Power Button CHAPTER 1: SETTING UP YOUR LAPTOP 13
Press the Power Button CHAPTER 1: SETTING UP YOUR LAPTOP 13
Mobile Manual
Page 14
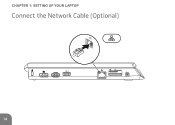
CHAPTER 1: SETTING UP YOUR LAPTOP Connect the Network Cable (Optional) 14
CHAPTER 1: SETTING UP YOUR LAPTOP Connect the Network Cable (Optional) 14

Mobile Manual
Page 15
... license agreements, setting preferences, and setting up Microsoft Windows. These steps are mandatory and may render your computer available at support.dell.com. To create a full system backup, see "Dell DataSafe Local Backup" on the operating system and features, see support.dell.com/MyNewDell. CAUTION: Do not interrupt the operating system's setup process.
... license agreements, setting preferences, and setting up Microsoft Windows. These steps are mandatory and may render your computer available at support.dell.com. To create a full system backup, see "Dell DataSafe Local Backup" on the operating system and features, see support.dell.com/MyNewDell. CAUTION: Do not interrupt the operating system's setup process.
Mobile Manual
Page 16
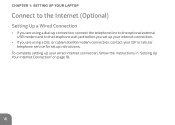
CHAPTER 1: SETTING UP YOUR LAPTOP Connect to the Internet (Optional) Setting Up a Wired Connection • If you set up your ISP or cellular telephone service for setup instructions. To complete setting up your Internet connection. • If you are using a dial-up connection, connect the telephone line to the optional external USB modem and to the telephone wall jack before you are using a DSL or cable/satellite modem connection, contact your wired Internet connection, follow the instructions in "Setting Up Your Internet Connection" on page 18. 16
CHAPTER 1: SETTING UP YOUR LAPTOP Connect to the Internet (Optional) Setting Up a Wired Connection • If you set up your ISP or cellular telephone service for setup instructions. To complete setting up your Internet connection. • If you are using a dial-up connection, connect the telephone line to the optional external USB modem and to the telephone wall jack before you are using a DSL or cable/satellite modem connection, contact your wired Internet connection, follow the instructions in "Setting Up Your Internet Connection" on page 18. 16

Mobile Manual
Page 17
Ensure that shipped with your router. In the search box, type network, and then click Network and Sharing Center→ Connect to complete the setup. 17 Click Start → Control Panel. 4. To set up your connection to your wireless router. Follow the instructions on your computer. 2. Before you can use your wireless Internet connection, you need to connect to a wireless router: 1. Save and close any open files, and exit any open programs. 3. CHAPTER 1: SETTING UP YOUR LAPTOP Setting Up a Wireless Connection NOTE: To set up your wireless router, see the documentation ...
Ensure that shipped with your router. In the search box, type network, and then click Network and Sharing Center→ Connect to complete the setup. 17 Click Start → Control Panel. 4. To set up your connection to your wireless router. Follow the instructions on your computer. 2. Before you can use your wireless Internet connection, you need to connect to a wireless router: 1. Save and close any open files, and exit any open programs. 3. CHAPTER 1: SETTING UP YOUR LAPTOP Setting Up a Wireless Connection NOTE: To set up your wireless router, see the documentation ...

Mobile Manual
Page 18
If you get one. 1. In the search box, type network, and then click Network and Sharing Center→ Set up a new connection or Network→ Connect to the Internet wizard can help you do not know which type of connection to the Internet but have a service outage. Have your ISP to check the service status, or try connecting again later. Save and close any open files, and exit any open programs. 2. The Connect to complete the setup. 18 Follow the instructions on the screen and use the setup information provided by country. NOTE: If you cannot connect to select, click Help...
If you get one. 1. In the search box, type network, and then click Network and Sharing Center→ Set up a new connection or Network→ Connect to the Internet wizard can help you do not know which type of connection to the Internet but have a service outage. Have your ISP to check the service status, or try connecting again later. Save and close any open files, and exit any open programs. 2. The Connect to complete the setup. 18 Follow the instructions on the screen and use the setup information provided by country. NOTE: If you cannot connect to select, click Help...

Mobile Manual
Page 19
CHAPTER 2: GETTING TO KNOW YOUR LAPTOP CHAPTER 2: GETTING TO KNOW YOUR LAPTOP
CHAPTER 2: GETTING TO KNOW YOUR LAPTOP CHAPTER 2: GETTING TO KNOW YOUR LAPTOP
Mobile Manual
Page 20
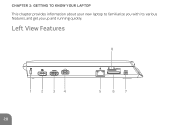
Left View Features 8 1 2 34 20 5 6 7 CHAPTER 2: GETTING TO KNOW YOUR LAPTOP This chapter provides information about your new laptop to familiarize you with its various features, and get you up and running quickly.
Left View Features 8 1 2 34 20 5 6 7 CHAPTER 2: GETTING TO KNOW YOUR LAPTOP This chapter provides information about your new laptop to familiarize you with its various features, and get you up and running quickly.

Mobile Manual
Page 21
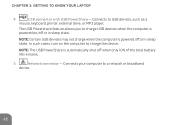
Attaches a commercially available security cable to a TV for both multi-channel digital audio and video signals. NOTE: For a monitor without built-in speakers, only the video signal will be read. 21 Connects to the computer. Connects your computer. 2 DisplayPort connector - NOTE: Before you buy a security cable, ensure that it fits into the security cable slot on your computer to external monitors and projectors with DisplayPort. 3 HDMI connector - CHAPTER 2: GETTING TO KNOW YOUR LAPTOP 1 Security cable slot -
Attaches a commercially available security cable to a TV for both multi-channel digital audio and video signals. NOTE: For a monitor without built-in speakers, only the video signal will be read. 21 Connects to the computer. Connects your computer. 2 DisplayPort connector - NOTE: Before you buy a security cable, ensure that it fits into the security cable slot on your computer to external monitors and projectors with DisplayPort. 3 HDMI connector - CHAPTER 2: GETTING TO KNOW YOUR LAPTOP 1 Security cable slot -
Mobile Manual
Page 22
In such cases, turn on /off or in sleep state. NOTE: The USB PowerShare is powered on the computer to USB devices, such as a mouse, keyboard, printer, external drive, or MP3 player. The USB Powershare feature allows you to a network or broadband device. 22 Connects to charge the device. NOTE: Certain USB devices may not charge when the computer is powered off when only 10% of the total battery life remains. 5 Network connector - CHAPTER 2: GETTING TO KNOW YOUR LAPTOP 4 USB connector with USB PowerShare - Connects your computer to charge USB devices when the computer ...
In such cases, turn on /off or in sleep state. NOTE: The USB PowerShare is powered on the computer to USB devices, such as a mouse, keyboard, printer, external drive, or MP3 player. The USB Powershare feature allows you to a network or broadband device. 22 Connects to charge the device. NOTE: Certain USB devices may not charge when the computer is powered off when only 10% of the total battery life remains. 5 Network connector - CHAPTER 2: GETTING TO KNOW YOUR LAPTOP 4 USB connector with USB PowerShare - Connects your computer to charge USB devices when the computer ...
Mobile Manual
Page 23
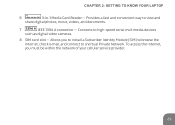
To access the Internet, you to install a Subscriber Identity Module (SIM) to browse the Internet, check e-mail, and connect to a Virtual Private Network. CHAPTER 2: GETTING TO KNOW YOUR LAPTOP 6 3-in-1 Media Card Reader - Allows you must be within the network of your cellular service provider. 23 Provides a fast and convenient way to high-speed serial multimedia devices such as digital video cameras. 8 SIM card slot - Connects to view and share digital photos, music, videos, and documents. 7 IEEE 1394 A connector -
To access the Internet, you to install a Subscriber Identity Module (SIM) to browse the Internet, check e-mail, and connect to a Virtual Private Network. CHAPTER 2: GETTING TO KNOW YOUR LAPTOP 6 3-in-1 Media Card Reader - Allows you must be within the network of your cellular service provider. 23 Provides a fast and convenient way to high-speed serial multimedia devices such as digital video cameras. 8 SIM card slot - Connects to view and share digital photos, music, videos, and documents. 7 IEEE 1394 A connector -

Mobile Manual
Page 24
Connect to a microphone or inputs signal for use with audio programs. 3 USB connectors (2) - CHAPTER 2: GETTING TO KNOW YOUR LAPTOP Right View Features 1 23 1 Audio out/Headphone connectors (2) - Connects to USB devices, such as a mouse, keyboard, printer, external drive, or MP3 player. 24 Connect to a pair of headphones or to a powered speaker or sound system. 2 Audio in/Microphone connector -
Connect to a microphone or inputs signal for use with audio programs. 3 USB connectors (2) - CHAPTER 2: GETTING TO KNOW YOUR LAPTOP Right View Features 1 23 1 Audio out/Headphone connectors (2) - Connects to USB devices, such as a mouse, keyboard, printer, external drive, or MP3 player. 24 Connect to a pair of headphones or to a powered speaker or sound system. 2 Audio in/Microphone connector -