
Alienware AW3423DW Monitor Users Guide
Page 3
... 9 Identifying parts and controls 10 Front view 10 Top view 11 Back view 11 Rear and bottom view 12 Monitor specifications 15 Resolution specifications 17 Supported video modes 17 HDMI preset display modes 17 Electrical specifications 19 Physical characteristics 20 Environmental characteristics 21 Pin assignments 22 Plug-and-Play capability 23 Universal Serial Bus (USB) interface 24 USB 3.2 Gen 1 (5 Gbps) upstream connector 24 USB 3.2 Gen 1 (5 Gbps) downstream connector 25 USB ports 25 QD-OLED monitor quality and pixel policy...
... 9 Identifying parts and controls 10 Front view 10 Top view 11 Back view 11 Rear and bottom view 12 Monitor specifications 15 Resolution specifications 17 Supported video modes 17 HDMI preset display modes 17 Electrical specifications 19 Physical characteristics 20 Environmental characteristics 21 Pin assignments 22 Plug-and-Play capability 23 Universal Serial Bus (USB) interface 24 USB 3.2 Gen 1 (5 Gbps) upstream connector 24 USB 3.2 Gen 1 (5 Gbps) downstream connector 25 USB ports 25 QD-OLED monitor quality and pixel policy...
Alienware AW3423DW Monitor Users Guide
Page 4
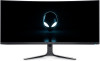
... Removing the monitor stand 36 Attaching the VESA adapter (optional 38 Operating the monitor 39 Turn on the monitor 39 Using the joystick 39 Using the On-Screen Display (OSD) menu 40 Accessing the Menu Launcher 40 Accessing the menu system 42 OSD warning message 57 Setting the maximum resolution 61 Using the tilt, swivel, and vertical extension 62 Tilt and swivel extensions 62 Vertical extension 62 Using AlienFX application 63 Prerequisites 63 Installing AWCC through Windows update...
... Removing the monitor stand 36 Attaching the VESA adapter (optional 38 Operating the monitor 39 Turn on the monitor 39 Using the joystick 39 Using the On-Screen Display (OSD) menu 40 Accessing the Menu Launcher 40 Accessing the menu system 42 OSD warning message 57 Setting the maximum resolution 61 Using the tilt, swivel, and vertical extension 62 Tilt and swivel extensions 62 Vertical extension 62 Using AlienFX application 63 Prerequisites 63 Installing AWCC through Windows update...
Alienware AW3423DW Monitor Users Guide
Page 9
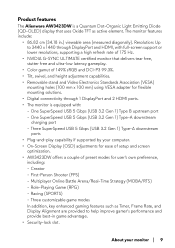
...-Screen Display (OSD) adjustments for ease of setup and screen optimization. • AW3423DW offers a couple of 149% sRGB and DCI-P3 99.3%. • Tilt, swivel, and height adjustment capabilities. • Removable stand and Video Electronics Standards Association (VESA) mounting holes (100 mm x 100 mm) using VESA adapter for user's own preference, including: - Resolution: Up to help improve gamer's performance and provide best-in .) viewable area (measured diagonally). One SuperSpeed USB 5 Gbps (USB 3.2 Gen 1) Type B upstream port...
...-Screen Display (OSD) adjustments for ease of setup and screen optimization. • AW3423DW offers a couple of 149% sRGB and DCI-P3 99.3%. • Tilt, swivel, and height adjustment capabilities. • Removable stand and Video Electronics Standards Association (VESA) mounting holes (100 mm x 100 mm) using VESA adapter for user's own preference, including: - Resolution: Up to help improve gamer's performance and provide best-in .) viewable area (measured diagonally). One SuperSpeed USB 5 Gbps (USB 3.2 Gen 1) Type B upstream port...

Alienware AW3423DW Monitor Users Guide
Page 10
Identifying parts and controls Front view Label Description Use 1 Cable-management slot (on and functioning normally. Solid blue light indicates that the monitor is in Standby Mode. • VESA DisplayHDR 400 True Black. • Optimize eye comfort with a flicker-free screen and low blue light feature. • The Monitor uses Low Blue Light panel and is compliant with LED indicator) To turn the monitor on . Blinking white light indicates that the monitor is designed to reduce the amount of blue light emitted...
Identifying parts and controls Front view Label Description Use 1 Cable-management slot (on and functioning normally. Solid blue light indicates that the monitor is in Standby Mode. • VESA DisplayHDR 400 True Black. • Optimize eye comfort with a flicker-free screen and low blue light feature. • The Monitor uses Low Blue Light panel and is compliant with LED indicator) To turn the monitor on . Blinking white light indicates that the monitor is designed to reduce the amount of blue light emitted...

Alienware AW3423DW Monitor Users Guide
Page 12
... stand from the monitor. Security-lock slot Secure the monitor with your monitor To organize the cables neatly. Label 1 2 3 4 5 6 Description Regulatory label Cable-management clips (2) Barcode, serial number, and Service Tag label Stand release button Cable-management slot (at the back of the stand) I /O ports. Rear and bottom view Rear and bottom view without monitor stand Label 1 2 Description Use Power connector Connect the power cable (shipped with a security lock (based on Kensington (security lock not included). Protects the I /O cover Use...
... stand from the monitor. Security-lock slot Secure the monitor with your monitor To organize the cables neatly. Label 1 2 3 4 5 6 Description Regulatory label Cable-management clips (2) Barcode, serial number, and Service Tag label Stand release button Cable-management slot (at the back of the stand) I /O ports. Rear and bottom view Rear and bottom view without monitor stand Label 1 2 Description Use Power connector Connect the power cable (shipped with a security lock (based on Kensington (security lock not included). Protects the I /O cover Use...

Alienware AW3423DW Monitor Users Guide
Page 15
... port does not support headphones. DisplayPort Connect your computer with one HDMI cable is shipped with your monitor: • DisplayPort-DisplayPort cable • Mini-DisplayPort-DisplayPort cable Line-out port Connect your monitor | 15 Monitor specifications Description Screen type Panel technology Aspect ratio Viewable image Diagonal: Width (active area) Height (active area) Total area Pixel pitch Pixel per inch (PPI) Viewing angle: Vertical Horizontal Luminance output Contrast ratio Faceplate coating Backlight Value Color Active Matrix QD OLED...
... port does not support headphones. DisplayPort Connect your computer with one HDMI cable is shipped with your monitor: • DisplayPort-DisplayPort cable • Mini-DisplayPort-DisplayPort cable Line-out port Connect your monitor | 15 Monitor specifications Description Screen type Panel technology Aspect ratio Viewable image Diagonal: Width (active area) Height (active area) Total area Pixel pitch Pixel per inch (PPI) Viewing angle: Vertical Horizontal Luminance output Contrast ratio Faceplate coating Backlight Value Color Active Matrix QD OLED...

Alienware AW3423DW Monitor Users Guide
Page 29
... to remove stain and dust. For best practices, follow the Safety instructions before cleaning the monitor. Maintenance guidelines Cleaning your monitor WARNING: Using improper methods when cleaning the monitor can result in the appearance of your monitor: • To clean the Dell monitor screen, lightly dampen a soft, clean cloth with water. About your monitor | 29 WARNING: Before cleaning the monitor, unplug the monitor power cable from the electrical outlet. This may cause changes in...
... to remove stain and dust. For best practices, follow the Safety instructions before cleaning the monitor. Maintenance guidelines Cleaning your monitor WARNING: Using improper methods when cleaning the monitor can result in the appearance of your monitor: • To clean the Dell monitor screen, lightly dampen a soft, clean cloth with water. About your monitor | 29 WARNING: Before cleaning the monitor, unplug the monitor power cable from the electrical outlet. This may cause changes in...

Alienware AW3423DW Monitor Users Guide
Page 33
... your monitor to work optimally with the lock. NOTE: If you are designed to a table using non-Dell cables. CAUTION: Do not plug the power cable into the wall outlet or turn on . The following image is attached. 9. The appearance of the lock may vary. Dell does not guarantee the video quality and performance when using the Kensington lock, connect the Kensington lock cable to the monitor. NOTE: The USB 3.2 Gen 1 (5 Gbps) cables are...
... your monitor to work optimally with the lock. NOTE: If you are designed to a table using non-Dell cables. CAUTION: Do not plug the power cable into the wall outlet or turn on . The following image is attached. 9. The appearance of the lock may vary. Dell does not guarantee the video quality and performance when using the Kensington lock, connect the Kensington lock cable to the monitor. NOTE: The USB 3.2 Gen 1 (5 Gbps) cables are...

Alienware AW3423DW Monitor Users Guide
Page 35
... does not display an image, see Common problems. Setting up the monitor | 35 Connect the other end of the USB 3.2 Gen 1 upstream cable to an appropriate USB 3.2 Gen 1 port on the monitor and the computer. Connect the USB peripherals to the computer: 1. NOTE: The images are for your monitor displays an image, installation is complete. The appearance of the procedures in this section, follow the Safety instructions. Plug the power cables for...
... does not display an image, see Common problems. Setting up the monitor | 35 Connect the other end of the USB 3.2 Gen 1 upstream cable to an appropriate USB 3.2 Gen 1 port on the monitor and the computer. Connect the USB peripherals to the computer: 1. NOTE: The images are for your monitor displays an image, installation is complete. The appearance of the procedures in this section, follow the Safety instructions. Plug the power cables for...

Alienware AW3423DW Monitor Users Guide
Page 36
... the display when removing the stand, ensure that was shipped with the stand. Disconnect the cables from any other source, follow the setup instructions that were included with your monitor. To remove the stand: 1. Turn off the monitor. 2. Place the monitor on a soft, clean surface. If you purchased from the monitor and slide them out through the cable-management slot on the stand riser. 36 | Setting up the monitor NOTE...
... the display when removing the stand, ensure that was shipped with the stand. Disconnect the cables from any other source, follow the setup instructions that were included with your monitor. To remove the stand: 1. Turn off the monitor. 2. Place the monitor on a soft, clean surface. If you purchased from the monitor and slide them out through the cable-management slot on the stand riser. 36 | Setting up the monitor NOTE...

Alienware AW3423DW Monitor Users Guide
Page 38
... the monitor panel on a soft cloth or cushion on the wall by following the instructions that come with the purchased wall-mount kit/3rd-party arm. Remove the monitor stand. (See Removing the monitor stand.) 3. b. NOTE: For use only with UL-listed wall mount bracket with this monitor. 1. Attaching the VESA adapter (optional) By installing the supplied VESA adapter onto the back of 27.68 kg. 38 | Setting up the monitor Attach the supplied VESA adapter to...
... the monitor panel on a soft cloth or cushion on the wall by following the instructions that come with the purchased wall-mount kit/3rd-party arm. Remove the monitor stand. (See Removing the monitor stand.) 3. b. NOTE: For use only with UL-listed wall mount bracket with this monitor. 1. Attaching the VESA adapter (optional) By installing the supplied VESA adapter onto the back of 27.68 kg. 38 | Setting up the monitor Attach the supplied VESA adapter to...
Alienware AW3423DW Monitor Users Guide
Page 41
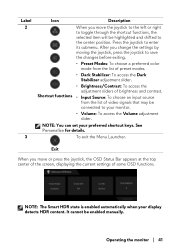
... Stabilizer adjustment slider. • Brightness/Contrast: To access the adjustment sliders of brightness and contrast. Operating the monitor | 41 Press the joystick to enter its submenu. Label 2 3 Icon Description When you change the settings by moving the joystick, press the joystick to save the changes before exiting. • Preset Modes: To choose a preferred color mode from the list of video signals that may be enabled manually. Exit...
... Stabilizer adjustment slider. • Brightness/Contrast: To access the adjustment sliders of brightness and contrast. Operating the monitor | 41 Press the joystick to enter its submenu. Label 2 3 Icon Description When you change the settings by moving the joystick, press the joystick to save the changes before exiting. • Preset Modes: To choose a preferred color mode from the list of video signals that may be enabled manually. Exit...
Alienware AW3423DW Monitor Users Guide
Page 43
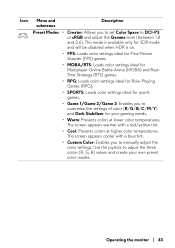
... color temperatures. Use the joystick to manually adjust the color settings. Icon Menu and submenus Description Preset Modes • Creator: Allows you to set Color Space to customize the settings of color (R/G/B/C/M/Y) and Dark Stabilizer for sports games. • Game 1/Game 2/Game 3: Enables you to adjust the three colors (R, G, B) values and create your gaming needs. • Warm: Presents colors at higher color temperatures. The screen appears warmer with a blue...
... color temperatures. Use the joystick to manually adjust the color settings. Icon Menu and submenus Description Preset Modes • Creator: Allows you to set Color Space to customize the settings of color (R/G/B/C/M/Y) and Dark Stabilizer for sports games. • Game 1/Game 2/Game 3: Enables you to adjust the three colors (R, G, B) values and create your gaming needs. • Warm: Presents colors at higher color temperatures. The screen appears warmer with a blue...
Alienware AW3423DW Monitor Users Guide
Page 54
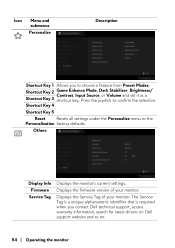
... 3 Game Enhance Mode, Dark Stabilizer, Brightness/ Contrast, Input Source, or Volume and set it as a shortcut key. Shortcut Key 4 Shortcut Key 5 Reset Resets all settings under the Personalize menu to confirm the selection. Displays the firmware version of your monitor. Displays the Service Tag of your monitor. Press the joystick to the Personalization factory defaults. Icon Menu and submenus Personalize Description Shortcut Key 1 Allows you contact Dell technical support, access warranty information...
... 3 Game Enhance Mode, Dark Stabilizer, Brightness/ Contrast, Input Source, or Volume and set it as a shortcut key. Shortcut Key 4 Shortcut Key 5 Reset Resets all settings under the Personalize menu to confirm the selection. Displays the firmware version of your monitor. Displays the Service Tag of your monitor. Press the joystick to the Personalization factory defaults. Icon Menu and submenus Personalize Description Shortcut Key 1 Allows you contact Dell technical support, access warranty information...
Alienware AW3423DW Monitor Users Guide
Page 61
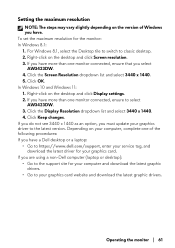
.... 2. Operating the monitor | 61 For Windows 8.1, select the Desktop tile to switch to https://www.dell.com/support, enter your service tag, and download the latest driver for your graphics card. Right-click on the desktop and click Display settings. 2. Click the Screen Resolution dropdown list and select 3440 x 1440. 5. In Windows 10 and Windows 11: 1. Click the Display Resolution dropdown list and select 3440 x 1440. 4. Click Keep changes.
.... 2. Operating the monitor | 61 For Windows 8.1, select the Desktop tile to switch to https://www.dell.com/support, enter your service tag, and download the latest driver for your graphics card. Right-click on the desktop and click Display settings. 2. Click the Screen Resolution dropdown list and select 3440 x 1440. 5. In Windows 10 and Windows 11: 1. Click the Display Resolution dropdown list and select 3440 x 1440. 4. Click Keep changes.
Alienware AW3423DW Monitor Users Guide
Page 63
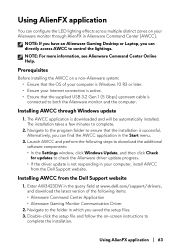
... the setup file and follow the on a non-Alienware system: • Ensure that the OS of the following steps to download the additional software components: • In the Settings window, click Windows Update, and then click Check for updates to check the Alienware driver update progress. • If the driver update is connected to control the lightings. Prerequisites Before installing the AWCC on -screen instructions to ensure that the supplied USB 3.2 Gen 1 (5 Gbps) upstream cable...
... the setup file and follow the on a non-Alienware system: • Ensure that the OS of the following steps to download the additional software components: • In the Settings window, click Windows Update, and then click Check for updates to check the Alienware driver update progress. • If the driver update is connected to control the lightings. Prerequisites Before installing the AWCC on -screen instructions to ensure that the supplied USB 3.2 Gen 1 (5 Gbps) upstream cable...

Alienware AW3423DW Monitor Users Guide
Page 73
... seconds. To run the built-in diagnostics only when the video cable is unplugged and the monitor is complete when the white screen appears. Press the joystick. The color of the screen). 2. To exit, press the joystick again. then turn on the surface of the screen changes to inspect the display in diagnostics: 1. 4. NOTE: You can run the built-in green, blue, black, and white screens.
... seconds. To run the built-in diagnostics only when the video cable is unplugged and the monitor is complete when the white screen appears. Press the joystick. The color of the screen). 2. To exit, press the joystick again. then turn on the surface of the screen changes to inspect the display in diagnostics: 1. 4. NOTE: You can run the built-in green, blue, black, and white screens.

Alienware AW3423DW Monitor Users Guide
Page 76
... the video cable connecting malfunctions on the application. • Adjust R/G/B value under Custom Color in the Game menu OSD. • Run the built-in diagnostics. Monitor • Ensure that the video cable connecting the monitor to the computer is connected properly and is secure. • Reset the monitor to factory settings. • Perform monitor self-test feature check to lower down the frequency (DP: the pictures 3440 x 1440 at 144 Hz, HDMI...
... the video cable connecting malfunctions on the application. • Adjust R/G/B value under Custom Color in the Game menu OSD. • Run the built-in diagnostics. Monitor • Ensure that the video cable connecting the monitor to the computer is connected properly and is secure. • Reset the monitor to factory settings. • Perform monitor self-test feature check to lower down the frequency (DP: the pictures 3440 x 1440 at 144 Hz, HDMI...

Alienware AW3423DW Monitor Users Guide
Page 77
... or desktop Troubleshooting | 77 The displayed Display will freeze, has Do not use a USB-C adapter or pictures appear black screen or display dock. No input signal No picture, the LED when user controls light is plugged in properly. The picture does not The picture cannot fill • Due to factory small screen, but does not fill settings. Product specific problems Specific symptoms What you experience Possible solutions Screen image is too Image is centered on Reset the monitor to different video formats...
... or desktop Troubleshooting | 77 The displayed Display will freeze, has Do not use a USB-C adapter or pictures appear black screen or display dock. No input signal No picture, the LED when user controls light is plugged in properly. The picture does not The picture cannot fill • Due to factory small screen, but does not fill settings. Product specific problems Specific symptoms What you experience Possible solutions Screen image is too Image is centered on Reset the monitor to different video formats...

Alienware AW3423DW Monitor Users Guide
Page 78
... Saver setting. See OLED Panel Maintenance. 78 | Troubleshooting Unevenness in Visible spots (bright or • Alternatively, use a dynamically luminance or color dark) or lines or Mura changing screensaver. Electromagnetic fields can cause the signal to remove it. These can be adjusted in for a long period of Pixel Refresh or Panel Refresh. A defective cable can cause screen flickering. Specific symptoms What you experience Possible solutions Screen flickering There are some • Use the native resolution...
... Saver setting. See OLED Panel Maintenance. 78 | Troubleshooting Unevenness in Visible spots (bright or • Alternatively, use a dynamically luminance or color dark) or lines or Mura changing screensaver. Electromagnetic fields can cause the signal to remove it. These can be adjusted in for a long period of Pixel Refresh or Panel Refresh. A defective cable can cause screen flickering. Specific symptoms What you experience Possible solutions Screen flickering There are some • Use the native resolution...


