
Owner's Manual
Page 10
71 System Setup 120 Overview 120 Entering System Setup 120 72 Flashing the BIOS 128 Contents | 10
71 System Setup 120 Overview 120 Entering System Setup 120 72 Flashing the BIOS 128 Contents | 10
Owner's Manual
Page 82
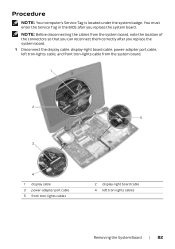
... 5 front tron-lights cables 2 display-light board cable 4 left tron-lights cables Removing the System Board | 82 You must enter the Service Tag in the BIOS after you replace the system board. 1 Disconnect the display cable, display-light board cable, power-adapter port cable, left tron-lights cable, and front tron...
... 5 front tron-lights cables 2 display-light board cable 4 left tron-lights cables Removing the System Board | 82 You must enter the Service Tag in the BIOS after you replace the system board. 1 Disconnect the display cable, display-light board cable, power-adapter port cable, left tron-lights cable, and front tron...

Owner's Manual
Page 86
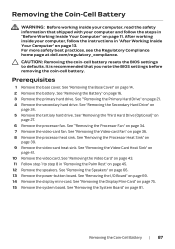
Entering the Service Tag in the BIOS 1 Turn on the computer. 2 Press during POST to enter the system setup program. 3 Navigate to the main tab and enter the Service Tag in the Service Tag field. Replacing the System Board | 86
Entering the Service Tag in the BIOS 1 Turn on the computer. 2 Press during POST to enter the system setup program. 3 Navigate to the main tab and enter the Service Tag in the Service Tag field. Replacing the System Board | 86
Owner's Manual
Page 87
...the speakers. See "Removing the Speakers" on page 13. For more safety best practices, see the Regulatory Compliance home page at dell.com/regulatory_compliance. After working inside your computer and follow the instructions in "Before Working Inside Your Computer" on page 34. 7 Remove ... 2 Remove the battery. Removing the Coin-Cell Battery WARNING: Before working inside your computer, read the safety information that you note the BIOS settings before removing the coin-cell battery. Prerequisites 1 Remove the base cover. See ""Removing the Processor Fan" on page 11. It is...
...the speakers. See "Removing the Speakers" on page 13. For more safety best practices, see the Regulatory Compliance home page at dell.com/regulatory_compliance. After working inside your computer and follow the instructions in "Before Working Inside Your Computer" on page 34. 7 Remove ... 2 Remove the battery. Removing the Coin-Cell Battery WARNING: Before working inside your computer, read the safety information that you note the BIOS settings before removing the coin-cell battery. Prerequisites 1 Remove the base cover. See ""Removing the Processor Fan" on page 11. It is...

Owner's Manual
Page 121
... the processor's L1 cache size. and down-arrow keys to your computer, including installed hardware, power conservation, and security features. Displays the BIOS version. Displays the type of the processor. As an option is highlighted, the Help Screen displays more information about each option listed in the...information for your computer. Press the up - Key Functions - Main Menu System Time (hh:mm:ss) System Date (mm/dd/yyyy) BIOS Version Product Name Service Tag Asset Tag CPU Type CPU Speed CPU ID CPU Cache L1 Cache Displays the system time. Information on the left...
... the processor's L1 cache size. and down-arrow keys to your computer, including installed hardware, power conservation, and security features. Displays the BIOS version. Displays the type of the processor. As an option is highlighted, the Help Screen displays more information about each option listed in the...information for your computer. Press the up - Key Functions - Main Menu System Time (hh:mm:ss) System Date (mm/dd/yyyy) BIOS Version Product Name Service Tag Asset Tag CPU Type CPU Speed CPU ID CPU Cache L1 Cache Displays the system time. Information on the left...

Owner's Manual
Page 123
... USB devices. Allows you to charge USB devices when the computer is running on battery. • Disabled: Disables USB PowerShare. This feature defines how the BIOS, in the absence of USB device (floppy, hard drive, or memory key) when this option is off or in auto mode. System Setup | 123...feature. Allows you to choose if the computer should display warning messages when you to set the touchpad backlight to be on the screen. Enabled: BIOS will detect unsupported AC adapters and display an error on or in standby mode. • AC Only: Charge USB devices when connected to AC ...
... USB devices. Allows you to charge USB devices when the computer is running on battery. • Disabled: Disables USB PowerShare. This feature defines how the BIOS, in the absence of USB device (floppy, hard drive, or memory key) when this option is off or in auto mode. System Setup | 123...feature. Allows you to choose if the computer should display warning messages when you to set the touchpad backlight to be on the screen. Enabled: BIOS will detect unsupported AC adapters and display an error on or in standby mode. • AC Only: Charge USB devices when connected to AC ...

Owner's Manual
Page 124
.... System Setup | 124 Flex Ratio Override Allows you to set the flex ratio override value. Non-Turbo Flex Support Allows you to disable or choose BIOS or cTDP. Long Duration PWR Limit Allows you to enable or disable this port for Windows debugging. Allows you to enable or disable non-turbo...
.... System Setup | 124 Flex Ratio Override Allows you to set the flex ratio override value. Non-Turbo Flex Support Allows you to disable or choose BIOS or cTDP. Long Duration PWR Limit Allows you to enable or disable this port for Windows debugging. Allows you to enable or disable non-turbo...
Owner's Manual
Page 128
...5 In the Operating System drop-down, select the operating system installed on your computer. 6 Click BIOS. 7 Click Download File to download the latest version of the Service Tag. Flashing the BIOS You may need to dell.com/support. 3 If you have your computer. 8 On the next page, select Single-file... download and click Continue. 9 Save the file and once the download is complete, navigate to allow automatic detection of the BIOS for your computer's Service ...
...5 In the Operating System drop-down, select the operating system installed on your computer. 6 Click BIOS. 7 Click Download File to download the latest version of the Service Tag. Flashing the BIOS You may need to dell.com/support. 3 If you have your computer. 8 On the next page, select Single-file... download and click Continue. 9 Save the file and once the download is complete, navigate to allow automatic detection of the BIOS for your computer's Service ...


