
Specifications
Page 17
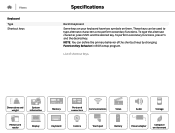
... Storage Media-card reader Display Keyboard Camera Touch pad Battery Power adapter Computer environment List of the shortcut keys by changing Function Key Behavior in BIOS setup program. Views Keyboard Type Shortcut keys Specifications Backlit keyboard Some keys on your keyboard have two symbols on them.
... Storage Media-card reader Display Keyboard Camera Touch pad Battery Power adapter Computer environment List of the shortcut keys by changing Function Key Behavior in BIOS setup program. Views Keyboard Type Shortcut keys Specifications Backlit keyboard Some keys on your keyboard have two symbols on them.

Service Manual
Page 11
BIOS setup program 136 Overview...136 Entering BIOS setup program 136 BIOS setup program options 136 Boot sequence 142 Boot options 142 Changing boot sequence for the current boot 143 Changing boot sequence for future boots 143 Flashing the BIOS 144 Getting help and contacting Alienware 145 Self-help resources 145 Contacting Alienware 145 11
BIOS setup program 136 Overview...136 Entering BIOS setup program 136 BIOS setup program options 136 Boot sequence 142 Boot options 142 Changing boot sequence for the current boot 143 Changing boot sequence for future boots 143 Flashing the BIOS 144 Getting help and contacting Alienware 145 Self-help resources 145 Contacting Alienware 145 11

Service Manual
Page 75
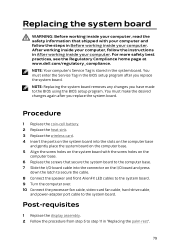
... working inside your computer. NOTE: Replacing the system board removes any changes you replace the system board. You must enter the Service Tag in the BIOS setup program after you have made to step 9 in "Removing the palm rest". 3 Remove the display assembly. You must make the desired changes again ... inside your computer. After working inside your computer, follow the steps in the system board. NOTE: Before disconnecting the cables from step 1 to the BIOS using the BIOS setup program. For more safety best practices, see the Regulatory Compliance home page at www...
... working inside your computer. NOTE: Replacing the system board removes any changes you replace the system board. You must enter the Service Tag in the BIOS setup program after you have made to step 9 in "Removing the palm rest". 3 Remove the display assembly. You must make the desired changes again ... inside your computer. After working inside your computer, follow the steps in the system board. NOTE: Before disconnecting the cables from step 1 to the BIOS using the BIOS setup program. For more safety best practices, see the Regulatory Compliance home page at www...
Service Manual
Page 79
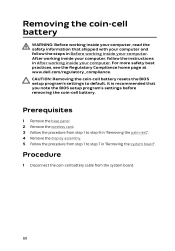
You must enter the Service Tag in the BIOS setup program after you have made to step 11 in After working inside your computer. You must make the desired changes again after you replace ... the palm rest". 79 For more safety best practices, see the Regulatory Compliance home page at www.dell.com/regulatory_compliance. Post-requisites 1 Replace the display assembly. 2 Follow the procedure from step 5 to the BIOS using the BIOS setup program. After working inside your computer, follow the steps in the system board. Replacing the...
You must enter the Service Tag in the BIOS setup program after you have made to step 11 in After working inside your computer. You must make the desired changes again after you replace ... the palm rest". 79 For more safety best practices, see the Regulatory Compliance home page at www.dell.com/regulatory_compliance. Post-requisites 1 Replace the display assembly. 2 Follow the procedure from step 5 to the BIOS using the BIOS setup program. After working inside your computer, follow the steps in the system board. Replacing the...
Service Manual
Page 88
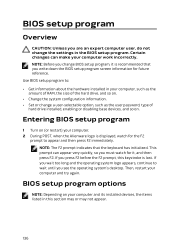
... rest". 4 Remove the display assembly. 5 Follow the procedure from the system board. 88 CAUTION: Removing the coin-cell battery resets the BIOS setup program's settings to step 9 in After working inside your computer. Procedure 1 Disconnect the coin-cell battery cable from step 1 to step...card. 3 Follow the procedure from step 1 to default. For more safety best practices, see the Regulatory Compliance home page at www.dell.com/regulatory_compliance. After working inside your computer, follow the steps in "Removing the system board". Removing the coin-cell battery WARNING: Before ...
... rest". 4 Remove the display assembly. 5 Follow the procedure from the system board. 88 CAUTION: Removing the coin-cell battery resets the BIOS setup program's settings to step 9 in After working inside your computer. Procedure 1 Disconnect the coin-cell battery cable from step 1 to step...card. 3 Follow the procedure from step 1 to default. For more safety best practices, see the Regulatory Compliance home page at www.dell.com/regulatory_compliance. After working inside your computer, follow the steps in "Removing the system board". Removing the coin-cell battery WARNING: Before ...
Service Manual
Page 136
... program to: • Get information about the hardware installed in your computer. 2 During POST, when the Alienware logo is displayed, watch for it is lost. Entering BIOS setup program 1 Turn on (or restart) your computer, such as the amount of RAM, the size of the hard drive, and so on. •...option, such as the user password, type of hard drive installed, enabling or disabling base devices, and so on your computer and try again. BIOS setup program options NOTE: Depending on . If you wait too long and the operating system logo appears, continue to appear and then press F2 ...
... program to: • Get information about the hardware installed in your computer. 2 During POST, when the Alienware logo is displayed, watch for it is lost. Entering BIOS setup program 1 Turn on (or restart) your computer, such as the amount of RAM, the size of the hard drive, and so on. •...option, such as the user password, type of hard drive installed, enabling or disabling base devices, and so on your computer and try again. BIOS setup program options NOTE: Depending on . If you wait too long and the operating system logo appears, continue to appear and then press F2 ...

Service Manual
Page 137
... the type of third hard-drive installed. Displays the service tag of secondary harddrive installed. Displays the type of your computer. Displays the BIOS version. Displays the processor L2 cache size. Displays the type of fifth hard-drive installed. Displays the type of hard-drive installed. Main... System Time System Date BIOS Version Product Name Service Tag Asset Tag CPU Type CPU Speed CPU ID L1 Cache L2 Cache L3 Cache Integrated Graphics Discrete Graphics 1...
... the type of third hard-drive installed. Displays the service tag of secondary harddrive installed. Displays the type of your computer. Displays the BIOS version. Displays the processor L2 cache size. Displays the type of fifth hard-drive installed. Displays the type of hard-drive installed. Main... System Time System Date BIOS Version Product Name Service Tag Asset Tag CPU Type CPU Speed CPU ID L1 Cache L2 Cache L3 Cache Integrated Graphics Discrete Graphics 1...
Service Manual
Page 138
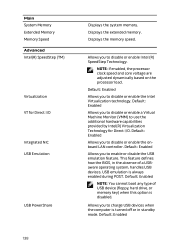
... in the absence of USB device (floppy, hard drive, or memory key) when this option is always enabled during POST. This feature defines how the BIOS, in standby mode. Displays the extended memory.
... in the absence of USB device (floppy, hard drive, or memory key) when this option is always enabled during POST. This feature defines how the BIOS, in standby mode. Displays the extended memory.

Service Manual
Page 141
Default: Not set Displays if the HDD password is absent. Displays a field to the BIOS setup program utility. The administrator password controls access to input the Service Tag manually when the Service Tag is clear or set . Allows you to ...
Default: Not set Displays if the HDD password is absent. Displays a field to the BIOS setup program utility. The administrator password controls access to input the Service Tag manually when the Service Tag is clear or set . Allows you to ...
Service Manual
Page 142
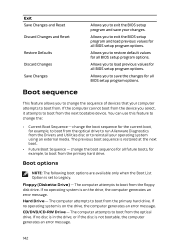
...program options. If no operating system is set to boot from the primary hard drive. Boot sequence This feature allows you to exit the BIOS setup program and load previous values for example, to Legacy. Hard Drive - Allows you to boot from . The computer attempts to ...to boot from the optical drive to change the boot sequence for the current boot, for all BIOS setup program options. change the: • Current Boot Sequence - Allows you to run Alienware Diagnostics from the primary hard drive. Boot options NOTE: The following boot options are available only ...
...program options. If no operating system is set to boot from the primary hard drive. Boot sequence This feature allows you to exit the BIOS setup program and load previous values for example, to Legacy. Hard Drive - Allows you to boot from . The computer attempts to ...to boot from the optical drive to change the boot sequence for the current boot, for all BIOS setup program options. change the: • Current Boot Sequence - Allows you to run Alienware Diagnostics from the primary hard drive. Boot options NOTE: The following boot options are available only ...
Service Manual
Page 143
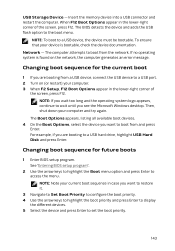
...appear in the lower-right corner of the screen, press F12. NOTE: To boot to access the menu. Changing boot sequence for future boots 1 Enter BIOS setup program. The Boot Options appears, listing all available boot devices. 4 On the Boot Options, select the device you see the Microsoft Windows desktop..... For example, if you want to boot from and press Enter. Network - If no operating system is bootable, check the device documentation. The BIOS detects the device and adds the USB flash option to a USB hard drive, highlight USB Hard Disk and press Enter. To ensure that your device...
...appear in the lower-right corner of the screen, press F12. NOTE: To boot to access the menu. Changing boot sequence for future boots 1 Enter BIOS setup program. The Boot Options appears, listing all available boot devices. 4 On the Boot Options, select the device you see the Microsoft Windows desktop..... For example, if you want to boot from and press Enter. Network - If no operating system is bootable, check the device documentation. The BIOS detects the device and adds the USB flash option to a USB hard drive, highlight USB Hard Disk and press Enter. To ensure that your device...
Service Manual
Page 144
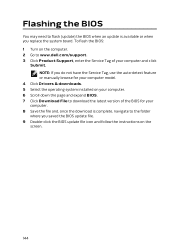
... latest version of your computer. 8 Save the file and, once the download is available or when you saved the BIOS update file. 9 Double-click the BIOS update file icon and follow the instructions on the computer. 2 Go to www.dell.com/support. 3 Click Product Support, enter the Service Tag of the... BIOS for your computer and click Submit. Flashing the BIOS You may need to flash (update) the BIOS when an update is complete, navigate to the folder where you ...
... latest version of your computer. 8 Save the file and, once the download is available or when you saved the BIOS update file. 9 Double-click the BIOS update file icon and follow the instructions on the computer. 2 Go to www.dell.com/support. 3 Click Product Support, enter the Service Tag of the... BIOS for your computer and click Submit. Flashing the BIOS You may need to flash (update) the BIOS when an update is complete, navigate to the folder where you ...


