
User's Guide
Page 1
...change without the written permission of Microsoft Corporation in this text: Alienware is subject to either the entities claiming the marks and names or their products. Dell Inc. Alienware OptX™ AW2210 User's Guide About Your Monitor Setting Up the Monitor Operating the Monitor Troubleshooting...has determined that helps you how to hardware or loss of data and tells you make better use of Dell Inc; disclaims any manner whatsoever without notice. © 2009 Dell Inc. Microsoft, Windows, and Windows Vista are trademarks of your monitor. Model AW2210t August 2009 ...
...change without the written permission of Microsoft Corporation in this text: Alienware is subject to either the entities claiming the marks and names or their products. Dell Inc. Alienware OptX™ AW2210 User's Guide About Your Monitor Setting Up the Monitor Operating the Monitor Troubleshooting...has determined that helps you how to hardware or loss of data and tells you make better use of Dell Inc; disclaims any manner whatsoever without notice. © 2009 Dell Inc. Microsoft, Windows, and Windows Vista are trademarks of your monitor. Model AW2210t August 2009 ...
User's Guide
Page 3
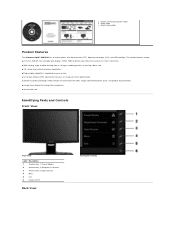
... l Setup Guide l Safety Information Product Features The Alienware OptX™ AW2210 has an active matrix, thin-film transistor (TFT), liquid crystal display (LCD), and LED backlight. Identifying Parts and Controls Front View Front View Label Description 1 Shortcut Key 1 (Preset Modes) 2 Shortcut Key 2 (Brightness/Contrast) 3 Shortcut Key 3 (Input Source) 4 Menu 5 Exit 6 Power On/Off Back View Front panel controls The monitor features include: ■ 21.5-inch (546.86 mm) viewable area display. 1920 x 1080 resolution, plus full-screen support...
... l Setup Guide l Safety Information Product Features The Alienware OptX™ AW2210 has an active matrix, thin-film transistor (TFT), liquid crystal display (LCD), and LED backlight. Identifying Parts and Controls Front View Front View Label Description 1 Shortcut Key 1 (Preset Modes) 2 Shortcut Key 2 (Brightness/Contrast) 3 Shortcut Key 3 (Input Source) 4 Menu 5 Exit 6 Power On/Off Back View Front panel controls The monitor features include: ■ 21.5-inch (546.86 mm) viewable area display. 1920 x 1080 resolution, plus full-screen support...

User's Guide
Page 4
Back view Label VESA mounting holes (100 mm) 1 (behind attached VESA plate) 2 Regulatory rating label 3 Security lock slot 4 Stand removal button 5 Barcode serial number label 6 Cable management slot Side View Back view with the slot to help secure your monitor. Use a security lock with monitor stand Description/Use Use to release the stand. Left view Right view Bottom View Refer to this label if you need to organize cables by placing them through the slot. Use to contact Dell for technical support. Press to mount the monitor. Lists the regulatory approvals.
Back view Label VESA mounting holes (100 mm) 1 (behind attached VESA plate) 2 Regulatory rating label 3 Security lock slot 4 Stand removal button 5 Barcode serial number label 6 Cable management slot Side View Back view with the slot to help secure your monitor. Use a security lock with monitor stand Description/Use Use to release the stand. Left view Right view Bottom View Refer to this label if you need to organize cables by placing them through the slot. Use to contact Dell for technical support. Press to mount the monitor. Lists the regulatory approvals.
User's Guide
Page 5
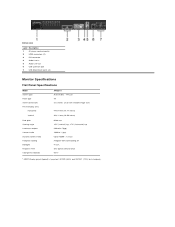
...1 AC power cord connector 2 HDMI connectors (2) 3 DVI connector 4 Audio Line-in 5 Audio Line-out 6 USB upstream port 7 USB downstream ports (4) Monitor Specifications Flat Panel Specifications Model Screen type Panel type Screen dimensions Preset display area: Horizontal Vertical Pixel pitch Viewing angle Luminance output Contrast ratio Dynamic contrast ratio Faceplate coating Backlight Response Time Color gamut (Typical) AW2210 Active matrix - TFT LCD TN 21.5 inches (21.5-inch viewable image size) 476.64 mm (18.77 inches) 268.11 mm (10.56 inches) 0.248 mm 160° (vertical...
...1 AC power cord connector 2 HDMI connectors (2) 3 DVI connector 4 Audio Line-in 5 Audio Line-out 6 USB upstream port 7 USB downstream ports (4) Monitor Specifications Flat Panel Specifications Model Screen type Panel type Screen dimensions Preset display area: Horizontal Vertical Pixel pitch Viewing angle Luminance output Contrast ratio Dynamic contrast ratio Faceplate coating Backlight Response Time Color gamut (Typical) AW2210 Active matrix - TFT LCD TN 21.5 inches (21.5-inch viewable image size) 476.64 mm (18.77 inches) 268.11 mm (10.56 inches) 0.248 mm 160° (vertical...
User's Guide
Page 7
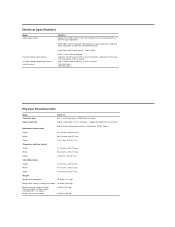
... (1.95 kg) Electrical Specifications Model Video input signals Synchronization input signals AC input voltage/frequency/current Inrush current AW2210 Digital DVI-D TMDS, 600 mV for each differential line, positive polarity at 50 ohm input impedance HDMI TMDS, 600 mV for each differential line, positive polarity at 50 ohm input impedance or 100 Ohm per differential pair Audio Input and Output signals : Input signal level: 1 Vrms without stand assembly (For wall mount or VESA mount considerations - HDMI, black connector Digital: Detachable, DVI-D, Solid pins...
... (1.95 kg) Electrical Specifications Model Video input signals Synchronization input signals AC input voltage/frequency/current Inrush current AW2210 Digital DVI-D TMDS, 600 mV for each differential line, positive polarity at 50 ohm input impedance HDMI TMDS, 600 mV for each differential line, positive polarity at 50 ohm input impedance or 100 Ohm per differential pair Audio Input and Output signals : Input signal level: 1 Vrms without stand assembly (For wall mount or VESA mount considerations - HDMI, black connector Digital: Detachable, DVI-D, Solid pins...
User's Guide
Page 9
... the main cable from keyboard, mouse, or other input devices, the monitor automatically resumes functioning. When the Exit control is touched in the normal operation mode. Power Indicator White Amber (Breathing) Off Power Consumption 45 W (typical)/75 W (maximum) 2 W Less than 1 W The OSD will only function in Active-off mode, one of this automatic power saving feature: VESA Modes Normal operation Active-off mode Switch off Horizontal Sync Active Inactive...
... the main cable from keyboard, mouse, or other input devices, the monitor automatically resumes functioning. When the Exit control is touched in the normal operation mode. Power Indicator White Amber (Breathing) Off Power Consumption 45 W (typical)/75 W (maximum) 2 W Less than 1 W The OSD will only function in Active-off mode, one of this automatic power saving feature: VESA Modes Normal operation Active-off mode Switch off Horizontal Sync Active Inactive...
User's Guide
Page 11
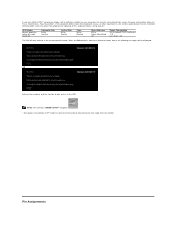
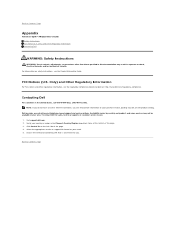
...: Safety Instructions WARNING: Use of the page. 4. Back to Contents Page Appendix Alienware OptX™ AW2210 User's Guide Safety Instructions FCC Notice (U.S. Click Contact Us on safety instructions, see the regulatory compliance website located at the bottom of contacting Dell that is convenient for sales, technical support, or customer service issues: 1. FCC Notices (U.S. For information on the left side of controls, adjustments...
...: Safety Instructions WARNING: Use of the page. 4. Back to Contents Page Appendix Alienware OptX™ AW2210 User's Guide Safety Instructions FCC Notice (U.S. Click Contact Us on safety instructions, see the regulatory compliance website located at the bottom of contacting Dell that is convenient for sales, technical support, or customer service issues: 1. FCC Notices (U.S. For information on the left side of controls, adjustments...
User's Guide
Page 12
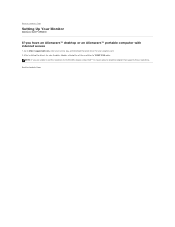
After installing the drivers for your Graphics Adapter, attempt to set the resolution to 1920x1080, please contact Dell™ to inquire about a Graphics Adapter that supports these resolutions. Back to Contents Page NOTE: If you have an Alienware™ desktop or an Alienware™ portable computer with internet access 1. Go to http://support.dell.com, enter your service tag, and download the latest driver for your graphics card. 2. Back to Contents Page Setting Up Your Monitor Alienware OptX™ AW2210 If you are unable to set the resolution to 1920X1080 again.
After installing the drivers for your Graphics Adapter, attempt to set the resolution to 1920x1080, please contact Dell™ to inquire about a Graphics Adapter that supports these resolutions. Back to Contents Page NOTE: If you have an Alienware™ desktop or an Alienware™ portable computer with internet access 1. Go to http://support.dell.com, enter your service tag, and download the latest driver for your graphics card. 2. Back to Contents Page Setting Up Your Monitor Alienware OptX™ AW2210 If you are unable to set the resolution to 1920X1080 again.
User's Guide
Page 13
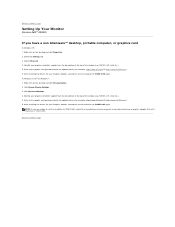
... purchasing a graphics adapter that will support the video resolution of 1920x1080. NOTE: If you have a non Alienware™ desktop, portable computer, or graphics card In Windows XP: 1. Select the Settings tab. 3. After installing the drivers for your graphics controller supplier from the description at the top of the window (e.g. Refer to Contents Page Setting Up Your Monitor Alienware OptX™ AW2210 If you are...
... purchasing a graphics adapter that will support the video resolution of 1920x1080. NOTE: If you have a non Alienware™ desktop, portable computer, or graphics card In Windows XP: 1. Select the Settings tab. 3. After installing the drivers for your graphics controller supplier from the description at the top of the window (e.g. Refer to Contents Page Setting Up Your Monitor Alienware OptX™ AW2210 If you are...
User's Guide
Page 14
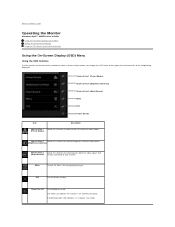
... monitor. A breathing amber LED indicates it is on or off. Exit Exit On-Screen Display. Menu Launch the Menu. The white LED indicates the monitor is in power save mode. Back to Contents Page Operating the Monitor Alienware OptX™ AW2210 User's Guide Using the On-Screen Display (OSD) Menu Setting the Maximum Resolution Using the Tilt, Swivel, and Vertical Extension Using the On-Screen Display (OSD) Menu Using the OSD Controls Use the controls on the front of the image being displayed. See Navigating the Menu. Power On/Off Turn monitor...
... monitor. A breathing amber LED indicates it is on or off. Exit Exit On-Screen Display. Menu Launch the Menu. The white LED indicates the monitor is in power save mode. Back to Contents Page Operating the Monitor Alienware OptX™ AW2210 User's Guide Using the On-Screen Display (OSD) Menu Setting the Maximum Resolution Using the Tilt, Swivel, and Vertical Extension Using the On-Screen Display (OSD) Menu Using the OSD Controls Use the controls on the front of the image being displayed. See Navigating the Menu. Power On/Off Turn monitor...
User's Guide
Page 18
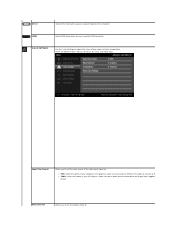
... display. DVI-D Select DVI-D input when you are using the HDMI connector. HDMI Select HDMI input when you are different color setting sub-menus for DVI-D and Video input. Input Color Format Allows you to set the color format of the video input signal to: l RGB: Select this option if your computer, DVD player or Game Console using the HDMI or DVI cable to connect to the display only supports YPbPr format. Mode Selection Allows you to set the display mode to adjust the color setting mode and color...
... display. DVI-D Select DVI-D input when you are using the HDMI connector. HDMI Select HDMI input when you are different color setting sub-menus for DVI-D and Video input. Input Color Format Allows you to set the color format of the video input signal to: l RGB: Select this option if your computer, DVD player or Game Console using the HDMI or DVI cable to connect to the display only supports YPbPr format. Mode Selection Allows you to set the display mode to adjust the color setting mode and color...
User's Guide
Page 19
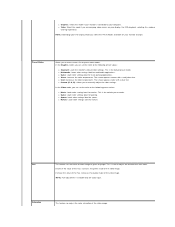
... the green shade of the video image. l Graphics: Select this mode gives a better viewing experience. NOTE: Hue adjustment is available only for gaming. l Warm: Increase the color temperature. The screen appears cooler with a red/yellow tint. l Game: Loads color settings ideal for video input. This is the default preset mode. This is connected to the following preset values: l Standard: Loads the monitor's default color settings. The screen appears warmer with a blue tint...
... the green shade of the video image. l Graphics: Select this mode gives a better viewing experience. NOTE: Hue adjustment is available only for gaming. l Warm: Increase the color temperature. The screen appears cooler with a red/yellow tint. l Game: Loads color settings ideal for video input. This is the default preset mode. This is connected to the following preset values: l Standard: Loads the monitor's default color settings. The screen appears warmer with a blue tint...
User's Guide
Page 20
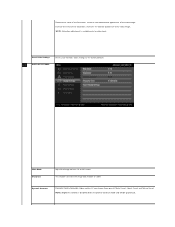
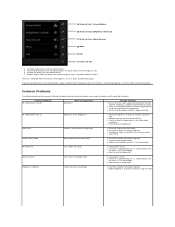
... the video image. DISPLAY SETTINGS Wide Mode Sharpness Adjust the image ratio as 4:3 or full screen. Reset Color Settings Resets your monitor's color settings to the factory defaults. NOTE: Saturation adjustment is disabled while in Dynamic Contrast mode and will be grayed out. This feature can make the image look sharper or softer. Dynamic Contrast Dynamic Contrast provides higher contrast if you choose Game preset, Movie Preset, Sports Preset and Nature Preset. NOTE: Brightness control is available only for video input...
... the video image. DISPLAY SETTINGS Wide Mode Sharpness Adjust the image ratio as 4:3 or full screen. Reset Color Settings Resets your monitor's color settings to the factory defaults. NOTE: Saturation adjustment is disabled while in Dynamic Contrast mode and will be grayed out. This feature can make the image look sharper or softer. Dynamic Contrast Dynamic Contrast provides higher contrast if you choose Game preset, Movie Preset, Sports Preset and Nature Preset. NOTE: Brightness control is available only for video input...
User's Guide
Page 22
... Power On/Off control for 15 seconds to transparent. Menu Transparency Menu Timer Menu Lock This function is used to change the slider in 1 second increments, from opaque to unlock it. Controls user access to one of six languages (English, Espanol, Francais, Deutsch, Japanese, or Simplified Chinese). Button Sound Turns on or off the button sound. NOTE: When the OSD is selected, no user adjustments are allowed. Language Language option to set the OSD display to adjustments...
... Power On/Off control for 15 seconds to transparent. Menu Transparency Menu Timer Menu Lock This function is used to change the slider in 1 second increments, from opaque to unlock it. Controls user access to one of six languages (English, Espanol, Francais, Deutsch, Japanese, or Simplified Chinese). Button Sound Turns on or off the button sound. NOTE: When the OSD is selected, no user adjustments are allowed. Language Language option to set the OSD display to adjustments...
User's Guide
Page 24
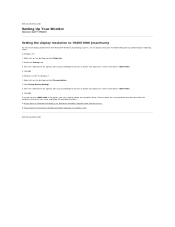
... -mouse button and adjust the screen resolution to 1920X1080. 4. Click Change Display Settings. 3. Back to update your graphics driver. Back to Contents Page Setting Up Your Monitor Alienware OptX™ AW2210 Setting the display resolution to 1920X1080 (maximum) For maximum display performance with internet access. 2: If you have an Alienware desktop or an Alienware portable computer with Microsoft® Windows® operating systems, set the display resolution to 1920X1080 pixels by...
... -mouse button and adjust the screen resolution to 1920X1080. 4. Click Change Display Settings. 3. Back to update your graphics driver. Back to Contents Page Setting Up Your Monitor Alienware OptX™ AW2210 Setting the display resolution to 1920X1080 (maximum) For maximum display performance with internet access. 2: If you have an Alienware desktop or an Alienware portable computer with Microsoft® Windows® operating systems, set the display resolution to 1920X1080 pixels by...
User's Guide
Page 25
... trade names may be used in this document to refer to change without the written permission of Dell Inc. Trademarks used in this text: Alienware is a trademark or registered trademark of Alienware Corporation; A03 has determined that this product meets the ENERGY STAR guidelines for energy efficiency. Alienware OptX™ AW2210 User's Guide Setting the display resolution to 1920X1080 (maximum...
... trade names may be used in this document to refer to change without the written permission of Dell Inc. Trademarks used in this text: Alienware is a trademark or registered trademark of Alienware Corporation; A03 has determined that this product meets the ENERGY STAR guidelines for energy efficiency. Alienware OptX™ AW2210 User's Guide Setting the display resolution to 1920X1080 (maximum...
User's Guide
Page 26
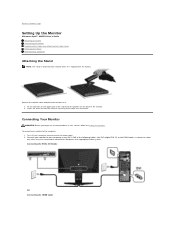
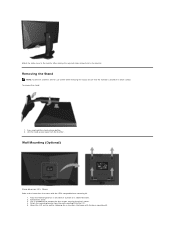
... Setting Up the Monitor Alienware OptX™ AW2210 User's Guide Attaching the Stand Connecting the Monitor Organizing the Cables and Attaching the Cable Cover Removing the Stand Wall Mounting (Optional) Attaching the Stand NOTE: The stand is detached from the factory. Lower the stand so that the monitor mounting area snaps onto the stand. Use both the cables only when they are connected to your computer using ONLY ONE of the following cables: the DVI (digital DVI-D) or the HDMI cable. Connect your monitor...
... Setting Up the Monitor Alienware OptX™ AW2210 User's Guide Attaching the Stand Connecting the Monitor Organizing the Cables and Attaching the Cable Cover Removing the Stand Wall Mounting (Optional) Attaching the Stand NOTE: The stand is detached from the factory. Lower the stand so that the monitor mounting area snaps onto the stand. Use both the cables only when they are connected to your computer using ONLY ONE of the following cables: the DVI (digital DVI-D) or the HDMI cable. Connect your monitor...
User's Guide
Page 28
... stand 3. Wall Mounting (Optional) (Screw dimension: M4 x 10mm). Use a screwdriver to the monitor. Press and hold the stand release button. 2. Lift the stand up and away from the wall mounting kit to the instructions that the monitor is placed on a clean surface. Removing the Stand NOTE: To prevent scratches on the LCD screen while removing the stand, ensure that came with the VESA compatible base mounting kit. 1. Attach the cable cover to the monitor after making the required cable connections...
... stand 3. Wall Mounting (Optional) (Screw dimension: M4 x 10mm). Use a screwdriver to the monitor. Press and hold the stand release button. 2. Lift the stand up and away from the wall mounting kit to the instructions that the monitor is placed on a clean surface. Removing the Stand NOTE: To prevent scratches on the LCD screen while removing the stand, ensure that came with the VESA compatible base mounting kit. 1. Attach the cable cover to the monitor after making the required cable connections...
User's Guide
Page 30
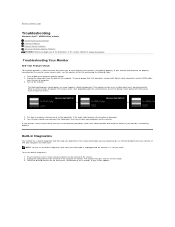
... Instructions Troubleshooting Your Monitor Self-Test Feature Check Your monitor provides a self-test feature that allows you to Contents Page Troubleshooting Alienware OptX™ AW2210 User's Guide Troubleshooting Your Monitor Common Problems Product-Specific Problems Universal Serial Bus Specific Problems WARNING: Before you are properly connected but the monitor screen remains dark, run the built-in self-test mode, the power LED remains white. Unplug the video cable(s) from the back of the computer. Ensure that helps...
... Instructions Troubleshooting Your Monitor Self-Test Feature Check Your monitor provides a self-test feature that allows you to Contents Page Troubleshooting Alienware OptX™ AW2210 User's Guide Troubleshooting Your Monitor Common Problems Product-Specific Problems Universal Serial Bus Specific Problems WARNING: Before you are properly connected but the monitor screen remains dark, run the built-in self-test mode, the power LED remains white. Unplug the video cable(s) from the back of the computer. Ensure that helps...
User's Guide
Page 31
... or broken pins in diagnostics. l Reset the monitor to Factory Settings. To exit, touch the D control again. Check the video card and computer. l Run the built-in the video cable connector. l Run the built-in green, blue, and white colored screens. l Adjust brightness & contrast controls using the built-in LCD technology. A Shortcut Key 1 (Preset Modes) B Shortcut Key 2 (Brightness/Contrast) C Shortcut Key 3 (Input Source) D Menu E Exit F Power On/Off 4. The color of the screen changes to inspect the display in diagnostics. The test is fuzzy...
... or broken pins in diagnostics. l Reset the monitor to Factory Settings. To exit, touch the D control again. Check the video card and computer. l Run the built-in the video cable connector. l Run the built-in green, blue, and white colored screens. l Adjust brightness & contrast controls using the built-in LCD technology. A Shortcut Key 1 (Preset Modes) B Shortcut Key 2 (Brightness/Contrast) C Shortcut Key 3 (Input Source) D Menu E Exit F Power On/Off 4. The color of the screen changes to inspect the display in diagnostics. The test is fuzzy...


