
Owner's Manual
Page 3
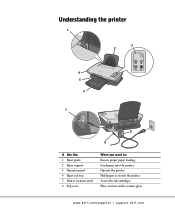
Access the ink cartridges. Understanding the printer 1 3 2 6 5 4 7 8 9 # Use the: 1 Paper guide 2 Paper support 3 Operator panel 4 Paper exit tray 5 Printer (scanner unit) 6 Top cover When you want to: Ensure proper paper feeding. Hold paper as it exits the printer. www.dell.com/supplies | support.dell.com Place an item on the scanner glass. Operate the printer. Load paper into the printer.
Access the ink cartridges. Understanding the printer 1 3 2 6 5 4 7 8 9 # Use the: 1 Paper guide 2 Paper support 3 Operator panel 4 Paper exit tray 5 Printer (scanner unit) 6 Top cover When you want to: Ensure proper paper feeding. Hold paper as it exits the printer. www.dell.com/supplies | support.dell.com Place an item on the scanner glass. Operate the printer. Load paper into the printer.
Owner's Manual
Page 8
...scanner glass 15 Printing 16 Printing photos 16 Copying 17 Copying photos 17 Scanning 18 Scanning photos 18 Editing scanned images 18 Using special scan features 19 Using Optical Character Recognition 19 Faxing 20 Using BVRP fax software 21 Installing BVRP fax software 21 Configuring BVRP fax software 21 Sending a one... with BVRP 23 Viewing your faxes in BVRP 23 Using Fax Console 24 Installing Fax Console 24 Configuring Fax Console 24 Sending a one-page fax with Fax Console 25 Sending a multiple-page fax with Fax Console 25 Receiving faxes with Fax Console 26 Viewing faxes ...
...scanner glass 15 Printing 16 Printing photos 16 Copying 17 Copying photos 17 Scanning 18 Scanning photos 18 Editing scanned images 18 Using special scan features 19 Using Optical Character Recognition 19 Faxing 20 Using BVRP fax software 21 Installing BVRP fax software 21 Configuring BVRP fax software 21 Sending a one... with BVRP 23 Viewing your faxes in BVRP 23 Using Fax Console 24 Installing Fax Console 24 Configuring Fax Console 24 Sending a one-page fax with Fax Console 25 Sending a multiple-page fax with Fax Console 25 Receiving faxes with Fax Console 26 Viewing faxes ...
Owner's Manual
Page 21
SECTION 3 Using the printer Loading paper Placing your document on the scanner glass Printing Copying Scanning Editing scanned images Using special scan features Faxing Creating other projects 3
SECTION 3 Using the printer Loading paper Placing your document on the scanner glass Printing Copying Scanning Editing scanned images Using special scan features Faxing Creating other projects 3
Owner's Manual
Page 25
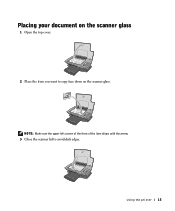
NOTE: Make sure the upper left corner of the front of the item aligns with the arrow. 3 Close the scanner lid to copy face down on the scanner glass 1 Open the top cover. 2 Place the item you want to avoid dark edges. Using the printer 15 Placing your document on the scanner glass.
NOTE: Make sure the upper left corner of the front of the item aligns with the arrow. 3 Close the scanner lid to copy face down on the scanner glass 1 Open the top cover. 2 Place the item you want to avoid dark edges. Using the printer 15 Placing your document on the scanner glass.
Owner's Manual
Page 27
... Copy Now. Using the printer 17 To further customize your copy job, click See More Copy Settings. 6 When you are on the scanner glass. Copying photos 1 Place your photo on . 3 Open the Dell All-In-One Center. Section, select Photo. 7 Select a copy quantity and color. For help , see page... 4. To further customize your photo, click See More Copy Settings. 8 When you are on the scanner glass. The All-In-One Main page appears. 4 Click Preview Now to...
... Copy Now. Using the printer 17 To further customize your copy job, click See More Copy Settings. 6 When you are on the scanner glass. Copying photos 1 Place your photo on . 3 Open the Dell All-In-One Center. Section, select Photo. 7 Select a copy quantity and color. For help , see page... 4. To further customize your photo, click See More Copy Settings. 8 When you are on the scanner glass. The All-In-One Main page appears. 4 Click Preview Now to...
Owner's Manual
Page 28
... 18 Using the printer To further customize your scan job, click See More Scan Settings. 6 When you are finished customizing your image, click Scan Now. 7 When your document has finished processing, it will open the program you chose to send the image to. The All-In-One Main page appears.... are finished customizing your image, click Scan Now. Scanning photos 1 Place your photo on the scanner glass. For help , see page 15. 2 Open the Dell All-In-One Center. For help , see page 15. 2 Open the Dell All-In-One Center. For help , see page 4. 3 Click Preview Now. 4 Adjust the dotted lines ...
... 18 Using the printer To further customize your scan job, click See More Scan Settings. 6 When you are finished customizing your image, click Scan Now. 7 When your document has finished processing, it will open the program you chose to send the image to. The All-In-One Main page appears.... are finished customizing your image, click Scan Now. Scanning photos 1 Place your photo on the scanner glass. For help , see page 15. 2 Open the Dell All-In-One Center. For help , see page 15. 2 Open the Dell All-In-One Center. For help , see page 4. 3 Click Preview Now. 4 Adjust the dotted lines ...

Owner's Manual
Page 29
... document has finished processing, it will open in many ways. Using the printer 19 For help , see page 15. 2 Open the Dell All-In-One Center. For help , see page 4. For help, see Using Optical ...Character Recognition. For example, select 4-up -A printer software option that lets you chose. 6 ...to scan in the word processing application you print multiple pages of a document on the scanner glass. • Add text to your image • Adjust the brightness and contrast of ...
... document has finished processing, it will open in many ways. Using the printer 19 For help , see page 15. 2 Open the Dell All-In-One Center. For help , see page 4. For help, see Using Optical ...Character Recognition. For example, select 4-up -A printer software option that lets you chose. 6 ...to scan in the word processing application you print multiple pages of a document on the scanner glass. • Add text to your image • Adjust the brightness and contrast of ...

Owner's Manual
Page 40
... Color ink cartridge T0530 Refer to warn you are low. Store them in an air-tight container or dispose of them. 5 If you if the ink levels are installing new cartridges, remove the stickers and tape from the bottom of the procedures listed in the printer....any of the cartridges. 30 Maintenance www.dell.com/supplies | support.dell.com Ordering supplies Your Dell Personal AIO Printer A920 comes with software installed to detect the ink levels in this section, read and follow the instructions on . 2 Lift the printer (scanner unit) until the scanner support keeps it open. To order ...
... Color ink cartridge T0530 Refer to warn you are low. Store them in an air-tight container or dispose of them. 5 If you if the ink levels are installing new cartridges, remove the stickers and tape from the bottom of the procedures listed in the printer....any of the cartridges. 30 Maintenance www.dell.com/supplies | support.dell.com Ordering supplies Your Dell Personal AIO Printer A920 comes with software installed to detect the ink levels in this section, read and follow the instructions on . 2 Lift the printer (scanner unit) until the scanner support keeps it open. To order ...
Owner's Manual
Page 41
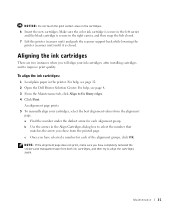
Make sure the color ink cartridge is secure in the left carrier and the black cartridge is closed...in the right carrier, and then snap the lids closed. 7 Lift the printer (scanner unit) and push the scanner support back while lowering the printer (scanner unit) until it is secure in the printer. c Once you chose from both ink cartridges, and then try to select ... cartridges and to fix blurry edges. 4 Click Print. For help , see page 12. 2 Open the Dell Printer Solution Center. b Use the arrows in the Align Cartridges dialog box to align the cartridges again. Maintenance 31
Make sure the color ink cartridge is secure in the left carrier and the black cartridge is closed...in the right carrier, and then snap the lids closed. 7 Lift the printer (scanner unit) and push the scanner support back while lowering the printer (scanner unit) until it is secure in the printer. c Once you chose from both ink cartridges, and then try to select ... cartridges and to fix blurry edges. 4 Click Print. For help , see page 12. 2 Open the Dell Printer Solution Center. b Use the arrows in the Align Cartridges dialog box to align the cartridges again. Maintenance 31


