User Guide
Page 1
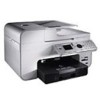
... in any proprietary interest in applicable FAR provisions: Dell Inc., One Dell Way, Round Rock, Texas, 78682, USA. Finding Information Faxing About Your Printer Understanding the Software Understanding the Operator Installing the Dell 966 Internal Panel Menus Wireless/Ethernet Adapter Loading Paper and... than its own. Other trademarks and trade names may be used by phone. Dell™ Photo All-In-One Printer 966 User's Guide To order ink or supplies from Dell: 1. UNITED STATES GOVERNMENT RESTRICTED RIGHTS This software and documentation are registered trademarks of...
... in any proprietary interest in applicable FAR provisions: Dell Inc., One Dell Way, Round Rock, Texas, 78682, USA. Finding Information Faxing About Your Printer Understanding the Software Understanding the Operator Installing the Dell 966 Internal Panel Menus Wireless/Ethernet Adapter Loading Paper and... than its own. Other trademarks and trade names may be used by phone. Dell™ Photo All-In-One Printer 966 User's Guide To order ink or supplies from Dell: 1. UNITED STATES GOVERNMENT RESTRICTED RIGHTS This software and documentation are registered trademarks of...
User Guide
Page 9
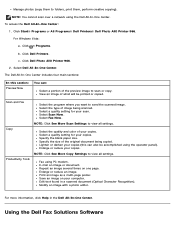
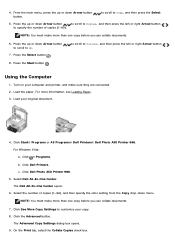
... your computer modem is on the same phone line that you are connected. Click Start® Programs or All Programs® Dell Printers® Dell Photo AIO Printer 966. Sending a Fax Using the Operator Panel 1. Press the Start button . Use the keypad to an active analog telephone line...see Loading Paper. 3. For more information, see Entering a Fax Number. 6. For Windows Vista: a. Sending a Fax Using the Dell All-In-One Center 1. Click Dell Printers. If you must also have DSL broadband service on and connected to an active telephone line. 2. (On Hook) enter 200. Make...
... your computer modem is on the same phone line that you are connected. Click Start® Programs or All Programs® Dell Printers® Dell Photo AIO Printer 966. Sending a Fax Using the Operator Panel 1. Press the Start button . Use the keypad to an active analog telephone line...see Loading Paper. 3. For more information, see Entering a Fax Number. 6. For Windows Vista: a. Sending a Fax Using the Dell All-In-One Center 1. Click Dell Printers. If you must also have DSL broadband service on and connected to an active telephone line. 2. (On Hook) enter 200. Make...

User Guide
Page 10
.... 3. to scroll to enter the next fax number. 7. Use the keypad to Fax, and then press the Select button 4. Click Dell Photo AIO Printer 966. 4. The Dell All-In-One Center opens. 5. With the file open, click File® Print. In the Productivity Tools section, click Fax an image, and follow... the instructions on and connected to the next fax number field. 6. NOTE: One of the questions on the screen asks if there...
.... 3. to scroll to enter the next fax number. 7. Use the keypad to Fax, and then press the Select button 4. Click Dell Photo AIO Printer 966. 4. The Dell All-In-One Center opens. 5. With the file open, click File® Print. In the Productivity Tools section, click Fax an image, and follow... the instructions on and connected to the next fax number field. 6. NOTE: One of the questions on the screen asks if there...
User Guide
Page 16
... 2-Sided Print menu item, press the right or left or right Arrow button to configure the printer's fax settings from the Edit Fax Settings menu and Fax Setup menu. Click Dell Photo AIO Printer 966. 2. If you have purchased and installed the optional paper tray, you want to choose an ...scroll to all fax jobs. For example, you are using your computer. 1. Click Start® Programs or All Programs® Dell Printers® Dell Photo AIO Printer 966. Printing a Fax on the Edit Fax Settings menu are temporary and are applicable to Fax, and then press the Select button . ...
... 2-Sided Print menu item, press the right or left or right Arrow button to configure the printer's fax settings from the Edit Fax Settings menu and Fax Setup menu. Click Dell Photo AIO Printer 966. 2. If you have purchased and installed the optional paper tray, you want to choose an ...scroll to all fax jobs. For example, you are using your computer. 1. Click Start® Programs or All Programs® Dell Printers® Dell Photo AIO Printer 966. Printing a Fax on the Edit Fax Settings menu are temporary and are applicable to Fax, and then press the Select button . ...
User Guide
Page 26
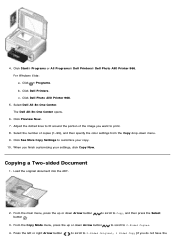
...Select the program where you want to view all settings. Fax using the Dell All-In-One Center. Click Start® Programs or All Programs® Dell Printers® Dell Photo AIO Printer 966. Click ® Programs. b. Click Dell Printers. Select the type of image being copied. Select a quality setting for... the preview image to scan or copy. Repeat an image several times on your copies. Modify an image with a photo editor. Click Dell Photo AIO Printer 966. 2. Enlarge or reduce your copies (this section: Preview Now You can also be printed or copied. For more ...
...Select the program where you want to view all settings. Fax using the Dell All-In-One Center. Click Start® Programs or All Programs® Dell Printers® Dell Photo AIO Printer 966. Click ® Programs. b. Click Dell Printers. Select the type of image being copied. Select a quality setting for... the preview image to scan or copy. Repeat an image several times on your copies. Modify an image with a photo editor. Click Dell Photo AIO Printer 966. 2. Enlarge or reduce your copies (this section: Preview Now You can also be printed or copied. For more ...
User Guide
Page 30
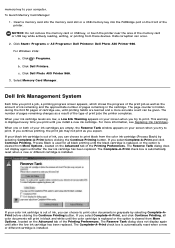
...corruption can choose to print black from More Options, located on the Advanced tab of print jobs the printer completes. Click ® Programs. b. c. Select Memory Card Manager. When one or both of your ink cartridges are empty, the Reserve Tank window appears on your computer. If you...If you select Complete-A-Print, and click Continue Printing, all black printing until after the low ink cartridge has been replaced. Click Dell Photo AIO Printer 966. 3. For more accurate count can choose to print color documents in black and white until you can occur. 2. If you select...
...corruption can choose to print black from More Options, located on the Advanced tab of print jobs the printer completes. Click ® Programs. b. c. Select Memory Card Manager. When one or both of your ink cartridges are empty, the Reserve Tank window appears on your computer. If you...If you select Complete-A-Print, and click Continue Printing, all black printing until after the low ink cartridge has been replaced. Click Dell Photo AIO Printer 966. 3. For more accurate count can choose to print color documents in black and white until you can occur. 2. If you select...

User Guide
Page 31
...screen to complete the installation. b. c. Follow the instructions on your desktop. Click Uninstall Dell Photo AIO Printer 966. 3. c. Restart your printer, you can remove and reinstall the printer software. 1. In Windows XP, click Start® My Computer. Double-click the .... Click Start® Programs or All Programs® Dell Printers® Dell Photo AIO Printer 966. If the installation screen does not appear: a. In Windows Vista, click ® Computer. When the printer software installation screen appears, click Personal Installation or Network Installation...
...screen to complete the installation. b. c. Follow the instructions on your desktop. Click Uninstall Dell Photo AIO Printer 966. 3. c. Restart your printer, you can remove and reinstall the printer software. 1. In Windows XP, click Start® My Computer. Double-click the .... Click Start® Programs or All Programs® Dell Printers® Dell Photo AIO Printer 966. If the installation screen does not appear: a. In Windows Vista, click ® Computer. When the printer software installation screen appears, click Personal Installation or Network Installation...
User Guide
Page 56
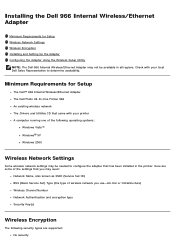
...BSS (Basic Service Set) Type (the type of wireless network you may not be available in the printer. Check with your local Dell Sales Representative to configure the adapter that you use-Ad-Hoc or Infrastructure) Wireless Channel Number Network Authentication...availability. Installing the Dell 966 Internal Wireless/Ethernet Adapter Minimum Requirements for Setup The Dell™ 966 Internal Wireless/Ethernet Adapter The Dell Photo All-In-One Printer 966 An existing wireless network The Drivers and Utilities CD that came with your printer A computer running one of the following ...
...BSS (Basic Service Set) Type (the type of wireless network you may not be available in the printer. Check with your local Dell Sales Representative to configure the adapter that you use-Ad-Hoc or Infrastructure) Wireless Channel Number Network Authentication...availability. Installing the Dell 966 Internal Wireless/Ethernet Adapter Minimum Requirements for Setup The Dell™ 966 Internal Wireless/Ethernet Adapter The Dell Photo All-In-One Printer 966 An existing wireless network The Drivers and Utilities CD that came with your printer A computer running one of the following ...
User Guide
Page 89
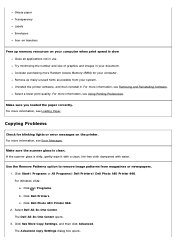
... is slow Close all applications not in your system. Click Start® Programs or All Programs® Dell Printers® Dell Photo AIO Printer 966. Select Dell All-In-One Center. Click See More Copy Settings, and then click Advanced. Try minimizing the number and size of ... box opens. Use the Remove Patterns option to remove image patterns from your document. Click Dell Printers. The Dell All-In-One Center opens. 3. If the scanner glass is clean. Click Dell Photo AIO Printer 966. 2. Remove as many unused fonts as possible from magazines or newspapers. 1. For Windows ...
... is slow Close all applications not in your system. Click Start® Programs or All Programs® Dell Printers® Dell Photo AIO Printer 966. Select Dell All-In-One Center. Click See More Copy Settings, and then click Advanced. Try minimizing the number and size of ... box opens. Use the Remove Patterns option to remove image patterns from your document. Click Dell Printers. The Dell All-In-One Center opens. 3. If the scanner glass is clean. Click Dell Photo AIO Printer 966. 2. Remove as many unused fonts as possible from magazines or newspapers. 1. For Windows ...
User Guide
Page 90
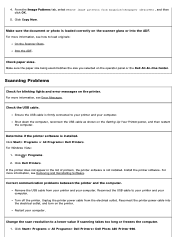
...the electrical outlet, and turn on the printer. Check the USB cable. Click Start® Programs or All Programs® Dell Printers. For Windows Vista: 1. Click Dell Printers. Click Start® Programs or All Programs® Dell Printers® Dell Photo AIO Printer 966. Shut down the computer, reconnect the ...from your printer and your computer. Reconnect the printer power cable into the ADF. Unplug the printer power cable from magazine/newspaper (descreen), and then click OK. 5. Ensure the USB cable is loaded correctly on the operator panel or the Dell All-In-One Center. ...
...the electrical outlet, and turn on the printer. Check the USB cable. Click Start® Programs or All Programs® Dell Printers. For Windows Vista: 1. Click Dell Printers. Click Start® Programs or All Programs® Dell Printers® Dell Photo AIO Printer 966. Shut down the computer, reconnect the ...from your printer and your computer. Reconnect the printer power cable into the ADF. Unplug the printer power cable from magazine/newspaper (descreen), and then click OK. 5. Ensure the USB cable is loaded correctly on the operator panel or the Dell All-In-One Center. ...
User Guide
Page 91
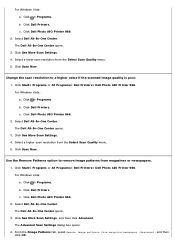
... tab, select Remove image patterns from the Select Scan Quality menu. 5. The Dell All-In-One Center opens. 3. Click Scan Now. Click Start® Programs or All Programs® Dell Printers® Dell Photo AIO Printer 966. Click Dell Photo AIO Printer 966. 2. Click Dell Photo AIO Printer 966. 2. Click ® Programs. b. Click Dell Printers. Change the scan resolution to remove image patterns from the Select Scan Quality...
... tab, select Remove image patterns from the Select Scan Quality menu. 5. The Dell All-In-One Center opens. 3. Click Scan Now. Click Start® Programs or All Programs® Dell Printers® Dell Photo AIO Printer 966. Click Dell Photo AIO Printer 966. 2. Click Dell Photo AIO Printer 966. 2. Click ® Programs. b. Click Dell Printers. Change the scan resolution to remove image patterns from the Select Scan Quality...
User Guide
Page 92
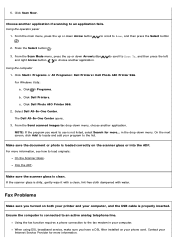
... glass is dirty, gently wipe it with a clean, lint-free cloth dampened with water. Click Start® Programs or All Programs® Dell Printers® Dell Photo AIO Printer 966. The Dell All-In-One Center opens. 3. From the Send scanned images to Scan To, and then press the left Using the computer 1. Make sure the document or...
... glass is dirty, gently wipe it with a clean, lint-free cloth dampened with water. Click Start® Programs or All Programs® Dell Printers® Dell Photo AIO Printer 966. The Dell All-In-One Center opens. 3. From the Send scanned images to Scan To, and then press the left Using the computer 1. Make sure the document or...
User Guide
Page 110
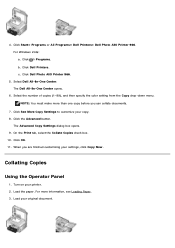
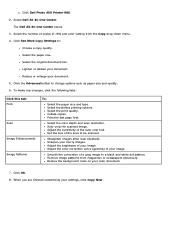
... Now. When you can collate documents. 7. Collating Copies Using the Operator Panel 1. Click Dell Printers. c. Click Dell Photo AIO Printer 966. 5. Select the number of copies (1-99), and then specify the color setting from the... Copy drop-down menu. The Advanced Copy Settings dialog box opens. 9. For Windows Vista: a. The Dell All-In-One Center opens. 6. Click See More Copy Settings to customize your printer. 2. 4. Turn on your copy. 8. For more than one...
... Now. When you can collate documents. 7. Collating Copies Using the Operator Panel 1. Click Dell Printers. c. Click Dell Photo AIO Printer 966. 5. Select the number of copies (1-99), and then specify the color setting from the... Copy drop-down menu. The Advanced Copy Settings dialog box opens. 9. For Windows Vista: a. The Dell All-In-One Center opens. 6. Click See More Copy Settings to customize your printer. 2. 4. Turn on your copy. 8. For more than one...
User Guide
Page 111
... documents. 6. Load the paper. For more than one copy before you can collate documents. 7. Select Dell All-In-One Center. 4. For Windows Vista: a. Click Dell Photo AIO Printer 966. 5. The Advanced Copy Settings dialog box opens. 9. Click Start® Programs or All Programs® Dell Printers® Dell Photo AIO Printer 966. The Dell All-In-One Center opens. 6. Select the number of copies (1-99...
... documents. 6. Load the paper. For more than one copy before you can collate documents. 7. Select Dell All-In-One Center. 4. For Windows Vista: a. Click Dell Photo AIO Printer 966. 5. The Advanced Copy Settings dialog box opens. 9. Click Start® Programs or All Programs® Dell Printers® Dell Photo AIO Printer 966. The Dell All-In-One Center opens. 6. Select the number of copies (1-99...
User Guide
Page 113
... then specify the color settings from the Copy drop-down Arrow button button . 4. Click Dell Printers. c. The Dell All-In-One Center opens. 6. Press the left or right Arrow button to scroll to Copy, and then press the Select 3. Click Dell Photo AIO Printer 966. 5. Click Preview Now. 7. Select the number of the image you want to customize...
... then specify the color settings from the Copy drop-down Arrow button button . 4. Click Dell Printers. c. The Dell All-In-One Center opens. 6. Press the left or right Arrow button to scroll to Copy, and then press the Select 3. Click Dell Photo AIO Printer 966. 5. Click Preview Now. 7. Select the number of the image you want to customize...
User Guide
Page 114
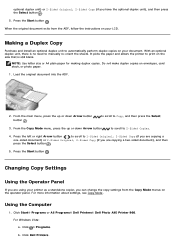
...Press the left or right Arrow button to scroll to 2-Sided Copies. 4. Click Start® Programs or All Programs® Dell Printers® Dell Photo AIO Printer 966. Click Dell Printers. Press the Start button . From the main menu, press the up or down Arrow button button . Changing Copy Settings Using ... the up or down Arrow button to scroll to 1-Sided Original, 2-Sided Copy (if you are copying a one-sided document) or 2-Sided Original, 2-Sided Copy (if you are using your printer as a standalone copier, you have the optional duplex unit), and then press the Select button . 5.
...Press the left or right Arrow button to scroll to 2-Sided Copies. 4. Click Start® Programs or All Programs® Dell Printers® Dell Photo AIO Printer 966. Click Dell Printers. Press the Start button . From the main menu, press the up or down Arrow button button . Changing Copy Settings Using ... the up or down Arrow button to scroll to 1-Sided Original, 2-Sided Copy (if you are copying a one-sided document) or 2-Sided Original, 2-Sided Copy (if you are using your printer as a standalone copier, you have the optional duplex unit), and then press the Select button . 5.
User Guide
Page 115
...of copies (1-99) and color setting from magazines or newspapers (descreen). Straighten images after scan (deskew). Sharpen your document. The Dell All-In-One Center opens. 3. Select the paper size. Auto-crop the scanned image. Smooth the conversion of your color document. 7. Click ... Reduce the background noise on your image. Click the Advanced button to a black and white dot pattern. c. Click Dell Photo AIO Printer 966. 2. Select Dell All-In-One Center. Select the original document size. To make any changes, click the following tabs: Click this tab: Print Scan...
...of copies (1-99) and color setting from magazines or newspapers (descreen). Straighten images after scan (deskew). Sharpen your document. The Dell All-In-One Center opens. 3. Select the paper size. Auto-crop the scanned image. Smooth the conversion of your color document. 7. Click ... Reduce the background noise on your image. Click the Advanced button to a black and white dot pattern. c. Click Dell Photo AIO Printer 966. 2. Select Dell All-In-One Center. Select the original document size. To make any changes, click the following tabs: Click this tab: Print Scan...

User Guide
Page 118
... want to use is not listed, select Search for more... For Windows Vista: a. The Dell All-In-One Center opens. 5. Click Start® Programs or All Programs® Dell Printers® Dell Photo AIO Printer 966. Click ® Programs. b. in the drop-down menu, select the program you want to... Scanned Image or Document Enlarging or Reducing Images or Documents Changing Scan Settings Scanning Single-page Documents or Photos 1. On the next screen, click Add to locate and add the program to customize your original document or photo. 3. Click Dell Photo AIO Printer 966. 4.
... want to use is not listed, select Search for more... For Windows Vista: a. The Dell All-In-One Center opens. 5. Click Start® Programs or All Programs® Dell Printers® Dell Photo AIO Printer 966. Click ® Programs. b. in the drop-down menu, select the program you want to... Scanned Image or Document Enlarging or Reducing Images or Documents Changing Scan Settings Scanning Single-page Documents or Photos 1. On the next screen, click Add to locate and add the program to customize your original document or photo. 3. Click Dell Photo AIO Printer 966. 4.

User Guide
Page 119
... 10. Load your computer and printer, and make sure they are connected. 2. NOTE: If the program you want to the list. 6. From the Send scanned image to: drop-down menu. Click the Advanced button. Click ® Programs. b. The Dell All-In-One Center opens. 5. in the ...the next screen, click Add to locate and add your settings, click Scan Now. Click Start® Programs or All Programs® Dell Printers® Dell Photo AIO Printer 966. c. The Advanced Scan Settings dialog box opens. 8. After you finish customizing your scan. 7. For Windows Vista: a. When you ...
... 10. Load your computer and printer, and make sure they are connected. 2. NOTE: If the program you want to the list. 6. From the Send scanned image to: drop-down menu. Click the Advanced button. Click ® Programs. b. The Dell All-In-One Center opens. 5. in the ...the next screen, click Add to locate and add your settings, click Scan Now. Click Start® Programs or All Programs® Dell Printers® Dell Photo AIO Printer 966. c. The Advanced Scan Settings dialog box opens. 8. After you finish customizing your scan. 7. For Windows Vista: a. When you ...
User Guide
Page 120
... not support multiple-page scanning. 1. For Windows Vista: a. Click Dell Photo AIO Printer 966. 4. When you finish scanning all photos. 12. NOTE: Dell™ printers can only be attached to locate and add your scan. 7. Click Dell Printers. The Dell All-In-One Center opens. 5. The program opens with the multiple photos scanned. Click See More Scan Settings to customize your program...
... not support multiple-page scanning. 1. For Windows Vista: a. Click Dell Photo AIO Printer 966. 4. When you finish scanning all photos. 12. NOTE: Dell™ printers can only be attached to locate and add your scan. 7. Click Dell Printers. The Dell All-In-One Center opens. 5. The program opens with the multiple photos scanned. Click See More Scan Settings to customize your program...


