User's Guide
Page 1
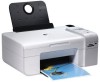
... and in applicable FAR provisions: Dell Inc., One Dell Way, Round Rock, Texas, 78682, USA. Information in this text: Dell, the DELL logo, Dell Picture Studio, and Dell Ink Management System are trademarks of Microsoft Corporation. DellTM Photo All-In-One Printer 926 User's Guide To order ink or supplies from Dell: 1. Double-click the icon on your printer. Notes, Notices, and Cautions...
... and in applicable FAR provisions: Dell Inc., One Dell Way, Round Rock, Texas, 78682, USA. Information in this text: Dell, the DELL logo, Dell Picture Studio, and Dell Ink Management System are trademarks of Microsoft Corporation. DellTM Photo All-In-One Printer 926 User's Guide To order ink or supplies from Dell: 1. Double-click the icon on your printer. Notes, Notices, and Cautions...
User's Guide
Page 5
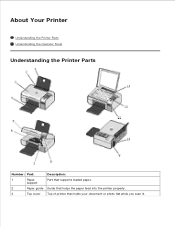
support 2 Paper guide Guide that helps the paper feed into the printer properly. 3 Top cover Top of printer that supports loaded paper. About Your Printer Understanding the Printer Parts Understanding the Operator Panel Understanding the Printer Parts Number: Part: Description: 1 Paper Part that holds your document or photo flat while you scan it.
support 2 Paper guide Guide that helps the paper feed into the printer properly. 3 Top cover Top of printer that supports loaded paper. About Your Printer Understanding the Printer Parts Understanding the Operator Panel Understanding the Printer Parts Number: Part: Description: 1 Paper Part that holds your document or photo flat while you scan it.
User's Guide
Page 6
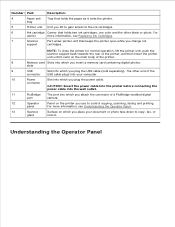
... Carrier that holds the paper as it rests on the printer you plug the USB cable (sold separately). Understanding the Operator Panel Number: Part: Description: 4 Paper exit Tray that holds two ink cartridges, one color and the other end of the connector USB cable plugs.... 7 Scanner Part under printer unit that keeps the printer open while you change ink support cartridges. The other black or photo. NOTE: To close the printer for normal operation, lift the printer unit, push the scanner support back towards the rear of the printer, and then lower the printer unit until...
... Carrier that holds the paper as it rests on the printer you plug the USB cable (sold separately). Understanding the Operator Panel Number: Part: Description: 4 Paper exit Tray that holds two ink cartridges, one color and the other end of the connector USB cable plugs.... 7 Scanner Part under printer unit that keeps the printer open while you change ink support cartridges. The other black or photo. NOTE: To close the printer for normal operation, lift the printer unit, push the scanner support back towards the rear of the printer, and then lower the printer unit until...

User's Guide
Page 7
... 7 Select button 8 Start button 9 Ink drop icons To: View scanning, copying, faxing, and printing options as well as status and error messages. Turn your printer on a memory card or digital camera. Scroll through photos and Microsoft Office files on or off your printer if a PictBridge camera with an active session is an error.
... 7 Select button 8 Start button 9 Ink drop icons To: View scanning, copying, faxing, and printing options as well as status and error messages. Turn your printer on a memory card or digital camera. Scroll through photos and Microsoft Office files on or off your printer if a PictBridge camera with an active session is an error.

User's Guide
Page 9
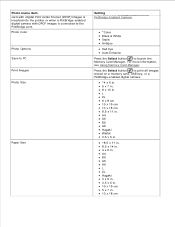
Letter A4 B5 L 2L Hagaki 25% 50% 75% Skew Correction Off On Scan Mode The Scan Menu is only available if the printer is connected to a computer or a network adapter. Scan menu item Settings Copy menu item Settings 2L Hagaki 3 x 5 in. 3.5 x 5 in. 10x15 cm 5 x 7 in. 13x18 cm Paper Type Automatic Plain Coated Photo Transparency Zoom 100% 125% 150% 175% 200% 4 x 6 in. 5 x 7 in.
Letter A4 B5 L 2L Hagaki 25% 50% 75% Skew Correction Off On Scan Mode The Scan Menu is only available if the printer is connected to a computer or a network adapter. Scan menu item Settings Copy menu item Settings 2L Hagaki 3 x 5 in. 3.5 x 5 in. 10x15 cm 5 x 7 in. 13x18 cm Paper Type Automatic Plain Coated Photo Transparency Zoom 100% 125% 150% 175% 200% 4 x 6 in. 5 x 7 in.

User's Guide
Page 10
... and then press the Select button to begin scanning the proof sheet. For more information, see Printing Photos From a Photo Mode Photo mode is only available when a memory card is inserted into the printer, or if a USB key or a PictBridge-enabled digital camera is All Last 25 Date Range From...Start button to open. Press the Start button to the PictBridge port. to select the application in which you want your scanned If your printer is connected to a network, use the Arrow buttons to choose from the following settings: Print DPOF NOTE: This menu item is only ...
... and then press the Select button to begin scanning the proof sheet. For more information, see Printing Photos From a Photo Mode Photo mode is only available when a memory card is inserted into the printer, or if a USB key or a PictBridge-enabled digital camera is All Last 25 Date Range From...Start button to open. Press the Start button to the PictBridge port. to select the application in which you want your scanned If your printer is connected to a network, use the Arrow buttons to choose from the following settings: Print DPOF NOTE: This menu item is only ...
User's Guide
Page 11
... USB key, or a PictBridge-enabled digital camera. *4 x 6 in. 5 x 7 in. 8 x 10 in . 13 x 18 cm Photo menu item card with Digital Print Order Format (DPOF) images is inserted into the printer or when a PictBridge-enabled digital camera with DPOF images is connected to PC Print Images... Photo Size Paper Size Sinefottrimnagtion, see Using Memory Card Manager. Photo Color Photo Options Save to the PictBridge port. L 2L 6 x 8 ...
... USB key, or a PictBridge-enabled digital camera. *4 x 6 in. 5 x 7 in. 8 x 10 in . 13 x 18 cm Photo menu item card with Digital Print Order Format (DPOF) images is inserted into the printer or when a PictBridge-enabled digital camera with DPOF images is connected to PC Print Images... Photo Size Paper Size Sinefottrimnagtion, see Using Memory Card Manager. Photo Color Photo Options Save to the PictBridge port. L 2L 6 x 8 ...
User's Guide
Page 12
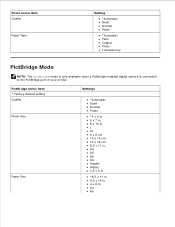
Photo menu item Quality Paper Type Setting *Automatic Draft Normal Photo *Automatic Plain Coated Photo Transparency PictBridge Mode NOTE: The PictBridge mode is only available when a PictBridge-enabled digital camera is connected to the PictBridge port of your printer. A4 B5 L 2L 6 x 8 cm 10 x 15 cm 13 x 18 cm 8.5 x 11 in . A4 A5 B5 A6 Hagaki Wallet 3.5 x 5 in. *8.5 x 11 in. 8.5 x 14 in. 4 x 6 in . PictBridge menu item * Factory default setting Quality Photo Size Paper Size Settings *Automatic Draft Normal Photo *4 x 6 in. 5 x 7 in. 8 x 10 in.
Photo menu item Quality Paper Type Setting *Automatic Draft Normal Photo *Automatic Plain Coated Photo Transparency PictBridge Mode NOTE: The PictBridge mode is only available when a PictBridge-enabled digital camera is connected to the PictBridge port of your printer. A4 B5 L 2L 6 x 8 cm 10 x 15 cm 13 x 18 cm 8.5 x 11 in . A4 A5 B5 A6 Hagaki Wallet 3.5 x 5 in. *8.5 x 11 in. 8.5 x 14 in. 4 x 6 in . PictBridge menu item * Factory default setting Quality Photo Size Paper Size Settings *Automatic Draft Normal Photo *4 x 6 in. 5 x 7 in. 8 x 10 in.

User's Guide
Page 16
.... 100 sheets of coated paper 20 sheets of banner paper The print side of the envelope faces up. You select Automatic, Normal, or Photo print quality. You select A4 Banner or Letter Banner paper size. 10 envelopes 25 sheets of labels The print side of the paper faces up . ...You use banner paper designed for inkjet printers. The paper guides rest against the edges of the paper. Select the next biggest size if the exact envelope size is correctly positioned. The print...
.... 100 sheets of coated paper 20 sheets of banner paper The print side of the envelope faces up. You select Automatic, Normal, or Photo print quality. You select A4 Banner or Letter Banner paper size. 10 envelopes 25 sheets of labels The print side of the paper faces up . ...You use banner paper designed for inkjet printers. The paper guides rest against the edges of the paper. Select the next biggest size if the exact envelope size is correctly positioned. The print...
User's Guide
Page 17
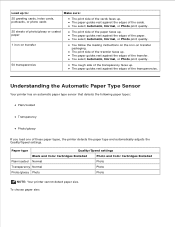
...the edges of the cards. Understanding the Automatic Paper Type Sensor Your printer has an automatic paper type sensor that detects the following paper types: Plain/coated Transparency Photo/glossy If you load one of the transfer. The paper guides rest against the edges of these ...paper types, the printer detects the paper type and automatically adjusts the Quality/Speed settings. You select Automatic, Normal, or Photo print quality. 50 ...
...the edges of the cards. Understanding the Automatic Paper Type Sensor Your printer has an automatic paper type sensor that detects the following paper types: Plain/coated Transparency Photo/glossy If you load one of the transfer. The paper guides rest against the edges of these ...paper types, the printer detects the paper type and automatically adjusts the Quality/Speed settings. You select Automatic, Normal, or Photo print quality. 50 ...
User's Guide
Page 19
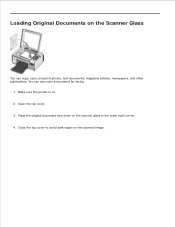
Close the top cover to avoid dark edges on the Scanner Glass You can also scan a document for faxing. 1. Loading Original Documents on the scanned image. Make sure the printer is on the scanner glass in the lower right corner. 4. Place the original document face down on . 2. Open the top cover. 3. You can copy, scan, and print photos, text documents, magazine articles, newspapers, and other publications. 5.
Close the top cover to avoid dark edges on the Scanner Glass You can also scan a document for faxing. 1. Loading Original Documents on the scanned image. Make sure the printer is on the scanner glass in the lower right corner. 4. Place the original document face down on . 2. Open the top cover. 3. You can copy, scan, and print photos, text documents, magazine articles, newspapers, and other publications. 5.

User's Guide
Page 20
... printer, and make any necessary changes to your document. 6. For more information, see Loading Paper into the Paper Support. 3. On the Print Setup and Advanced tabs, make sure they are connected. 2. When you use a color cartridge and a photo cartridge for printing photos..... The Printing Preferences dialog box closes. 7. The Print dialog box opens. 4. Printing Printing Documents Printing Photos Printing Envelopes Printing Photos From a PictBridge-Enabled Camera Printing Photos From a Memory Card or USB Key Printing From a Bluetooth-enabled Device NOTE: DellTM recommends you finish ...
... printer, and make any necessary changes to your document. 6. For more information, see Loading Paper into the Paper Support. 3. On the Print Setup and Advanced tabs, make sure they are connected. 2. When you use a color cartridge and a photo cartridge for printing photos..... The Printing Preferences dialog box closes. 7. The Print dialog box opens. 4. Printing Printing Documents Printing Photos Printing Envelopes Printing Photos From a PictBridge-Enabled Camera Printing Photos From a Memory Card or USB Key Printing From a Bluetooth-enabled Device NOTE: DellTM recommends you finish ...

User's Guide
Page 21
..., make sure they are using Dell Picture StudioTM, select Printer Settings to prevent your computer and printer, and make any necessary changes for the photo from the dropdown menu. Remove each photo after it exits the printer to view Printing Preferences. 5. The printout on non-photo paper contains a 2mm margin on your photos from the drop-down menu...
..., make sure they are using Dell Picture StudioTM, select Printer Settings to prevent your computer and printer, and make any necessary changes for the photo from the dropdown menu. Remove each photo after it exits the printer to view Printing Preferences. 5. The printout on non-photo paper contains a 2mm margin on your photos from the drop-down menu...
User's Guide
Page 22
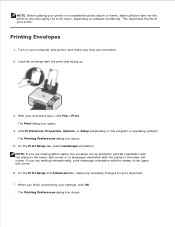
...internationally, print landscape orientation with the print side facing up. 3. 9. Printing Envelopes 1. Load the envelope with the stamp in a nonadhesive photo album or frame, allow sufficient time for your settings, click OK. The Printing Preferences dialog box opens. 5. The Printing Preferences dialog ...Preferences, Properties, Options, or Setup (depending on ambient conditions). When you are connected. 2. NOTE: Before placing your computer and printer, and make any necessary changes for the prints to dry thoroughly (12 to 24 hours, depending on the program or operating ...
...internationally, print landscape orientation with the print side facing up. 3. 9. Printing Envelopes 1. Load the envelope with the stamp in a nonadhesive photo album or frame, allow sufficient time for your settings, click OK. The Printing Preferences dialog box opens. 5. The Printing Preferences dialog ...Preferences, Properties, Options, or Setup (depending on ambient conditions). When you are connected. 2. NOTE: Before placing your computer and printer, and make any necessary changes for the prints to dry thoroughly (12 to 24 hours, depending on the program or operating ...

User's Guide
Page 23
... These functions become available after you choose to begin printing photos. For PictBridge printing, the printer (or PTP) USB selection should be unavailable. Turn on the front of the printer. NOTE: If you disconnect the PictBridge camera from the printer, some of the functions of the USB cable into the...with your digital camera. NOTICE: Do not unplug the USB cable or touch the printer in the area of the appropriate camera USB settings and PictBridge connection and usage information. 3. Insert one end of the USB cable into the PictBridge port on your camera to change ...
... These functions become available after you choose to begin printing photos. For PictBridge printing, the printer (or PTP) USB selection should be unavailable. Turn on the front of the printer. NOTE: If you disconnect the PictBridge camera from the printer, some of the functions of the USB cable into the...with your digital camera. NOTICE: Do not unplug the USB cable or touch the printer in the area of the appropriate camera USB settings and PictBridge connection and usage information. 3. Insert one end of the USB cable into the PictBridge port on your camera to change ...

User's Guide
Page 24
...should be used for PictBridge may also be inserted with this printer are as shown: NOTICE: Do not remove the memory card or touch the printer in the area of the memory card while the light is ...blinking. The connector that is used for operation with the label facing up. The card reader has four slots to store photos. The ... that have been certified for accessing information that is stored on USB Flash Drive devices. Printing Photos From a Memory Card or USB Key Most digital cameras use a memory card to accommodate these...
...should be used for PictBridge may also be inserted with this printer are as shown: NOTICE: Do not remove the memory card or touch the printer in the area of the memory card while the light is ...blinking. The connector that is used for operation with the label facing up. The card reader has four slots to store photos. The ... that have been certified for accessing information that is stored on USB Flash Drive devices. Printing Photos From a Memory Card or USB Key Most digital cameras use a memory card to accommodate these...
User's Guide
Page 25
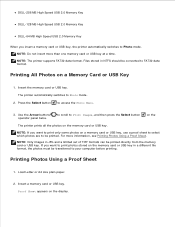
... the memory card or USB key. to scroll to Print Images, and then press the Select button on the The printer prints all the photos on the display. For more than one memory card or USB key at a time. Proof Sheet appears on the memory card or USB key. NOTE: Do... High Speed USB 2.0 Memory Key DELL-128 MB High Speed USB 2.0 Memory Key DELL-64 MB High Speed USB 2.0 Memory Key When you insert a memory card or USB key, the printer automatically switches to access the Photo Menu. 3. Printing All Photos on a Memory Card or USB Key 1. Printing Photos Using a Proof Sheet 1. Insert ...
... the memory card or USB key. to scroll to Print Images, and then press the Select button on the The printer prints all the photos on the display. For more than one memory card or USB key at a time. Proof Sheet appears on the memory card or USB key. NOTE: Do... High Speed USB 2.0 Memory Key DELL-128 MB High Speed USB 2.0 Memory Key DELL-64 MB High Speed USB 2.0 Memory Key When you insert a memory card or USB key, the printer automatically switches to access the Photo Menu. 3. Printing All Photos on a Memory Card or USB Key 1. Printing Photos Using a Proof Sheet 1. Insert ...

User's Guide
Page 26
... sheet prints. 7. NOTE: Make sure you completely fill in a certain date range. For more information, see Loading Original Documents on the Scanner Glass. 9. 2. Print the 25 most recent photos on the printout. Press the left of the proof sheet. An * appears on a Memory Card or USB Key to use. NOTE: ...Make sure the size of the paper you loaded in the printer matches the paper size you want to print photos stored on the proof sheet to your computer before printing. Fill in a different file format, the...
... sheet prints. 7. NOTE: Make sure you completely fill in a certain date range. For more information, see Loading Original Documents on the Scanner Glass. 9. 2. Print the 25 most recent photos on the printout. Press the left of the proof sheet. An * appears on a Memory Card or USB Key to use. NOTE: ...Make sure the size of the paper you loaded in the printer matches the paper size you want to print photos stored on the proof sheet to your computer before printing. Fill in a different file format, the...
User's Guide
Page 27
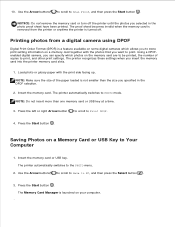
...photos from the printer or anytime the printer is not smaller than one memory card or USB key at a time. 3. Press the left or right Arrow button to scroll to PHOTO mode. Insert the memory card or USB key. The printer automatically switches to Print DPOF. 4. Press the Start button . Saving Photos...the memory card are to be printed, the number of the paper loaded is turned off the printer until the photos you want to print, and other print settings. The printer automatically switches to Your Computer 1. Press the Start button . Insert the memory card. The ...
...photos from the printer or anytime the printer is not smaller than one memory card or USB key at a time. 3. Press the left or right Arrow button to scroll to PHOTO mode. Insert the memory card or USB key. The printer automatically switches to Print DPOF. 4. Press the Start button . Saving Photos...the memory card are to be printed, the number of the paper loaded is turned off the printer until the photos you want to print, and other print settings. The printer automatically switches to Your Computer 1. Press the Start button . Insert the memory card. The ...

User's Guide
Page 28
... setting. Use the Arrow buttons to scroll through the photo options settings. 4. The printer automatically displays the Photo Menu. 2. The printer automatically displays the Photo Menu. 2. Changing the Photo Options Settings 1. Press the Select button to select a photo color setting. Insert a memory card or USB key into the printer. Follow the instructions on the Memory Card Manager dialog...
... setting. Use the Arrow buttons to scroll through the photo options settings. 4. The printer automatically displays the Photo Menu. 2. The printer automatically displays the Photo Menu. 2. Changing the Photo Options Settings 1. Press the Select button to select a photo color setting. Insert a memory card or USB key into the printer. Follow the instructions on the Memory Card Manager dialog...


