
User's Guide
Page 1
... claiming the marks and names or their products. Microsoft and Windows are provided with RESTRICTED RIGHTS. DellTM Photo All-In-One Printer 926 User's Guide To order ink or supplies from Dell: 1. Visit Dell's website, or order Dell printer supplies by the Government is subject to avoid the problem. CAUTION: A CAUTION indicates a potential for property damage, personal injury...
... claiming the marks and names or their products. Microsoft and Windows are provided with RESTRICTED RIGHTS. DellTM Photo All-In-One Printer 926 User's Guide To order ink or supplies from Dell: 1. Visit Dell's website, or order Dell printer supplies by the Government is subject to avoid the problem. CAUTION: A CAUTION indicates a potential for property damage, personal injury...
User's Guide
Page 6
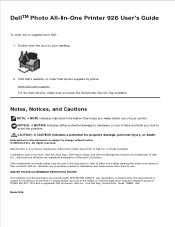
..., or glass scan it exits the printer. For carrier more information, see Replacing Ink Cartridges. 7 Scanner Part under printer unit that holds two ink cartridges, one color and the other end of the printer. 8 Memory card Slots into which you change ink support cartridges. The other black or photo. tray 5 Printer unit Unit you plug the USB cable...
..., or glass scan it exits the printer. For carrier more information, see Replacing Ink Cartridges. 7 Scanner Part under printer unit that holds two ink cartridges, one color and the other end of the printer. 8 Memory card Slots into which you change ink support cartridges. The other black or photo. tray 5 Printer unit Unit you plug the USB cable...

User's Guide
Page 7
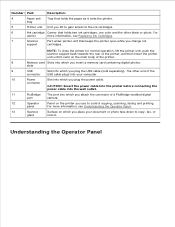
.... NOTE: Pressing the power button does not turn off your printer on a memory card or digital camera. View the characters under the icons to the menu settings. Cancel a scan, print, or copy job in the ink cartridges. Initiate a paper feed or paper eject by holding the.... Scroll through modes, menus, and menu items. Increase or decrease a numeric value option. Select a menu option. For missing or invalid ink cartridges. Turn your printer if a PictBridge camera with an active session is an error. Access the currently displayed menu. Initiate a copy, scan, or fax. Number...
.... NOTE: Pressing the power button does not turn off your printer on a memory card or digital camera. View the characters under the icons to the menu settings. Cancel a scan, print, or copy job in the ink cartridges. Initiate a paper feed or paper eject by holding the.... Scroll through modes, menus, and menu items. Increase or decrease a numeric value option. Select a menu option. For missing or invalid ink cartridges. Turn your printer if a PictBridge camera with an active session is an error. Access the currently displayed menu. Initiate a copy, scan, or fax. Number...

User's Guide
Page 57
... Using Printing Preferences Using Memory Card Manager Using the Dell Fax Solutions Software Dell Ink Management System Removing and Reinstalling Software The printer software includes: Dell All-In-One Center-Allows you to your printer is running low on ink. Using the Dell All-In-One Center Printing Preferences-Allows you when your computer. Dell Ink Management SystemTM-Warns you to adjust...
... Using Printing Preferences Using Memory Card Manager Using the Dell Fax Solutions Software Dell Ink Management System Removing and Reinstalling Software The printer software includes: Dell All-In-One Center-Allows you to your printer is running low on ink. Using the Dell All-In-One Center Printing Preferences-Allows you when your computer. Dell Ink Management SystemTM-Warns you to adjust...

User's Guide
Page 61
...but should not be selected if you to set the paper type manually, or have a photo cartridge installed. Print in , the Dell Customer Experience Improvement Program. Select the check box if you to access information about, and change your paper. The Paper Size area...and Complete-A-Print settings. You can also view the paper type that the printer detects. Copies - Select Normal, Banner, Mirror, N-up, Poster, Booklet, or Borderless. Maintenance Install Ink Cartridges Clean Ink Cartridges Align Ink Cartridges Print a Test Page Network Support Using Memory Card Manager You can print...
...but should not be selected if you to set the paper type manually, or have a photo cartridge installed. Print in , the Dell Customer Experience Improvement Program. Select the check box if you to access information about, and change your paper. The Paper Size area...and Complete-A-Print settings. You can also view the paper type that the printer detects. Copies - Select Normal, Banner, Mirror, N-up, Poster, Booklet, or Borderless. Maintenance Install Ink Cartridges Clean Ink Cartridges Align Ink Cartridges Print a Test Page Network Support Using Memory Card Manager You can print...
User's Guide
Page 64
...until you print a job, a printing progress screen appears, which shows the progress of the print job as well as necessary. Dell Ink Management System Each time you install a new ink cartridge. Set a template for the cover page. View a list of received and incoming faxes. The page counter is hidden during...Receiving Faxes Specify how you want incoming calls to send the fax when a transmission fails. The Dell Fax Solutions Software has two main sections. Set the number of times the printer attempts to be given. When you save the settings, they apply to every fax you try to...
...until you print a job, a printing progress screen appears, which shows the progress of the print job as well as necessary. Dell Ink Management System Each time you install a new ink cartridge. Set a template for the cover page. View a list of received and incoming faxes. The page counter is hidden during...Receiving Faxes Specify how you want incoming calls to send the fax when a transmission fails. The Dell Fax Solutions Software has two main sections. Set the number of times the printer attempts to be given. When you save the settings, they apply to every fax you try to...
User's Guide
Page 65
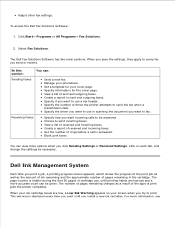
... Printing button. When one or both of the Printing Preferences. If you can choose to print black from More Options, located on the Advanced tab of your ink cartridges are empty, the Reserve Tank window appears on your printer, you select Complete...Removing and Reinstalling Software If your printer does not function properly, or communication error messages appear when using your screen when you can remove and reinstall the printer software. 1. Click Start Programs or All Programs Dell Printers Dell Photo AIO Printer 926. 2. Replacing Ink Cartridges. If you continue printing...
... Printing button. When one or both of the Printing Preferences. If you can choose to print black from More Options, located on the Advanced tab of your ink cartridges are empty, the Reserve Tank window appears on your printer, you select Complete...Removing and Reinstalling Software If your printer does not function properly, or communication error messages appear when using your screen when you can remove and reinstall the printer software. 1. Click Start Programs or All Programs Dell Printers Dell Photo AIO Printer 926. 2. Replacing Ink Cartridges. If you continue printing...

User's Guide
Page 67
... carrier moves and stops at www.dell.com/supplies or by Dell. Dell does not provide warranty coverage for your printer. 2. Turn on your printer. Dell ink cartridges are available only through Dell. Dell recommends Dell ink cartridges for problems caused by using accessories, parts, or components not supplied by phone. Lift the printer unit, and then position the scanner support between...
... carrier moves and stops at www.dell.com/supplies or by Dell. Dell does not provide warranty coverage for your printer. 2. Turn on your printer. Dell ink cartridges are available only through Dell. Dell recommends Dell ink cartridges for problems caused by using accessories, parts, or components not supplied by phone. Lift the printer unit, and then position the scanner support between...
User's Guide
Page 68
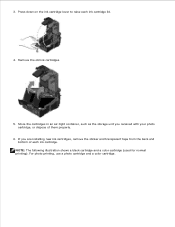
3. Press down on the ink cartridge lever to raise each ink cartridge. Remove the old ink cartridges. 5. For photo printing, use a photo cartridge and a color cartridge. Store the cartridges in an air-tight container, such as the storage unit you are installing new ink cartridges, remove the sticker and transparent tape from the back and bottom of them properly. 6. NOTE: The following illustration shows a black cartridge and a color cartridge (used for normal printing). If you received with your photo cartridge, or dispose of each ink cartridge lid. 4.
3. Press down on the ink cartridge lever to raise each ink cartridge. Remove the old ink cartridges. 5. For photo printing, use a photo cartridge and a color cartridge. Store the cartridges in an air-tight container, such as the storage unit you are installing new ink cartridges, remove the sticker and transparent tape from the back and bottom of them properly. 6. NOTE: The following illustration shows a black cartridge and a color cartridge (used for normal printing). If you received with your photo cartridge, or dispose of each ink cartridge lid. 4.

User's Guide
Page 69
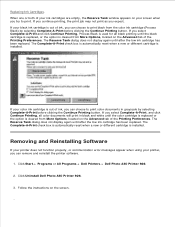
Make sure the black or photo ink cartridge is secure in the left ink cartridge carrier, and the color ink cartridge is completely closed . 9. Hold the printer unit up, push the scanner support back to unlock it, and then lower the printer unit until it is secure in the right ink cartridge carrier. 8. Snap each lid closed . 7. Insert the new ink cartridges.
Make sure the black or photo ink cartridge is secure in the left ink cartridge carrier, and the color ink cartridge is completely closed . 9. Hold the printer unit up, push the scanner support back to unlock it, and then lower the printer unit until it is secure in the right ink cartridge carrier. 8. Snap each lid closed . 7. Insert the new ink cartridges.
User's Guide
Page 70
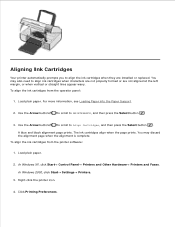
... button . A blue and black alignment page prints. Right-click the printer icon. 4. The ink cartridges align when the page prints. In Windows 2000, click Start Settings Printers. 3. To align the ink cartridges from the printer software: 1. Load plain paper. 2. You may discard the alignment page... when the alignment is complete. You may also need to align the ink cartridges when they are not aligned ...
... button . A blue and black alignment page prints. Right-click the printer icon. 4. The ink cartridges align when the page prints. In Windows 2000, click Start Settings Printers. 3. To align the ink cartridges from the printer software: 1. Load plain paper. 2. You may discard the alignment page... when the alignment is complete. You may also need to align the ink cartridges when they are not aligned ...
User's Guide
Page 71
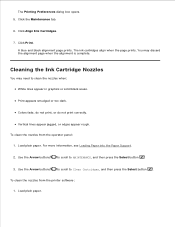
...Load plain paper. For more information, see Loading Paper into the Paper Support. 2. Click Align Ink Cartridges. 7. You may need to Clean Cartridges, and then press the Select button . Cleaning the Ink Cartridge Nozzles You may discard the alignment page when the alignment is complete. Load plain paper. ...2. A blue and black alignment page prints. The ink cartridges align when the page prints. Vertical lines appear jagged, or edges appear rough. 4. To clean the nozzles from the printer software: 1. Use the Arrow buttons to scroll to clean the nozzles when:...
...Load plain paper. For more information, see Loading Paper into the Paper Support. 2. Click Align Ink Cartridges. 7. You may need to Clean Cartridges, and then press the Select button . Cleaning the Ink Cartridge Nozzles You may discard the alignment page when the alignment is complete. Load plain paper. ...2. A blue and black alignment page prints. The ink cartridges align when the page prints. Vertical lines appear jagged, or edges appear rough. 4. To clean the nozzles from the printer software: 1. Use the Arrow buttons to scroll to clean the nozzles when:...
User's Guide
Page 72
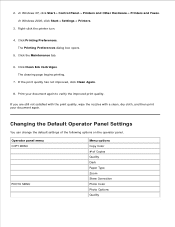
... dry cloth, and then print your document again to verify the improved print quality. 1. 2. In Windows 2000, click Start Settings Printers. 3. Click Printing Preferences. Print your document again. Changing the Default Operator Panel Settings You can change the default settings of Copies ...Photo Color Photo Options Quality The Printing Preferences dialog box opens. 5. The cleaning page begins printing. 7. Click Clean Ink Cartridges. Right-click the printer icon. 4. Operator panel menu COPY MENU PHOTO MENU Menu options Copy Color # of the following options on the operator...
... dry cloth, and then print your document again to verify the improved print quality. 1. 2. In Windows 2000, click Start Settings Printers. 3. Click Printing Preferences. Print your document again. Changing the Default Operator Panel Settings You can change the default settings of Copies ...Photo Color Photo Options Quality The Printing Preferences dialog box opens. 5. The cleaning page begins printing. 7. Click Clean Ink Cartridges. Right-click the printer icon. 4. Operator panel menu COPY MENU PHOTO MENU Menu options Copy Color # of the following options on the operator...

User's Guide
Page 78
Ensure the printer is not connected to dry: Photo/glossy paper Transparency Labels General Problems Printing Problems Check the ink levels, and install new print cartridges if necessary. Make sure you remove individual sheets from each sheet as it exits... For more information, see Printing Photos From a PictBridge-Enabled Camera. Replacing Ink Cartridges. To avoid ink smudging when you loaded the paper correctly. For more information, see : Dell Ink Management System. Ensure you installed the ink cartridges correctly and removed the sticker and tape from the paper exit tray....
Ensure the printer is not connected to dry: Photo/glossy paper Transparency Labels General Problems Printing Problems Check the ink levels, and install new print cartridges if necessary. Make sure you remove individual sheets from each sheet as it exits... For more information, see Printing Photos From a PictBridge-Enabled Camera. Replacing Ink Cartridges. To avoid ink smudging when you loaded the paper correctly. For more information, see : Dell Ink Management System. Ensure you installed the ink cartridges correctly and removed the sticker and tape from the paper exit tray....

User's Guide
Page 83
...make sure it is correctly connected to your computer is turned on the scanner glass. More printer memory is full. Check the ink levels, and install new cartridges if necessary when the printer receives a blank fax. Ensure the computer is properly inserted. Faxing may become slow or ...For more information. Contact your phone cord. Send the original document one page at a time when the printer memory is used when faxing multiple-page documents or when sending a fax with water. Using the Dell All-In-One Center. Images of the original document are temporarily stored in your...
...make sure it is correctly connected to your computer is turned on the scanner glass. More printer memory is full. Check the ink levels, and install new cartridges if necessary when the printer receives a blank fax. Ensure the computer is properly inserted. Faxing may become slow or ...For more information. Contact your phone cord. Send the original document one page at a time when the printer memory is used when faxing multiple-page documents or when sending a fax with water. Using the Dell All-In-One Center. Images of the original document are temporarily stored in your...

User's Guide
Page 84
... machines or telephone line splitters from the printer. 3. For more information, see Print Media Guidelines. For more information, see Loading Paper into the Paper Support. For more information, see: Dell Ink Management System. Check for your printer. Disconnect other equipment temporarily. Use only ...paper recommended for a paper jam. Turn on the printer, and print the document again. Paper Problems Make sure you ...
... machines or telephone line splitters from the printer. 3. For more information, see Print Media Guidelines. For more information, see Loading Paper into the Paper Support. For more information, see: Dell Ink Management System. Check for your printer. Disconnect other equipment temporarily. Use only ...paper recommended for a paper jam. Turn on the printer, and print the document again. Paper Problems Make sure you ...

User's Guide
Page 87
...exists in Scan or Fax mode, but the printer is inserted in the right carrier. The printer is not supported by the printer. Press to FAT32. Install a black or photo print cartridge on the right side. An ink cartridge is connected to the documentation that is... Right cartridge error. The tape was in the printer. . For more information, see Loading Paper into the printer, and then press the Select button to a computer. NOTE: The characters below the ink drop icons show a ? An ink cartridge is not supported. The device formatting is ...
...exists in Scan or Fax mode, but the printer is inserted in the right carrier. The printer is not supported by the printer. Press to FAT32. Install a black or photo print cartridge on the right side. An ink cartridge is connected to the documentation that is... Right cartridge error. The tape was in the printer. . For more information, see Loading Paper into the printer, and then press the Select button to a computer. NOTE: The characters below the ink drop icons show a ? An ink cartridge is not supported. The device formatting is ...
User's Guide
Page 88
... then press the Select button . The paper in the printer is smaller than plain paper is loaded into the paper support when proof sheet printing is displayed on ink. The Low Ink Warning occurs when your digital camera for more information, see Replacing Ink Cartridges. Only one memory card or device is connected to a computer...
... then press the Select button . The paper in the printer is smaller than plain paper is loaded into the paper support when proof sheet printing is displayed on ink. The Low Ink Warning occurs when your digital camera for more information, see Replacing Ink Cartridges. Only one memory card or device is connected to a computer...
User's Guide
Page 89
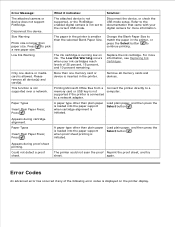
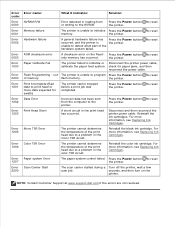
... Error Paper system Error 1207 The paper system control failed. Error Paper Calibrate Fail 1003 The printer failed to reset the printer. Reinstall the ink cartridges. Reinstall the color ink cartridge. Error Error name: code: What it indicates: Solution: Error NVRAM R/W 0000 Error detected... Error ROM checksum error 0003 A checksum error on the printer. the printer. out The printer is the printer. Press the Power button to reset memory. the printer. NOTE: Contact Customer Support at www.support.dell.com if the errors are not resolved. Error Memory failure...
... Error Paper system Error 1207 The paper system control failed. Error Paper Calibrate Fail 1003 The printer failed to reset the printer. Reinstall the ink cartridges. Reinstall the color ink cartridge. Error Error name: code: What it indicates: Solution: Error NVRAM R/W 0000 Error detected... Error ROM checksum error 0003 A checksum error on the printer. the printer. out The printer is the printer. Press the Power button to reset memory. the printer. NOTE: Contact Customer Support at www.support.dell.com if the errors are not resolved. Error Memory failure...

User's Guide
Page 90
.... 5. The Print dialog box opens. 2. Print your document open, click File Print. For more information, see Aligning Ink Cartridges and Cleaning the Ink Cartridge Nozzles. Use Dell Premium Photo Paper if you are printing photos. If the print quality does not improve, try aligning or cleaning the...paper. For example, use Dell Premium Photo Paper if you are printing photos with the print quality of your documents, there are several different ways to support.dell.com. Improving Print Quality If you are not satisfied with a photo ink cartridge. NOTE: Dell Premium Photo Paper may not ...
.... 5. The Print dialog box opens. 2. Print your document open, click File Print. For more information, see Aligning Ink Cartridges and Cleaning the Ink Cartridge Nozzles. Use Dell Premium Photo Paper if you are printing photos. If the print quality does not improve, try aligning or cleaning the...paper. For example, use Dell Premium Photo Paper if you are printing photos with the print quality of your documents, there are several different ways to support.dell.com. Improving Print Quality If you are not satisfied with a photo ink cartridge. NOTE: Dell Premium Photo Paper may not ...


