RS232 Command Set Document
Page 1
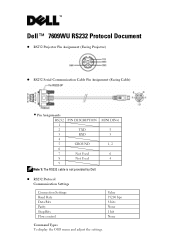
MINI DIN-6 5 3 1, 2 6 4 z RS232 Protocol Communication Settings Connection Settings Baud Rate Data Bits Parity Stop Bits Flow control Value 19200 bps 8 bits None 1 bit None Command Types To display the OSD menu and adjust the settings. Dell™ 7609WU RS232 Protocol Document z RS232 Projector Pin Assignment (Facing Projector) z RS232 Serial Communication Cable Pin Assignment (Facing Cable) Š Pin Assignments RS232 PIN DESCRIPTION 1 2 TXD 3 RXD 4 5 GROUND 6 7 Not Used 8 Not Used 9 Note 1: The RS232 cable is not provided by Dell.
MINI DIN-6 5 3 1, 2 6 4 z RS232 Protocol Communication Settings Connection Settings Baud Rate Data Bits Parity Stop Bits Flow control Value 19200 bps 8 bits None 1 bit None Command Types To display the OSD menu and adjust the settings. Dell™ 7609WU RS232 Protocol Document z RS232 Projector Pin Assignment (Facing Projector) z RS232 Serial Communication Cable Pin Assignment (Facing Cable) Š Pin Assignments RS232 PIN DESCRIPTION 1 2 TXD 3 RXD 4 5 GROUND 6 7 Not Used 8 Not Used 9 Note 1: The RS232 cable is not provided by Dell.
RS232 Command Set Document
Page 5
...0x05: Power Saving Information in trademarks and trade names other than its own. disclaims any manner whatsoever without notice. © 2008 Dell Inc. Audio Source Write 0xefbe 0x10 0x0006 0xdb09 0x1111 0x0002 0x54 Audio Source Read 0xefbe 0x10 0x0005 0xfe39 0x1111 0x0001 0x55 Password ...Change Password H. All rights reserved. Trademarks used in this document to refer to change without the written permission of Dell Inc. Other trademarks and trade names may be used in this text: Dell and the DELL logo are trademarks of Dell Inc. September 2008 Rev. Frequency H. is...
...0x05: Power Saving Information in trademarks and trade names other than its own. disclaims any manner whatsoever without notice. © 2008 Dell Inc. Audio Source Write 0xefbe 0x10 0x0006 0xdb09 0x1111 0x0002 0x54 Audio Source Read 0xefbe 0x10 0x0005 0xfe39 0x1111 0x0001 0x55 Password ...Change Password H. All rights reserved. Trademarks used in this document to refer to change without the written permission of Dell Inc. Other trademarks and trade names may be used in this text: Dell and the DELL logo are trademarks of Dell Inc. September 2008 Rev. Frequency H. is...

User's Guide
Page 2
... the written permission of Dell Inc.; Microsoft and Windows are trademarks of Dell Inc. Model 7609WU April 2008 Rev. NOTICE: A NOTICE indicates either the entities claiming the marks and names or their products. Dell Inc. Information in this text: Dell and the DELL logo are registered trademarks... or trademarks of these materials in any proprietary interest in this document to refer to either potential damage to hardware or loss of data and tells you make better use of your projector. ...
... the written permission of Dell Inc.; Microsoft and Windows are trademarks of Dell Inc. Model 7609WU April 2008 Rev. NOTICE: A NOTICE indicates either the entities claiming the marks and names or their products. Dell Inc. Information in this text: Dell and the DELL logo are registered trademarks... or trademarks of these materials in any proprietary interest in this document to refer to either potential damage to hardware or loss of data and tells you make better use of your projector. ...
User's Guide
Page 3
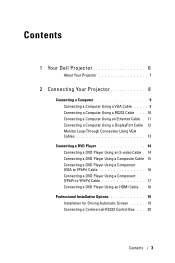
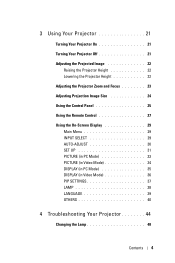
Contents 1 Your Dell Projector 6 About Your Projector 7 2 Connecting Your Projector 8 Connecting a Computer 9 Connecting a Computer Using a VGA Cable . . . . . 9 Connecting a Computer Using a RS232 Cable . . . 10 Connecting a Computer Using an Ethernet Cable . 11 Connecting a Computer Using a DisplayPort Cable 12 Monitor Loop-Through Connection Using VGA Cables 13 Connecting a DVD Player 14 Connecting a DVD Player Using an S-video Cable . 14 Connecting a DVD Player Using a Composite Cable...
Contents 1 Your Dell Projector 6 About Your Projector 7 2 Connecting Your Projector 8 Connecting a Computer 9 Connecting a Computer Using a VGA Cable . . . . . 9 Connecting a Computer Using a RS232 Cable . . . 10 Connecting a Computer Using an Ethernet Cable . 11 Connecting a Computer Using a DisplayPort Cable 12 Monitor Loop-Through Connection Using VGA Cables 13 Connecting a DVD Player 14 Connecting a DVD Player Using an S-video Cable . 14 Connecting a DVD Player Using a Composite Cable...
User's Guide
Page 4
... 21 Adjusting the Projected Image 22 Raising the Projector Height 22 Lowering the Projector Height 22 Adjusting the Projector Zoom and Focus 23 Adjusting Projection Image Size 24 Using the Control Panel 25 Using the Remote Control 27 Using the On-Screen Display 29 Main Menu 29 INPUT SELECT 29 AUTO-ADJUST 30 SET UP 31...
... 21 Adjusting the Projected Image 22 Raising the Projector Height 22 Lowering the Projector Height 22 Adjusting the Projector Zoom and Focus 23 Adjusting Projection Image Size 24 Using the Control Panel 25 Using the Remote Control 27 Using the On-Screen Display 29 Main Menu 29 INPUT SELECT 29 AUTO-ADJUST 30 SET UP 31...
User's Guide
Page 7
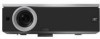
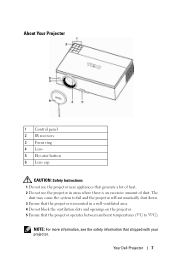
...Lens 5 Elevator button 6 Lens cap CAUTION: Safety Instructions 1 Do not use the projector near appliances that the projector operates between ambient temperatures (5ºC to fail and the projector will automatically shut down. 3 Ensure that the projector is mounted in a well-ventilated area. 4 Do not block the ventilation... slots and openings on the projector. 5 Ensure that generate a lot of heat. 2 Do not use the projector in areas where there is an excessive amount of dust. The dust may cause the system to 35ºC). Your Dell Projector 7 NOTE: For more information, see...
...Lens 5 Elevator button 6 Lens cap CAUTION: Safety Instructions 1 Do not use the projector near appliances that the projector operates between ambient temperatures (5ºC to fail and the projector will automatically shut down. 3 Ensure that the projector is mounted in a well-ventilated area. 4 Do not block the ventilation... slots and openings on the projector. 5 Ensure that generate a lot of heat. 2 Do not use the projector in areas where there is an excessive amount of dust. The dust may cause the system to 35ºC). Your Dell Projector 7 NOTE: For more information, see...
User's Guide
Page 9
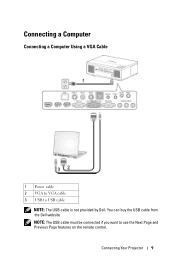
Connecting a Computer Connecting a Computer Using a VGA Cable 1 Power cable 2 VGA to VGA cable 3 USB to use the Next Page and Previous Page features on the remote control. Connecting Your Projector 9 You can buy the USB cable from the Dell website NOTE: The USB cable must be connected if you want to USB cable NOTE: The USB cable is not provided by Dell.
Connecting a Computer Connecting a Computer Using a VGA Cable 1 Power cable 2 VGA to VGA cable 3 USB to use the Next Page and Previous Page features on the remote control. Connecting Your Projector 9 You can buy the USB cable from the Dell website NOTE: The USB cable must be connected if you want to USB cable NOTE: The USB cable is not provided by Dell.
User's Guide
Page 10
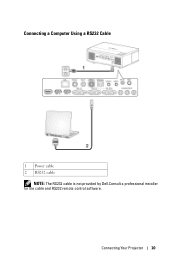
Connecting Your Projector 10 Connecting a Computer Using a RS232 Cable 1 Power cable 2 RS232 cable NOTE: The RS232 cable is not provided by Dell.Consult a professional installer for the cable and RS232 remote control software.
Connecting Your Projector 10 Connecting a Computer Using a RS232 Cable 1 Power cable 2 RS232 cable NOTE: The RS232 cable is not provided by Dell.Consult a professional installer for the cable and RS232 remote control software.
User's Guide
Page 11
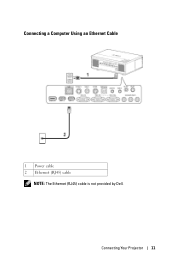
Connecting a Computer Using an Ethernet Cable 1 Power cable 2 Ethernet (RJ45) cable NOTE: The Ethernet (RJ45) cable is not provided by Dell. Connecting Your Projector 11
Connecting a Computer Using an Ethernet Cable 1 Power cable 2 Ethernet (RJ45) cable NOTE: The Ethernet (RJ45) cable is not provided by Dell. Connecting Your Projector 11

User's Guide
Page 13
Monitor Loop-Through Connection Using VGA Cables 1 Power cable 2 VGA to VGA cable Connecting Your Projector 13
Monitor Loop-Through Connection Using VGA Cables 1 Power cable 2 VGA to VGA cable Connecting Your Projector 13
User's Guide
Page 14
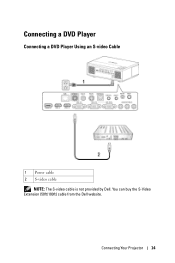
Connecting a DVD Player Connecting a DVD Player Using an S-video Cable 1 Power cable 2 S-video cable NOTE: The S-video cable is not provided by Dell. Connecting Your Projector 14 You can buy the S-Video Extension (50ft/100ft) cable from the Dell website.
Connecting a DVD Player Connecting a DVD Player Using an S-video Cable 1 Power cable 2 S-video cable NOTE: The S-video cable is not provided by Dell. Connecting Your Projector 14 You can buy the S-Video Extension (50ft/100ft) cable from the Dell website.
User's Guide
Page 15
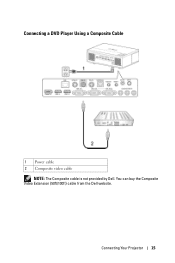
You can buy the Composite Video Extension (50ft/100ft) cable from the Dell website. Connecting Your Projector 15 Connecting a DVD Player Using a Composite Cable 1 Power cable 2 Composite video cable NOTE: The Composite cable is not provided by Dell.
You can buy the Composite Video Extension (50ft/100ft) cable from the Dell website. Connecting Your Projector 15 Connecting a DVD Player Using a Composite Cable 1 Power cable 2 Composite video cable NOTE: The Composite cable is not provided by Dell.

User's Guide
Page 16
NOTE: You can buy the VGA to YPbPr Extension (50ft/100ft) cable from the Dell website. Connecting a DVD Player Using a Component (VGA to YPbPr) Cable 1 Power cable 2 VGA to YPbPr cable NOTE: The VGA to either VGA-A Input or VGA-B Input. You can connect the component cable to YPbPr cable is not provided by Dell. Connecting Your Projector 16
NOTE: You can buy the VGA to YPbPr Extension (50ft/100ft) cable from the Dell website. Connecting a DVD Player Using a Component (VGA to YPbPr) Cable 1 Power cable 2 VGA to YPbPr cable NOTE: The VGA to either VGA-A Input or VGA-B Input. You can connect the component cable to YPbPr cable is not provided by Dell. Connecting Your Projector 16

User's Guide
Page 17
Connecting Your Projector 17 Connecting a DVD Player Using a Component (YPbPr to YPbPr) Cable 1 Power cable 2 YPbPr to YPbPr cable NOTE: The YPbPr to YPbPr cable is not provided by Dell.
Connecting Your Projector 17 Connecting a DVD Player Using a Component (YPbPr to YPbPr) Cable 1 Power cable 2 YPbPr to YPbPr cable NOTE: The YPbPr to YPbPr cable is not provided by Dell.

User's Guide
Page 18
Connecting a DVD Player Using an HDMI Cable 1 Power cable 2 HDMI cable NOTE: The HDMI cable is not provided by Dell. Connecting Your Projector 18
Connecting a DVD Player Using an HDMI Cable 1 Power cable 2 HDMI cable NOTE: The HDMI cable is not provided by Dell. Connecting Your Projector 18

User's Guide
Page 19
Connecting Your Projector 19 NOTE: Use a 12V DC plug with the projector. The 12V DC power cable has to be connected to connect the automatic screen with a dimension 1.7mm (ID) x 4.00mm (DD) x 9.5 mm (shaft) to the DC 12V jack. Professional Installation Options Installation for Driving Automatic Screen 1 Power cable 2 12V DC power cable 3 Automatic screen NOTE: The 12V DC power cable is not provided by Dell.
Connecting Your Projector 19 NOTE: Use a 12V DC plug with the projector. The 12V DC power cable has to be connected to connect the automatic screen with a dimension 1.7mm (ID) x 4.00mm (DD) x 9.5 mm (shaft) to the DC 12V jack. Professional Installation Options Installation for Driving Automatic Screen 1 Power cable 2 12V DC power cable 3 Automatic screen NOTE: The 12V DC power cable is not provided by Dell.
User's Guide
Page 21
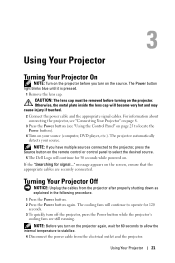
...cables from the electrical outlet and the projector. Using Your Projector 21 For information about connecting the projector, see "Connecting Your Projector" on page 8. 3 Press the Power button (see "Using the Control Panel" on page 25 to select the desired source. 5 The Dell Logo will become very hot and may ...cause injury if touched. 2 Connect the power cable and the appropriate signal cables. NOTE: If you turn off the projector, press the Power button...
...cables from the electrical outlet and the projector. Using Your Projector 21 For information about connecting the projector, see "Connecting Your Projector" on page 8. 3 Press the Power button (see "Using the Control Panel" on page 25 to select the desired source. 5 The Dell Logo will become very hot and may ...cause injury if touched. 2 Connect the power cable and the appropriate signal cables. NOTE: If you turn off the projector, press the Power button...

User's Guide
Page 22
...the message; To clear the message, press the Menu button on the screen. Adjusting the Projected Image Raising the Projector Height 1 Press the Elevator button. 2 Raise the projector to the desired display angle, and then release the button to lock the elevator foot into position. 1 Elevator... button 2 Elevator foot 3 Tilt adjustment wheel Using Your Projector 22 the message disappears after 10 seconds. NOTE: If you hand near the elevator foot when pressing the elevator button. 1 Press the...
...the message; To clear the message, press the Menu button on the screen. Adjusting the Projected Image Raising the Projector Height 1 Press the Elevator button. 2 Raise the projector to the desired display angle, and then release the button to lock the elevator foot into position. 1 Elevator... button 2 Elevator foot 3 Tilt adjustment wheel Using Your Projector 22 the message disappears after 10 seconds. NOTE: If you hand near the elevator foot when pressing the elevator button. 1 Press the...

User's Guide
Page 23
... ft to 39.37 ft (1.0m to zoom in and out. 6 Rotate the focus ring adjustment until the image is fully retracted before moving the projector. 2 Unlock the lens shift lock, before you adjust the lens shift. 3 Turn the vertical/horizontal lens shift knob to shift the lens. 4 After ... the lens shift lock. 5 Pull the zoom ring adjustment up and down to 12.0m). 7 Close the side door of the projector. Adjusting the Projector Zoom and Focus 1 Open the side door of the projector. 1 2 34 5 6 1 Side door 2 Vertical lens shift knob 3 Lens shift lock 4 Horizontal lens shift knob 5 Zoom ring 6 ...
... ft to 39.37 ft (1.0m to zoom in and out. 6 Rotate the focus ring adjustment until the image is fully retracted before moving the projector. 2 Unlock the lens shift lock, before you adjust the lens shift. 3 Turn the vertical/horizontal lens shift knob to shift the lens. 4 After ... the lens shift lock. 5 Pull the zoom ring adjustment up and down to 12.0m). 7 Close the side door of the projector. Adjusting the Projector Zoom and Focus 1 Open the side door of the projector. 1 2 34 5 6 1 Side door 2 Vertical lens shift knob 3 Lens shift lock 4 Horizontal lens shift knob 5 Zoom ring 6 ...

User's Guide
Page 24
Adjusting Projection Image Size Using Your Projector 24
Adjusting Projection Image Size Using Your Projector 24


