Quick Reference Guide
Page 5
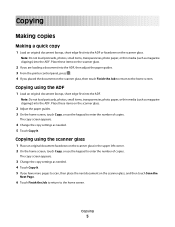
...ADF 1 Load an original document faceup, short edge first into the ADF. Note: Do not load postcards, photos, small items, transparencies, photo paper, or thin media (such as magazine clippings) into the ADF. Copying using the scanner glass 1 Place an original document facedown on the scanner ...return to the home screen. Note: Do not load postcards, photos, small items, transparencies, photo paper, or thin media (such as magazine clippings) into the ADF, then adjust the paper guides. 3 From the printer control panel, press . 4 If you have more pages to the home screen. Place these ...
...ADF 1 Load an original document faceup, short edge first into the ADF. Note: Do not load postcards, photos, small items, transparencies, photo paper, or thin media (such as magazine clippings) into the ADF. Copying using the scanner glass 1 Place an original document facedown on the scanner ...return to the home screen. Note: Do not load postcards, photos, small items, transparencies, photo paper, or thin media (such as magazine clippings) into the ADF, then adjust the paper guides. 3 From the printer control panel, press . 4 If you have more pages to the home screen. Place these ...
Quick Reference Guide
Page 6
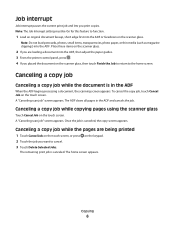
... in the ADF and cancels the job. Note: Do not load postcards, photos, small items, transparencies, photo paper, or thin media (such as magazine clippings) into the ADF, then adjust the paper guides. 3 From the printer control panel, press . 4 If you print copies. Canceling a copy job while copying pages using the scanner glass...
... in the ADF and cancels the job. Note: Do not load postcards, photos, small items, transparencies, photo paper, or thin media (such as magazine clippings) into the ADF, then adjust the paper guides. 3 From the printer control panel, press . 4 If you print copies. Canceling a copy job while copying pages using the scanner glass...

Quick Reference Guide
Page 9
...Next Number, and then enter the recipient's telephone number or shortcut number, or search the address book. This gives you must use the PostScript printer driver for your printer. 1 From your software program, click File ΠPrint. 2 From the Print window, select your desk. Faxing 9 Use this function ...into the ADF. Note: To place a dial pause within a fax number, press . Note: Do not load postcards, photos, small items, transparencies, photo paper, or thin media (such as a comma in the "Fax to dial an outside line first. 5 Touch Fax It. Place these items on the scanner ...
...Next Number, and then enter the recipient's telephone number or shortcut number, or search the address book. This gives you must use the PostScript printer driver for your printer. 1 From your software program, click File ΠPrint. 2 From the Print window, select your desk. Faxing 9 Use this function ...into the ADF. Note: To place a dial pause within a fax number, press . Note: Do not load postcards, photos, small items, transparencies, photo paper, or thin media (such as a comma in the "Fax to dial an outside line first. 5 Touch Fax It. Place these items on the scanner ...
Quick Reference Guide
Page 10
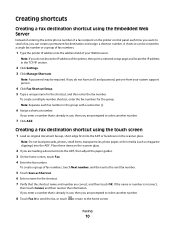
...on the scanner glass. Creating a fax destination shortcut using the Embedded Web Server Instead of entering the entire phone number of a fax recipient on the printer control panel each fax number in the group with a semicolon (;). 6 Assign a shortcut number. If you are loading a document into the ADF.... you do not have an ID and password, get one from your Web browser. Note: Do not load postcards, photos, small items, transparencies, photo paper, or thin media (such as Shortcut. 6 Enter a name for the shortcut. 7 Verify that is incorrect, then touch Cancel, and then reenter the...
...on the scanner glass. Creating a fax destination shortcut using the Embedded Web Server Instead of entering the entire phone number of a fax recipient on the printer control panel each fax number in the group with a semicolon (;). 6 Assign a shortcut number. If you are loading a document into the ADF.... you do not have an ID and password, get one from your Web browser. Note: Do not load postcards, photos, small items, transparencies, photo paper, or thin media (such as Shortcut. 6 Enter a name for the shortcut. 7 Verify that is incorrect, then touch Cancel, and then reenter the...
Quick Reference Guide
Page 11
...original document faceup, short edge first into the ADF or facedown on the scanner glass. Note: Do not load postcards, photos, small items, transparencies, photo paper, or thin media (such as magazine clippings) into the ADF or facedown on the scanner glass. 2 If you are loading a document into the ADF.... 4 Type the FTP address. 5 Touch Send It. Place these items on the scanner glass. 2 If you are loading a document into the ADF, adjust the paper guides. 3 On the home screen, touch FTP. 4 Touch Search Address Book. 5 Type the name or part of the name you are loading a document into ...
...original document faceup, short edge first into the ADF or facedown on the scanner glass. Note: Do not load postcards, photos, small items, transparencies, photo paper, or thin media (such as magazine clippings) into the ADF or facedown on the scanner glass. 2 If you are loading a document into the ADF.... 4 Type the FTP address. 5 Touch Send It. Place these items on the scanner glass. 2 If you are loading a document into the ADF, adjust the paper guides. 3 On the home screen, touch FTP. 4 Touch Search Address Book. 5 Type the name or part of the name you are loading a document into ...
Quick Reference Guide
Page 12
... Profiles on the home screen, then locate your shortcut on the scanner glass. Note: Do not load postcards, photos, small items, transparencies, photo paper, or thin media (such as magazine clippings) into the address field of your documents. If you clicked Submit. Scanning to a flash drive 1 .... 8 Review the instructions on the scanner glass. a Load an original document faceup, short edge first into the USB port on the front of the printer, then print a network setup page and locate the IP address in the TCP/IP section. 2 Click Scan Profile. 3 Click Create. 4 Select your...
... Profiles on the home screen, then locate your shortcut on the scanner glass. Note: Do not load postcards, photos, small items, transparencies, photo paper, or thin media (such as magazine clippings) into the address field of your documents. If you clicked Submit. Scanning to a flash drive 1 .... 8 Review the instructions on the scanner glass. a Load an original document faceup, short edge first into the USB port on the front of the printer, then print a network setup page and locate the IP address in the TCP/IP section. 2 Click Scan Profile. 3 Click Create. 4 Select your...
User's Guide
Page 3
...Turning Daylight Saving Time on ...69 Loading paper and specialty media 70 Setting the Paper Size and Paper Type...70 Configuring Universal paper settings...70 Loading the standard or optional 250...Paper and specialty media guidelines 84 Paper guidelines...84 Paper characteristics...84 Unacceptable paper ...85 Selecting paper...85 Selecting preprinted forms and letterhead...85 Using recycled paper and other office papers ...86 Storing paper...86 Supported paper sizes, types, and weights...87 Paper sizes supported by the printer ...87 Paper types and weights supported by the printer ...89 Paper...
...Turning Daylight Saving Time on ...69 Loading paper and specialty media 70 Setting the Paper Size and Paper Type...70 Configuring Universal paper settings...70 Loading the standard or optional 250...Paper and specialty media guidelines 84 Paper guidelines...84 Paper characteristics...84 Unacceptable paper ...85 Selecting paper...85 Selecting preprinted forms and letterhead...85 Using recycled paper and other office papers ...86 Storing paper...86 Supported paper sizes, types, and weights...87 Paper sizes supported by the printer ...87 Paper types and weights supported by the printer ...89 Paper...
User's Guide
Page 4
Copying to letterhead...93 Customizing copy settings...93 Copying from one size to another...93 Making copies using paper from a selected tray ...94 Copying a document that contains mixed paper sizes...94 Copying on both sides of the paper (duplexing) ...95 Reducing or enlarging copies ...95 Adjusting copy quality...96 Collating copies...96 Placing separator...
Copying to letterhead...93 Customizing copy settings...93 Copying from one size to another...93 Making copies using paper from a selected tray ...94 Copying a document that contains mixed paper sizes...94 Copying on both sides of the paper (duplexing) ...95 Reducing or enlarging copies ...95 Adjusting copy quality...96 Collating copies...96 Placing separator...

User's Guide
Page 7
... locations...139 200 and 201 paper jams...139 202 paper jam...141 230-239 paper jams...142 240-249 paper jams...143 250 paper jam...144 260 paper jam...145 270-279 paper jams...145 280-282 paper jams...145 283 staple jams...146 290-294 paper jams...148 Understanding printer menus 150 Menus list...150 Paper menu...151 Default Source...
... locations...139 200 and 201 paper jams...139 202 paper jam...141 230-239 paper jams...142 240-249 paper jams...143 250 paper jam...144 260 paper jam...145 270-279 paper jams...145 280-282 paper jams...145 283 staple jams...146 290-294 paper jams...148 Understanding printer menus 150 Menus list...150 Paper menu...151 Default Source...

User's Guide
Page 8
Configure MP menu...154 Envelope Enhance...155 Substitute Size menu...155 Paper Texture menu ...155 Paper Weight menu ...157 Paper Loading menu ...158 Custom Types menu...159 Custom Names menu...160 Custom Scan Sizes menu ...160 Custom Bin Names menu ...160 Universal Setup menu...161 ...
Configure MP menu...154 Envelope Enhance...155 Substitute Size menu...155 Paper Texture menu ...155 Paper Weight menu ...157 Paper Loading menu ...158 Custom Types menu...159 Custom Names menu...160 Custom Scan Sizes menu ...160 Custom Bin Names menu ...160 Universal Setup menu...161 ...
User's Guide
Page 9
... Viewing reports...255 Adjusting the brightness of the display...255 Adjusting Power Saver...255 Restoring the factory default settings...256 Troubleshooting 257 Solving basic printer problems...257 Printer control panel display is blank or displays only diamonds 257 Solving printing problems...257 Multiple-language PDFs do not print...257 Error message about... other held jobs do not print ...258 Job takes longer than expected to print ...259 Job prints from the wrong tray or on the wrong paper 259 Contents 9
... Viewing reports...255 Adjusting the brightness of the display...255 Adjusting Power Saver...255 Restoring the factory default settings...256 Troubleshooting 257 Solving basic printer problems...257 Printer control panel display is blank or displays only diamonds 257 Solving printing problems...257 Multiple-language PDFs do not print...257 Error message about... other held jobs do not print ...258 Job takes longer than expected to print ...259 Job prints from the wrong tray or on the wrong paper 259 Contents 9
User's Guide
Page 10
... Received fax has poor print quality...268 Solving option problems...269 Option does not operate correctly or quits after it is installed 269 Paper trays...269 2000-sheet tray...270 Envelope feeder ...270 Output options ...271 Flash memory card...271 Hard disk with adapter...271 Internal ...Solutions Port ...271 Memory card ...271 Solving paper feed problems...272 Paper frequently jams ...272 Paper jam message remains after jam is cleared ...272 Page that jammed does not reprint after you clear the jam 272 Solving...
... Received fax has poor print quality...268 Solving option problems...269 Option does not operate correctly or quits after it is installed 269 Paper trays...269 2000-sheet tray...270 Envelope feeder ...270 Output options ...271 Flash memory card...271 Hard disk with adapter...271 Internal ...Solutions Port ...271 Memory card ...271 Solving paper feed problems...272 Paper frequently jams ...272 Paper jam message remains after jam is cleared ...272 Page that jammed does not reprint after you clear the jam 272 Solving...
User's Guide
Page 11
Incorrect margins...275 Paper curl...276 Print irregularities ...276 Repeating defects...277 Skewed print...278 Solid black or white streaks...278 Print is too light ...279 Print is too ...
Incorrect margins...275 Paper curl...276 Print irregularities ...276 Repeating defects...277 Skewed print...278 Solid black or white streaks...278 Print is too light ...279 Print is too ...

User's Guide
Page 16
...clippings) into the ADF faceup, short edge first. • Load up to 32 lb). • Do not load postcards, photos, small items, transparencies, photo paper, or thin media (such as magazine clippings or lightweight carbonless forms). When using the scanner glass: • Place a document facedown on the scanner glass. Using...mixed page sizes (letter and legal). • Scan media weights from 52 to 120 g/m2 (14 to 25.3 mm (1 in.) thick. Learning about the printer 16 Use the scanner glass for multiple-page documents. When using the ADF: • Load the document into the ADF.
...clippings) into the ADF faceup, short edge first. • Load up to 32 lb). • Do not load postcards, photos, small items, transparencies, photo paper, or thin media (such as magazine clippings or lightweight carbonless forms). When using the scanner glass: • Place a document facedown on the scanner glass. Using...mixed page sizes (letter and legal). • Scan media weights from 52 to 120 g/m2 (14 to 25.3 mm (1 in.) thick. Learning about the printer 16 Use the scanner glass for multiple-page documents. When using the ADF: • Load the document into the ADF.
User's Guide
Page 22
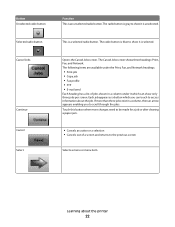
Each job appears as a button which can touch to access information about the printer 22 The Cancel Jobs screen shows three headings: Print, Fax, and Network. If more changes need to be made for a job or after clearing a paper jam. • Cancels an action or a selection • Cancels out of jobs shown in...
Each job appears as a button which can touch to access information about the printer 22 The Cancel Jobs screen shows three headings: Print, Fax, and Network. If more changes need to be made for a job or after clearing a paper jam. • Cancels an action or a selection • Cancels out of jobs shown in...
User's Guide
Page 70
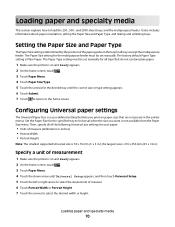
...trays that are not preset in .). the largest size is Plain Paper. The Paper Size setting for the specified tray to Universal when the size you print on paper sizes that do not contain plain paper. 1 Make sure the printer is 76 x 76 mm (3 x 3 in the tray for... measurement 1 Make sure the printer is not available from the Paper Size menu. It also includes information about paper orientation, setting the Paper Size and Paper Type, and linking and unlinking trays. Loading paper and specialty media 70 Setting the Paper Size and Paper Type The Paper Size setting is determined by the...
...trays that are not preset in .). the largest size is Plain Paper. The Paper Size setting for the specified tray to Universal when the size you print on paper sizes that do not contain plain paper. 1 Make sure the printer is 76 x 76 mm (3 x 3 in the tray for... measurement 1 Make sure the printer is not available from the Paper Size menu. It also includes information about paper orientation, setting the Paper Size and Paper Type, and linking and unlinking trays. Loading paper and specialty media 70 Setting the Paper Size and Paper Type The Paper Size setting is determined by the...

User's Guide
Page 71
...are different in either tray: 1 Pull the tray out. 8 Touch Submit to load paper in appearance, they require the same process for the paper size being loaded. Use these instructions to save your selection. Loading paper and specialty media 71 Doing so may cause a jam. 2 Squeeze the width guide... tab inward as shown, and move the width guide to the home screen. Submitting Selection appears, followed by the Paper menu. 9 Touch to return to the ...
...are different in either tray: 1 Pull the tray out. 8 Touch Submit to load paper in appearance, they require the same process for the paper size being loaded. Use these instructions to save your selection. Loading paper and specialty media 71 Doing so may cause a jam. 2 Squeeze the width guide... tab inward as shown, and move the width guide to the home screen. Submitting Selection appears, followed by the Paper menu. 9 Touch to return to the ...
User's Guide
Page 72
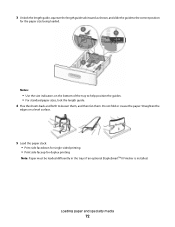
...: • Use the size indicators on a level surface. 5 Load the paper stack: • Print side facedown for single-sided printing • Print side faceup for the paper size being loaded. Loading paper and specialty media 72 Do not fold or crease the paper. Straighten the edges on the bottom of the tray to help..., lock the length guide. 4 Flex the sheets back and forth to the correct position for duplex printing Note: Paper must be loaded differently in the trays if an optional StapleSmartTM II Finisher is installed. 3 Unlock the length guide, squeeze the length guide tab inward ...
...: • Use the size indicators on a level surface. 5 Load the paper stack: • Print side facedown for single-sided printing • Print side faceup for the paper size being loaded. Loading paper and specialty media 72 Do not fold or crease the paper. Straighten the edges on the bottom of the tray to help..., lock the length guide. 4 Flex the sheets back and forth to the correct position for duplex printing Note: Paper must be loaded differently in the trays if an optional StapleSmartTM II Finisher is installed. 3 Unlock the length guide, squeeze the length guide tab inward ...
User's Guide
Page 73
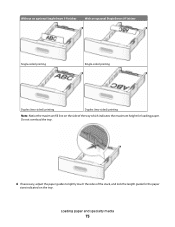
Loading paper and specialty media 73 Without an optional StapleSmart II Finisher With an optional StapleSmart II Finisher Single-sided printing Single-sided printing Duplex (two-sided) printing Duplex (two-sided) printing Note: Notice the maximum fill line on the tray. Do not overload the tray. 6 If necessary, adjust the paper guides to lightly touch the sides of the tray which indicates the maximum height for the paper sizes indicated on the side of the stack, and lock the length guide for loading paper.
Loading paper and specialty media 73 Without an optional StapleSmart II Finisher With an optional StapleSmart II Finisher Single-sided printing Single-sided printing Duplex (two-sided) printing Duplex (two-sided) printing Note: Notice the maximum fill line on the tray. Do not overload the tray. 6 If necessary, adjust the paper guides to lightly touch the sides of the tray which indicates the maximum height for the paper sizes indicated on the side of the stack, and lock the length guide for loading paper.
User's Guide
Page 74
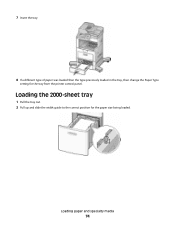
7 Insert the tray. 8 If a different type of paper was loaded than the type previously loaded in the tray, then change the Paper Type setting for the paper size being loaded. Loading the 2000-sheet tray 1 Pull the tray out. 2 Pull up and slide the width guide to the correct position for the tray from the printer control panel. Loading paper and specialty media 74
7 Insert the tray. 8 If a different type of paper was loaded than the type previously loaded in the tray, then change the Paper Type setting for the paper size being loaded. Loading the 2000-sheet tray 1 Pull the tray out. 2 Pull up and slide the width guide to the correct position for the tray from the printer control panel. Loading paper and specialty media 74


