Dell™ Photo Printer 540 Owner's Manual
Page 9
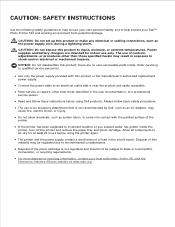
... inside the printer, turn off the printer and remove the paper tray and photo cartridge. Always follow these instructions before using Dell products. Refer servicing to qualified service personnel. • Use only the power supply provided with the painted surface of the printer. • If the printer has been ... in the circuit board. The use only. CAUTION: SAFETY INSTRUCTIONS Use the following safety guidelines to help protect your Dell™ Photo Printer 540 and working environment from potential damage. Allow all components to air-dry for indoor use of lead in the user ...
... inside the printer, turn off the printer and remove the paper tray and photo cartridge. Always follow these instructions before using Dell products. Refer servicing to qualified service personnel. • Use only the power supply provided with the painted surface of the printer. • If the printer has been ... in the circuit board. The use only. CAUTION: SAFETY INSTRUCTIONS Use the following safety guidelines to help protect your Dell™ Photo Printer 540 and working environment from potential damage. Allow all components to air-dry for indoor use of lead in the user ...
Dell™ Photo Printer 540 Owner's Manual
Page 12
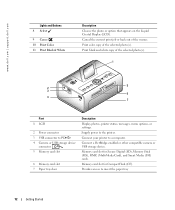
Cancel the current print job or back out of the selected photo(s). Connect your printer to insert the paper tray 12 Getting Started Memory card slot for Secure Digital (SD), Memory Stick (MS), MMC (MultiMedia Card), and Smart Media (SM) cards....storage device. Supply power to PC 4 Camera or USB storage device connector 5 Memory card slot 6 Memory card slot 7 Paper tray door Description Display photos, printer status, messages, menu options, or settings. www.dell.com | support.dell.com Lights and Buttons 8 Select 9 Cancel 10 Print Color 11 Print Black & White Description Choose the...
Cancel the current print job or back out of the selected photo(s). Connect your printer to insert the paper tray 12 Getting Started Memory card slot for Secure Digital (SD), Memory Stick (MS), MMC (MultiMedia Card), and Smart Media (SM) cards....storage device. Supply power to PC 4 Camera or USB storage device connector 5 Memory card slot 6 Memory card slot 7 Paper tray door Description Display photos, printer status, messages, menu options, or settings. www.dell.com | support.dell.com Lights and Buttons 8 Select 9 Cancel 10 Print Color 11 Print Black & White Description Choose the...
Dell™ Photo Printer 540 Owner's Manual
Page 13
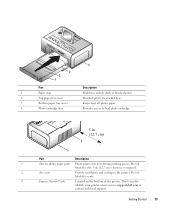
... Description 1 Slot for photo paper path Photo paper exits here during printing passes. Do not block the vents. 3 Express Service Code Located on the bottom of finished prints. 2 Top paper tray cover Finished prints are stacked here. 3 Bottom paper tray cover Keeps dust off photo paper. 4 Photo cartridge door Provides access to identify your printer when you use support.dell.com or contact...
... Description 1 Slot for photo paper path Photo paper exits here during printing passes. Do not block the vents. 3 Express Service Code Located on the bottom of finished prints. 2 Top paper tray cover Finished prints are stacked here. 3 Bottom paper tray cover Keeps dust off photo paper. 4 Photo cartridge door Provides access to identify your printer when you use support.dell.com or contact...
Dell™ Photo Printer 540 Owner's Manual
Page 15
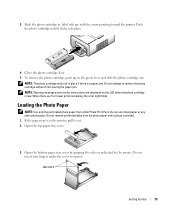
... any other photo paper. Do not remove perforated tabs from a Dell Photo Print Pack. Push the photo cartridge until a photo is printed. 1 If the paper tray is a paper jam. NOTE: The photo cartridge may lock in place if there is in the printer, pull it . Do not attempt to open it out. 2 Open the top paper tray cover. 3 Open the bottom paper tray cover by...
... any other photo paper. Do not remove perforated tabs from a Dell Photo Print Pack. Push the photo cartridge until a photo is printed. 1 If the paper tray is a paper jam. NOTE: The photo cartridge may lock in place if there is in the printer, pull it . Do not attempt to open it out. 2 Open the top paper tray cover. 3 Open the bottom paper tray cover by...
Dell™ Photo Printer 540 Owner's Manual
Page 16
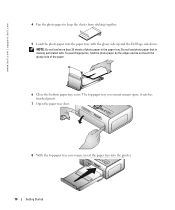
... of the paper. 6 Close the bottom paper tray cover. www.dell.com | support.dell.com 4 Fan the photo paper to keep the sheets from sticking together. 5 Load the photo paper into the printer. 16 Getting Started it catches finished prints. 7 Open the paper tray door. 8 With the top paper tray cover open ; The top paper tray cover must remain open , insert the paper tray into the paper tray, with the...
... of the paper. 6 Close the bottom paper tray cover. www.dell.com | support.dell.com 4 Fan the photo paper to keep the sheets from sticking together. 5 Load the photo paper into the printer. 16 Getting Started it catches finished prints. 7 Open the paper tray door. 8 With the top paper tray cover open ; The top paper tray cover must remain open , insert the paper tray into the paper tray, with the...
Dell™ Photo Printer 540 Owner's Manual
Page 21
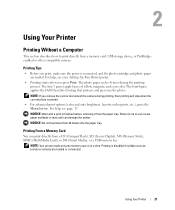
...Media), or a USB memory key. Printing is finished before removing it from the paper tray. NOTICE: Wait until a print is disabled if multiple sources (cards or camera) are loaded. Using Your Printer 21 2 Using Your Printer Printing Without a Computer This section describes how to do so can cause... printing process. Printing From a Memory Card You can damage the printer. NOTE: Your printer reads only one memory source at a time. The fourth pass applies the Dell Clear Life Coating that protects and preserves the photo. Printing Tips • Before you press Print. For help ,...
...Media), or a USB memory key. Printing is finished before removing it from the paper tray. NOTICE: Wait until a print is disabled if multiple sources (cards or camera) are loaded. Using Your Printer 21 2 Using Your Printer Printing Without a Computer This section describes how to do so can cause... printing process. Printing From a Memory Card You can damage the printer. NOTE: Your printer reads only one memory source at a time. The fourth pass applies the Dell Clear Life Coating that protects and preserves the photo. Printing Tips • Before you press Print. For help ,...
Dell™ Photo Printer 540 Owner's Manual
Page 24
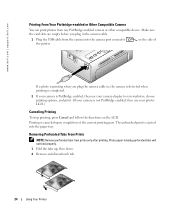
... cable. 1 Plug the USB cable from the camera into the paper tray. Photo paper missing perforated tabs will not feed properly. 1 Fold the tabs up, then down. 2 Remove and discard each tab. 24 Using Your Printer The unfinished print is not PictBridge enabled, then use your camera ...display to review photos, choose printing options, and print. (If your camera is ejected into the camera port connector the printer. on the LCD. www.dell.com | support.dell.com Printing From Your...
... cable. 1 Plug the USB cable from the camera into the paper tray. Photo paper missing perforated tabs will not feed properly. 1 Fold the tabs up, then down. 2 Remove and discard each tab. 24 Using Your Printer The unfinished print is not PictBridge enabled, then use your camera ...display to review photos, choose printing options, and print. (If your camera is ejected into the camera port connector the printer. on the LCD. www.dell.com | support.dell.com Printing From Your...
Dell™ Photo Printer 540 Owner's Manual
Page 29
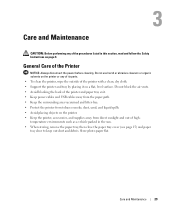
... any of its parts. • To clean the printer, wipe the outside of hightemperature environments such as a vehicle parked in the sun. • When storing, remove the paper tray, then close the paper tray cover (see page 15) and paper tray door to keep out dust and debris. Store photo paper flat. Care and Maintenance 29 General Care of...
... any of its parts. • To clean the printer, wipe the outside of hightemperature environments such as a vehicle parked in the sun. • When storing, remove the paper tray, then close the paper tray cover (see page 15) and paper tray door to keep out dust and debris. Store photo paper flat. Care and Maintenance 29 General Care of...
Dell™ Photo Printer 540 Owner's Manual
Page 30
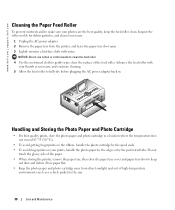
... • To avoid getting fingerprints on the ribbon, handle the photo cartridge by the perforated tabs. www.dell.com | support.dell.com Cleaning the Paper Feed Roller To prevent misfeeds and to make sure your prints, handle the photo paper by the edges or by the spool ends. • To ...clean if necessary. 1 Unplug the AC power adapter. 2 Remove the paper tray from direct sunlight and out of the feed roller. Store paper flat. • Keep the photo paper and photo cartridge away from the printer, and leave the paper tray door open. 3 Lightly moisten a lint-free cloth with your thumb ...
... • To avoid getting fingerprints on the ribbon, handle the photo cartridge by the perforated tabs. www.dell.com | support.dell.com Cleaning the Paper Feed Roller To prevent misfeeds and to make sure your prints, handle the photo paper by the edges or by the spool ends. • To ...clean if necessary. 1 Unplug the AC power adapter. 2 Remove the paper tray from direct sunlight and out of the feed roller. Store paper flat. • Keep the photo paper and photo cartridge away from the printer, and leave the paper tray door open. 3 Lightly moisten a lint-free cloth with your thumb ...
Dell™ Photo Printer 540 Owner's Manual
Page 33
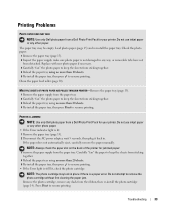
... back in. Press Print to remove the photo cartridge without first clearing the paper jam. The paper tray may lock in any other paper. Load photo paper (page 15) and re-install the paper tray. NOTE: Always check the paper slot on the back of the printer for your printer. PRINTER IS JAMMED NOTE: Use only Dell photo paper from the ribbon, then re-install the...
... back in. Press Print to remove the photo cartridge without first clearing the paper jam. The paper tray may lock in any other paper. Load photo paper (page 15) and re-install the paper tray. NOTE: Always check the paper slot on the back of the printer for your printer. PRINTER IS JAMMED NOTE: Use only Dell photo paper from the ribbon, then re-install the...
Dell™ Photo Printer 540 Owner's Manual
Page 34
... Dell photo paper from a Dell Photo Print Pack for your printer. PRINT IS SPOTTED Check to wipe clean. NOTE: When storing photo paper, remove and close the paper tray and close the paper tray door on the photo paper or inside the printer. Do not use inkjet paper or any other photo paper. • Check the photo paper: 1 Remove the paper tray. 2 Check the paper slot on glossy side of the printer. 3 Remove loose paper...
... Dell photo paper from a Dell Photo Print Pack for your printer. PRINT IS SPOTTED Check to wipe clean. NOTE: When storing photo paper, remove and close the paper tray and close the paper tray door on the photo paper or inside the printer. Do not use inkjet paper or any other photo paper. • Check the photo paper: 1 Remove the paper tray. 2 Check the paper slot on glossy side of the printer. 3 Remove loose paper...
Dell™ Photo Printer 540 Owner's Manual
Page 35
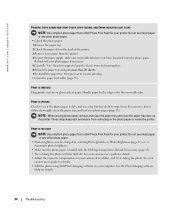
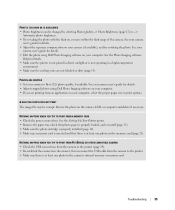
... 21). A SELECTED PHOTO DOES NOT PRINT The image file may be changed by selecting Photo Quality--> Photo Brightness (page 17) or --> Automatic photo brightness. • Try re-taking the photo. See the Setting Up Your Printer poster. • Remove the paper tray, check that photo paper is properly loaded, ... • Photo brightness can be corrupt. NOTHING HAPPENS WHEN YOU TRY TO PRINT FROM A MEMORY CARD • Check the power connections. PHOTOS ARE CROPPED • Set your computer. See your camera user's guide for details. • Edit the photo using Dell Photo Imaging software ...
... 21). A SELECTED PHOTO DOES NOT PRINT The image file may be changed by selecting Photo Quality--> Photo Brightness (page 17) or --> Automatic photo brightness. • Try re-taking the photo. See the Setting Up Your Printer poster. • Remove the paper tray, check that photo paper is properly loaded, ... • Photo brightness can be corrupt. NOTHING HAPPENS WHEN YOU TRY TO PRINT FROM A MEMORY CARD • Check the power connections. PHOTOS ARE CROPPED • Set your computer. See your camera user's guide for details. • Edit the photo using Dell Photo Imaging software ...

Dell™ Photo Printer 540 Owner's Manual
Page 36
...8226; Scrapping of photo paper as you wish to keep your printer. Disconnect then reconnect the USB cable from the printer to see if the paper tray is empty or if paper is fully depleted. 36 Troubleshooting Do not attempt to remove the photo cartridge without first clearing the paper error. •... printing may lock in direct sunlight or is installed (page 25). www.dell.com | support.dell.com NOTHING HAPPENS WHEN YOU TRY TO PRINT (FROM COMPUTER) • Check the USB connections from the printer to Pause Printing and Offline, if checked. • Close unnecessary software ...
...8226; Scrapping of photo paper as you wish to keep your printer. Disconnect then reconnect the USB cable from the printer to see if the paper tray is empty or if paper is fully depleted. 36 Troubleshooting Do not attempt to remove the photo cartridge without first clearing the paper error. •... printing may lock in direct sunlight or is installed (page 25). www.dell.com | support.dell.com NOTHING HAPPENS WHEN YOU TRY TO PRINT (FROM COMPUTER) • Check the USB connections from the printer to Pause Printing and Offline, if checked. • Close unnecessary software ...

Dell™ Photo Printer 540 Owner's Manual
Page 73
Printer Specifications Printing process Operating environment (for prints 2-5) NOTE: Print speed is the complete and exclusive statement of continuous prints, and environmental conditions. Without paper tray: 5.4 x 7.4 x 3.2 in. (137 x 189 x 81 mm) With paper tray: 13.2 x 7.4 x 3.2 in. (336 x 189 x 81 mm) Without paper tray: 2.69 lbs (1.22 Kg) With paper tray...on photo size, number of the agreement between you and Dell regarding the Software. for first print (< 60 sec. for optimum photo quality) Power Print speed Size (Depth, width, height) Weight Print size Photo paper size Photo ...
Printer Specifications Printing process Operating environment (for prints 2-5) NOTE: Print speed is the complete and exclusive statement of continuous prints, and environmental conditions. Without paper tray: 5.4 x 7.4 x 3.2 in. (137 x 189 x 81 mm) With paper tray: 13.2 x 7.4 x 3.2 in. (336 x 189 x 81 mm) Without paper tray: 2.69 lbs (1.22 Kg) With paper tray...on photo size, number of the agreement between you and Dell regarding the Software. for first print (< 60 sec. for optimum photo quality) Power Print speed Size (Depth, width, height) Weight Print size Photo paper size Photo ...
Dell™ Photo Printer 540 User's Guide
Page 2
...contact your local authorities. Power supplies and battery chargers are no user-serviceable parts inside the printer, turn off the printer and remove the paper tray and photo cartridge. there are intended for at www.eaie.org. If the printer has been subjected to qualified service personnel. In the US, visit the Electronics Industry Alliance...your own personal safety and to liquid, moisture, or extreme temperatures. CAUTION: SAFETY INSTRUCTIONS Use the following safety guidelines to help protect your Dell™ Photo Printer 540 and working environment from potential damage.
...contact your local authorities. Power supplies and battery chargers are no user-serviceable parts inside the printer, turn off the printer and remove the paper tray and photo cartridge. there are intended for at www.eaie.org. If the printer has been subjected to qualified service personnel. In the US, visit the Electronics Industry Alliance...your own personal safety and to liquid, moisture, or extreme temperatures. CAUTION: SAFETY INSTRUCTIONS Use the following safety guidelines to help protect your Dell™ Photo Printer 540 and working environment from potential damage.
Dell™ Photo Printer 540 User's Guide
Page 6
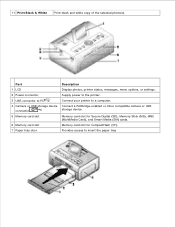
...white copy of the selected photo(s). Part Description 1 LCD Display photos, printer status, messages, menu options, or settings. 2 Power connector Supply power to the printer. 3 USB connector to PC Connect your printer to a computer. 4 ...Camera or USB storage device Connect a PictBridge-enabled or other compatible camera or USB connector storage device. 5 Memory card slot Memory card slot for Secure Digital (SD), Memory Stick (MS), MMC (MultiMedia Card), and Smart Media (SM) cards. 6 Memory card slot Memory card slot for CompactFlash (CF). 7 Paper tray...
...white copy of the selected photo(s). Part Description 1 LCD Display photos, printer status, messages, menu options, or settings. 2 Power connector Supply power to the printer. 3 USB connector to PC Connect your printer to a computer. 4 ...Camera or USB storage device Connect a PictBridge-enabled or other compatible camera or USB connector storage device. 5 Memory card slot Memory card slot for Secure Digital (SD), Memory Stick (MS), MMC (MultiMedia Card), and Smart Media (SM) cards. 6 Memory card slot Memory card slot for CompactFlash (CF). 7 Paper tray...
Dell™ Photo Printer 540 User's Guide
Page 7
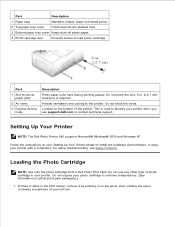
Setting Up Your Printer NOTE: The Dell Photo Printer 540 supports Microsoft® Windows® 2000 and Windows XP. Part Description 1 Paper stop Maintains orderly stack of finished prints. 2 Top paper tray cover Finished prints are stacked here. 3 Bottom paper tray cover Keeps dust off photo paper. 4 Photo cartridge door Provides access to the printer. Provide ventilation and cooling to load photo cartridge. Do not expose...
Setting Up Your Printer NOTE: The Dell Photo Printer 540 supports Microsoft® Windows® 2000 and Windows XP. Part Description 1 Paper stop Maintains orderly stack of finished prints. 2 Top paper tray cover Finished prints are stacked here. 3 Bottom paper tray cover Keeps dust off photo paper. 4 Photo cartridge door Provides access to the printer. Provide ventilation and cooling to load photo cartridge. Do not expose...

Dell™ Photo Printer 540 User's Guide
Page 9
... the Dell logo side down. If the paper tray is in the paper tray. Fan the photo paper to open ; Do not load photo paper that is printed. 1. Do not use inkjet paper or any other photo paper. Open the bottom paper tray cover by grasping the sides as indicated by the edges and do not touch the glossy side of photo paper in the printer, pull...
... the Dell logo side down. If the paper tray is in the paper tray. Fan the photo paper to open ; Do not load photo paper that is printed. 1. Do not use inkjet paper or any other photo paper. Open the bottom paper tray cover by grasping the sides as indicated by the edges and do not touch the glossy side of photo paper in the printer, pull...

Dell™ Photo Printer 540 User's Guide
Page 10
With the top paper tray cover open, insert the paper tray into the printer. Press Select ( ) and follow the directions on the display, then press Select ( ). 3. 6. 7. Continue scrolling until the menu heading you want appears on the LCD. NOTE: The option currently selected is highlighted. 4. Press until the option you want is noted with a checkmark. Select Menu Items 1. Open the paper tray door. 8. Changing Settings-Press Menu Press the Menu button to customize your photo and printer settings. Press the Menu button. 2. Print Options Menu
With the top paper tray cover open, insert the paper tray into the printer. Press Select ( ) and follow the directions on the display, then press Select ( ). 3. 6. 7. Continue scrolling until the menu heading you want appears on the LCD. NOTE: The option currently selected is highlighted. 4. Press until the option you want is noted with a checkmark. Select Menu Items 1. Open the paper tray door. 8. Changing Settings-Press Menu Press the Menu button to customize your photo and printer settings. Press the Menu button. 2. Print Options Menu

Dell™ Photo Printer 540 User's Guide
Page 14
... printing process. The fourth pass applies the Dell Clear Life Coating that protects and preserves the photo. Printing From a Memory Card You can damage the printer. The photo paper cycles 4 times during printing, then printing will stop when the current photo is disabled if multiple sources (cards or...is connected, and the photo cartridge and photo paper are loaded or connected. NOTE: If you press Print. NOTE: Your printer reads only one memory source at a time. Printing Tips Before you print, make sure the power is finished before removing it from the paper tray. For advanced print ...
... printing process. The fourth pass applies the Dell Clear Life Coating that protects and preserves the photo. Printing From a Memory Card You can damage the printer. The photo paper cycles 4 times during printing, then printing will stop when the current photo is disabled if multiple sources (cards or...is connected, and the photo cartridge and photo paper are loaded or connected. NOTE: If you press Print. NOTE: Your printer reads only one memory source at a time. Printing Tips Before you print, make sure the power is finished before removing it from the paper tray. For advanced print ...

