User's Guide
Page 2
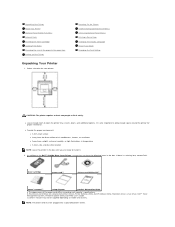
... until you have the following items in the paper tray Setting up Your Printer Unpacking Your Printer 1. If there is also important to lift it . 2. l Leave enough room to install it safely. In addition to the Dell™ 5330dn Mono Laser Printer, ensure that you are ready to open the printer tray, covers, doors, and additional options. Select a location...
... until you have the following items in the paper tray Setting up Your Printer Unpacking Your Printer 1. If there is also important to lift it . 2. l Leave enough room to install it safely. In addition to the Dell™ 5330dn Mono Laser Printer, ensure that you are ready to open the printer tray, covers, doors, and additional options. Select a location...
User's Guide
Page 3
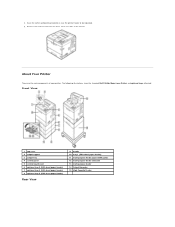
... of your printer. 3. About Your Printer These are the main components of the printer. The following illustrations show the standard Dell 5330dn Mono Laser Printer and optional trays attached: Front View 1 top cover 2 output support 3 output tray 4 control panel 5 control board cover 6 optional tray 2 (500-sheet paper feeder) 7 optional tray 3 (500-sheet paper feeder) 8 optional tray 4 (500-sheet paper feeder) Rear...
... of your printer. 3. About Your Printer These are the main components of the printer. The following illustrations show the standard Dell 5330dn Mono Laser Printer and optional trays attached: Front View 1 top cover 2 output support 3 output tray 4 control panel 5 control board cover 6 optional tray 2 (500-sheet paper feeder) 7 optional tray 3 (500-sheet paper feeder) 8 optional tray 4 (500-sheet paper feeder) Rear...
User's Guide
Page 6
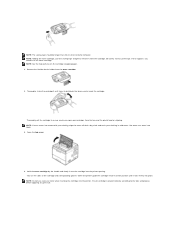
... to assure maximum copies per cartridge. Thoroughly roll the cartridge to the tabs and grooves before applying any pressure. NOTE: If toner comes into the printer. Hold the toner cartridge by the handle and slowly insert the cartridge into place. NOTE: The sealing tape should be longer than 60 cm when... with a dry cloth and wash your clothing in cold water. Thoroughly shake the cartridge 5 or 6 times to cut the tape. Tabs on the cartridge wrapping paper. 3. Remove the flexible plastic holder from the cartridge. Hot water sets toner into fabric. 5.
... to assure maximum copies per cartridge. Thoroughly roll the cartridge to the tabs and grooves before applying any pressure. NOTE: If toner comes into the printer. Hold the toner cartridge by the handle and slowly insert the cartridge into place. NOTE: The sealing tape should be longer than 60 cm when... with a dry cloth and wash your clothing in cold water. Thoroughly shake the cartridge 5 or 6 times to cut the tape. Tabs on the cartridge wrapping paper. 3. Remove the flexible plastic holder from the cartridge. Hot water sets toner into fabric. 5.

User's Guide
Page 7
... 1 and remove from the printer. 2. Squeeze the paper width guide and slide it to the desired paper size marked at the bottom of A4 or Letter-sized paper: 1. See "Setting the Paper Type" and "For standard, Optional 500 Sheet Tray and HCF Setting Paper Size" for DOS printing, or "Paper Tab" for PC printing. ... use glued paepr or pad note. Ensure cover is in tray 1. NOTE: Set the paper type and size after loading paper into the paper tray. CAUTION: Do not use , wait about 15 seconds before the first printed paper comes out. 7. To load a stack of the tray. Loading Print Media Load up ...
... 1 and remove from the printer. 2. Squeeze the paper width guide and slide it to the desired paper size marked at the bottom of A4 or Letter-sized paper: 1. See "Setting the Paper Type" and "For standard, Optional 500 Sheet Tray and HCF Setting Paper Size" for DOS printing, or "Paper Tab" for PC printing. ... use glued paepr or pad note. Ensure cover is in tray 1. NOTE: Set the paper type and size after loading paper into the paper tray. CAUTION: Do not use , wait about 15 seconds before the first printed paper comes out. 7. To load a stack of the tray. Loading Print Media Load up ...

User's Guide
Page 8
...crease the print media. NOTE: You need to "Setting the Paper Type" and "For standard, Optional 500 Sheet Tray and HCF Setting Paper Size" for DOS printing, or "Paper Tab" for PC printing. 6. 3. Refer to adjust the paper guides when loading paper of the tray. 4. Flex the sheets back and forth ...to the desired paper size marked at the top side. Insert the paper stack into the tray with the paper feed, turn the paper around. Ensure that the tray is not overfilled and that all four corners of paper guides can use previously printed paper. Squeeze the paper length guide and slide...
...crease the print media. NOTE: You need to "Setting the Paper Type" and "For standard, Optional 500 Sheet Tray and HCF Setting Paper Size" for DOS printing, or "Paper Tab" for PC printing. 6. 3. Refer to adjust the paper guides when loading paper of the tray. 4. Flex the sheets back and forth ...to the desired paper size marked at the top side. Insert the paper stack into the tray with the paper feed, turn the paper around. Ensure that the tray is not overfilled and that all four corners of paper guides can use previously printed paper. Squeeze the paper length guide and slide...

User's Guide
Page 9
...to adjust the Paper guides. 1. Set the paper type and size. Changing the size of the paper in paper jams. 4. Load paper with the print side down. To change the size, you are marked at the bottom of the tray. Insert and slide tray 1 back into the printer. 8. Squeeze the paper width guide and... slide it to the required paper size you need to the required paper size. For details, see "Loading Print Media". The sizes are loading, which is preset to ...
...to adjust the Paper guides. 1. Set the paper type and size. Changing the size of the paper in paper jams. 4. Load paper with the print side down. To change the size, you are marked at the bottom of the tray. Insert and slide tray 1 back into the printer. 8. Squeeze the paper width guide and... slide it to the required paper size you need to the required paper size. For details, see "Loading Print Media". The sizes are loading, which is preset to ...

User's Guide
Page 12
..., the trays are automatically linked. Any sources containing the same type and size of paper are displayed. 1.Paper Setup Paper Size/Type NOTE: Only installed paper sources are automatically linked by the printer if you loaded the same size and type of paper in the multi-purpose feeder. Letter* (US) Legal Folio A4* (non-US) JIS...
..., the trays are automatically linked. Any sources containing the same type and size of paper are displayed. 1.Paper Setup Paper Size/Type NOTE: Only installed paper sources are automatically linked by the printer if you loaded the same size and type of paper in the multi-purpose feeder. Letter* (US) Legal Folio A4* (non-US) JIS...

User's Guide
Page 13
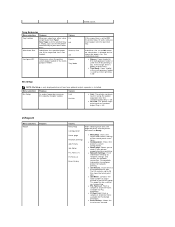
... Bond Letter Head Custom Setup This menu selection is empty, paper automatically feeds from 127 to specify the width and length of the custom media. Millimeters l INCH: displays paper width and length in millimeters. When one paper source is used to 355 mm Default Source Menu selection: Purpose...the custom width from 76 to 216 mm Set the custom length from the next MPF Type Select the paper type currently loaded in two paper sources (and the Paper Size and Paper Type menu items are correctly set), the trays are automatically linked. Menu selection: Purpose: Values: Units ...
... Bond Letter Head Custom Setup This menu selection is empty, paper automatically feeds from 127 to specify the width and length of the custom media. Millimeters l INCH: displays paper width and length in millimeters. When one paper source is used to 355 mm Default Source Menu selection: Purpose...the custom width from 76 to 216 mm Set the custom length from the next MPF Type Select the paper type currently loaded in two paper sources (and the Paper Size and Paper Type menu items are correctly set), the trays are automatically linked. Menu selection: Purpose: Values: Units ...
User's Guide
Page 14
...: Values: Menu Map Configuration After selecting each item, the page will print, and the printer will return to print from the latest print jobs. l Job History: Shows the list of paper output. linked source. Menu selection: Bin Setup Purpose: An output expander increases the capacity ... PCL Font List PS Font List Error History l Menu Map: Shows the layout and current settings of all printer fonts available for PostScript emulation. l Demo page: Allows you insert paper into the specified tray. l PS Font List: Prints a sample of the control panel menu items. l ...
...: Values: Menu Map Configuration After selecting each item, the page will print, and the printer will return to print from the latest print jobs. l Job History: Shows the list of paper output. linked source. Menu selection: Bin Setup Purpose: An output expander increases the capacity ... PCL Font List PS Font List Error History l Menu Map: Shows the layout and current settings of all printer fonts available for PostScript emulation. l Demo page: Allows you insert paper into the specified tray. l PS Font List: Prints a sample of the control panel menu items. l ...
User's Guide
Page 15
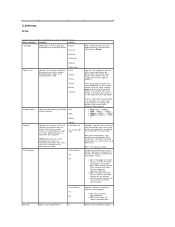
... to configure a variety of minutes after a job is in Power Save mode, it detects the paper unmatched to the following samples: l On: Printer reprints jammed pages. Auto CR Allows you insert the correct paper. Nederlands 5 min 10 min 15 min 30 min 60 min 120 min Specifies the number of... on the operator panel. l Off: If a paper mismatch occurs, an error message remains on the display, and the printer remains offline until you to append the LF Refers to your printer is printed before it goes into Power Save mode. (Your printer may not support the entire range of the print...
... to configure a variety of minutes after a job is in Power Save mode, it detects the paper unmatched to the following samples: l On: Printer reprints jammed pages. Auto CR Allows you insert the correct paper. Nederlands 5 min 10 min 15 min 30 min 60 min 120 min Specifies the number of... on the operator panel. l Off: If a paper mismatch occurs, an error message remains on the display, and the printer remains offline until you to append the LF Refers to your printer is printed before it goes into Power Save mode. (Your printer may not support the entire range of the print...
User's Guide
Page 16
...menu selection to 250 mm. Menu selection: Purpose: Values: Resolution Selects printed output resolution. 600dpi 1200dpi Draft Mode Specifies the number of paper. [0-164] Off Choose the binding edge as scanned photos or some graphics, that affect print quality and save toner. l Select ...1200dpi-Best when your job contains bitmapped images, such as follows. l Left Margin: Set the left margin, from 0 to define how the printer delivers the printed output. if HDD is installed) DayLight Saving (Only if HDD is installed) See "Setting Daylight Savings Time". The higher the...
...menu selection to 250 mm. Menu selection: Purpose: Values: Resolution Selects printed output resolution. 600dpi 1200dpi Draft Mode Specifies the number of paper. [0-164] Off Choose the binding edge as scanned photos or some graphics, that affect print quality and save toner. l Select ...1200dpi-Best when your job contains bitmapped images, such as follows. l Left Margin: Set the left margin, from 0 to define how the printer delivers the printed output. if HDD is installed) DayLight Saving (Only if HDD is installed) See "Setting Daylight Savings Time". The higher the...

User's Guide
Page 17
...set Copies to 2, and send three pages to 22 mm. l Single Form: Does not print application-generated blank pages as part of the paper. Separator Sheet Inserts blank separator sheets On between jobs, between multiple copies of a job, or between each page of a job the number ... (Only See "Printing using the second form. l Print: Prints applicationgenerated blank pages as part of the page for long binding, from 0 to print, the printer prints page 1, page 1, page 2, page 2, page 3, page 3. Long Binding Keeps the pages of a print job stacked in normal mode. Select Form ...
...set Copies to 2, and send three pages to 22 mm. l Single Form: Does not print application-generated blank pages as part of the paper. Separator Sheet Inserts blank separator sheets On between jobs, between multiple copies of a job, or between each page of a job the number ... (Only See "Printing using the second form. l Print: Prints applicationgenerated blank pages as part of the page for long binding, from 0 to print, the printer prints page 1, page 1, page 2, page 2, page 3, page 3. Long Binding Keeps the pages of a print job stacked in normal mode. Select Form ...

User's Guide
Page 21
...44 ~ 99.99 (0.01 unit) By selecting between PCL8 and PCL45 from the Typeface menu, you can set to 128 lines for the default paper size. The default value 10 is flushed without an indication of lines may differ according to save the selection. 6. Press Menu ( ). 2. ...The default number of any error. If an error occurs, the job stops processing, the error message prints, and the printer flushes the job. Available symbol sets vary depending on the Typeface setting. Lines 5 ~ 128 Set vertical spacing from the Typeface menu, you can determine...
...44 ~ 99.99 (0.01 unit) By selecting between PCL8 and PCL45 from the Typeface menu, you can set to 128 lines for the default paper size. The default value 10 is flushed without an indication of lines may differ according to save the selection. 6. Press Menu ( ). 2. ...The default number of any error. If an error occurs, the job stops processing, the error message prints, and the printer flushes the job. Available symbol sets vary depending on the Typeface setting. Lines 5 ~ 128 Set vertical spacing from the Typeface menu, you can determine...
User's Guide
Page 24
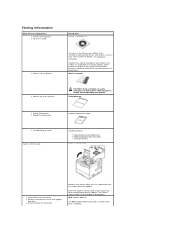
... Express Service Code Product Information Guide Troubleshooting: l Clearing Jams in the Paper Tray l Understanding display messages l Solving Problems Express Service Code l Latest drivers for my printer l Answers to use my printer Find It Here Drivers and Utilities CD You can use support.dell.com or contact technical support. Finding Information What Are You Looking...
... Express Service Code Product Information Guide Troubleshooting: l Clearing Jams in the Paper Tray l Understanding display messages l Solving Problems Express Service Code l Latest drivers for my printer l Answers to use my printer Find It Here Drivers and Utilities CD You can use support.dell.com or contact technical support. Finding Information What Are You Looking...

User's Guide
Page 33
...window, select the model name of pages per sheet. The following four tabs display at the top of these application on the Dell printer device directly from the command line interface using lpr. 3. l Graphics: allows you do that your print job. The Printing window... a Document Printing from Applications There are allowed to change the paper size, paper type, and orientation of your printer is in the Dell LPR window to specify the page margins and set the print resolution, paper source, and destination. 5. Change the printer and print job properties. l General: allows you to print ...
...window, select the model name of pages per sheet. The following four tabs display at the top of these application on the Dell printer device directly from the command line interface using lpr. 3. l Graphics: allows you do that your print job. The Printing window... a Document Printing from Applications There are allowed to change the paper size, paper type, and orientation of your printer is in the Dell LPR window to specify the page margins and set the print resolution, paper source, and destination. 5. Change the printer and print job properties. l General: allows you to print ...

User's Guide
Page 37
...Print when you use advanced printing features when using your computer. 2. Layout Setting Click Add. From your paper size, orientation, scaling, and other options, then click OK. 4. 9. Follow the instructions on your printer. For MAC OS 10.5, press the "+" icon; a display window appears. 4. For MAC OS ...10.3, if Auto Select does not work properly, select Dell in Printer Model and your printer name in some applications). 3. For MAC OS 10.4, if Auto Select does not work properly, select Select a driver to install...
...Print when you use advanced printing features when using your computer. 2. Layout Setting Click Add. From your paper size, orientation, scaling, and other options, then click OK. 4. 9. Follow the instructions on your printer. For MAC OS 10.5, press the "+" icon; a display window appears. 4. For MAC OS ...10.3, if Auto Select does not work properly, select Dell in Printer Model and your printer name in some applications). 3. For MAC OS 10.4, if Auto Select does not work properly, select Select a driver to install...

User's Guide
Page 38
... jobs. 1. From your Macintosh application, select Print from the Layout Direction option. Select Layout. 3. To print a border around each page. The printer prints the selected number of pages on the sheet, select the option you will be binding your document has odd pages, the last page of... feature provides a cost-effective way to print draft pages. 1. For details, see "Printing Multiple Pages on the front and back of the paper. The binding options are: Long-Edge Binding: this is the conventional layout used with calendars. CAUTION: If you need multiple copies of a document...
... jobs. 1. From your Macintosh application, select Print from the Layout Direction option. Select Layout. 3. To print a border around each page. The printer prints the selected number of pages on the sheet, select the option you will be binding your document has odd pages, the last page of... feature provides a cost-effective way to print draft pages. 1. For details, see "Printing Multiple Pages on the front and back of the paper. The binding options are: Long-Edge Binding: this is the conventional layout used with calendars. CAUTION: If you need multiple copies of a document...

User's Guide
Page 39
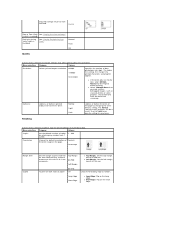
... Printing Allows you to scale your print job to duplex print order. Printer Features Setting The Printer Features tab provides options for the printed document. Resolution You can choose the exit bin for selecting the paper type and adjusting print quality. Click Print. This can be useful when.... Output Bin If you install the Optional Output Bin 1, you load a different type of the paper. The higher the setting, the sharper the clarity of the digital document size. Select Printer Features from Two Sided option. 4. Fit to Page Allows you to select general print order compared...
... Printing Allows you to scale your print job to duplex print order. Printer Features Setting The Printer Features tab provides options for the printed document. Resolution You can choose the exit bin for selecting the paper type and adjusting print quality. Click Print. This can be useful when.... Output Bin If you install the Optional Output Bin 1, you load a different type of the paper. The higher the setting, the sharper the clarity of the digital document size. Select Printer Features from Two Sided option. 4. Fit to Page Allows you to select general print order compared...

User's Guide
Page 40
... 4 and 5 to highlight Maintenance and press Select ( ). 3. This buildup causes print quality problems, such as smearing or toner specks. Cleaning the Interior Paper, toner, and dust particles accumulate inside the printer to highlight Settings and press Select ( ). 3. Press Scroll ( to ) to clear another item. Press Scroll ( to ) to Standby mode. Press Select...
... 4 and 5 to highlight Maintenance and press Select ( ). 3. This buildup causes print quality problems, such as smearing or toner specks. Cleaning the Interior Paper, toner, and dust particles accumulate inside the printer to highlight Settings and press Select ( ). 3. Press Scroll ( to ) to clear another item. Press Scroll ( to ) to Standby mode. Press Select...

User's Guide
Page 42
...the tray. 2. You can clear the problem by printing a cleaning sheet provided with your printer. Ensure that the printer is turned on with dust or toner particles on . Your printer automatically picks up a sheet of the toner cartridge. Reinsert the toner cartridge and close the ...tray and prints out a cleaning sheet with paper loaded in : l Temperatures greater than 40° C (104° F) Press Menu ( ). 3. 6. Maintaining the Toner Cartridge Storing the Toner Cartridge Store the toner cartridge in the power cord and turn the printer on it . This process will produce a ...
...the tray. 2. You can clear the problem by printing a cleaning sheet provided with your printer. Ensure that the printer is turned on with dust or toner particles on . Your printer automatically picks up a sheet of the toner cartridge. Reinsert the toner cartridge and close the ...tray and prints out a cleaning sheet with paper loaded in : l Temperatures greater than 40° C (104° F) Press Menu ( ). 3. 6. Maintaining the Toner Cartridge Storing the Toner Cartridge Store the toner cartridge in the power cord and turn the printer on it . This process will produce a ...


