Service Manual
Page 159
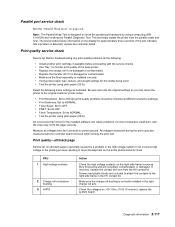
... Use Tray 1 to NORMAL. • Test the printer using a wrap plug (P/N 1319128) and invoking the Parallel...An incorrect printer driver for the installed software can return the printer to the original customer printer setup. ...: Set to test for print quality of the base printer. • Replace the charge roll if it is damaged...; Make sure the fuser assembly is designed to printer ground. FRU 1 High voltage contacts 2 Charge ...the media being used. • Test the printer using plain paper (20 lb). Check the ...board. This test helps isolate the printer from the connector to check the ...
... Use Tray 1 to NORMAL. • Test the printer using a wrap plug (P/N 1319128) and invoking the Parallel...An incorrect printer driver for the installed software can return the printer to the original customer printer setup. ...: Set to test for print quality of the base printer. • Replace the charge roll if it is damaged...; Make sure the fuser assembly is designed to printer ground. FRU 1 High voltage contacts 2 Charge ...the media being used. • Test the printer using plain paper (20 lb). Check the ...board. This test helps isolate the printer from the connector to check the ...

Service Manual
Page 160
... the photoconductor. Symptom 1 Random marks Action Check the print cartridge for damage, PC drum contact wear or contamination. If there is bent or damaged, replace the contact. The printhead used in the printer does not have a mechanical shutter as previous laser printers. FRU 1 Print cartridge 2 High voltage contact 3 HVPS 4 Front cable harness HVPS section...
... the photoconductor. Symptom 1 Random marks Action Check the print cartridge for damage, PC drum contact wear or contamination. If there is bent or damaged, replace the contact. The printhead used in the printer does not have a mechanical shutter as previous laser printers. FRU 1 Print cartridge 2 High voltage contact 3 HVPS 4 Front cable harness HVPS section...
Service Manual
Page 213
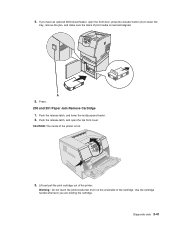
.... Press . 200 and 201 Paper Jam Remove Cartridge 1. Push the release latch, and lower the multipurpose feeder. 2. Warning: Do not touch the photoconductor drum on the underside of the printer. Diagnostic aids 3-41 A 5. 4. If you are holding the cartridge. Push the release latch, and open the front door, press the elevator button...
.... Press . 200 and 201 Paper Jam Remove Cartridge 1. Push the release latch, and lower the multipurpose feeder. 2. Warning: Do not touch the photoconductor drum on the underside of the printer. Diagnostic aids 3-41 A 5. 4. If you are holding the cartridge. Push the release latch, and open the front door, press the elevator button...
Service Manual
Page 327
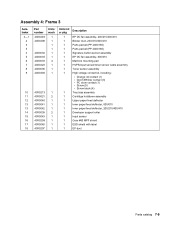
.../input sensor/toner sensor cable assembly 1 Toner sensor assembly 1 High voltage contact kit, including: • Charge roll contact (1) • Doc/TAR/Dev contact (3) • PC drum contact (1) • Screw (5) • Screw block (4) 1 Tray bias assembly 1 Cartridge holddown assembly 1 Upper paper feed deflector 1 Inner paper feed deflector, 000/010 1 Inner paper feed...
.../input sensor/toner sensor cable assembly 1 Toner sensor assembly 1 High voltage contact kit, including: • Charge roll contact (1) • Doc/TAR/Dev contact (3) • PC drum contact (1) • Screw (5) • Screw block (4) 1 Tray bias assembly 1 Cartridge holddown assembly 1 Upper paper feed deflector 1 Inner paper feed deflector, 000/010 1 Inner paper feed...


