
User's Guide
Page 2
... message indicating the menus are using the Up or Down arrow button, the cursor moves one input option or a duplex unit and an input option. l Blinking green - Printer is on , but idle. You must be in the Ready state to four optional paper trays, or three trays... and a duplex unit. Understanding the Operator Panel Number: Use the: 1 Indicator light 2 Menu button 3 Navigation buttons To: Determine whether the printer is on , busy, idle, processing a job, or requires operator intervention. l Off -...
... message indicating the menus are using the Up or Down arrow button, the cursor moves one input option or a duplex unit and an input option. l Blinking green - Printer is on , but idle. You must be in the Ready state to four optional paper trays, or three trays... and a duplex unit. Understanding the Operator Panel Number: Use the: 1 Indicator light 2 Menu button 3 Navigation buttons To: Determine whether the printer is on , busy, idle, processing a job, or requires operator intervention. l Off -...
User's Guide
Page 15
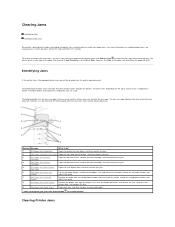
Identifying Jams If the printer jams, the appropriate jam message will print. Open the rear duplex door, and remove the jam. 9 24x Paper Jam Check Tray x Open each tray, and then remove any jammed media. * After clearing the jam, press the ... top front cover, remove the print cartridge, and then remove the jam. 5 23x Paper Jam Open Duplex Open the rear duplex door, and then remove the jam. However, it properly, you should be displayed on the printer operator panel. To resolve the paper jam messages, you must clear the entire paper path and...
Identifying Jams If the printer jams, the appropriate jam message will print. Open the rear duplex door, and remove the jam. 9 24x Paper Jam Check Tray x Open each tray, and then remove any jammed media. * After clearing the jam, press the ... top front cover, remove the print cartridge, and then remove the jam. 5 23x Paper Jam Open Duplex Open the rear duplex door, and then remove the jam. However, it properly, you should be displayed on the printer operator panel. To resolve the paper jam messages, you must clear the entire paper path and...
User's Guide
Page 16
... Use the cartridge handle whenever you quickly clear the print path. To go to light for extended periods. CAUTION: The inside the printer occur in two locations and require the removal of the cartridge. Paper jams can occur, clearing the paper path is fairly easy depending ...: The following clearing jam instructions may be hot. Lift and pull the print cartridge out of the printer occur in the input options or the duplex tray. Jams in the front of the printer. However, they have been grouped to lower the multipurpose feeder. 2. Although there are holding the cartridge...
... Use the cartridge handle whenever you quickly clear the print path. To go to light for extended periods. CAUTION: The inside the printer occur in two locations and require the removal of the cartridge. Paper jams can occur, clearing the paper path is fairly easy depending ...: The following clearing jam instructions may be hot. Lift and pull the print cartridge out of the printer occur in the input options or the duplex tray. Jams in the front of the printer. However, they have been grouped to lower the multipurpose feeder. 2. Although there are holding the cartridge...

User's Guide
Page 19
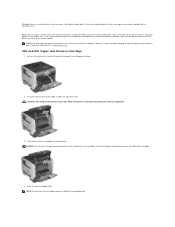
Open the duplex rear door. 2. Close the duplex rear door. Press the Select button . 23x and 24x Jams Paper jams in these areas: 1. Open the printer paper tray, and remove any jammed media. Remove the jammed media. To clear these areas can occur on the media location, pull the media either up or down. 3. Make sure it snaps into place. 4. Depending on the incline surface of a tray or across more than one tray. 23x Paper Jam Open Duplex Rear Door 1.
Open the duplex rear door. 2. Close the duplex rear door. Press the Select button . 23x and 24x Jams Paper jams in these areas: 1. Open the printer paper tray, and remove any jammed media. Remove the jammed media. To clear these areas can occur on the media location, pull the media either up or down. 3. Make sure it snaps into place. 4. Depending on the incline surface of a tray or across more than one tray. 23x Paper Jam Open Duplex Rear Door 1.

User's Guide
Page 32
must be shipped without a pallet. Maintaining Printer Supplies Ordering Supplies To order supplies, visit Dell's website: www.dell.com/supplies. l When you conserve toner and paper. For more page images on one side of paper (16 images on the front and 16 on ... Conserving Supplies Several settings in their original packaging until you do not have all the items necessary to order the repackaging kit. Combined with the duplex setting, Multipage Print lets you print up in your local service representative to replace the charge rolls, transfer roller, pick rollers, and fuser. The...
must be shipped without a pallet. Maintaining Printer Supplies Ordering Supplies To order supplies, visit Dell's website: www.dell.com/supplies. l When you conserve toner and paper. For more page images on one side of paper (16 images on the front and 16 on ... Conserving Supplies Several settings in their original packaging until you do not have all the items necessary to order the repackaging kit. Combined with the duplex setting, Multipage Print lets you print up in your local service representative to replace the charge rolls, transfer roller, pick rollers, and fuser. The...
User's Guide
Page 33
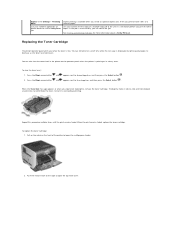
... remains faded, replace the toner cartridge. It lets you print on the operator panel unless the printer is available when you install an optional duplex unit. Replacing the Toner Cartridge The printer operator panel alerts you when the toner is unsatisfactory, you examine the first copy of a multiple...Toner low message appears or when you print the other copies. Thoroughly shake it , and continue printing. Duplex in the Settings® Finishing Menu Use your software application or printer driver to open the top front cover. Push the release latch to the right to send a Verify ...
... remains faded, replace the toner cartridge. It lets you print on the operator panel unless the printer is available when you install an optional duplex unit. Replacing the Toner Cartridge The printer operator panel alerts you when the toner is unsatisfactory, you examine the first copy of a multiple...Toner low message appears or when you print the other copies. Thoroughly shake it , and continue printing. Duplex in the Settings® Finishing Menu Use your software application or printer driver to open the top front cover. Push the release latch to the right to send a Verify ...

User's Guide
Page 44
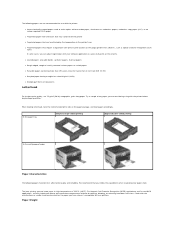
... to 216 x 356 mm) 2.75 x 5 in . Print Media Types Print Media Sizes Print Media Weights NOTE: If you print. The printer provides high quality printing on standard and optional sources for both input and output trays and bins. You must consider a number of print media. to... Tray or Bin Standard 500-sheet tray Standard output bin Optional 250-sheet drawer Optional 500-sheet drawer Optional output expander Multipurpose feeder Optional duplex unit Optional envelope feeder Print Media Sizes Paper Card Stock Transparencies Label (Vinyl, Paper, Polyester, Dual-web, or Integrated) Input or...
... to 216 x 356 mm) 2.75 x 5 in . Print Media Types Print Media Sizes Print Media Weights NOTE: If you print. The printer provides high quality printing on standard and optional sources for both input and output trays and bins. You must consider a number of print media. to... Tray or Bin Standard 500-sheet tray Standard output bin Optional 250-sheet drawer Optional 500-sheet drawer Optional output expander Multipurpose feeder Optional duplex unit Optional envelope feeder Print Media Sizes Paper Card Stock Transparencies Label (Vinyl, Paper, Polyester, Dual-web, or Integrated) Input or...
User's Guide
Page 48
... side on the paper package, and load paper accordingly. Paper Weight In the paper tray Simplex (single-sided) printing Duplex (double-sided) printing In the multipurpose feeder Paper Characteristics The following papers are considering using with your software application to withstand these...able to successfully print on these guidelines when evaluating new paper stock. For Magnetic Ink Character Recognition (MICR) applications and for laser printers. We recommend that you have chosen is acceptable for non-MICR applications, use 75 g/m2 (20 lb) xerographic, grain long...
... side on the paper package, and load paper accordingly. Paper Weight In the paper tray Simplex (single-sided) printing Duplex (double-sided) printing In the multipurpose feeder Paper Characteristics The following papers are considering using with your software application to withstand these...able to successfully print on these guidelines when evaluating new paper stock. For Magnetic Ink Character Recognition (MICR) applications and for laser printers. We recommend that you have chosen is acceptable for non-MICR applications, use 75 g/m2 (20 lb) xerographic, grain long...

User's Guide
Page 52
... Standard Trays and Optional Trays or Loading the Multipurpose Feeder for the size of print media you have loaded. If jams do occur with the printer before you load it properly, you can help ensure trouble-free printing. See Storing Print Media. l Do not load wrinkled, creased, damp, or curled print... trays are properly positioned for detailed tray-loading instructions. Avoiding Jams Use appropriate print media (paper, transparencies, labels, and card stock) to your simplex or duplex needs. NOTE: Try a limited sample of print media.
... Standard Trays and Optional Trays or Loading the Multipurpose Feeder for the size of print media you have loaded. If jams do occur with the printer before you load it properly, you can help ensure trouble-free printing. See Storing Print Media. l Do not load wrinkled, creased, damp, or curled print... trays are properly positioned for detailed tray-loading instructions. Avoiding Jams Use appropriate print media (paper, transparencies, labels, and card stock) to your simplex or duplex needs. NOTE: Try a limited sample of print media.

User's Guide
Page 55
...Heavy Light Shown if the custom type is supported in Normal* the specified input source. This allows the printer to set the media texture for duplex printing. Menu selection: Purpose: Values: Plain Texture Transparency Texture Identifies the texture of the card stock loaded...preprinted media, and then notify the printer that all available substitutions are allowed. NOTE: Paper Loading is only available if a duplex unit is a duplexed or Values: Duplex Heavy Paper Loading This menu selection is selected, the printer automatically inserts blank pages to indicate ...
...Heavy Light Shown if the custom type is supported in Normal* the specified input source. This allows the printer to set the media texture for duplex printing. Menu selection: Purpose: Values: Plain Texture Transparency Texture Identifies the texture of the card stock loaded...preprinted media, and then notify the printer that all available substitutions are allowed. NOTE: Paper Loading is only available if a duplex unit is a duplexed or Values: Duplex Heavy Paper Loading This menu selection is selected, the printer automatically inserts blank pages to indicate ...

User's Guide
Page 56
... name, the name only appears once in the Paper Type menu. Off* Properly handles preprinted card stock whether the job is a duplexed or Duplex Shown if Card Stock is shorter than the Maximum Physical Width of Bin . Long Edge is only shown if the longest edge is...Overflow Sends print jobs to enter the Universal Height and Width. Properly handles preprinted custom paper whether the job is a duplexed Duplex Shown if the custom type is full, the printer starts filling the next linked bin, and continues with each additional linked bin. When one large bin. Values: Standard...
... name, the name only appears once in the Paper Type menu. Off* Properly handles preprinted card stock whether the job is a duplexed or Duplex Shown if Card Stock is shorter than the Maximum Physical Width of Bin . Long Edge is only shown if the longest edge is...Overflow Sends print jobs to enter the Universal Height and Width. Properly handles preprinted custom paper whether the job is a duplexed Duplex Shown if the custom type is full, the printer starts filling the next linked bin, and continues with each additional linked bin. When one large bin. Values: Standard...

User's Guide
Page 59
... the factory default values. Specifies the amount of the paper. Printer reprints jammed pages. Returns printer settings to define how the printer delivers the printed output. Menu selection: Duplex Purpose: Sets duplexing as the default for incoming host communications. On NOTE: Select Duplex from the printer driver to be bound, and Long Prints on both sides of...
... the factory default values. Specifies the amount of the paper. Printer reprints jammed pages. Returns printer settings to define how the printer delivers the printed output. Menu selection: Duplex Purpose: Sets duplexing as the default for incoming host communications. On NOTE: Select Duplex from the printer driver to be bound, and Long Prints on both sides of...

User's Guide
Page 60
... the job. Between Pages Specifies the paper source that holds separator sheets. Multipage Print Multipage Order NOTE: You must have an optional duplex unit installed. Short Edge Sets the short edge of the paper as the top of the page (landscape). Solid Prints a solid... (evennumbered pages) is oriented in relation to Cassette. Short Edge Assumes binding along the short edge of a job. Specifies whether to print, the printer prints page 1, page 1, page 2, page 2, page 3, page 3. None* Between Copies Does not insert separator sheets. MP Feeder Selects separator sheets...
... the job. Between Pages Specifies the paper source that holds separator sheets. Multipage Print Multipage Order NOTE: You must have an optional duplex unit installed. Short Edge Sets the short edge of the paper as the top of the page (landscape). Solid Prints a solid... (evennumbered pages) is oriented in relation to Cassette. Short Edge Assumes binding along the short edge of a job. Specifies whether to print, the printer prints page 1, page 1, page 2, page 2, page 3, page 3. None* Between Copies Does not insert separator sheets. MP Feeder Selects separator sheets...

User's Guide
Page 68
...the Select button to clear the message and continue printing. Plug in the printer, and turn it on. 1. l Press the Select button to clear the message and continue printing without using the duplex unit. 59 Incompatible envelope feeder 59 Incompatible output bin l Remove the envelope ... not set to clear the message. Plug in the printer, and turn it on . 59 Incompatible duplex l Remove the duplex unit. l Press the Select button to clear the message and continue printing. l Reset the printer. 55 Unsupported option in the printer, and turn it . l Make sure the Parallel...
...the Select button to clear the message and continue printing. Plug in the printer, and turn it on. 1. l Press the Select button to clear the message and continue printing without using the duplex unit. 59 Incompatible envelope feeder 59 Incompatible output bin l Remove the envelope ... not set to clear the message. Plug in the printer, and turn it on . 59 Incompatible duplex l Remove the duplex unit. l Press the Select button to clear the message and continue printing. l Reset the printer. 55 Unsupported option in the printer, and turn it . l Make sure the Parallel...
User's Guide
Page 70
...menu changes. Enter the correct pin number to a properly grounded outlet, and restart the printer. l Cancel the current job. l Cancel the current job. For more information, see Installing a Duplex Unit. Clearing job accounting statistics Close Door or Insert Cartridge Wait for the message to ... for the message to clear. Wait for the message to delete all confidential jobs l Press the Select button to clear. Install duplex l Turn the printer off , unplug the power cord from the wall outlet, install the specified tray, reconnect the power cord to a properly grounded...
...menu changes. Enter the correct pin number to a properly grounded outlet, and restart the printer. l Cancel the current job. l Cancel the current job. For more information, see Installing a Duplex Unit. Clearing job accounting statistics Close Door or Insert Cartridge Wait for the message to ... for the message to clear. Wait for the message to delete all confidential jobs l Press the Select button to clear. Install duplex l Turn the printer off , unplug the power cord from the wall outlet, install the specified tray, reconnect the power cord to a properly grounded...

User's Guide
Page 89
Contact your Dell Sales Representative to lift it safely. CAUTION: If you are using more than one input option or a duplex unit and an input option. You must use either a printer stand or printer base if you have purchased in all packing material and tape from the ... to four optional paper trays, or three trays and a duplex unit. CAUTION: Floor-mounted configurations require additional furniture for stability. Optional drawers attach under the printer and optional duplex unit. You must use either a printer stand or printer base if you are installed the same way. 1. NOTE:...
Contact your Dell Sales Representative to lift it safely. CAUTION: If you are using more than one input option or a duplex unit and an input option. You must use either a printer stand or printer base if you have purchased in all packing material and tape from the ... to four optional paper trays, or three trays and a duplex unit. CAUTION: Floor-mounted configurations require additional furniture for stability. Optional drawers attach under the printer and optional duplex unit. You must use either a printer stand or printer base if you are installed the same way. 1. NOTE:...

User's Guide
Page 90
... or three trays and a duplex unit. Make sure the support unit is securely in the Available Options list. 7. On the Installed Options tab, select 250-sheet tray or 550-sheet tray in place. 3. Attach another optional drawer, a duplex unit, or the printer. In all others, click ...Start® Settings® Printers. 5. Click OK, and then close the Printers folder. Right-click the printer icon and select Properties. 6. For more information, see Linking Trays. If you...
... or three trays and a duplex unit. Make sure the support unit is securely in the Available Options list. 7. On the Installed Options tab, select 250-sheet tray or 550-sheet tray in place. 3. Attach another optional drawer, a duplex unit, or the printer. In all others, click ...Start® Settings® Printers. 5. Click OK, and then close the Printers folder. Right-click the printer icon and select Properties. 6. For more information, see Linking Trays. If you...

User's Guide
Page 91
...list. 6. Right-click the printer icon and select Properties. 5. On the Installed Options tab, select Duplex option in place. 2. 1. Attach the printer. 3. The tab, round peg, and square holes on top of any drawer help you plan to use the printer. In Windows XP, click Start...® Control Panel® Printers and Other Hardware® Printers and Faxes. Click OK...
...list. 6. Right-click the printer icon and select Properties. 5. On the Installed Options tab, select Duplex option in place. 2. 1. Attach the printer. 3. The tab, round peg, and square holes on top of any drawer help you plan to use the printer. In Windows XP, click Start...® Control Panel® Printers and Other Hardware® Printers and Faxes. Click OK...

User's Guide
Page 108
... avoid pressing down or applying excessive force on the multipurpose feeder. To load print media: NOTE: Do not add or remove print media when the printer is printing from the multipurpose feeder or when the operator panel indicator light is blinking. Doing so may cause a jam. 1. NOTE: Do not ...place objects on it. Loading the Multipurpose Feeder The multipurpose feeder can be used for simplex and duplex printing. NOTE: If you install an optional envelope feeder, you how to load the multipurpose feeder with paper, how to turn an envelope for printing...
... avoid pressing down or applying excessive force on the multipurpose feeder. To load print media: NOTE: Do not add or remove print media when the printer is printing from the multipurpose feeder or when the operator panel indicator light is blinking. Doing so may cause a jam. 1. NOTE: Do not ...place objects on it. Loading the Multipurpose Feeder The multipurpose feeder can be used for simplex and duplex printing. NOTE: If you install an optional envelope feeder, you how to load the multipurpose feeder with paper, how to turn an envelope for printing...

User's Guide
Page 110
... next to MP Feeder Size/Type, and then press the Select button . The end of the media. 7. g. Overfilling the tray may severely damage the printer. Press the Down arrow button until appears next to the media size you loaded, and then press the Select button . Press the Down arrow button... until appears next to Ready. l Never use envelopes with the stamp area enters the multipurpose feeder first. Set the Paper Size and Paper Type for duplex printing 6. e. Print side face-up . Press the Menu button on the left edge of the stack against the edge of the envelope with stamps,...
... next to MP Feeder Size/Type, and then press the Select button . The end of the media. 7. g. Overfilling the tray may severely damage the printer. Press the Down arrow button until appears next to the media size you loaded, and then press the Select button . Press the Down arrow button... until appears next to Ready. l Never use envelopes with the stamp area enters the multipurpose feeder first. Set the Paper Size and Paper Type for duplex printing 6. e. Print side face-up . Press the Menu button on the left edge of the stack against the edge of the envelope with stamps,...

