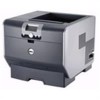

User's Guide
Page 2
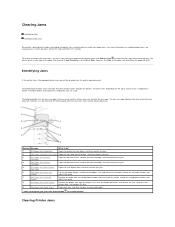
...the bottom of the screen changes the screen to another. Number: 1 2 3 4 5 6 7 Part: Output expander (650 sheets) Tray 1/Standard tray (500 sheets) Duplex unit (500 sheets) Envelope feeder (85 envelopes) Tray 2 (250 or 500 sheets) Tray 3 (250 or 500 sheets) Tray 4 (250 or 500 sheets) CAUTION:... is on , busy, idle, processing a job, or requires operator intervention. When navigating through a list using more than one input option or a duplex unit and an input option. The Left or Right arrow button is required. l Solid amber - l Blinking green - Move up to access the menu...
...the bottom of the screen changes the screen to another. Number: 1 2 3 4 5 6 7 Part: Output expander (650 sheets) Tray 1/Standard tray (500 sheets) Duplex unit (500 sheets) Envelope feeder (85 envelopes) Tray 2 (250 or 500 sheets) Tray 3 (250 or 500 sheets) Tray 4 (250 or 500 sheets) CAUTION:... is on , busy, idle, processing a job, or requires operator intervention. When navigating through a list using more than one input option or a duplex unit and an input option. The Left or Right arrow button is required. l Solid amber - l Blinking green - Move up to access the menu...
User's Guide
Page 15
...feeder, flex and stack the media, reload the multipurpose feeder, and Feeder adjust the guide. 8 23x Paper Jam Check Duplex Remove the duplex tray from the duplex unit, raise the duplex deflector, and remove the jam. The following illustration shows the path that jammed if Jam Recovery is best to clear the... Open the top front cover, remove the print cartridge, and then remove the jam. 5 23x Paper Jam Open Duplex Open the rear duplex door, and then remove the jam. Open the rear duplex door, and remove the jam. 9 24x Paper Jam Check Tray x Open each tray, and then remove any...
...feeder, flex and stack the media, reload the multipurpose feeder, and Feeder adjust the guide. 8 23x Paper Jam Check Duplex Remove the duplex tray from the duplex unit, raise the duplex deflector, and remove the jam. The following illustration shows the path that jammed if Jam Recovery is best to clear the... Open the top front cover, remove the print cartridge, and then remove the jam. 5 23x Paper Jam Open Duplex Open the rear duplex door, and then remove the jam. Open the rear duplex door, and remove the jam. 9 24x Paper Jam Check Tray x Open each tray, and then remove any...
User's Guide
Page 16
...: the front of the printer, inside of the cartridge. To go to cool before touching any internal components. 3. Jams in the input options or the duplex tray. NOTE: Do not leave the cartridge exposed to help you are several places a jam can also occur at the rear of the printer occur...
...: the front of the printer, inside of the cartridge. To go to cool before touching any internal components. 3. Jams in the input options or the duplex tray. NOTE: Do not leave the cartridge exposed to help you are several places a jam can also occur at the rear of the printer occur...

User's Guide
Page 19
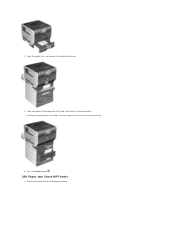
Close the duplex rear door. Depending on the incline surface of a tray or across more than one tray. Make sure it snaps into place. 4. Open the printer paper tray, and remove any jammed media. Press the Select button . 23x and 24x Jams Paper jams in these areas: 1. Open the duplex rear door. 2. Remove the jammed media. To clear these areas can occur on the media location, pull the media either up or down. 3. 23x Paper Jam Open Duplex Rear Door 1.
Close the duplex rear door. Depending on the incline surface of a tray or across more than one tray. Make sure it snaps into place. 4. Open the printer paper tray, and remove any jammed media. Press the Select button . 23x and 24x Jams Paper jams in these areas: 1. Open the duplex rear door. 2. Remove the jammed media. To clear these areas can occur on the media location, pull the media either up or down. 3. 23x Paper Jam Open Duplex Rear Door 1.
User's Guide
Page 20
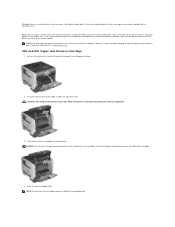
Press the Select button . 250 Paper Jam Check MP Feeder 1. Open any optional trays beginning at the top, and remove any jammed media. Pull the print media either up . 3. If it does not pull easily one way, try the other way. 4. Open the duplex tray, and remove the media by pulling up or down. 2. Remove the paper from the multipurpose feeder.
Press the Select button . 250 Paper Jam Check MP Feeder 1. Open any optional trays beginning at the top, and remove any jammed media. Pull the print media either up . 3. If it does not pull easily one way, try the other way. 4. Open the duplex tray, and remove the media by pulling up or down. 2. Remove the paper from the multipurpose feeder.

User's Guide
Page 32
.... l When 80 Scheduled maintenance advised appears on the back). Roller When the paper fails to 10 (darkest setting). Combined with the duplex setting, Multipage Print lets you adjust the level of toner released on one side of paper (16 images on the front and 16 ... have all the items necessary to be performed by an authorized service technician. Maintaining Printer Supplies Ordering Supplies To order supplies, visit Dell's website: www.dell.com/supplies. The values range from 1 (lightest setting) to properly feed from the tray. Store supplies right side up to ...
.... l When 80 Scheduled maintenance advised appears on the back). Roller When the paper fails to 10 (darkest setting). Combined with the duplex setting, Multipage Print lets you adjust the level of toner released on one side of paper (16 images on the front and 16 ... have all the items necessary to be performed by an authorized service technician. Maintaining Printer Supplies Ordering Supplies To order supplies, visit Dell's website: www.dell.com/supplies. The values range from 1 (lightest setting) to properly feed from the tray. Store supplies right side up to ...
User's Guide
Page 33
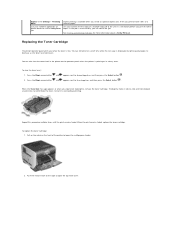
... it, and continue printing. Replacing the Toner Cartridge The printer operator panel alerts you when the toner is available when you install an optional duplex unit. Thoroughly shake it is displayed, but print quality begins to View Supplies, and then press the Select button . Pull on the notch... on the front of paper. When the print remains faded, replace the toner cartridge. Duplex printing is low. It lets you print on the operator panel unless the printer is unsatisfactory, you examine the first copy of a multiple-copy...
... it, and continue printing. Replacing the Toner Cartridge The printer operator panel alerts you when the toner is available when you install an optional duplex unit. Thoroughly shake it is displayed, but print quality begins to View Supplies, and then press the Select button . Pull on the notch... on the front of paper. When the print remains faded, replace the toner cartridge. Duplex printing is low. It lets you print on the operator panel unless the printer is unsatisfactory, you examine the first copy of a multiple-copy...

User's Guide
Page 44
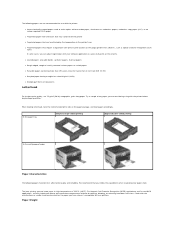
... Output Tray or Bin Standard 500-sheet tray Standard output bin Optional 250-sheet drawer Optional 500-sheet drawer Optional output expander Multipurpose feeder Optional duplex unit Optional envelope feeder Print Media Sizes Paper Card Stock Transparencies Label (Vinyl, Paper, Polyester, Dual-web, or Integrated) Input or Output Tray or Bin...
... Output Tray or Bin Standard 500-sheet tray Standard output bin Optional 250-sheet drawer Optional 500-sheet drawer Optional output expander Multipurpose feeder Optional duplex unit Optional envelope feeder Print Media Sizes Paper Card Stock Transparencies Label (Vinyl, Paper, Polyester, Dual-web, or Integrated) Input or Output Tray or Bin...

User's Guide
Page 45
.... (140 x 210 mm to 176 x 250 mm) 3.87 x 6.38 in . to 8.5 x 14 in. (148 x 182 mm to 216 x 356 mm) 2.75 x 5 in . Multipurpose feeder Optional duplex unit Optional 250-sheet drawer JIS B5 Letter Legal Executive Folio1 Statement1 Universal2 7 ¾ Envelope 9 Envelope 10 Envelope DL Envelope B5 Envelope C5 Envelope Other...
.... (140 x 210 mm to 176 x 250 mm) 3.87 x 6.38 in . to 8.5 x 14 in. (148 x 182 mm to 216 x 356 mm) 2.75 x 5 in . Multipurpose feeder Optional duplex unit Optional 250-sheet drawer JIS B5 Letter Legal Executive Folio1 Statement1 Universal2 7 ¾ Envelope 9 Envelope 10 Envelope DL Envelope B5 Envelope C5 Envelope Other...
User's Guide
Page 48
... on the paper package, and load paper accordingly. The following paper characteristics affect print quality and reliability. In the paper tray Simplex (single-sided) printing Duplex (double-sided) printing In the multipurpose feeder Paper Characteristics The following papers are considering using with your software application to successfully print on these forms...
... on the paper package, and load paper accordingly. The following paper characteristics affect print quality and reliability. In the paper tray Simplex (single-sided) printing Duplex (double-sided) printing In the multipurpose feeder Paper Characteristics The following papers are considering using with your software application to successfully print on these forms...

User's Guide
Page 52
... yourself. l If a jam occurs, clear the entire media path. Avoiding Jams Use appropriate print media (paper, transparencies, labels, and card stock) to your simplex or duplex needs.
... yourself. l If a jam occurs, clear the entire media path. Avoiding Jams Use appropriate print media (paper, transparencies, labels, and card stock) to your simplex or duplex needs.

User's Guide
Page 55
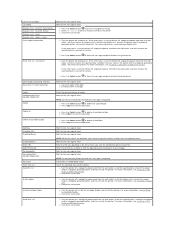
... loading orientation for each of the defined media types. Heavy Paper Loading This menu selection is a duplexed or Values: Duplex When simplex printing is not loaded. This allows the printer to optimize the print quality for duplex printing. Substitute Size Substitutes the specified paper size if the requested size is selected, the printer... substitutions are allowed. Rough Custom Texture Identifies the texture of the custom paper loaded in a specific input source. NOTE: Paper Loading is only available if a duplex unit is loaded for the specified media.
... loading orientation for each of the defined media types. Heavy Paper Loading This menu selection is a duplexed or Values: Duplex When simplex printing is not loaded. This allows the printer to optimize the print quality for duplex printing. Substitute Size Substitutes the specified paper size if the requested size is selected, the printer... substitutions are allowed. Rough Custom Texture Identifies the texture of the custom paper loaded in a specific input source. NOTE: Paper Loading is only available if a duplex unit is loaded for the specified media.

User's Guide
Page 56
...When one optional output bin is supported in the specified single-sided job. Off* Properly handles preprinted card stock whether the job is a duplexed or Duplex Shown if Card Stock is used to enter the Universal Height and Width. Sets the portrait width of the Universal Paper Size. Bin Setup... Physical Width of Bin . NOTE: Bin Setup is only displayed when at least one linked bin is truncated to the output bin designated for duplex and n-up. l The name is full, the printer starts filling the next linked bin, and continues with each additional linked bin. Universal ...
...When one optional output bin is supported in the specified single-sided job. Off* Properly handles preprinted card stock whether the job is a duplexed or Duplex Shown if Card Stock is used to enter the Universal Height and Width. Sets the portrait width of the Universal Paper Size. Bin Setup... Physical Width of Bin . NOTE: Bin Setup is only displayed when at least one linked bin is truncated to the output bin designated for duplex and n-up. l The name is full, the printer starts filling the next linked bin, and continues with each additional linked bin. Universal ...

User's Guide
Page 59
... a job that an entire page is processed before it cancels the job. 40* is the default setting. Menu selection: Duplex Purpose: Sets duplexing as the default does not prevent a software application from certain offline situations, reprints Continue: jammed pages, or waits until memory...amount of the paper. Printer reprints jammed pages. Printer reprints a jammed page unless the memory required to hold the page is insufficient to duplex only specific jobs. PS Emulation Uses a PS interpreter for incoming host communications. Page Protect: Off* On Auto* - Off* - ...
... a job that an entire page is processed before it cancels the job. 40* is the default setting. Menu selection: Duplex Purpose: Sets duplexing as the default does not prevent a software application from certain offline situations, reprints Continue: jammed pages, or waits until memory...amount of the paper. Printer reprints jammed pages. Printer reprints a jammed page unless the memory required to hold the page is insufficient to duplex only specific jobs. PS Emulation Uses a PS interpreter for incoming host communications. Page Protect: Off* On Auto* - Off* - ...

User's Guide
Page 60
... the multipurpose feeder. Tray (Tray 1*) Inserts a blank sheet between each set Configure MP to Cassette. Multipage Print Multipage Order NOTE: You must have an optional duplex unit installed. None* Does not print a border around each page of a job. On Prints entire job the number of the page (landscape). Short Edge Sets...
... the multipurpose feeder. Tray (Tray 1*) Inserts a blank sheet between each set Configure MP to Cassette. Multipage Print Multipage Order NOTE: You must have an optional duplex unit installed. None* Does not print a border around each page of a job. On Prints entire job the number of the page (landscape). Short Edge Sets...

User's Guide
Page 68
... Select button to Disabled. 1. l Reset the printer. 55 Unsupported option in the printer, and turn it on it on . 59 Incompatible duplex l Remove the duplex unit. Turn the printer off and unplug the printer. 2. Unplug the power cord from the wall outlet. 3. Turn the printer on the ... through the parallel port. l Make sure the USB Buffer menu item is not set to clear the message and continue printing without using the duplex unit. 59 Incompatible envelope feeder 59 Incompatible output bin l Remove the envelope feeder. Remove the excess flash memory. 3. Plug in slot 1....
... Select button to Disabled. 1. l Reset the printer. 55 Unsupported option in the printer, and turn it on it on . 59 Incompatible duplex l Remove the duplex unit. Turn the printer off and unplug the printer. 2. Unplug the power cord from the wall outlet. 3. Turn the printer on the ... through the parallel port. l Make sure the USB Buffer menu item is not set to clear the message and continue printing without using the duplex unit. 59 Incompatible envelope feeder 59 Incompatible output bin l Remove the envelope feeder. Remove the excess flash memory. 3. Plug in slot 1....
User's Guide
Page 70
...current job. Wait for the message to a properly grounded outlet, and then restart the printer. Insert the specified tray into the printer. Install duplex l Turn the printer off and back on . l Close the upper front door. Deleting Disabling DLEs Disabling Menus Enabling Menus Enter PIN Enter ... Formatting Flash DO NOT POWER OFF Hex Trace Insert Tray Install bin Wait for the message to clear. For more information, see Installing a Duplex Unit. NOTE: While the menus are disabled, you have changed the media. Delete all l Press the Select button to delete all confidential ...
...current job. Wait for the message to a properly grounded outlet, and then restart the printer. Insert the specified tray into the printer. Install duplex l Turn the printer off and back on . l Close the upper front door. Deleting Disabling DLEs Disabling Menus Enabling Menus Enter PIN Enter ... Formatting Flash DO NOT POWER OFF Hex Trace Insert Tray Install bin Wait for the message to clear. For more information, see Installing a Duplex Unit. NOTE: While the menus are disabled, you have changed the media. Delete all l Press the Select button to delete all confidential ...

User's Guide
Page 89
...drawer are installing options after setting up to four optional paper trays, or three trays and a duplex unit. Remove the tray from both the support unit and the tray. Contact your Dell Sales Representative to lift it safely. Installing a 250-Sheet or 500-Sheet Drawer NOTE: You ...can install up to four optional paper trays, or three trays and a duplex unit. Remove all regions. Installing and Removing Options Order...
...drawer are installing options after setting up to four optional paper trays, or three trays and a duplex unit. Remove the tray from both the support unit and the tray. Contact your Dell Sales Representative to lift it safely. Installing a 250-Sheet or 500-Sheet Drawer NOTE: You ...can install up to four optional paper trays, or three trays and a duplex unit. Remove all regions. Installing and Removing Options Order...

User's Guide
Page 90
...® Printers and Other Hardware® Printers and Faxes. Click Add. 8. Installing a Duplex Unit NOTE: You can attach a label to the trays to four optional paper trays, or three trays and a duplex unit. On the Installed Options tab, select 250-sheet tray or 550-sheet tray in place... linked. Right-click the printer icon and select Properties. 6. Attach another optional drawer, a duplex unit, or the printer. The tab, round peg, and square holes on top of any drawers. The duplex unit attaches under the printer, below the standard tray and above any drawer help you position...
...® Printers and Other Hardware® Printers and Faxes. Click Add. 8. Installing a Duplex Unit NOTE: You can attach a label to the trays to four optional paper trays, or three trays and a duplex unit. On the Installed Options tab, select 250-sheet tray or 550-sheet tray in place... linked. Right-click the printer icon and select Properties. 6. Attach another optional drawer, a duplex unit, or the printer. The tab, round peg, and square holes on top of any drawers. The duplex unit attaches under the printer, below the standard tray and above any drawer help you position...

User's Guide
Page 91
...® Printers and Other Hardware® Printers and Faxes. On the Installed Options tab, select Duplex option in place. 2. A wire bail, bracket, and labels are aligned properly. Place the duplex unit on top of any installed drawers or the table or printer cabinet where you position the... duplex unit so the edges are also included. Click OK, and then close the Printers folder. ...
...® Printers and Other Hardware® Printers and Faxes. On the Installed Options tab, select Duplex option in place. 2. A wire bail, bracket, and labels are aligned properly. Place the duplex unit on top of any installed drawers or the table or printer cabinet where you position the... duplex unit so the edges are also included. Click OK, and then close the Printers folder. ...


