User's Guide
Page 15
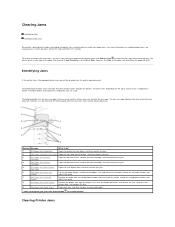
...illustration shows the path that jammed if Jam Recovery is best to clear the entire paper path to resume printing. Clearing Jams Identifying Jams Clearing Printer Jams By carefully selecting print media and loading it is set to On or Auto; To resolve the paper jam messages, you are using.... Identifying Jams If the printer jams, the appropriate jam message will print. Rear Door 6 260 Paper Jam Check Env Lift the envelope weight, remove all envelopes, flex and stack the envelopes, reload the envelope feeder, and...
...illustration shows the path that jammed if Jam Recovery is best to clear the entire paper path to resume printing. Clearing Jams Identifying Jams Clearing Printer Jams By carefully selecting print media and loading it is set to On or Auto; To resolve the paper jam messages, you are using.... Identifying Jams If the printer jams, the appropriate jam message will print. Rear Door 6 260 Paper Jam Check Env Lift the envelope weight, remove all envelopes, flex and stack the envelopes, reload the envelope feeder, and...
User's Guide
Page 20
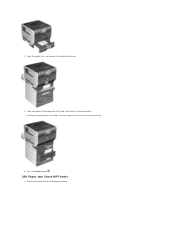
If it does not pull easily one way, try the other way. 4. Remove the paper from the multipurpose feeder. Pull the print media either up . 3. 2. Open the duplex tray, and remove the media by pulling up or down. Open any optional trays beginning at the top, and remove any jammed media. Press the Select button . 250 Paper Jam Check MP Feeder 1.
If it does not pull easily one way, try the other way. 4. Remove the paper from the multipurpose feeder. Pull the print media either up . 3. 2. Open the duplex tray, and remove the media by pulling up or down. Open any optional trays beginning at the top, and remove any jammed media. Press the Select button . 250 Paper Jam Check MP Feeder 1.
User's Guide
Page 21
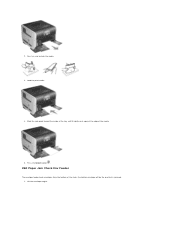
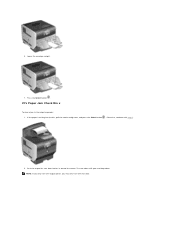
Press the Select button . 260 Paper Jam Check Env Feeder The envelope feeder feeds envelopes from the bottom of the media. 5. Load the print media. 4. Flex, fan, and restack the media. 3. Lift the envelope weight. Slide the side guide toward the inside of the tray until it lightly rests against the edge of the stack; the bottom envelope will be the one that is jammed. 1. 2.
Press the Select button . 260 Paper Jam Check Env Feeder The envelope feeder feeds envelopes from the bottom of the media. 5. Load the print media. 4. Flex, fan, and restack the media. 3. Lift the envelope weight. Slide the side guide toward the inside of the tray until it lightly rests against the edge of the stack; the bottom envelope will be the one that is jammed. 1. 2.
User's Guide
Page 23
Otherwise, continue with step 2. 2. If the paper is exiting into the bin, pull the media straight out, and press the Select button . Push the output bin rear door latches in the output expander: 1. Lower the envelope weight. 7. Press the Select button . 27x Paper Jam Check Bin x To clear a jam in toward the center. The rear doors will open and drop down. NOTE: If you only have one output option, you may only have one rear door. 6.
Otherwise, continue with step 2. 2. If the paper is exiting into the bin, pull the media straight out, and press the Select button . Push the output bin rear door latches in the output expander: 1. Lower the envelope weight. 7. Press the Select button . 27x Paper Jam Check Bin x To clear a jam in toward the center. The rear doors will open and drop down. NOTE: If you only have one output option, you may only have one rear door. 6.
User's Guide
Page 29
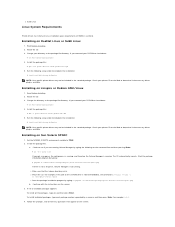
... are any driver plugins available. Mount the CD. 3. Installing on the screen. 3. Check to see if you mounted your printer CD or the Web to complete the installation: # /usr/local/dell/setup.dellprint NOTE: Your specific printer driver may not be included in the standard package. A list of 70MB in /usr...the command line and then pressing Enter: # ps -ef | grep vold If you mounted your CD-ROM to complete the installation: # /usr/local/dell/setup.dellprint NOTE: Your specific printer driver may not be included in the standard package. Read Before Installing. 2.
... are any driver plugins available. Mount the CD. 3. Installing on the screen. 3. Check to see if you mounted your printer CD or the Web to complete the installation: # /usr/local/dell/setup.dellprint NOTE: Your specific printer driver may not be included in the standard package. A list of 70MB in /usr...the command line and then pressing Enter: # ps -ef | grep vold If you mounted your CD-ROM to complete the installation: # /usr/local/dell/setup.dellprint NOTE: Your specific printer driver may not be included in the standard package. Read Before Installing. 2.
User's Guide
Page 30
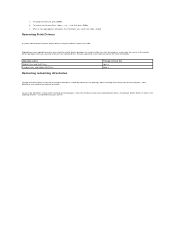
a. c. b. See your operating system, you mark the printer drivers packages for more than one package. By default, printer drivers installs in this table. Removing Print Drivers A system administrator removes printer drivers using the utilities listed in the following location: /usr/local/dell/unix_prt_drivers. After removing all the packages, check the directory where you the installation was...
a. c. b. See your operating system, you mark the printer drivers packages for more than one package. By default, printer drivers installs in this table. Removing Print Drivers A system administrator removes printer drivers using the utilities listed in the following location: /usr/local/dell/unix_prt_drivers. After removing all the packages, check the directory where you the installation was...

User's Guide
Page 47
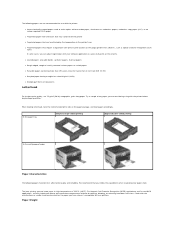
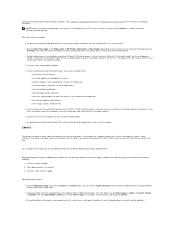
We recommend that you have chosen is acceptable for laser printers. For Magnetic Ink Character Recognition (MICR) applications and...with the manufacturer or vendor to withstand these guidelines when evaluating new paper stock. Paper Weight The printer can automatically feed paper weights from 60 to 176 g/m2 (16 to 47 lb bond) grain... grain long paper. The laser printing process heats paper to high temperatures of any paper you avoid printing problems. The following paper characteristics affect print quality and reliability. Check with the printer before buying large quantities. Paper...
We recommend that you have chosen is acceptable for laser printers. For Magnetic Ink Character Recognition (MICR) applications and...with the manufacturer or vendor to withstand these guidelines when evaluating new paper stock. Paper Weight The printer can automatically feed paper weights from 60 to 176 g/m2 (16 to 47 lb bond) grain... grain long paper. The laser printing process heats paper to high temperatures of any paper you avoid printing problems. The following paper characteristics affect print quality and reliability. Check with the printer before buying large quantities. Paper...
User's Guide
Page 48
...cases, you can adjust registration with chemicals that may contaminate the printer l Preprinted papers that can be affected by the temperature in the printer fuser l Preprinted papers that you are not recommended for laser printers. We recommend that require a registration (the precise print location ...are considering using with the manufacturer or vendor to successfully print on these guidelines when evaluating new paper stock. Check with the printer before buying large quantities. Paper Weight Try a sample of 230°C (446°F). The following paper characteristics ...
...cases, you can adjust registration with chemicals that may contaminate the printer l Preprinted papers that can be affected by the temperature in the printer fuser l Preprinted papers that you are not recommended for laser printers. We recommend that require a registration (the precise print location ...are considering using with the manufacturer or vendor to successfully print on these guidelines when evaluating new paper stock. Check with the printer before buying large quantities. Paper Weight Try a sample of 230°C (446°F). The following paper characteristics ...

User's Guide
Page 49
...Print quality and durability depend on the transparencies. The Paper Type setting should be set to Transparency to help prevent jams. Check with the manufacturer or vendor to determine whether your software application to 90 g/m2 (24 lb bond). Envelopes You can ...considering l Use transparencies designed specifically for information about transparency compatibility with your transparencies are compatible with laser printers that are able to 36 lb bond) grain long in laser printers. Fingerprints on transparencies: l Be sure to set the Paper Type to feed properly, causing ...
...Print quality and durability depend on the transparencies. The Paper Type setting should be set to Transparency to help prevent jams. Check with the manufacturer or vendor to determine whether your software application to 90 g/m2 (24 lb bond). Envelopes You can ...considering l Use transparencies designed specifically for information about transparency compatibility with your transparencies are compatible with laser printers that are able to 36 lb bond) grain long in laser printers. Fingerprints on transparencies: l Be sure to set the Paper Type to feed properly, causing ...
User's Guide
Page 50
...When using the envelope feeder, you are considering using, check with the envelope supplier. When printing on many labels designed for the envelope feeder as long as the cotton content is in the envelope feeder. You can use with laser printers. l Load only one size of high humidity (over...176;F) without sealing, excessive curling, wrinkling, or releasing hazardous emissions. You can withstand temperatures of paper. l Set the Paper Size/Type in laser printers. l Use envelopes that can set the Paper Type to vinyl labels and the texture and weight to 105 g/m2 (28 lb bond) ...
...When using the envelope feeder, you are considering using, check with the envelope supplier. When printing on many labels designed for the envelope feeder as long as the cotton content is in the envelope feeder. You can use with laser printers. l Load only one size of high humidity (over...176;F) without sealing, excessive curling, wrinkling, or releasing hazardous emissions. You can withstand temperatures of paper. l Set the Paper Size/Type in laser printers. l Use envelopes that can set the Paper Type to vinyl labels and the texture and weight to 105 g/m2 (28 lb bond) ...

User's Guide
Page 67
...l Cancel the current job. Remove the print cartridge, and install a new one . l Check tray length and width guides to clear the messages. For more information, see Installing Printer Memory. l Delete fonts, macros, and other data in the tray. For more information, see... toner cartridge, and install a supported one . l Install additional memory. l Cancel the current job. For more information, see Installing Printer Memory. The job may not print correctly. For more information, see Replacing the Toner Cartridge. l Press the Select button to clear ...
...l Cancel the current job. Remove the print cartridge, and install a new one . l Check tray length and width guides to clear the messages. For more information, see Installing Printer Memory. l Delete fonts, macros, and other data in the tray. For more information, see... toner cartridge, and install a supported one . l Install additional memory. l Cancel the current job. For more information, see Installing Printer Memory. The job may not print correctly. For more information, see Replacing the Toner Cartridge. l Press the Select button to clear ...
User's Guide
Page 69
... button to resume printing. 1. Clear the paper path. 2. After clearing the paper path, press the Select button to resume printing. 1. Turn the printer off. 2. Check all cable connections. 4. Turn the printer back on. Wait for service, and report the message number and description of the problem. For more information, see Replacing the Toner...
... button to resume printing. 1. Clear the paper path. 2. After clearing the paper path, press the Select button to resume printing. 1. Turn the printer off. 2. Check all cable connections. 4. Turn the printer back on. Wait for service, and report the message number and description of the problem. For more information, see Replacing the Toner...
User's Guide
Page 70
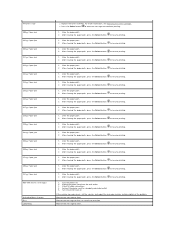
Cancel not available Cancelling Change Change Change Change Check duplex connection Wait for the message to clear. Wait for the message to clear. NOTE: Do not turn the printer off , unplug the power cord from the wall outlet, and then remove the specified device, and call for ...the wall outlet, install the specified bin, connect the power cord to clear. Wait for the message to cancel the operation. Check tray connection l Turn the printer off , unplug the power cord from the wall outlet, install the specified tray, reconnect the power cord to clear. l...
Cancel not available Cancelling Change Change Change Change Check duplex connection Wait for the message to clear. Wait for the message to clear. NOTE: Do not turn the printer off , unplug the power cord from the wall outlet, and then remove the specified device, and call for ...the wall outlet, install the specified bin, connect the power cord to clear. Wait for the message to cancel the operation. Check tray connection l Turn the printer off , unplug the power cord from the wall outlet, install the specified tray, reconnect the power cord to clear. l...
User's Guide
Page 73
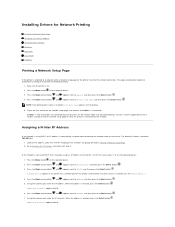
... installed, you see Network Option 1. 4. The default IP address should be malfunctioning. If a print server is installed, Print Net1 Setup appears on the printer to a network, print a network setup page on the display. 5. Submitting Selection appears briefly. 6. Press the Menu button on the network setup page... pad, enter the IP address. Press the Down arrow button until appears next to Network Setup Page, and then press the Select button . Check the first section on . 2. If the network is entered, press the Select button . Press the Down arrow button until appears next to ...
... installed, you see Network Option 1. 4. The default IP address should be malfunctioning. If a print server is installed, Print Net1 Setup appears on the printer to a network, print a network setup page on the display. 5. Submitting Selection appears briefly. 6. Press the Menu button on the network setup page... pad, enter the IP address. Press the Down arrow button until appears next to Network Setup Page, and then press the Select button . Check the first section on . 2. If the network is entered, press the Select button . Press the Down arrow button until appears next to ...

User's Guide
Page 77
...a hand is the best use . For example, in a mixed environment, visit support.dell.com. In all others , click Start®Settings®Printers. 7. For more information about which printer driver to use of all the Dell features, such as the Status Monitor, that are installed with a USB or parallel cable... CD. To use one of the server, and look for a new printer object to be added to -Peer Select Just enable printer sharing, and then click OK. 6. Click File®Properties. 9. To check that the printer is copied from the print server computer to the client computer, and for...
...a hand is the best use . For example, in a mixed environment, visit support.dell.com. In all others , click Start®Settings®Printers. 7. For more information about which printer driver to use of all the Dell features, such as the Status Monitor, that are installed with a USB or parallel cable... CD. To use one of the server, and look for a new printer object to be added to -Peer Select Just enable printer sharing, and then click OK. 6. Click File®Properties. 9. To check that the printer is copied from the print server computer to the client computer, and for...

User's Guide
Page 81
...are running . Run the following setup script to TRUE. 2. Check to see if you the installation was successful, type q to complete the installation: # /usr/local/dell/setup.dellprint NOTE: Your specific printer driver may not be included in the standard package. For example,.../cdrom/unix/packages/print-drivers-solaris2-sparc.pkg b. Set the NONABI_SCRIPTS environment variable to complete the installation: # /usr/local/dell/setup.dellprint NOTE: Your specific printer driver may not be included in this table. b. When a message appears telling you are any questions that the /cdrom ...
...are running . Run the following setup script to TRUE. 2. Check to see if you the installation was successful, type q to complete the installation: # /usr/local/dell/setup.dellprint NOTE: Your specific printer driver may not be included in the standard package. For example,.../cdrom/unix/packages/print-drivers-solaris2-sparc.pkg b. Set the NONABI_SCRIPTS environment variable to complete the installation: # /usr/local/dell/setup.dellprint NOTE: Your specific printer driver may not be included in this table. b. When a message appears telling you are any questions that the /cdrom ...

User's Guide
Page 82
After removing all the packages, check the directory where you installed printer drivers. Queue-Based Printing For information about installing a network printer in the following location: /usr/local/dell/unix_prt_drivers. Depending on your operating system, you mark the printer drivers packages for more than one package. By default, printer drivers installs in a NetWare environment, refer to your...
After removing all the packages, check the directory where you installed printer drivers. Queue-Based Printing For information about installing a network printer in the following location: /usr/local/dell/unix_prt_drivers. Depending on your operating system, you mark the printer drivers packages for more than one package. By default, printer drivers installs in a NetWare environment, refer to your...

User's Guide
Page 126
... order replacement toner cartridges. See Dell Printer Supplies Reorder Application for a particular printer. The Printing Status window displays the status of the printer (Printer Ready, Printer Offline, and Error-Check Printer) and the name of toner so you send a job to print. Click Start®Programs or All Programs®Dell Printers®Dell Laser Printer 5210n / 5310n®Printer Supplies Reorder Application. If ordering...
... order replacement toner cartridges. See Dell Printer Supplies Reorder Application for a particular printer. The Printing Status window displays the status of the printer (Printer Ready, Printer Offline, and Error-Check Printer) and the name of toner so you send a job to print. Click Start®Programs or All Programs®Dell Printers®Dell Laser Printer 5210n / 5310n®Printer Supplies Reorder Application. If ordering...
User's Guide
Page 130
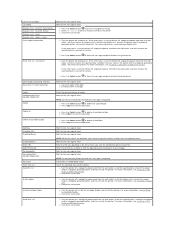
...They require no action on the display before sending a job to the printer and the host computer, print server, option, or other network device. Checking an Unresponsive Printer If the printer is not responding, first make sure: l The power cord is blank... diamonds. This often fixes the problem. Troubleshooting Understanding Printer Messages Checking an Unresponsive Printer Solving Printing Problems Solving Option Problems Solving Paper Feed Problems Solving Print Quality Problems Understanding Printer Messages The printer displays three types of paper from the service message ...
...They require no action on the display before sending a job to the printer and the host computer, print server, option, or other network device. Checking an Unresponsive Printer If the printer is not responding, first make sure: l The power cord is blank... diamonds. This often fixes the problem. Troubleshooting Understanding Printer Messages Checking an Unresponsive Printer Solving Printing Problems Solving Option Problems Solving Paper Feed Problems Solving Print Quality Problems Understanding Printer Messages The printer displays three types of paper from the service message ...
User's Guide
Page 131
...XP Professional x64, Windows XP, Windows Server 2003, Windows 2000, or Windows 98/Me and using an incompatible parallel cable. l The printer is set correctly in the Finishing Menu. l The job is too complex. Reduce the complexity of the print job by eliminating the ...are set to On in the Finishing Menu or through the list of held jobs and deleting others you have properly configured the printer for network printing. Check the Print as image box. 4. For more information, see Understanding the Operator Panel Menus. The documents contain unavailable fonts. ...
...XP Professional x64, Windows XP, Windows Server 2003, Windows 2000, or Windows 98/Me and using an incompatible parallel cable. l The printer is set correctly in the Finishing Menu. l The job is too complex. Reduce the complexity of the print job by eliminating the ...are set to On in the Finishing Menu or through the list of held jobs and deleting others you have properly configured the printer for network printing. Check the Print as image box. 4. For more information, see Understanding the Operator Panel Menus. The documents contain unavailable fonts. ...


